
Use the automatic rules in TidyTic to automate tidying of your PC.
In this tutorial I will explain how to use the automatic rules that you can create in TidyTic to automate tidying of your PC.
Thanks to these rules, you can for example very easily ask TidyTic to automatically tidy all your images in a folder.
Or sort all your videos by quality, automatically rename files and much more.
This tutorial will be a bit long, not because automatic rules are complicated to use or create, far from it.
But because the software offers you so many possibilities that it would be impossible to give you an example for each possibility.
They are however very simple to use and create!
I will give you a few number to give you an idea of the possibilities available to you.
TidyTic offers you 4 possible actions thanks to these rules :
- Rename a file.
- Move a file.
- Associate one information / personalization with a file.
- Delete one information / personalization to a file.
To trigger one of these 4 actions TidyTic provides you with 7 main conditions :
- Based on a term found in the file name.
- Depending on presence or not of the file in a folder.
- Based on information / personalization associated with the file.
- Depending on a characteristic of the file :
-> The size of the file.
-> The date of the file.
-> The width of an image or video.
-> The height of an image or video.
We are already at 28 different possibilities just by taking the main categories.
On the starting actions described above, one of the possibilities is to add or delete a type / subtype to your files.
By default you have 10 types / subtypes configured in TidyTic.
Which increases our possibilities to at least 280 because you can create as many types / subtypes as you wish.
One of the possible conditions is based on a term found in the file name. So I will not be able to give you a precise number because the possibilities are endless : As much as you can write with your keyboard.
You can also define several conditions in the same rule in order to know whether the requested action will be triggered on your files or not.
Let's say that, for example, I created a rule that has three conditions :
This therefore increases our possibilities for a rule with three conditions to a minimum of 13,720 different possibilities (280 * 7 * 7).
I'm going to stop there because you got the idea, the possibilities offered by the automatic rules for the tidying of your PC are simply endless.
You can customize these rules as you see fit to meet any need.
In this tutorial I will start by giving you a presentation of the possible actions and conditions for your rules.
By explaining how the interface and works of the TidyTic "Automatic rules" page.
I will then try to show you as many examples as possible to give you a good idea of how to use these rules.
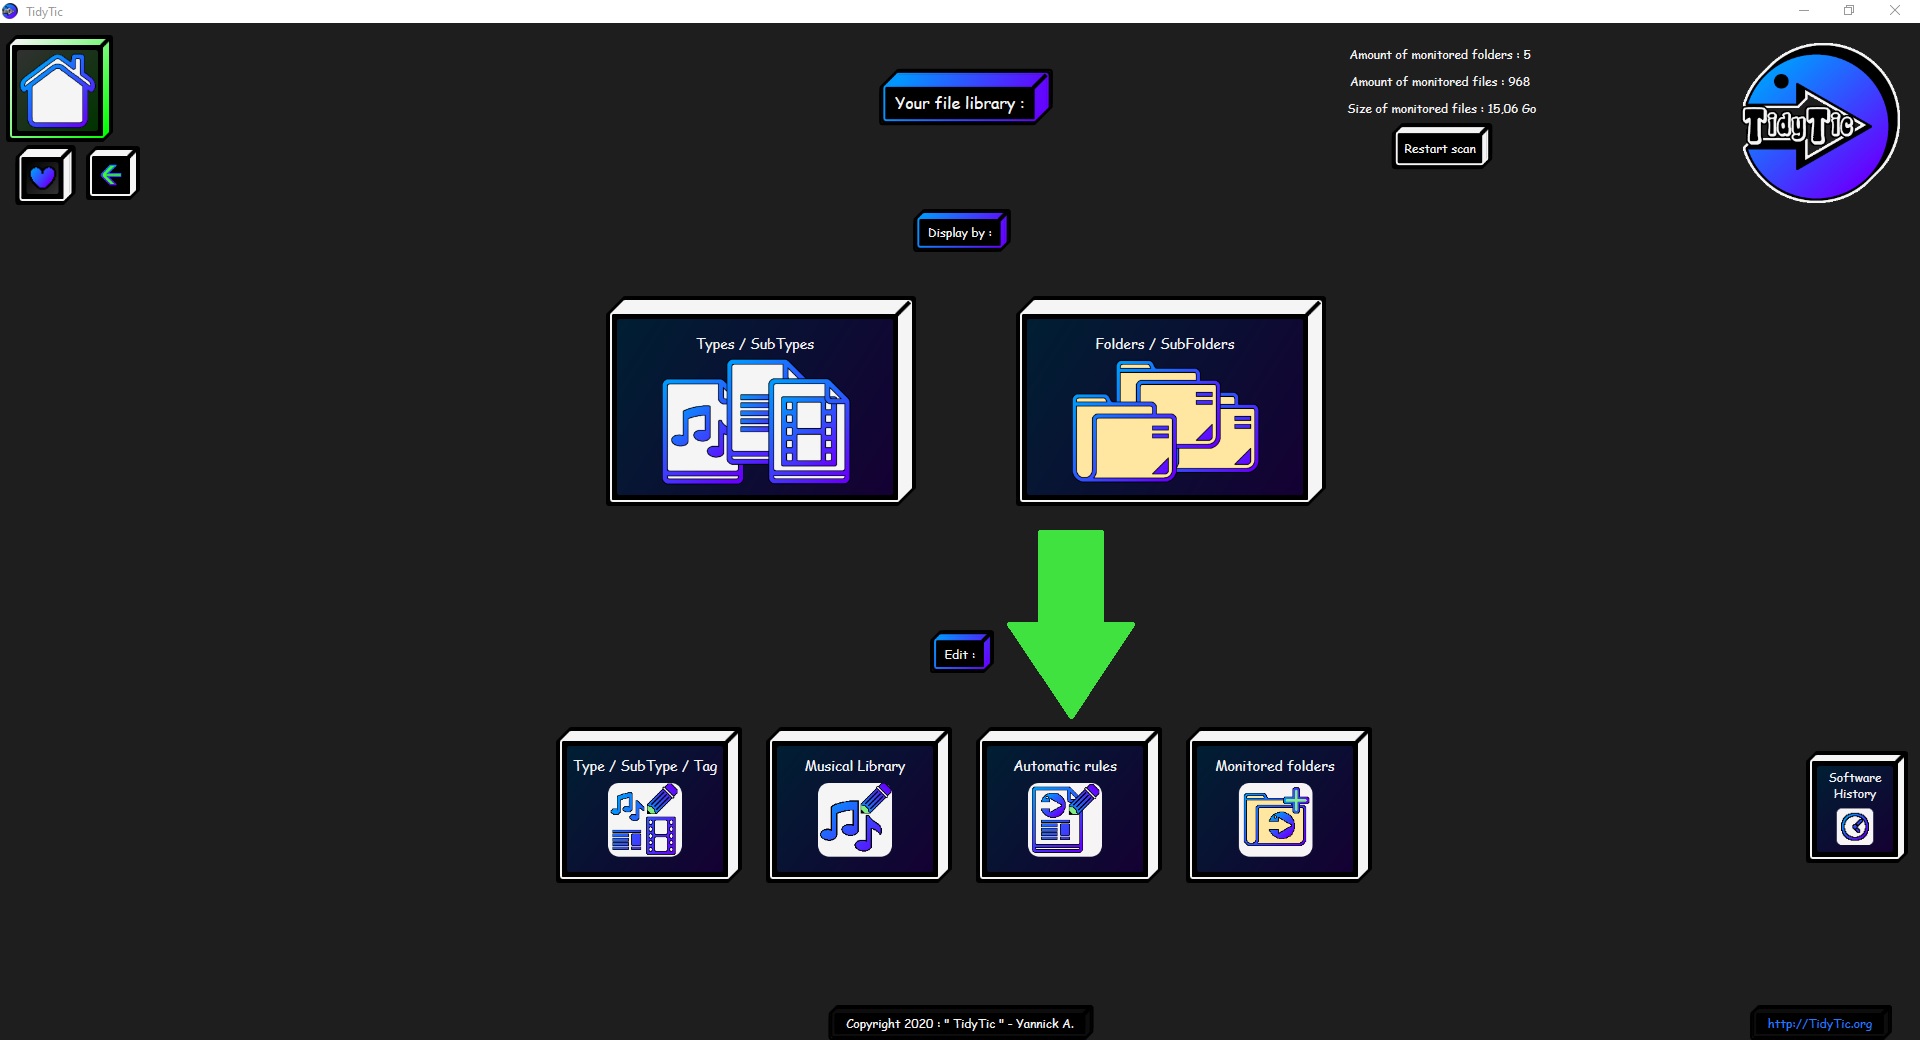
The shortcut for this page is available on the software home page.
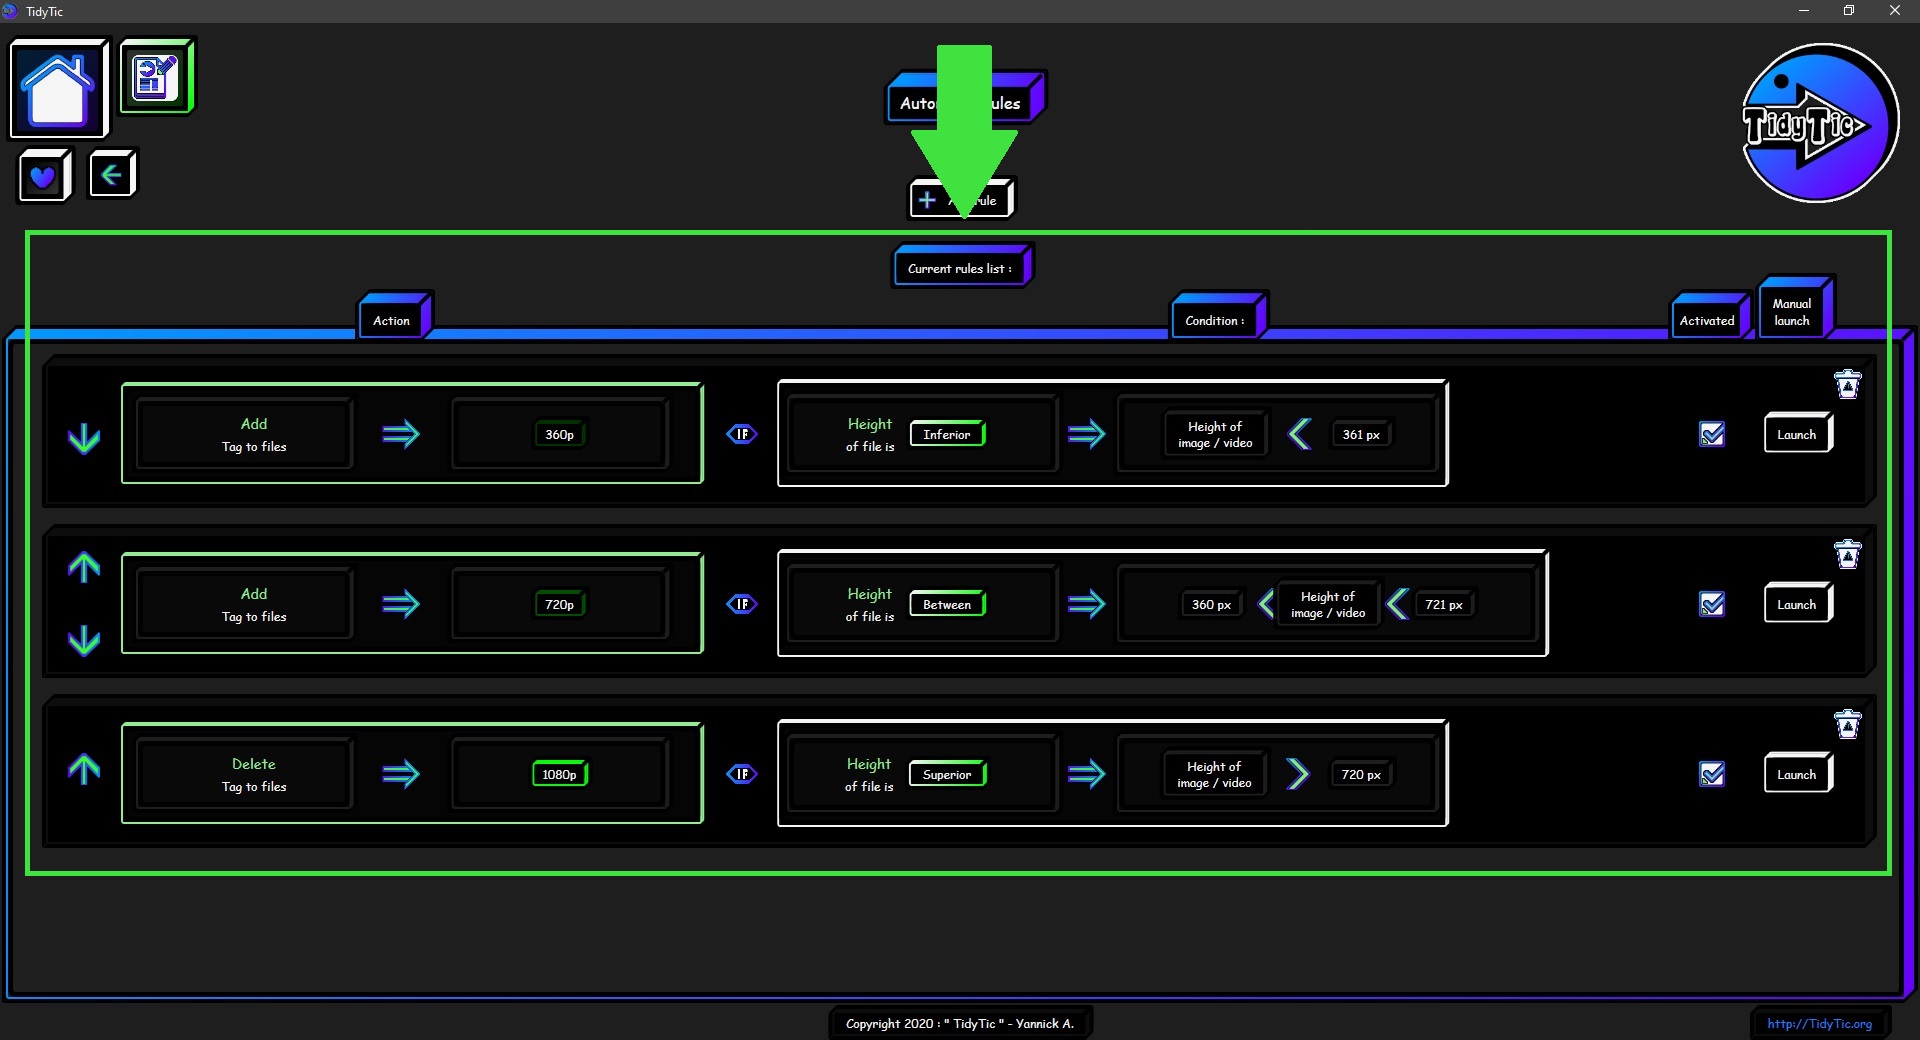
On this page you will have at the top in the middle a button to add a rule.
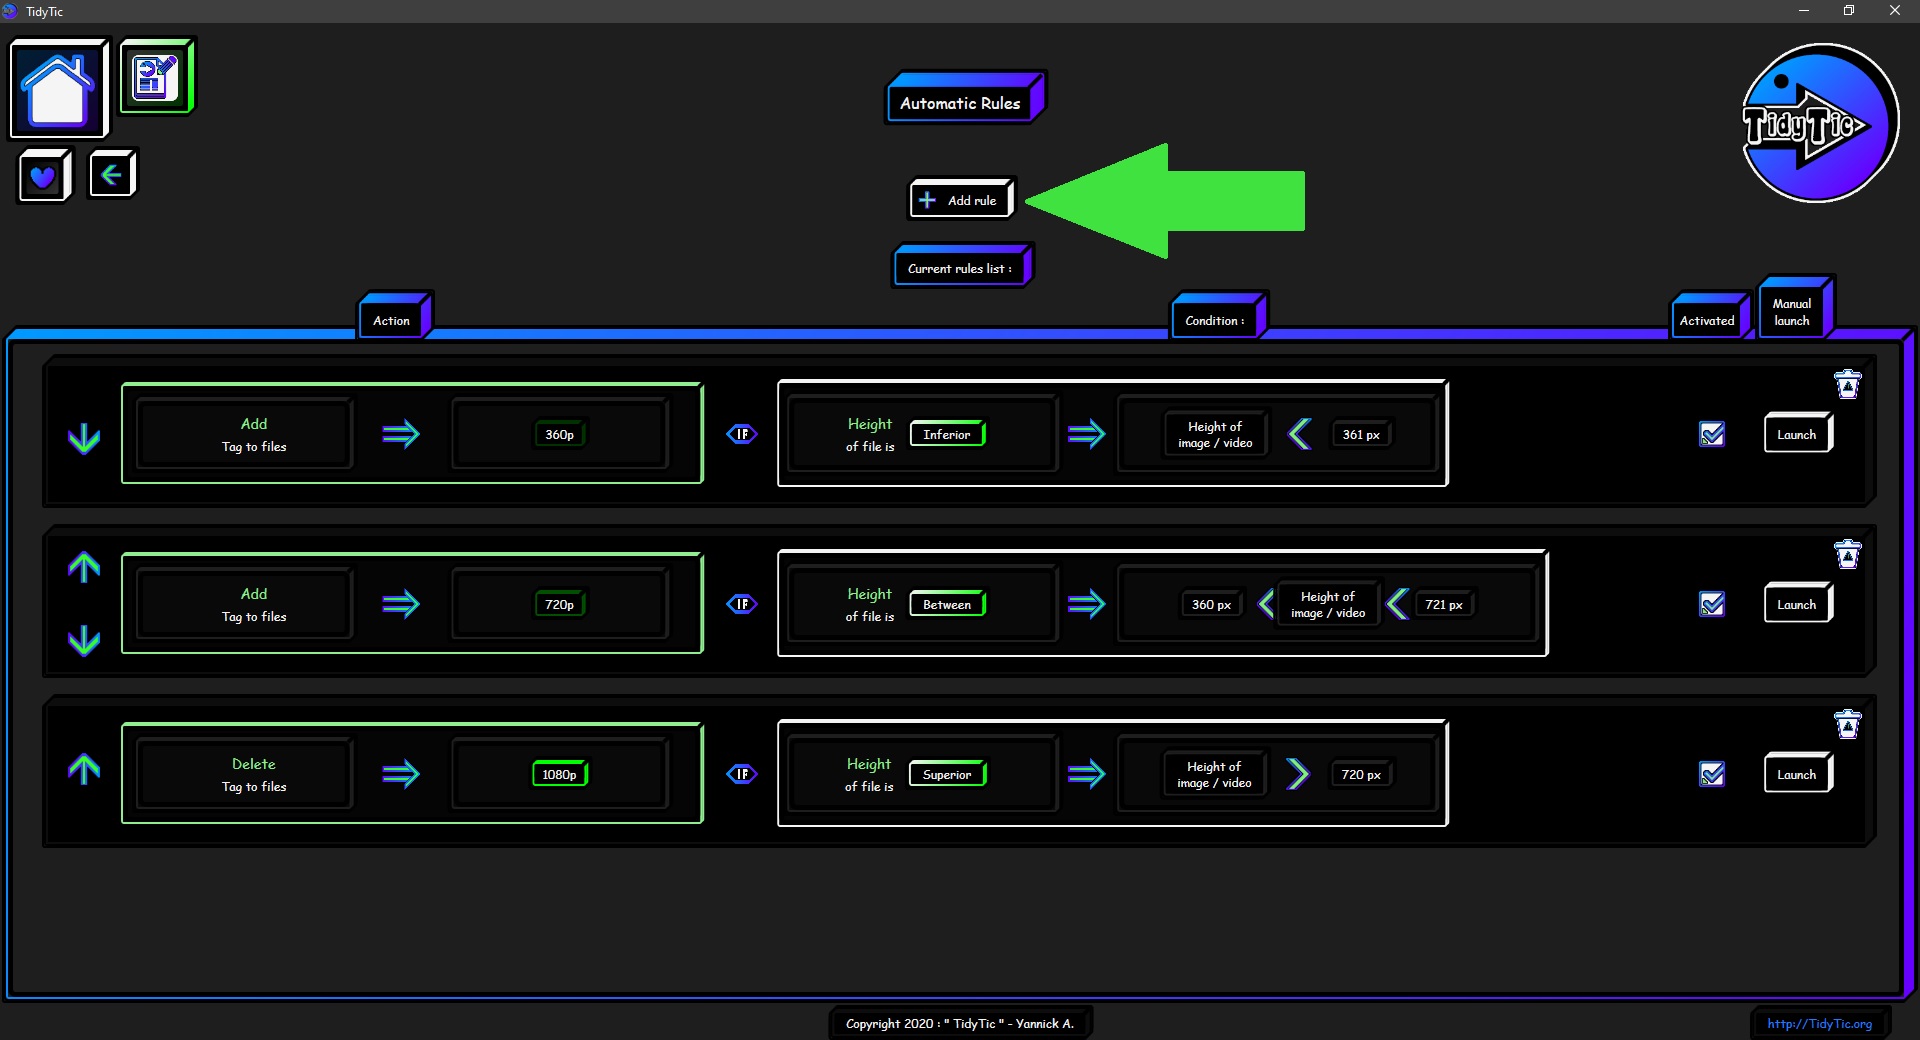
You will have below the list of rules that you will have created in the software.
The rules that you can see in the screenshot below will be part of an example that I will show you later.
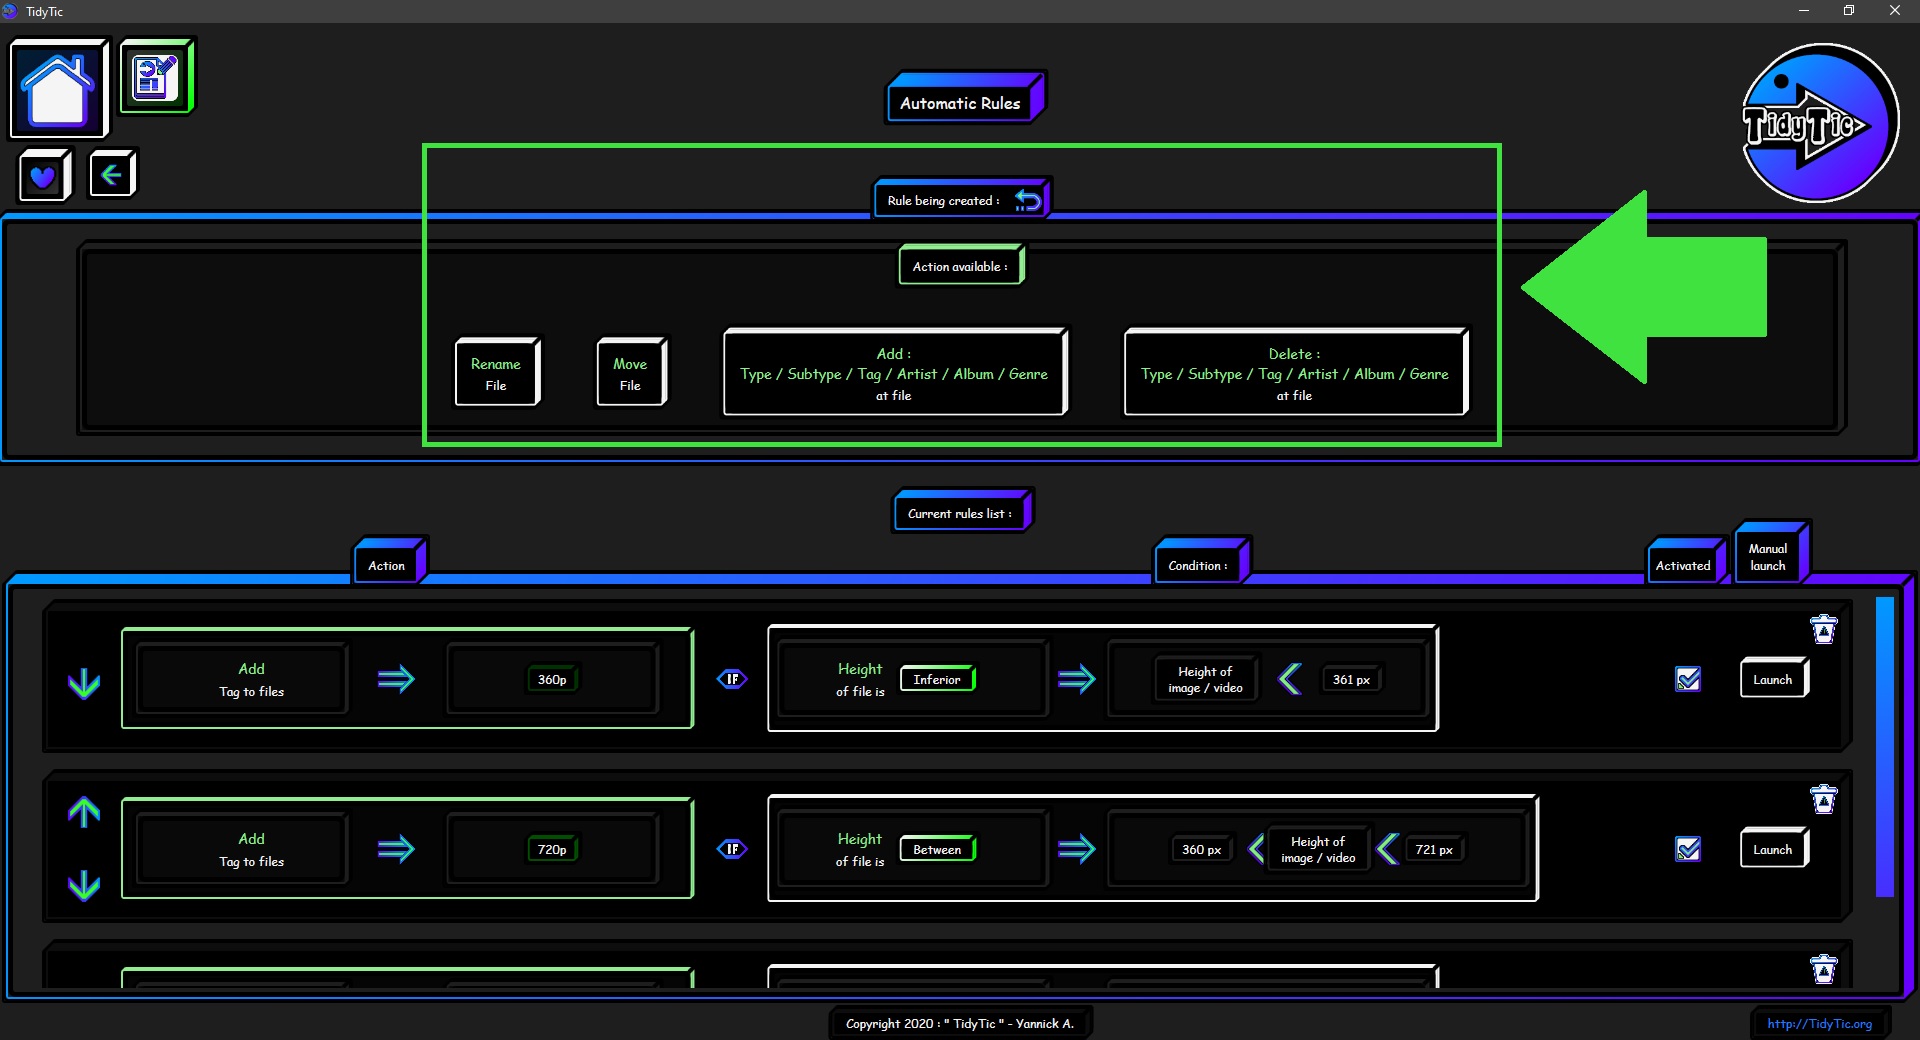
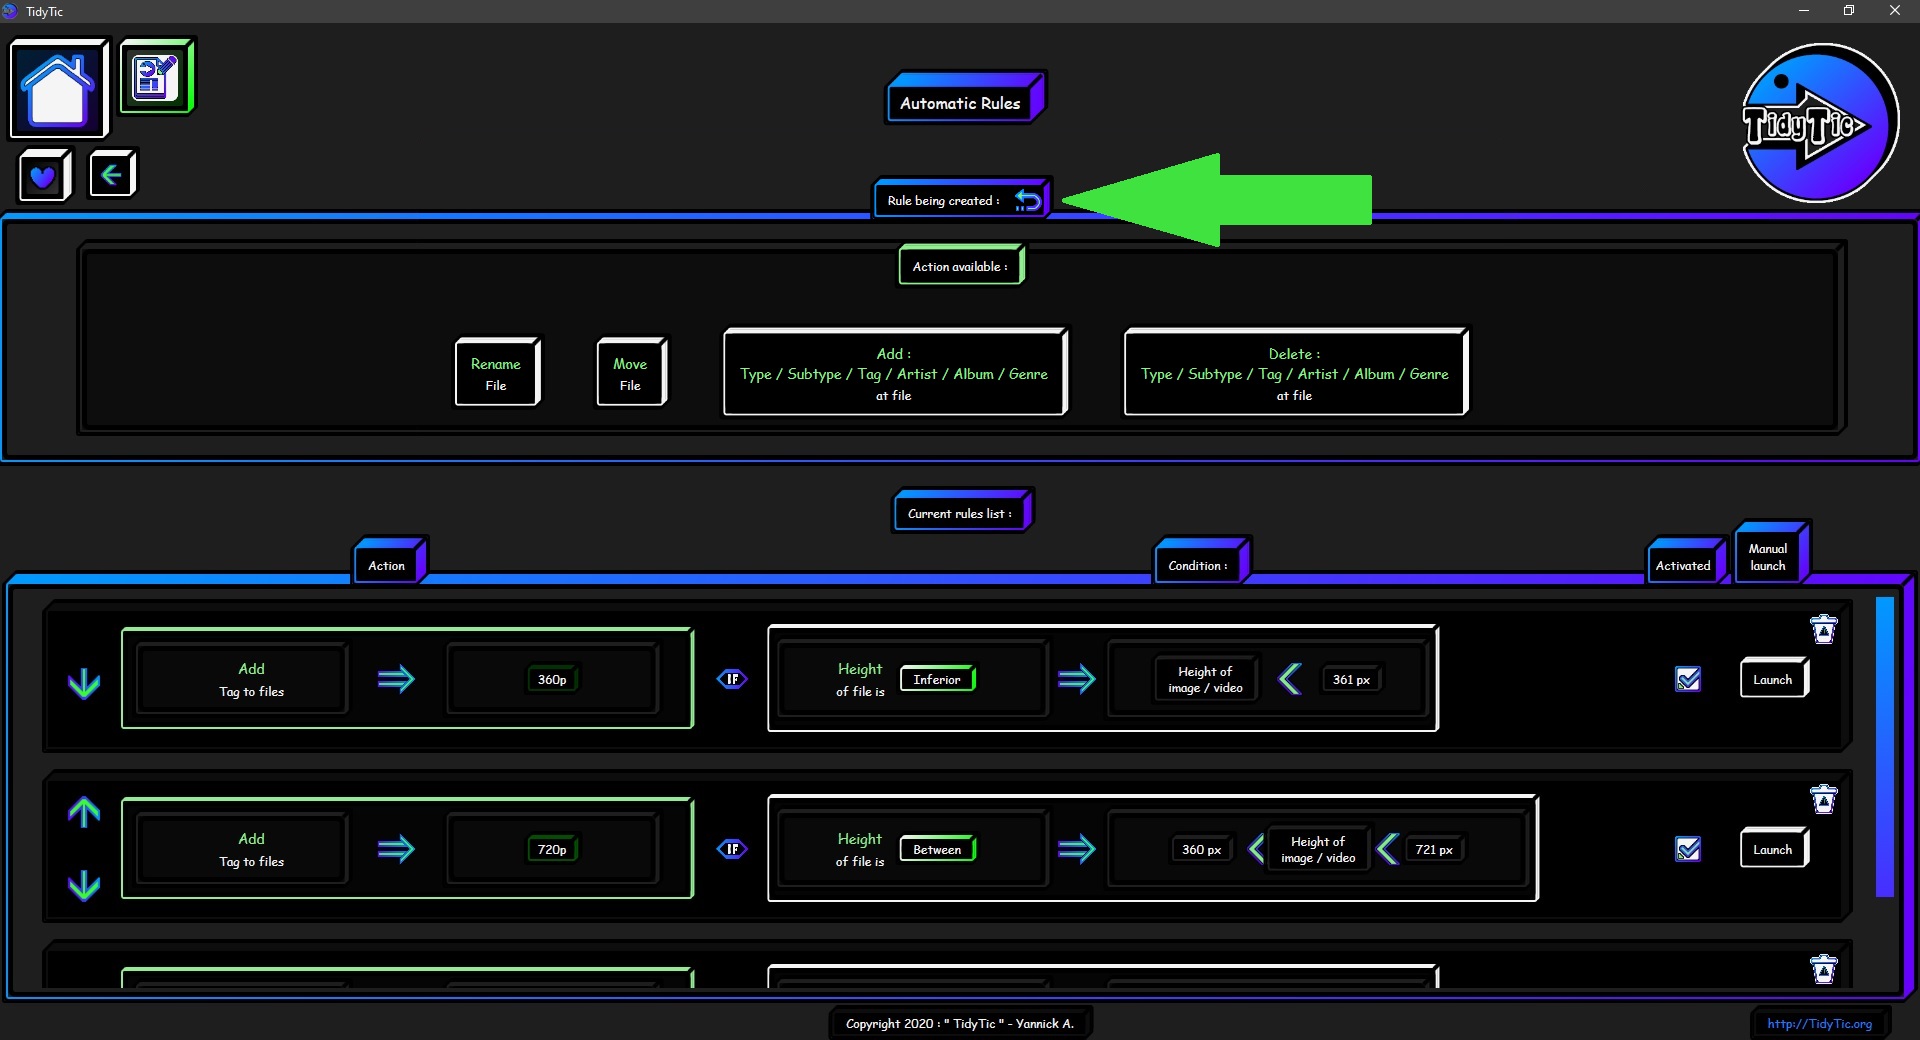
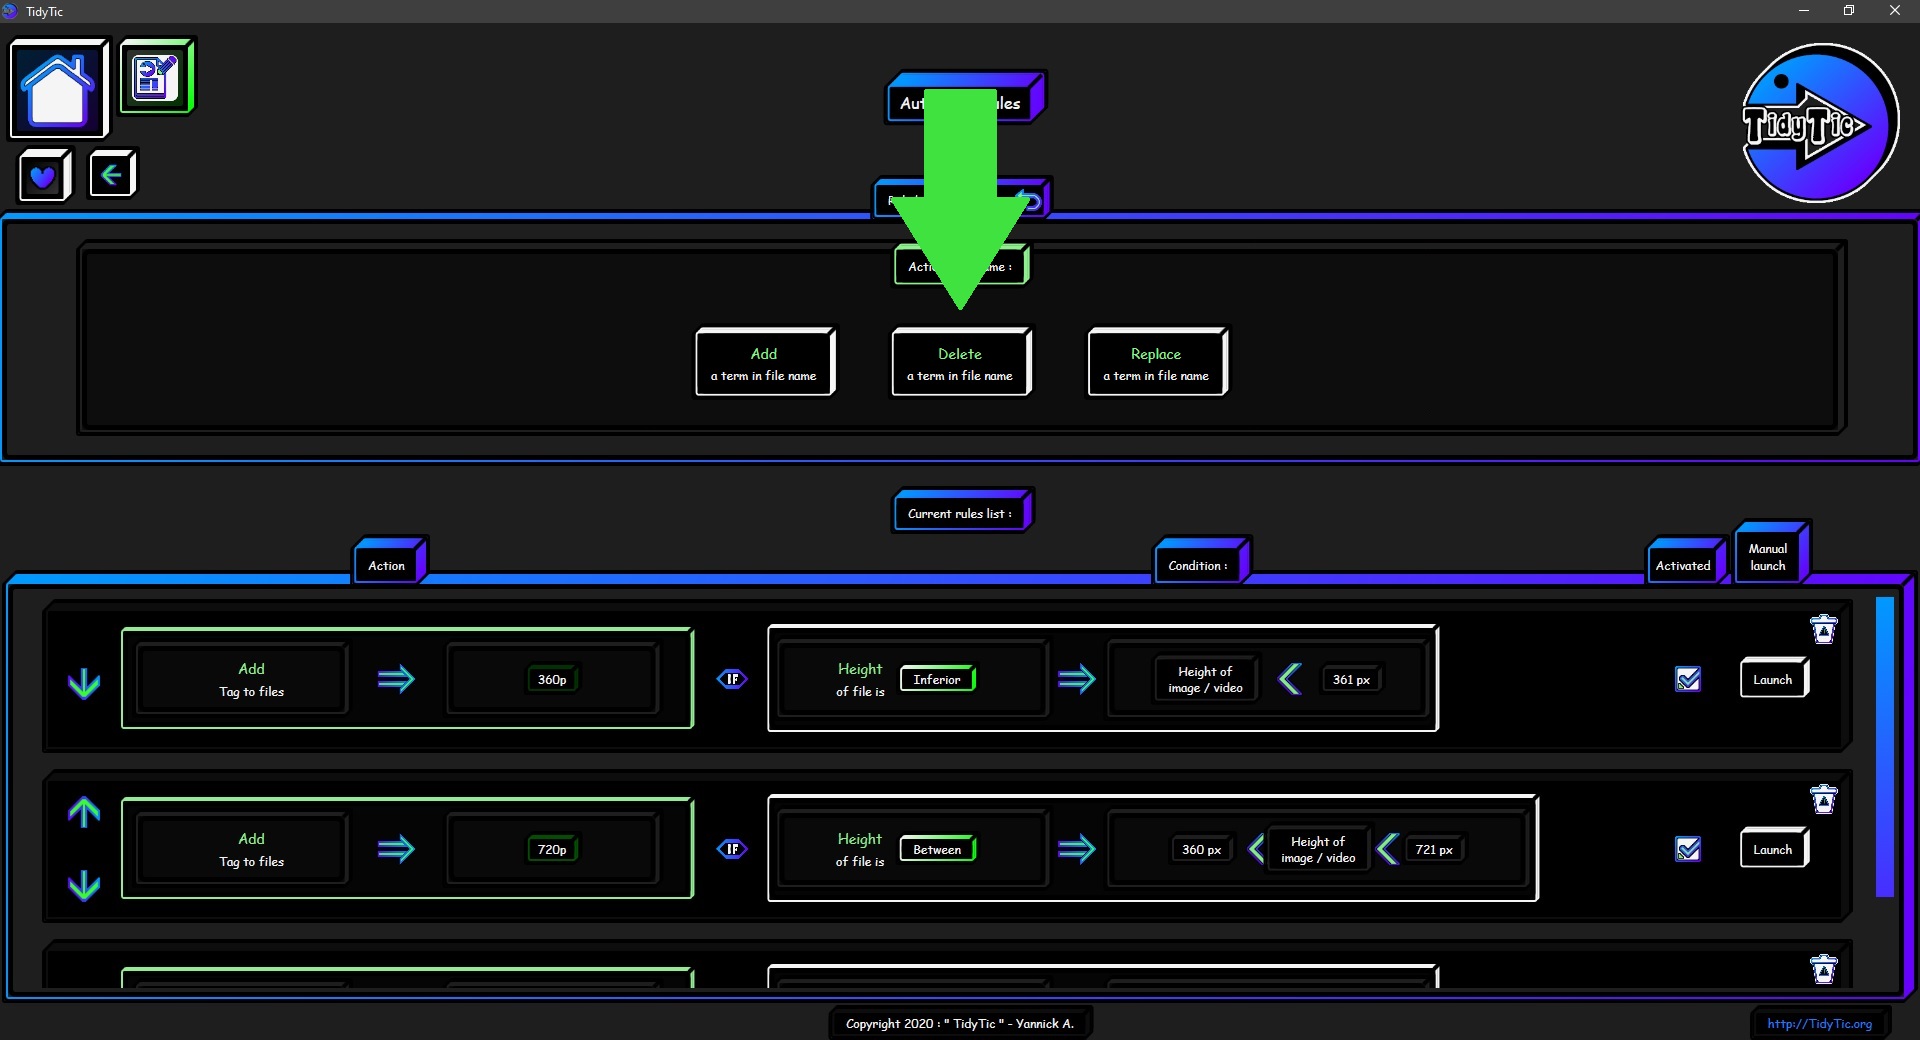
When you start creating a rule a menu will appear to let you choose the action for the rule.
To cancel the creation of the rule, simply click on the " ![]() " icon.
" icon.
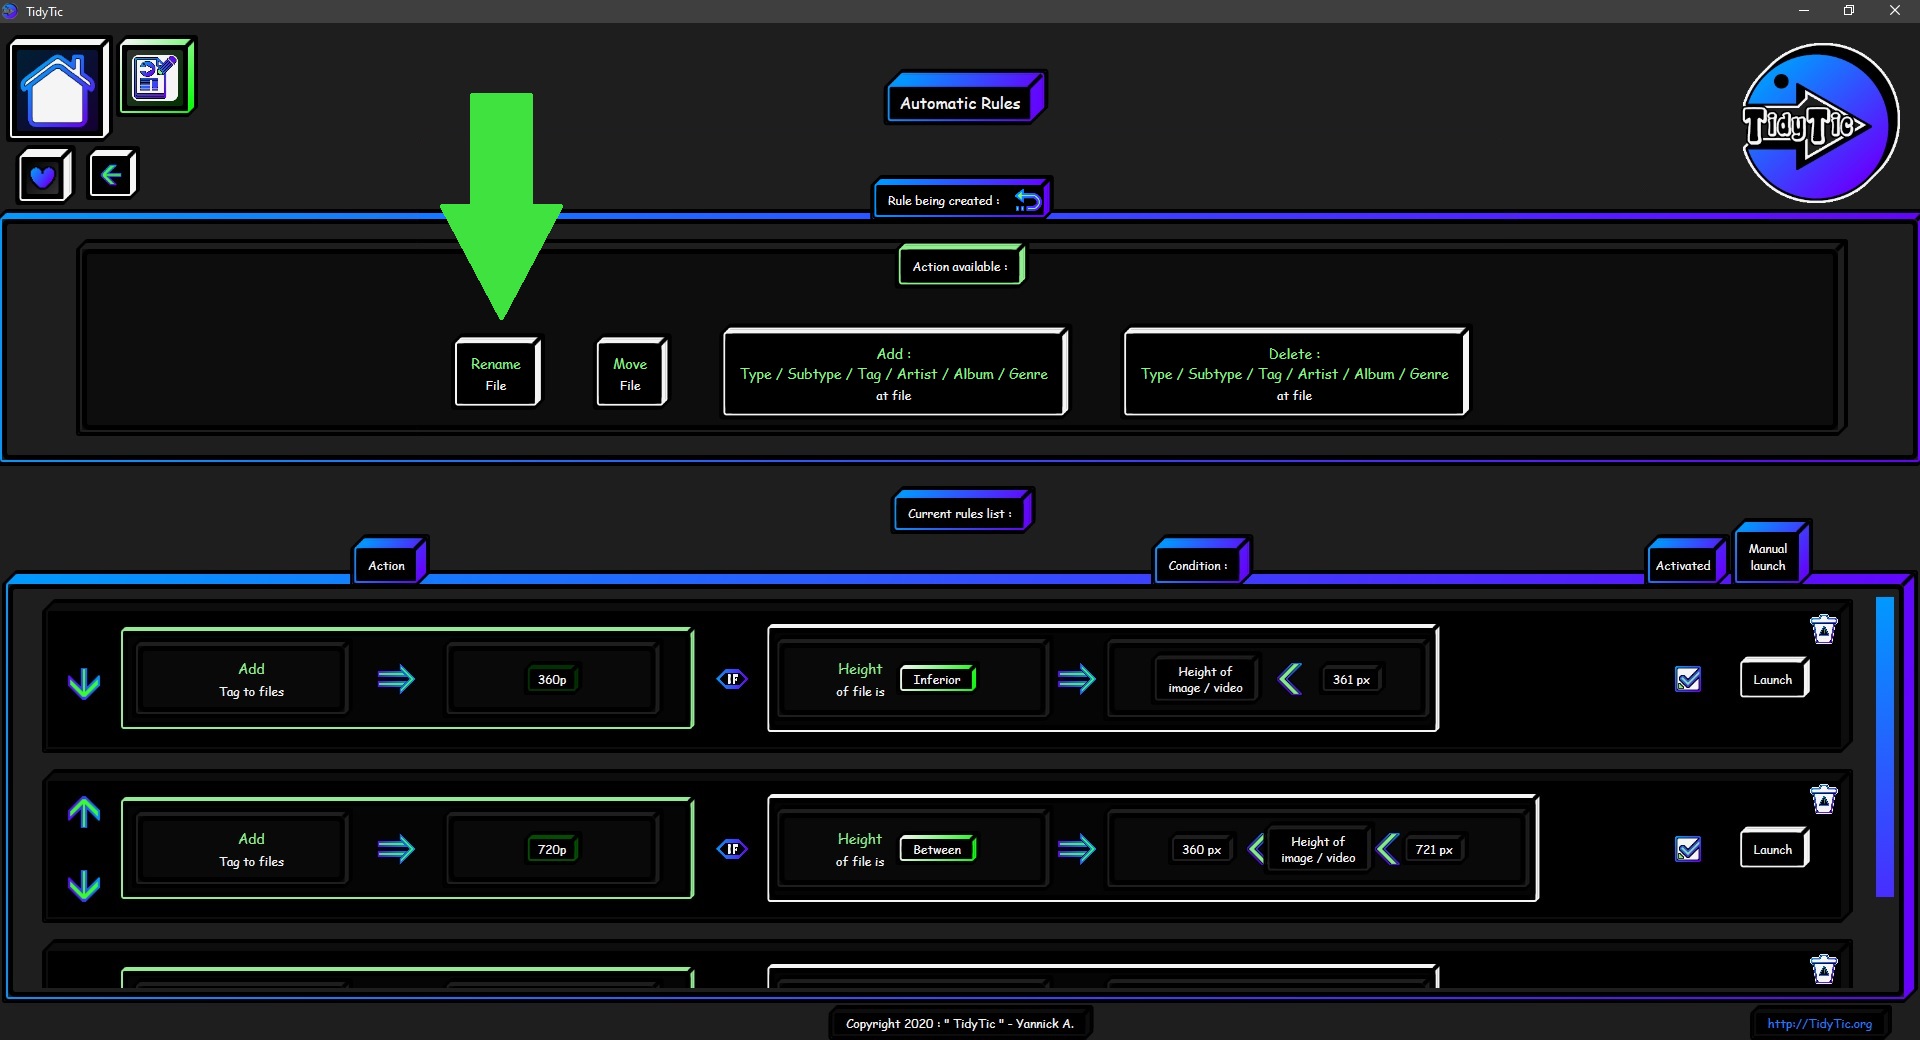
Available actions for your automatic rules :
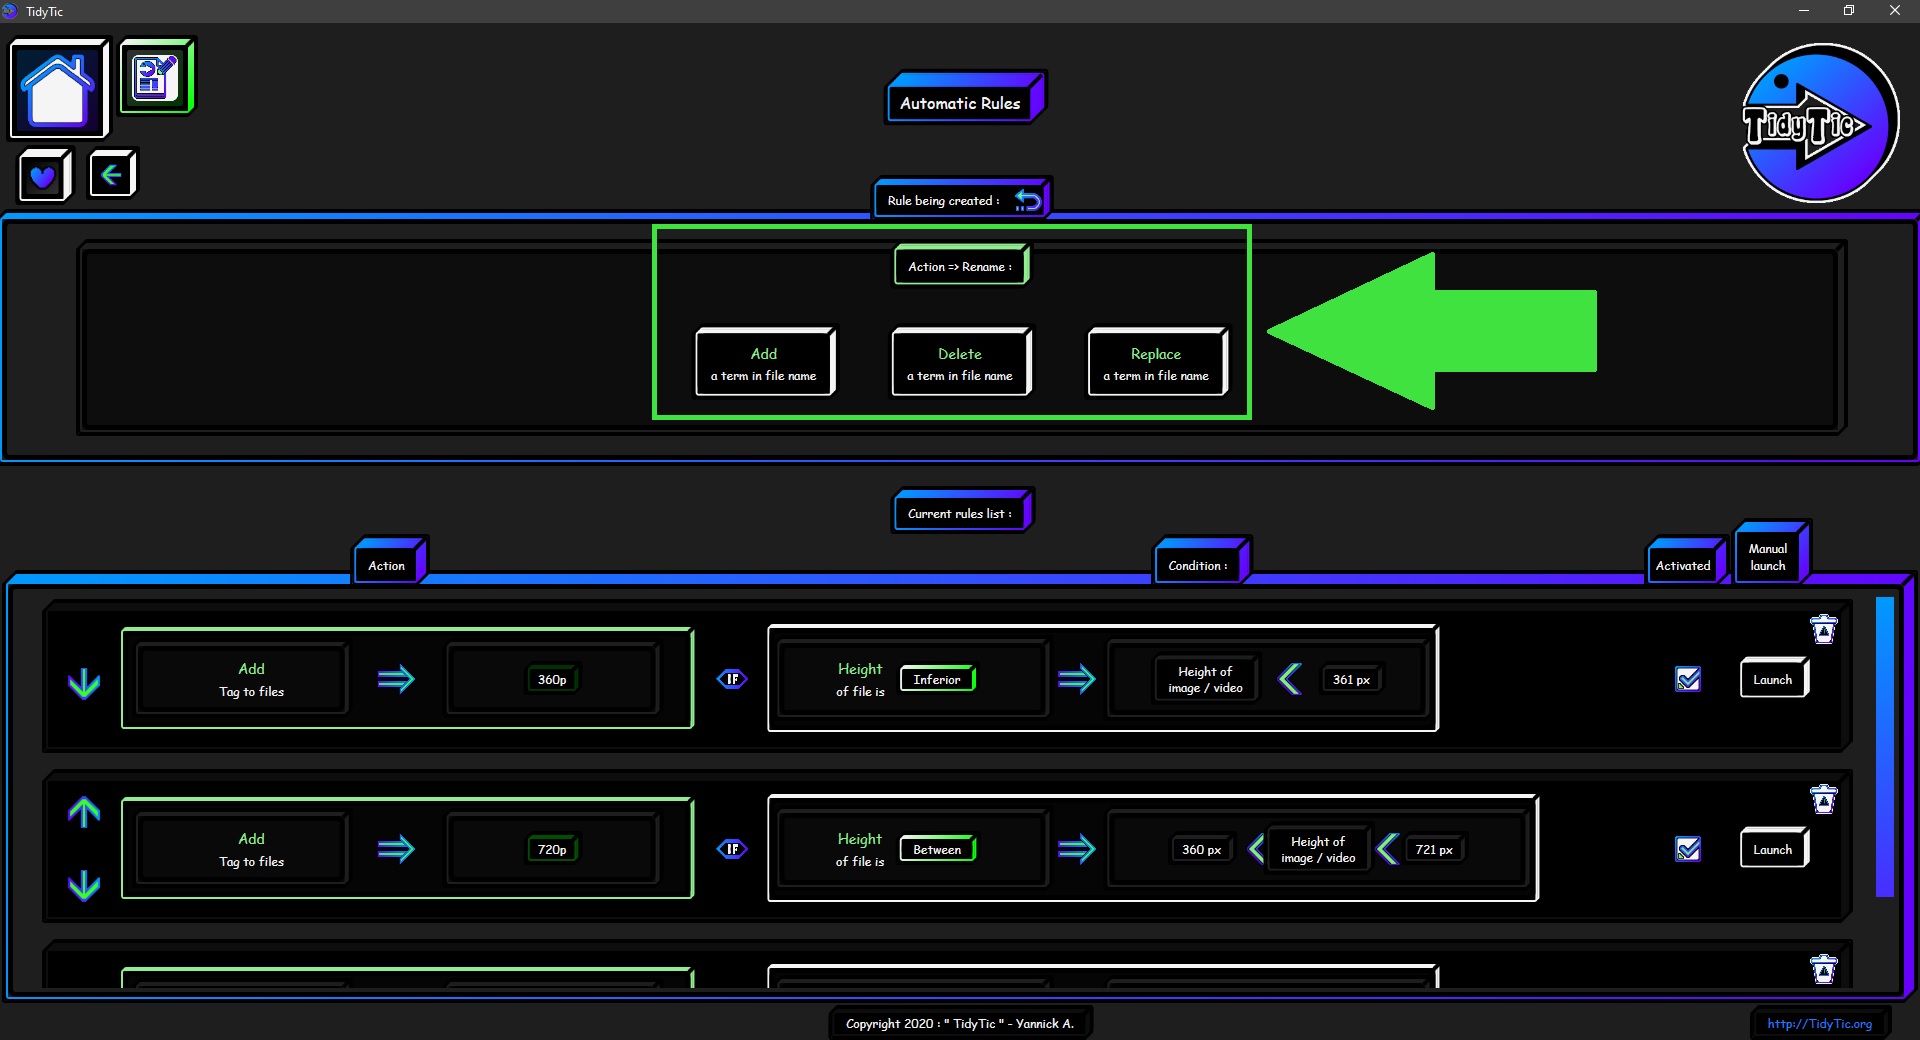
Action : "Rename the file" :
This action leaves you with three options:
- Add.
- Remove.
- Replace.
 ____
____ 
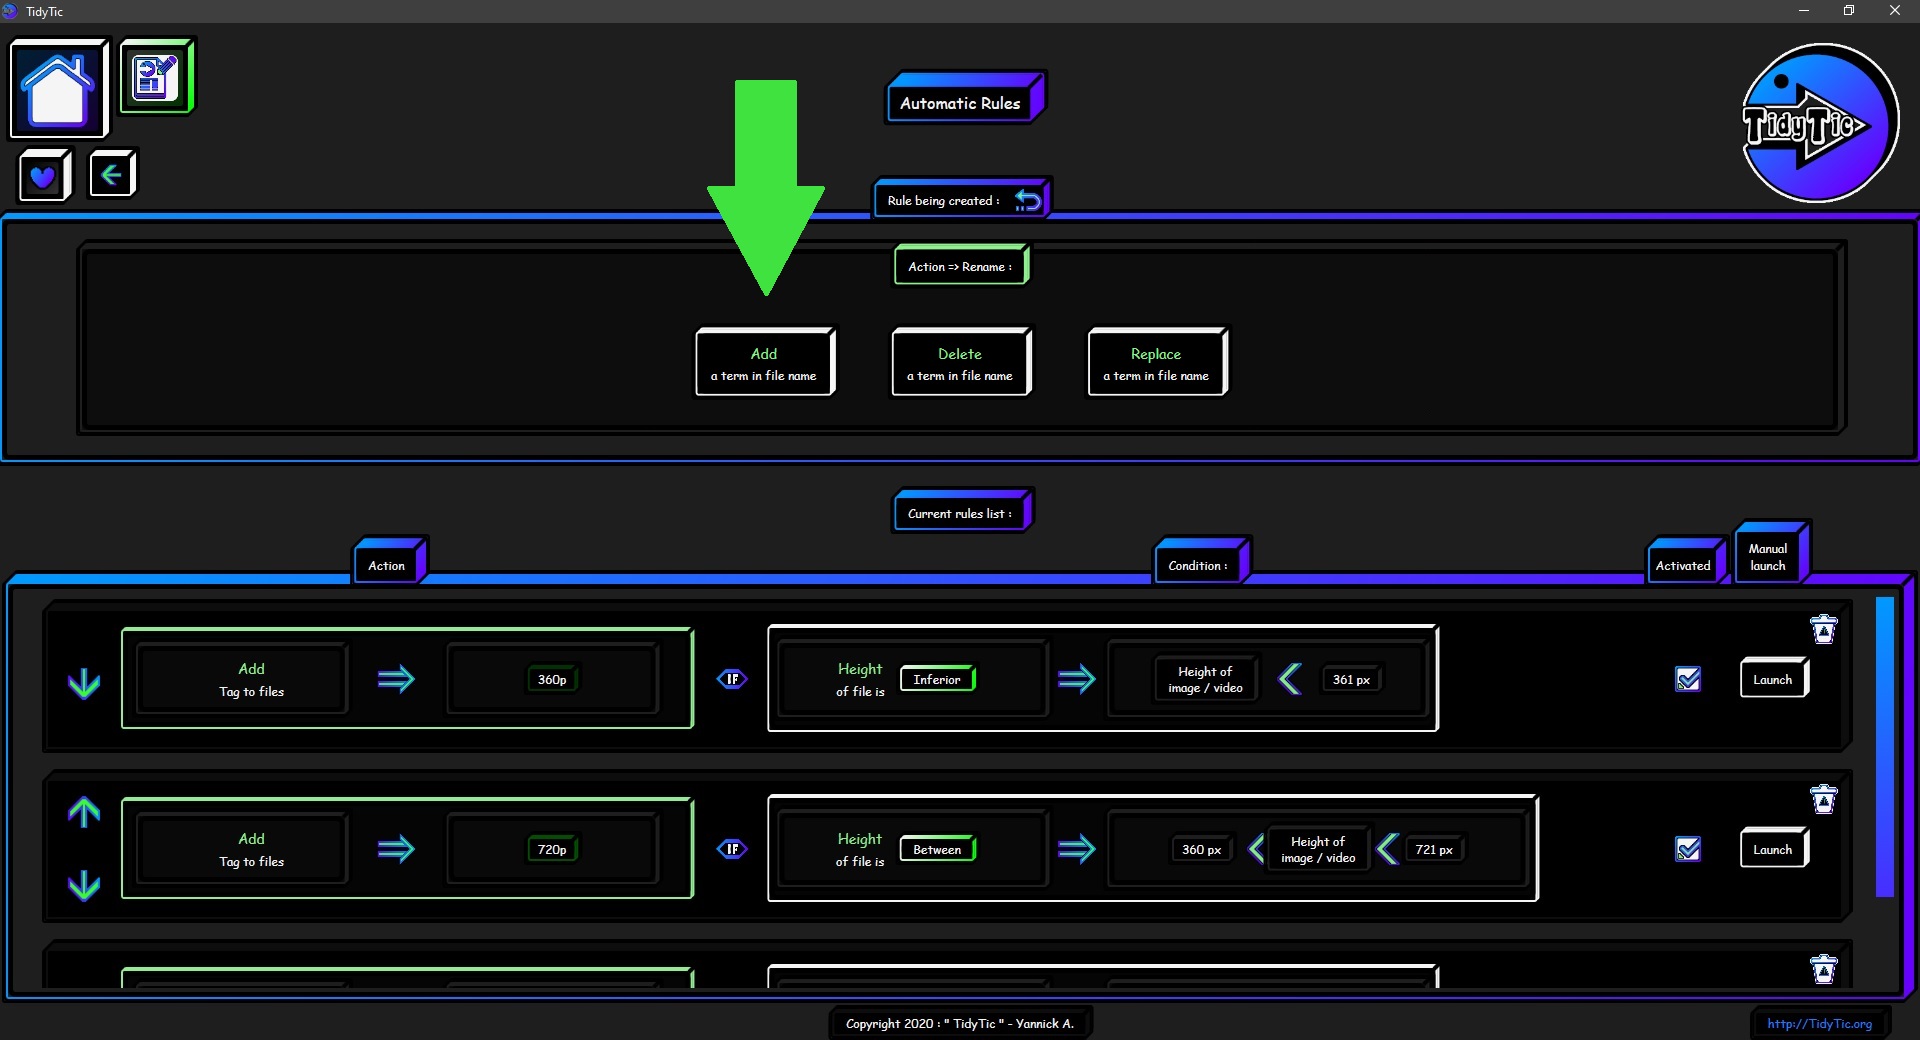
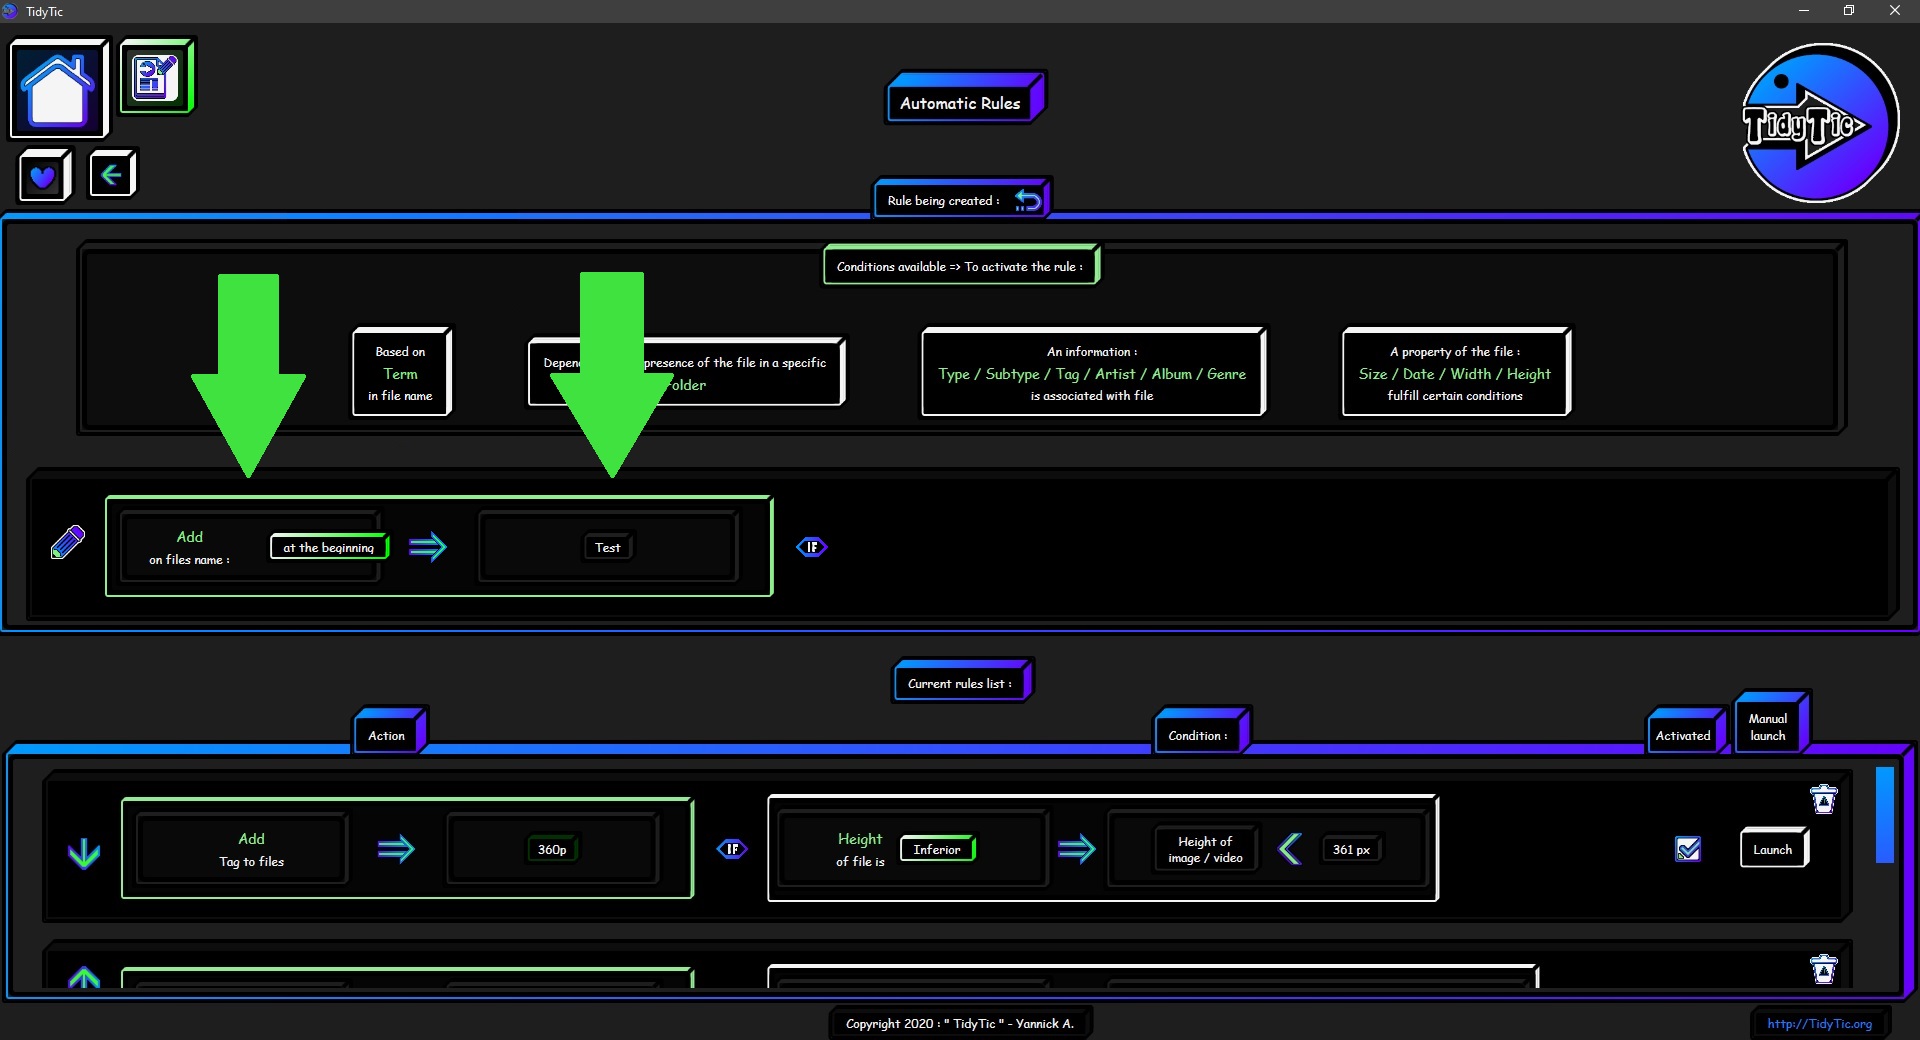
The "Add" option :
This is really very easy to understand.
You write in the box the text you want to add to the file names using this rule.
And choose if you want to add it at the beginning or at the end of the file name.
 ____
____ 
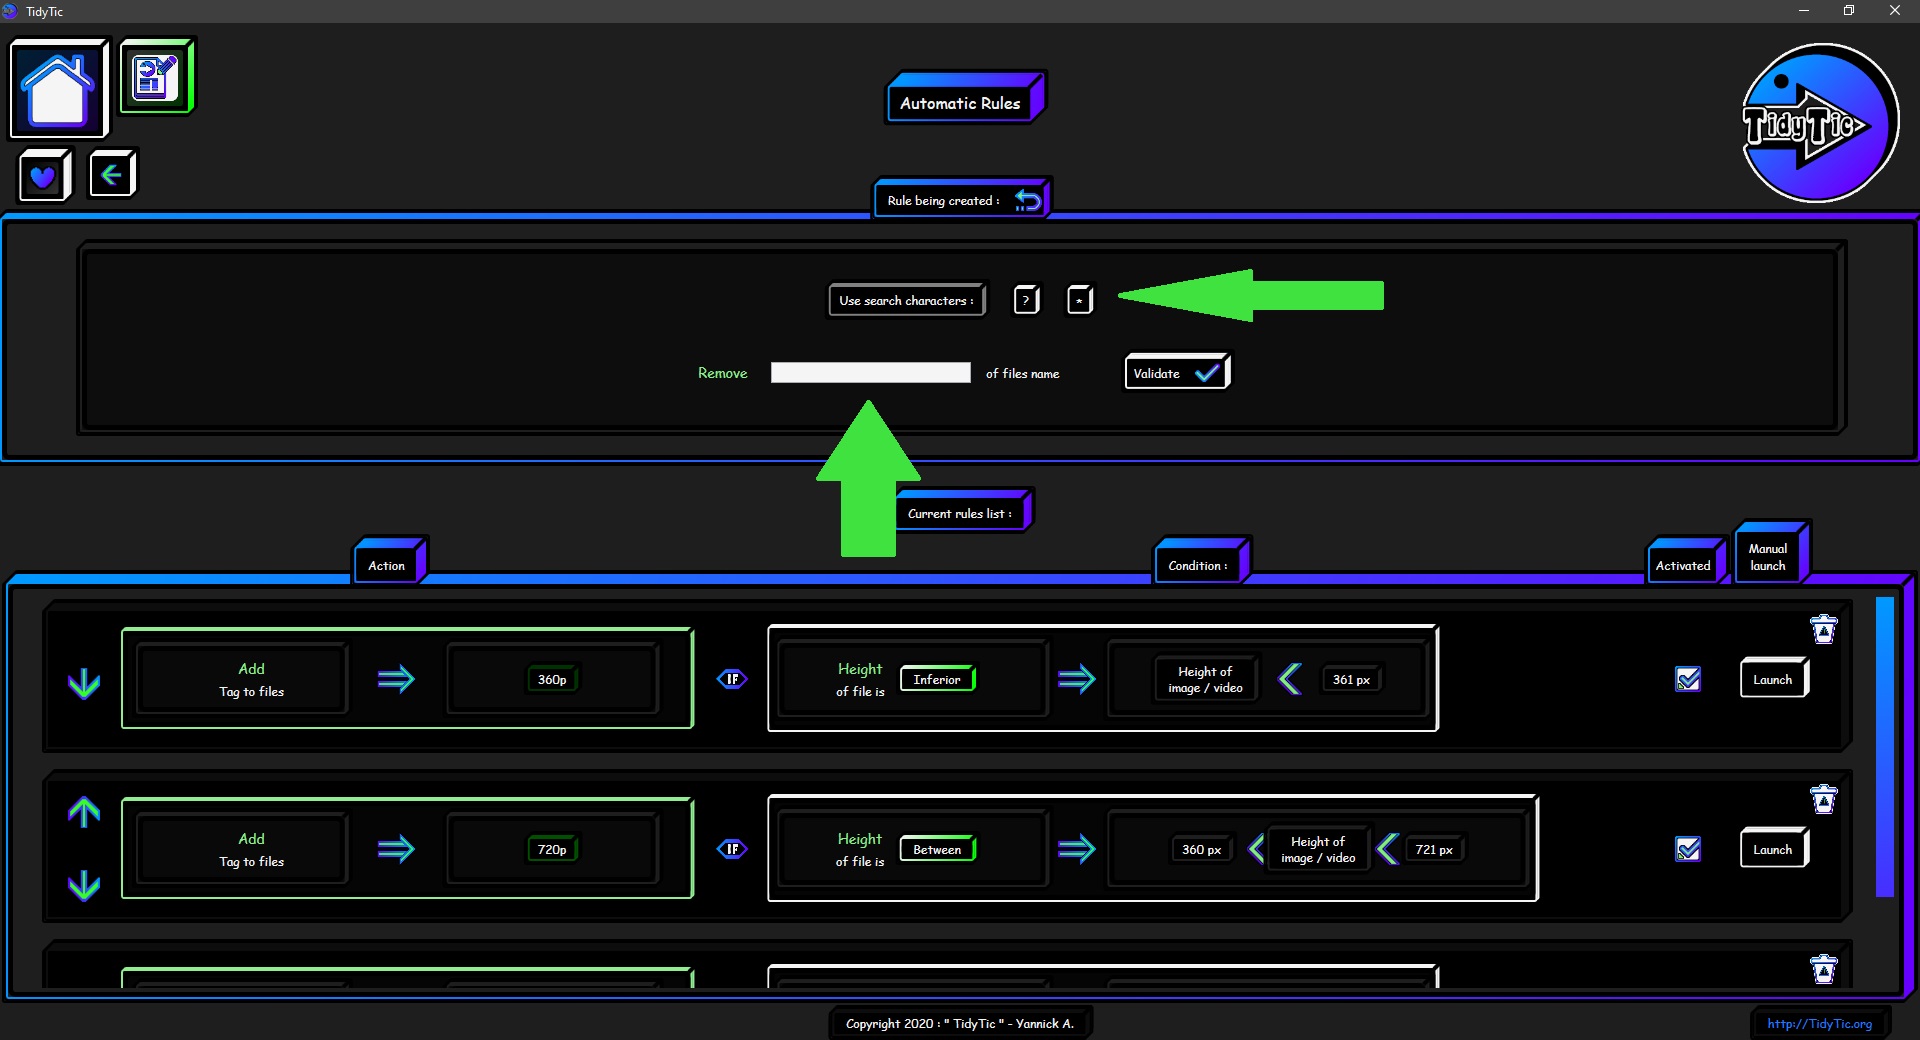
The "Delete" option :
In this option you just have to write in the box the text you want to remove from the file names using this rule.
You also have the possibility of using "search characters" in this option.
For more information on search characters and their uses you can consult the tutorial : "Edit your files in TidyTic: Rename, sort, move etc.”.
I have provided in this tutorial the detailed operation of the search characters.
 ____
____ 
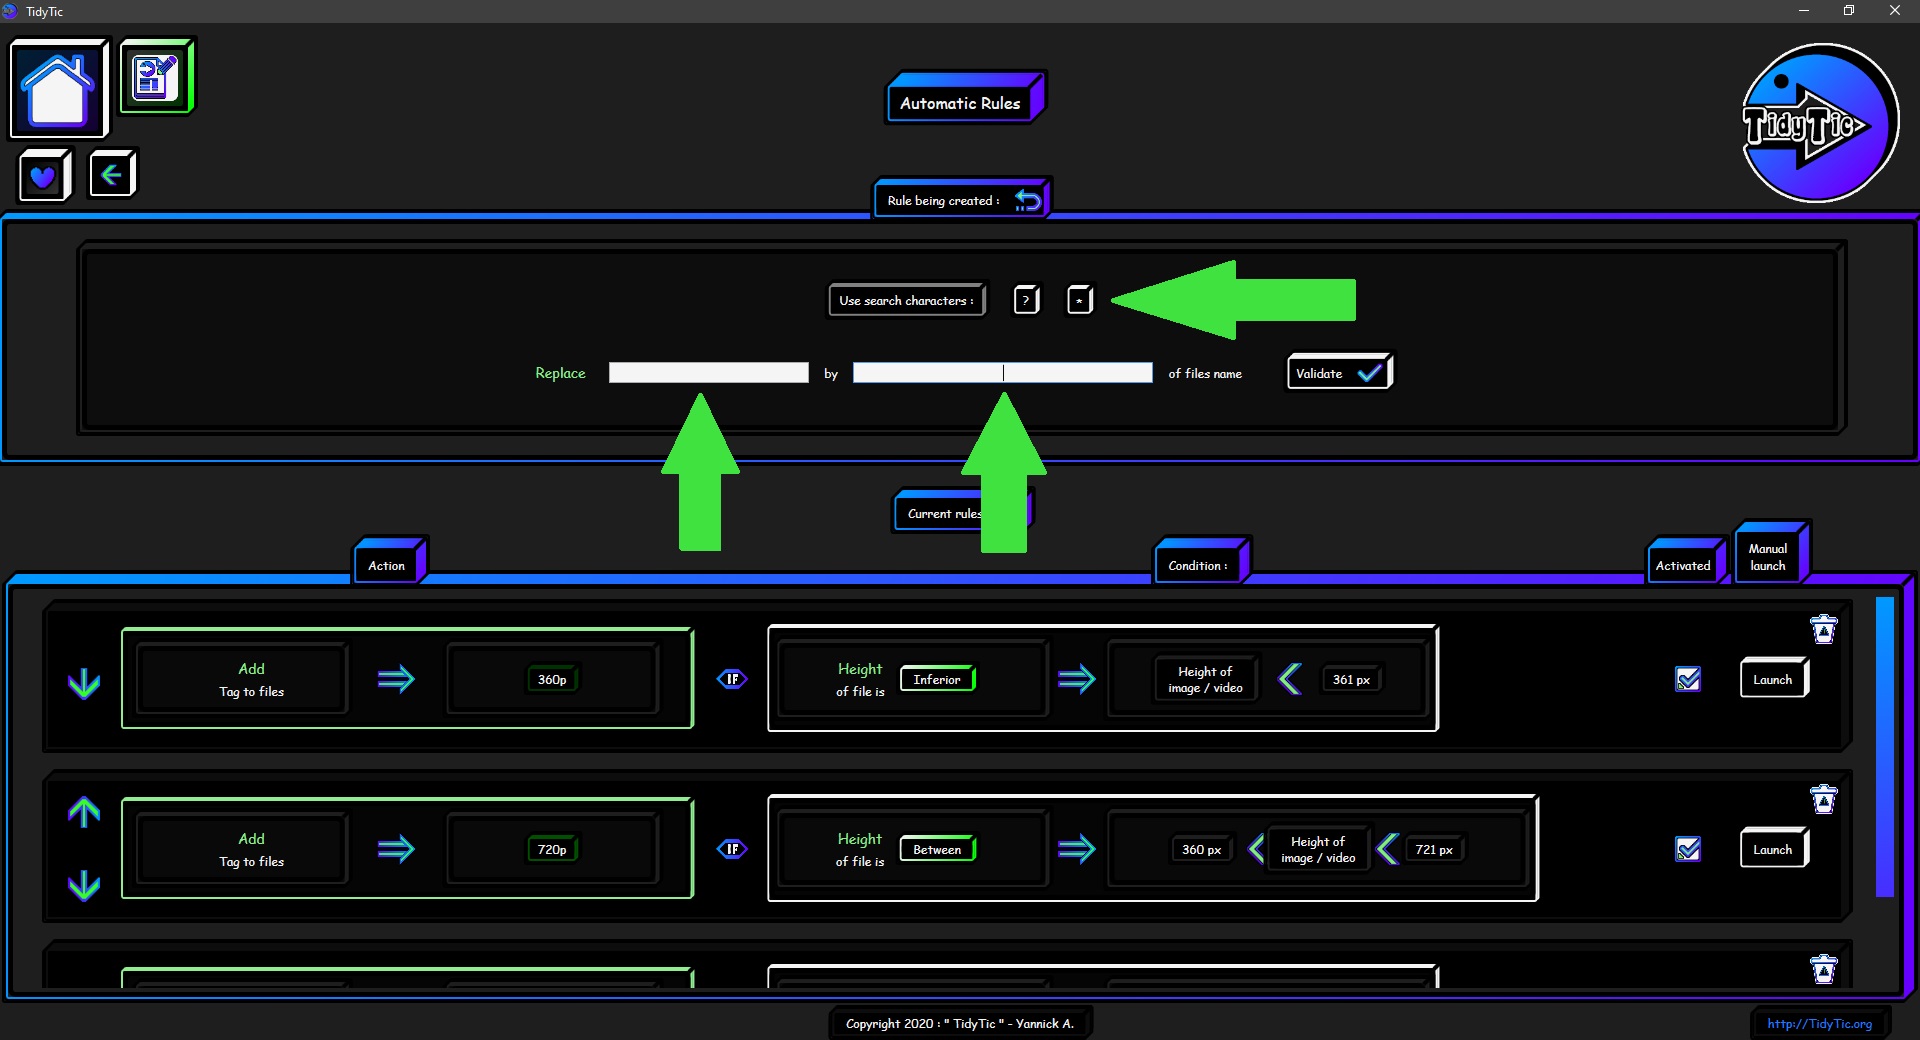
The "Replace" option :
In this option you just have to write in the first box the text you want to replace in the file name and in the 2nd box what you want to replace it with.
You also have the possibility of using "search characters" in this option.
For more information on search characters and their uses you can consult the tutorial : "Edit your files in TidyTic: Rename, sort, move etc.”.
I have provided in this tutorial the detailed operation of the search characters.
 ____
____ 
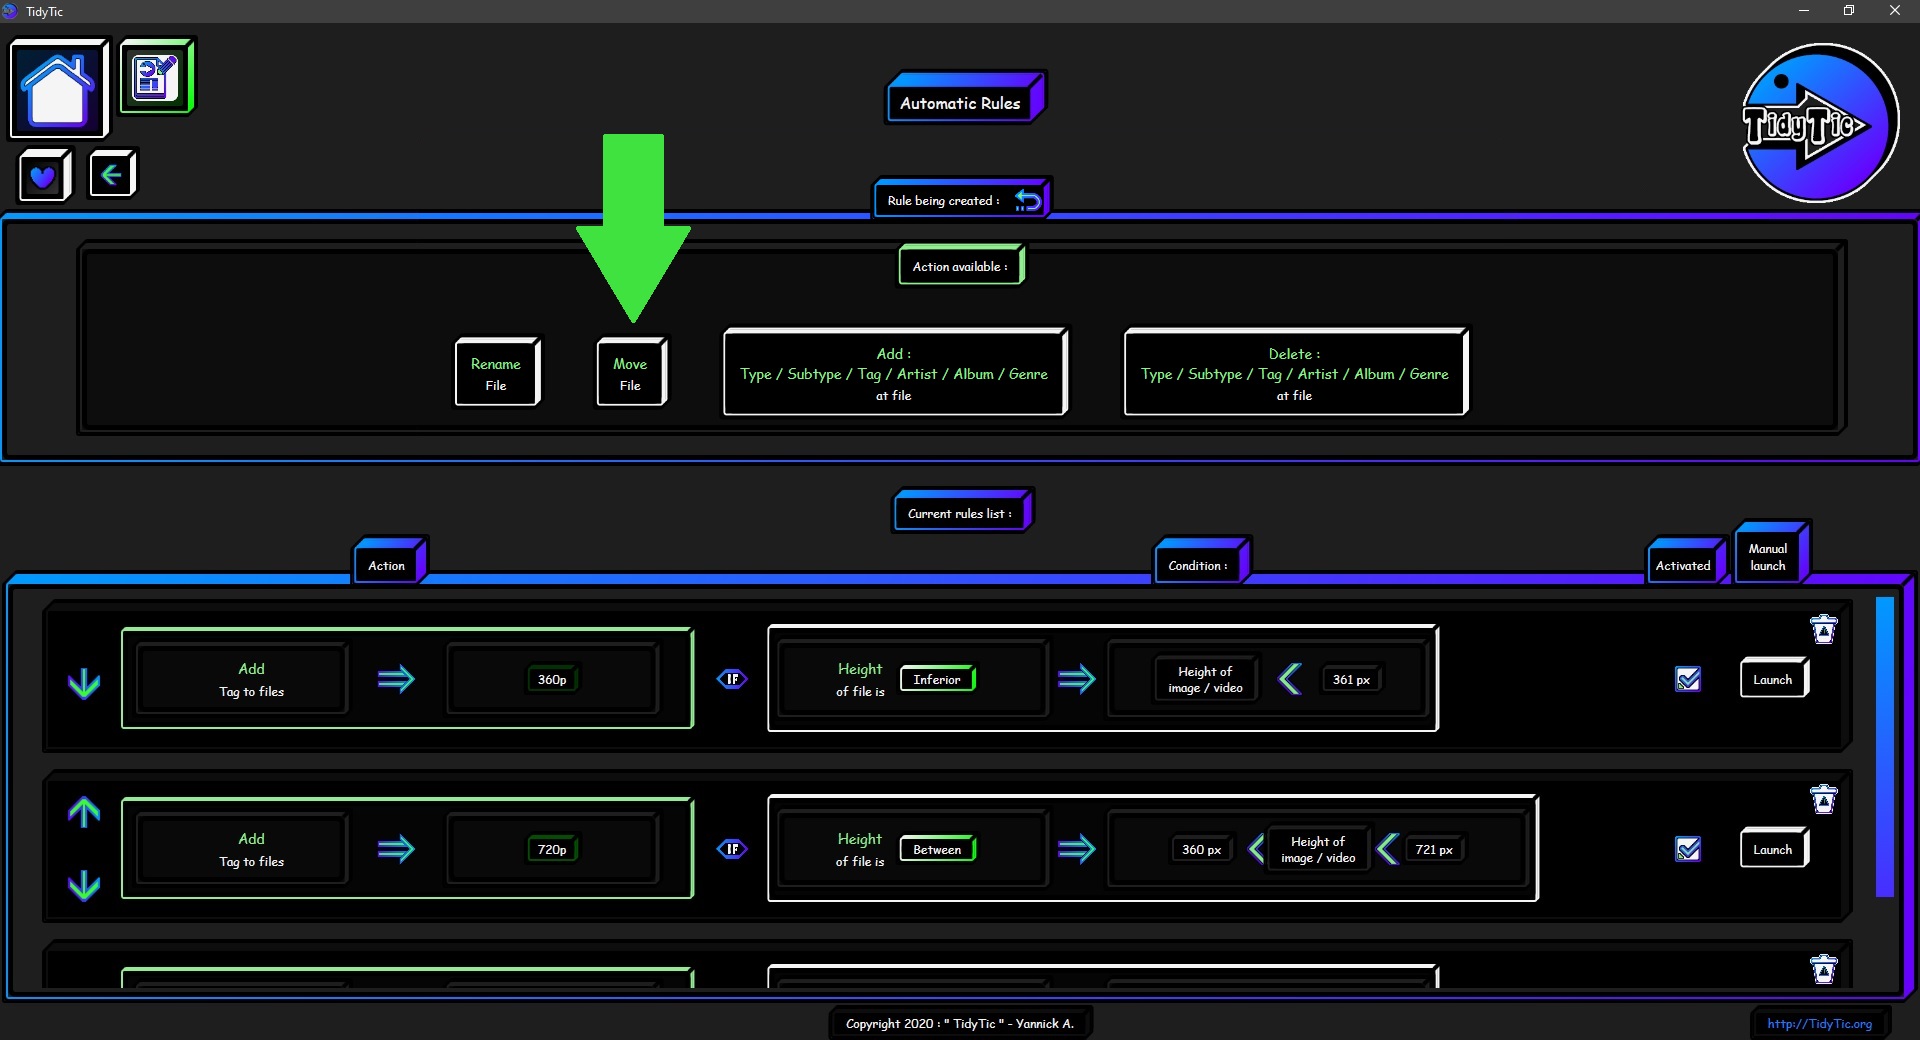
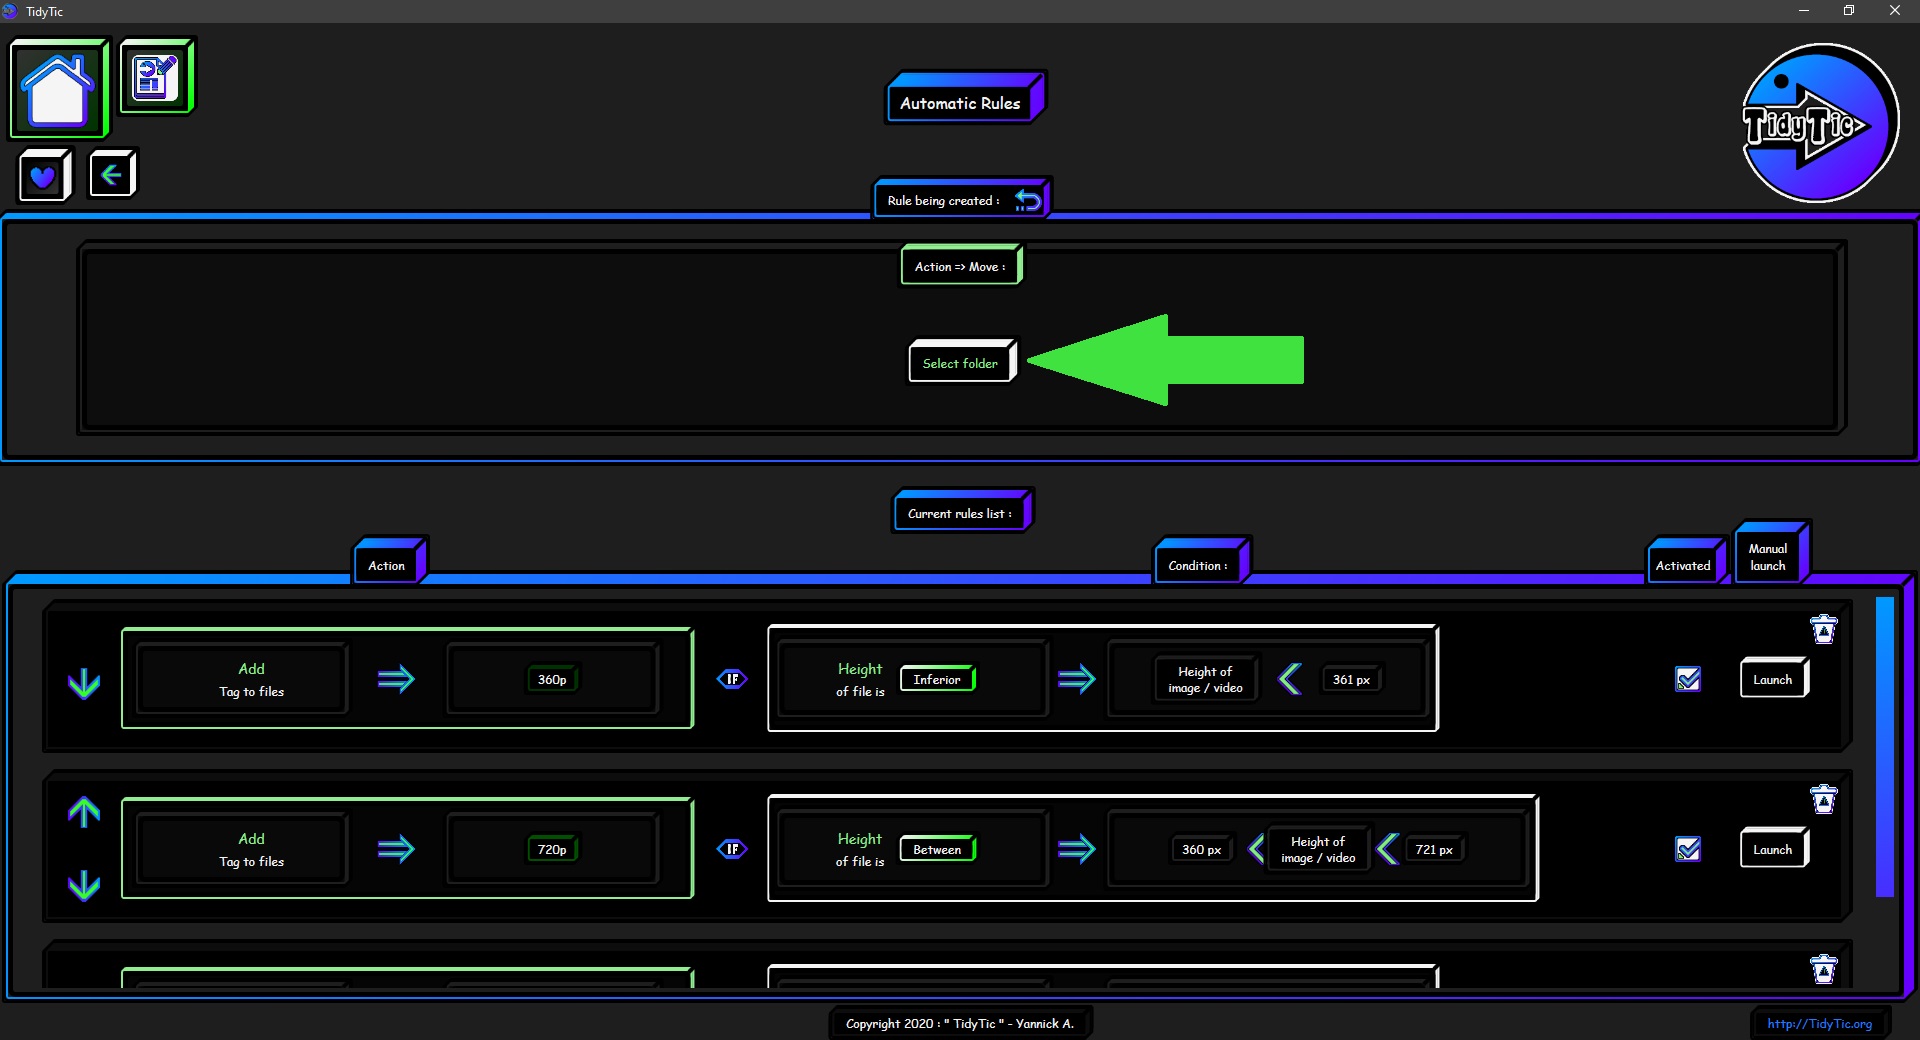
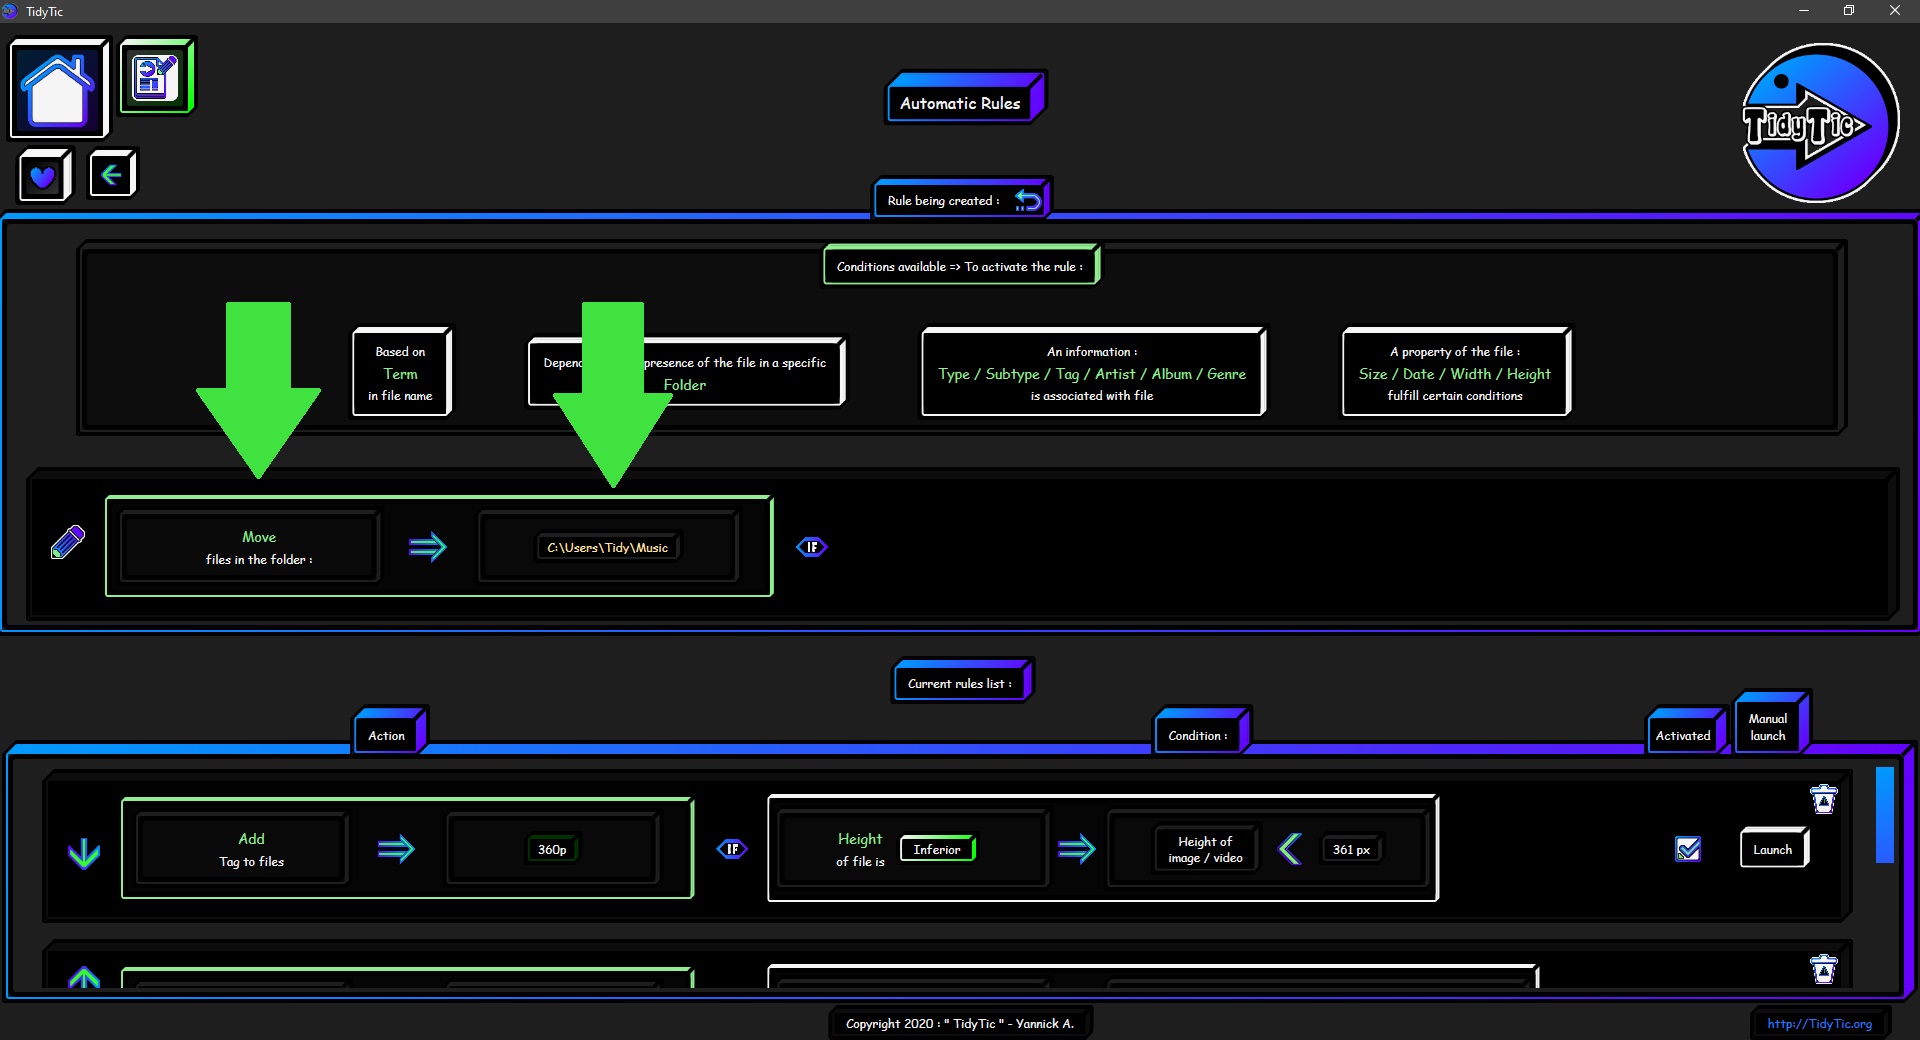
Action : "Move the file" :
For this action, just choose the folder in which you want to move the files with this rule.
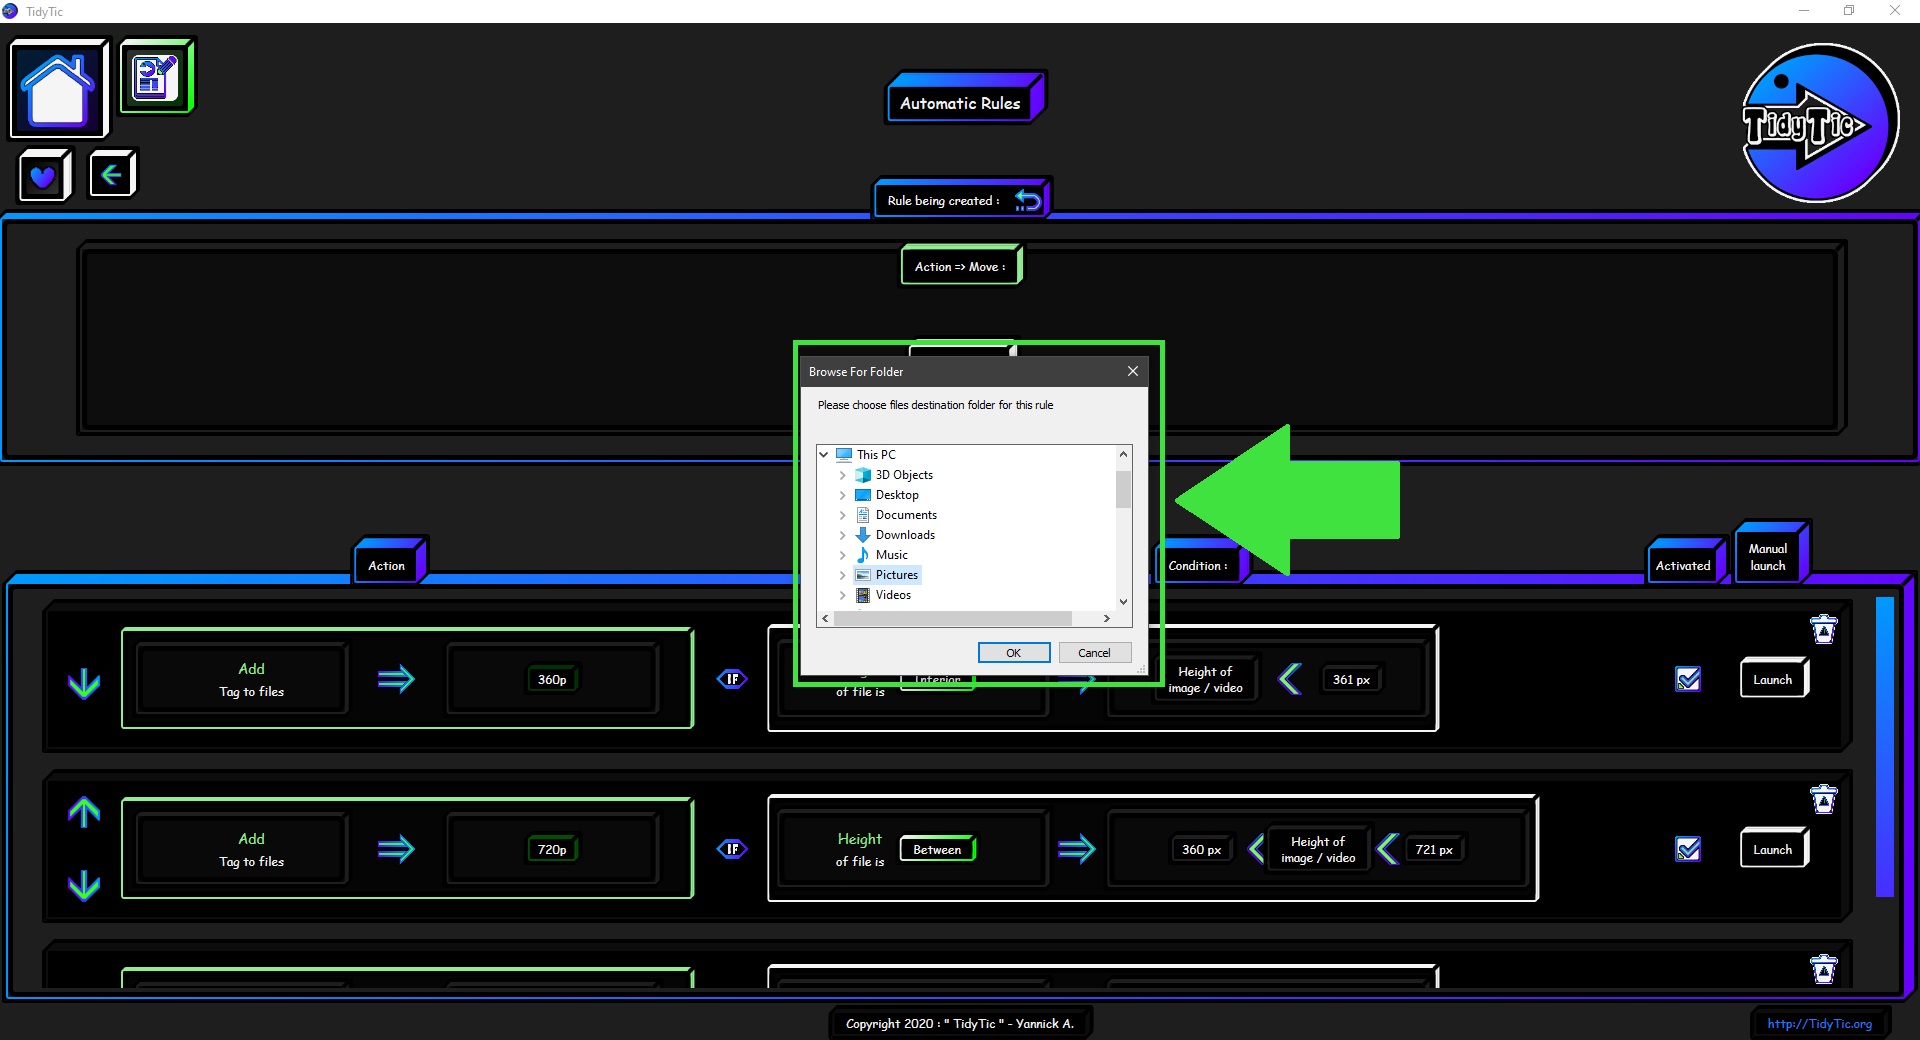
You will find a button for this purpose which will open a window allowing to choose in which folder you want to move the file.
However, you can only choose a folder that is part of the list of monitored folders or one of its subfolders.
 ____
____  ____
____ 
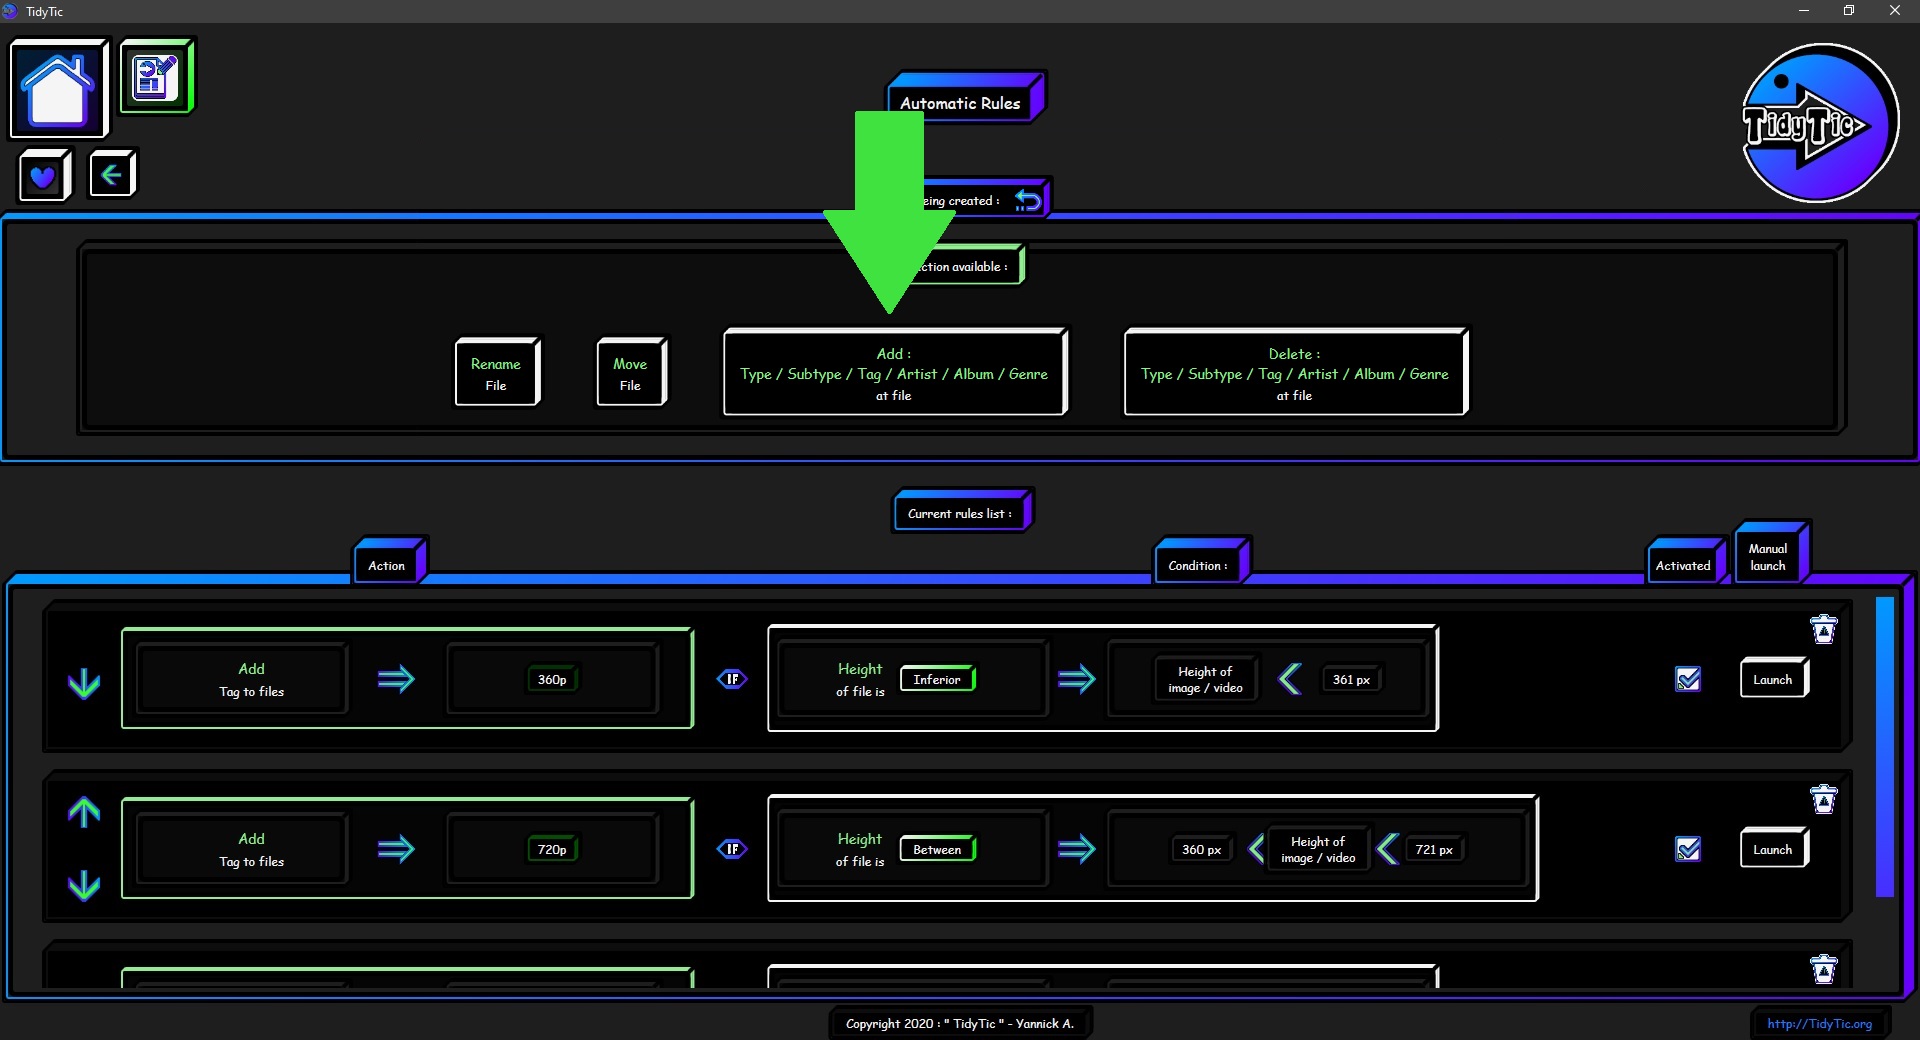
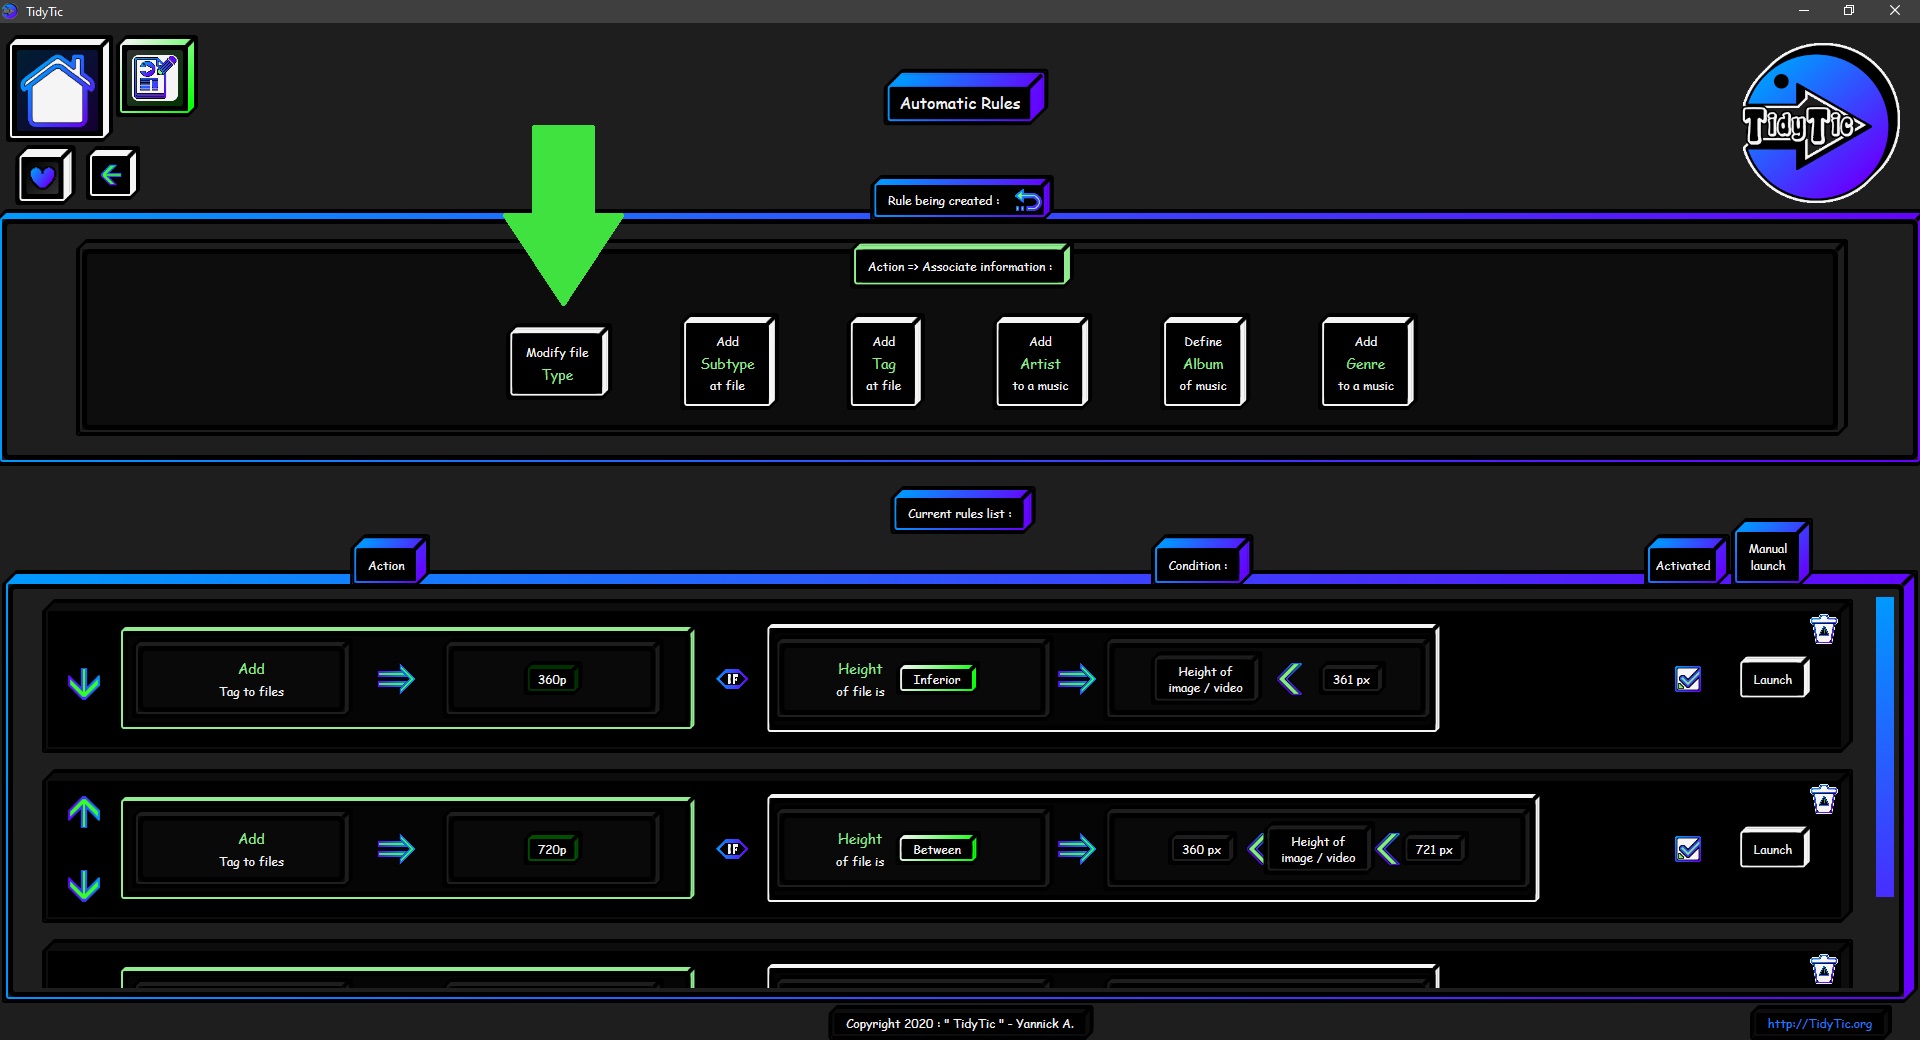
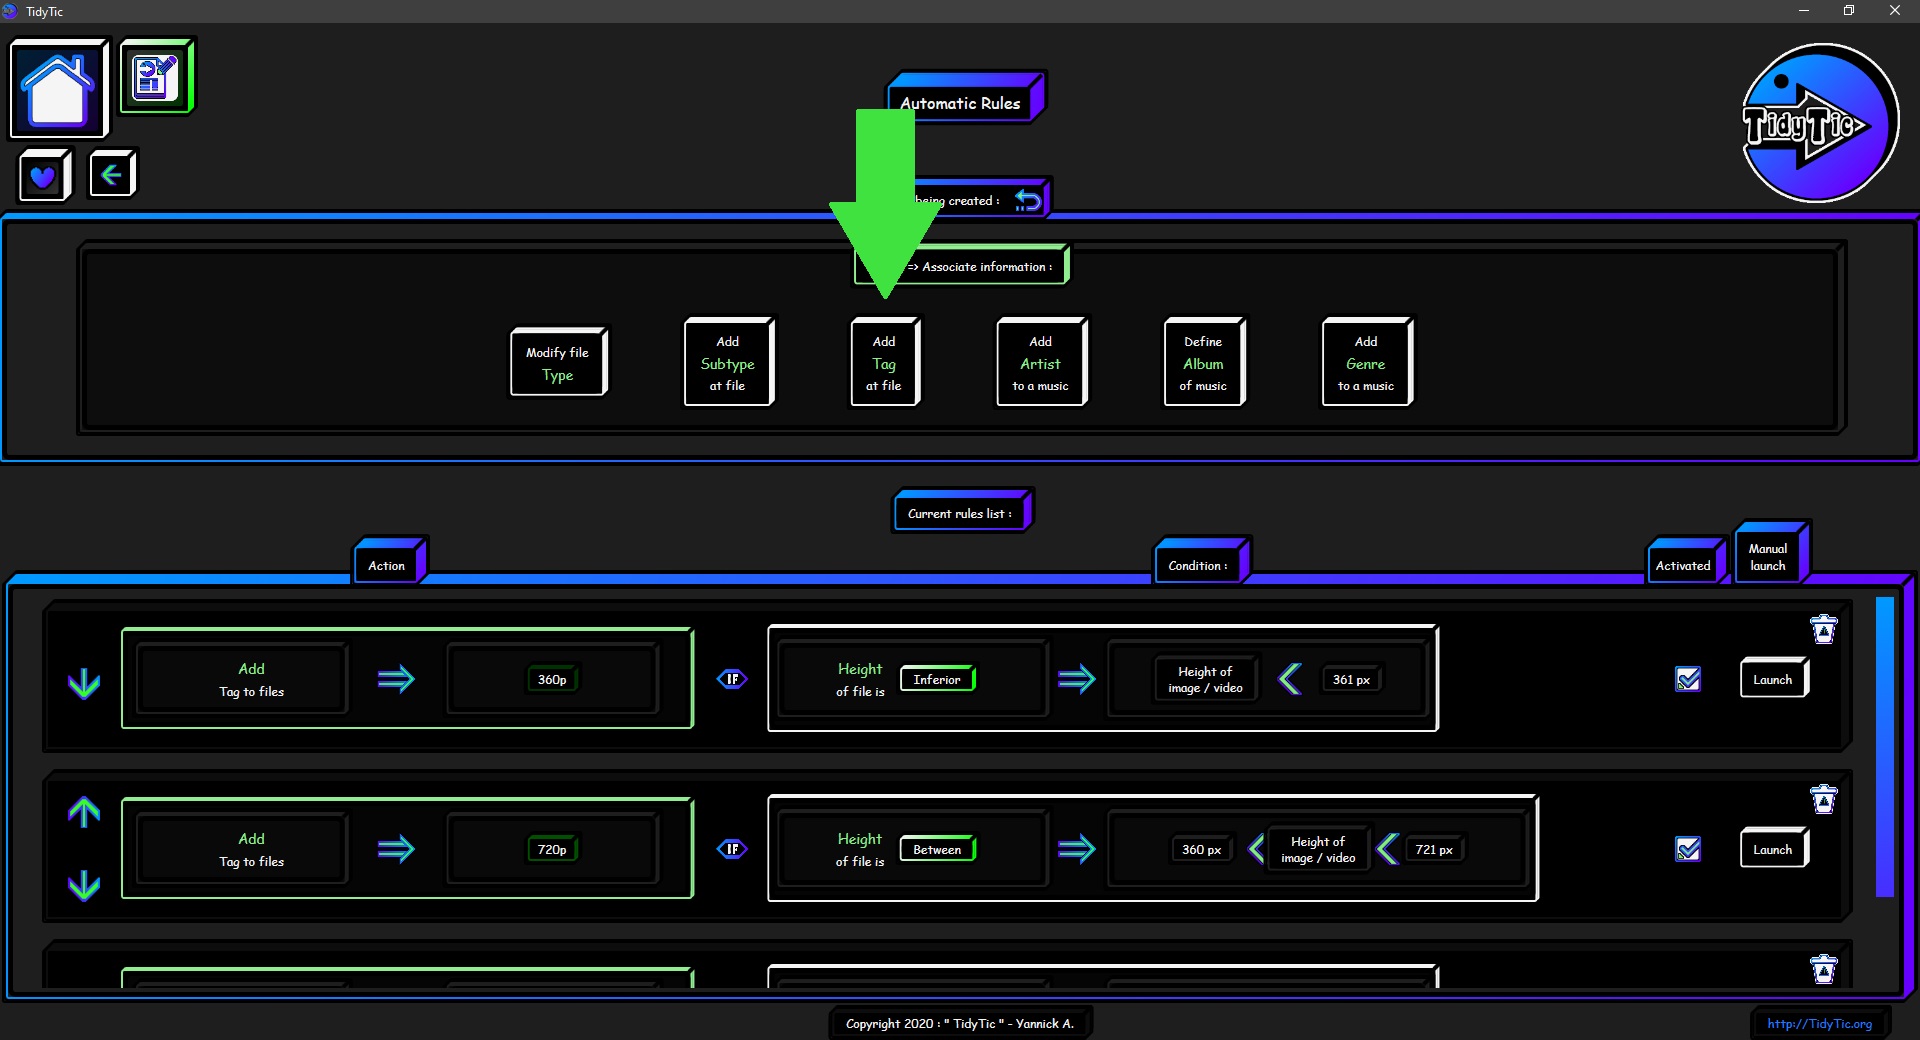
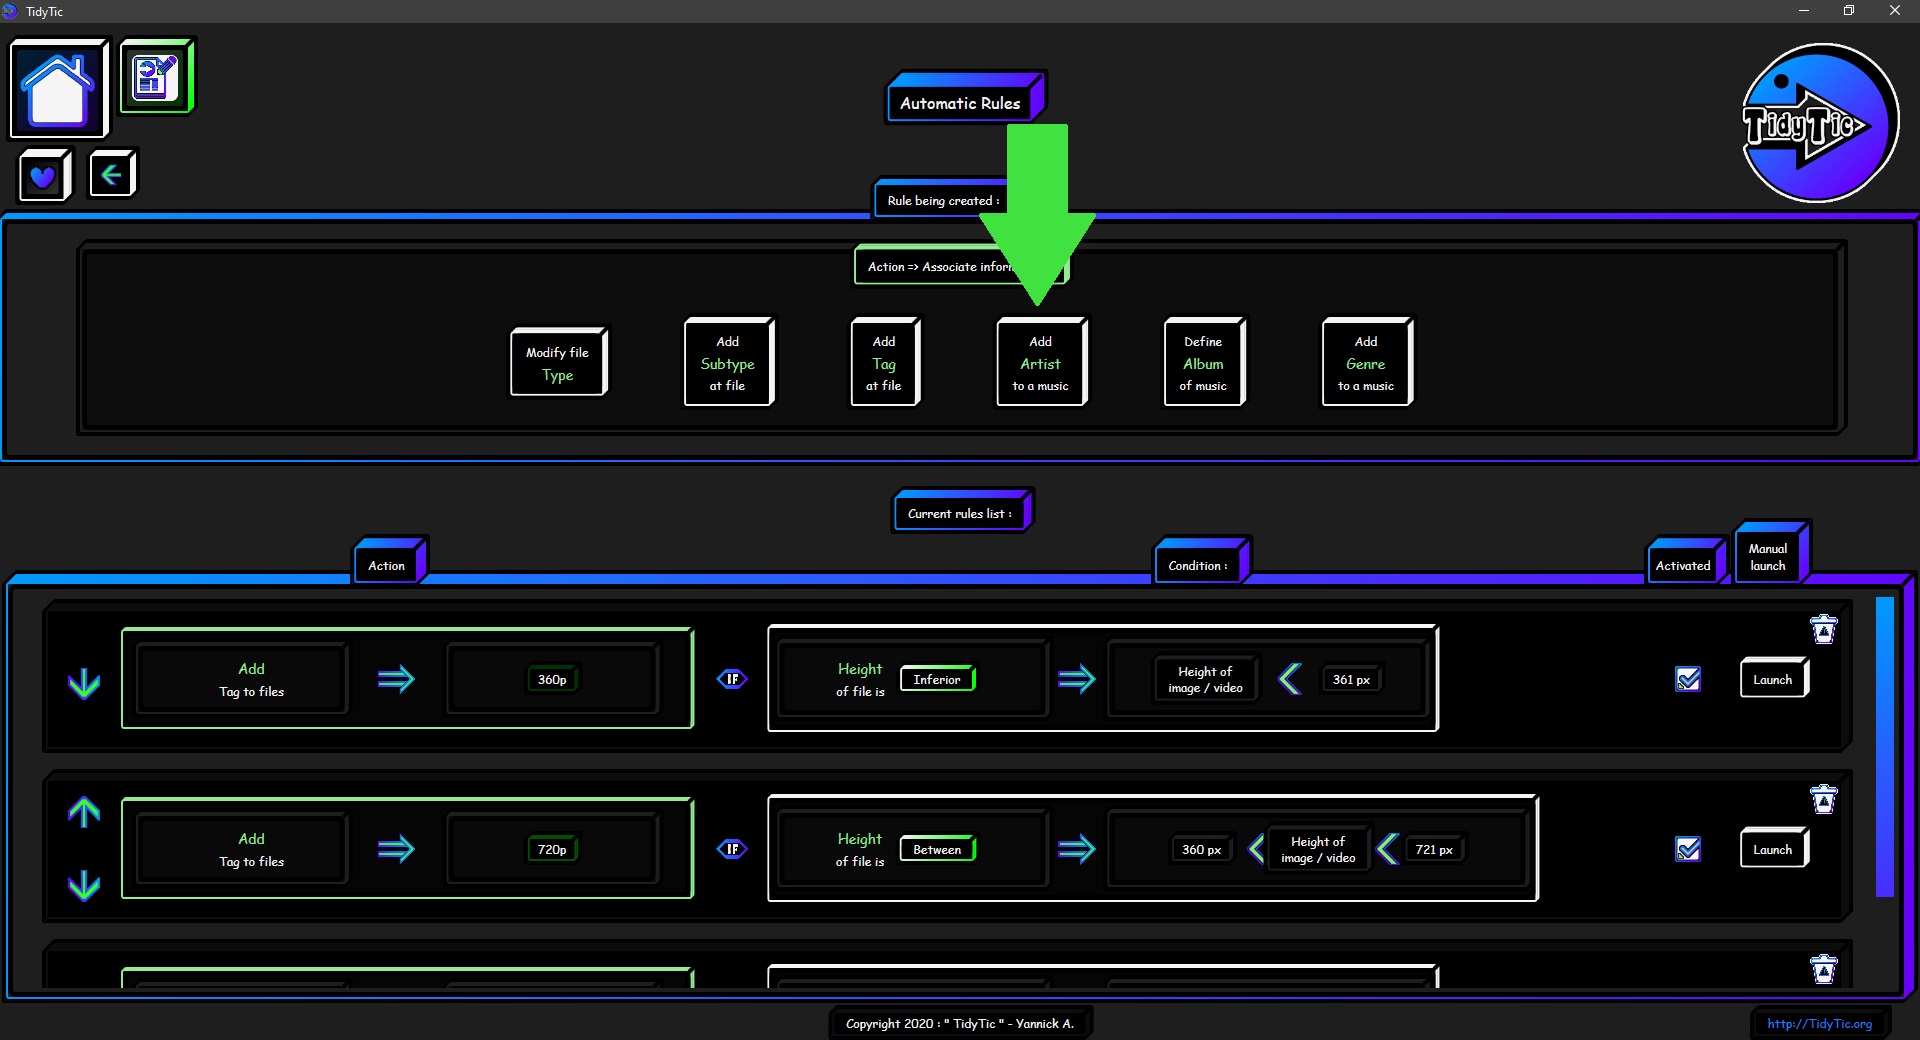
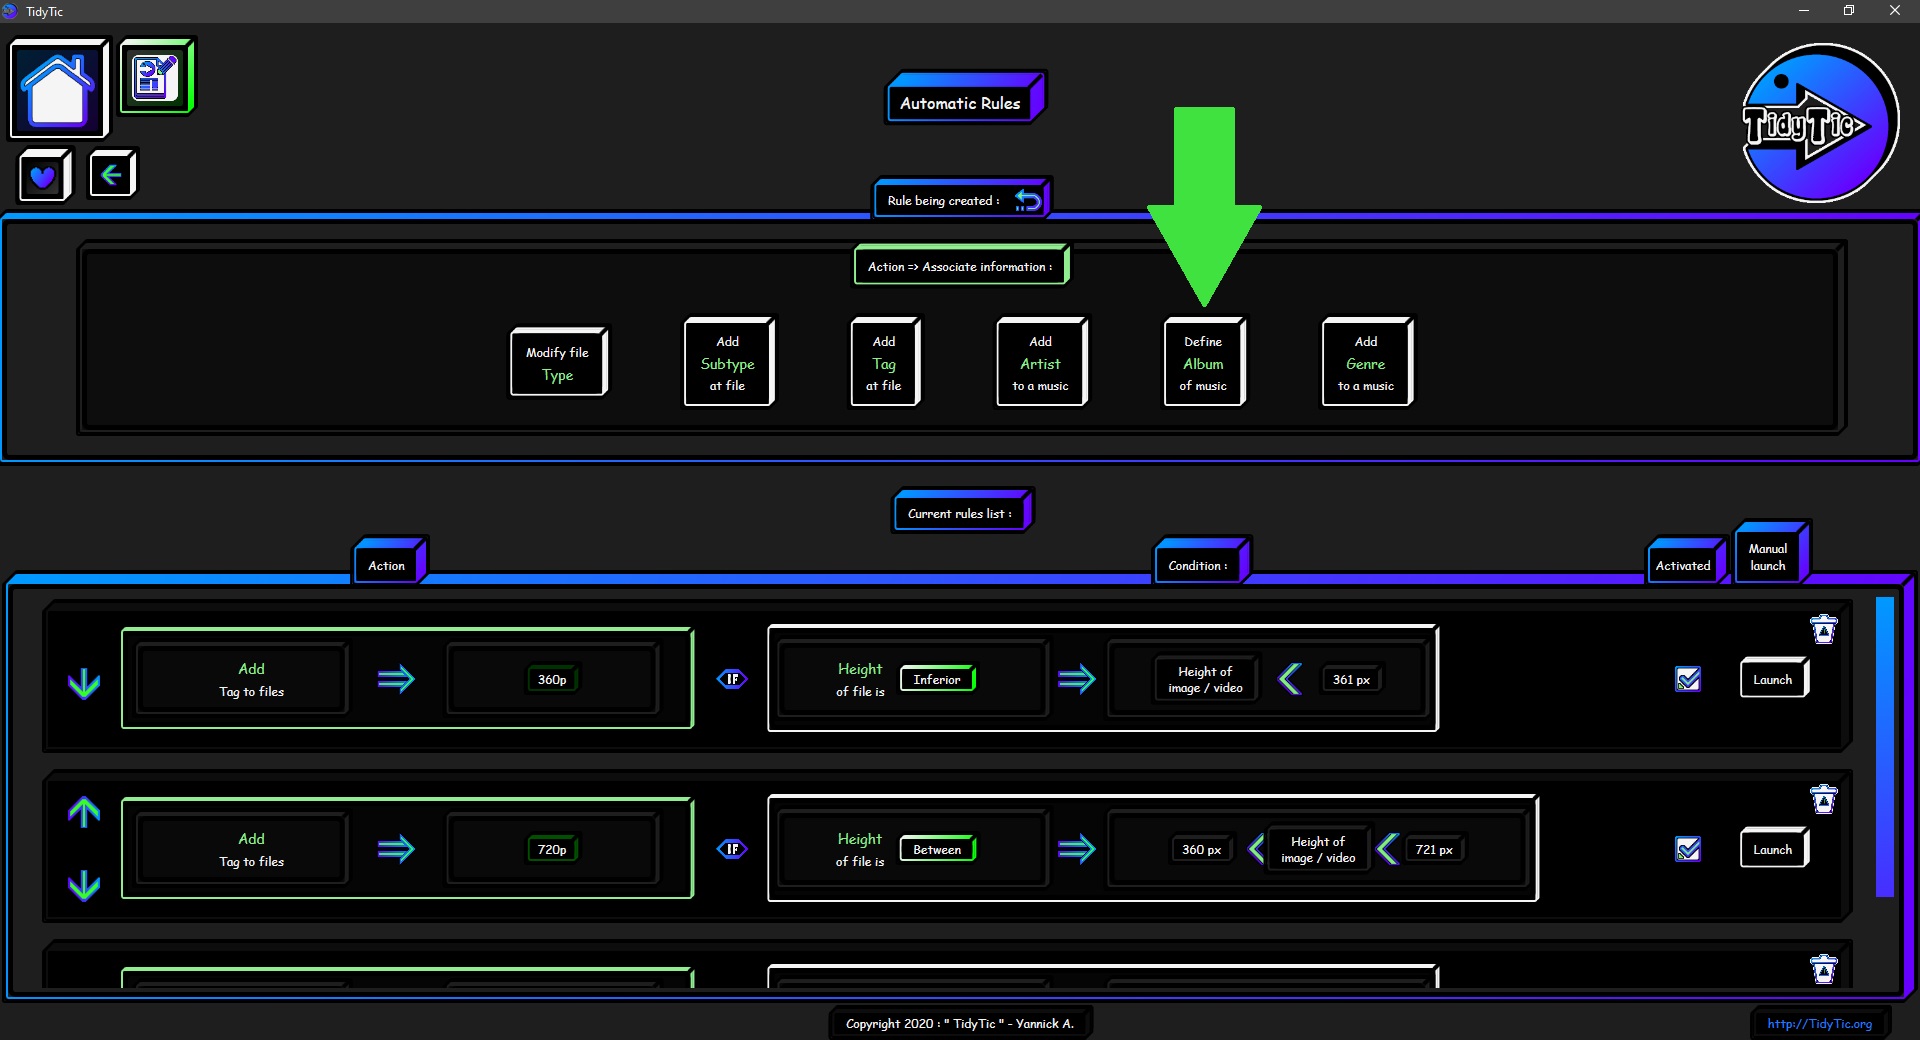
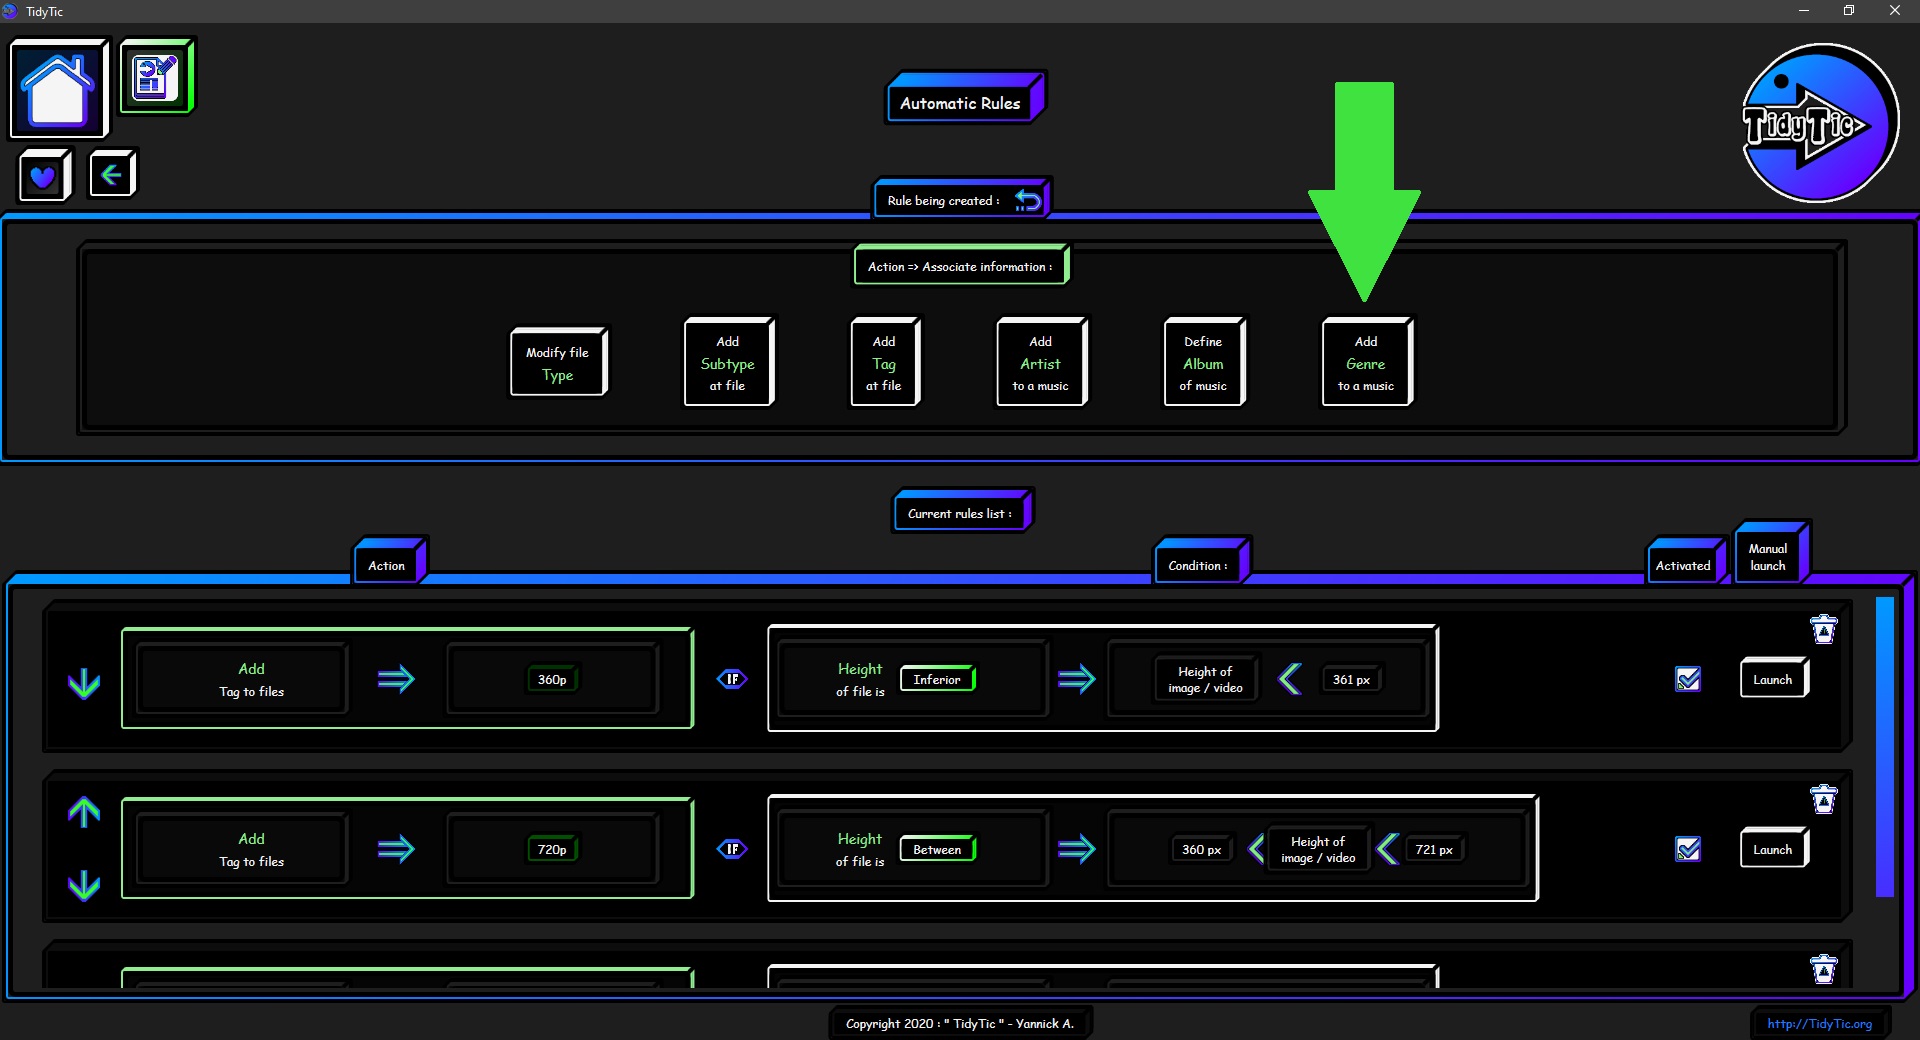
Action: "Add : Type / Subtype / Tag / Artist / Album / Genre to files" :
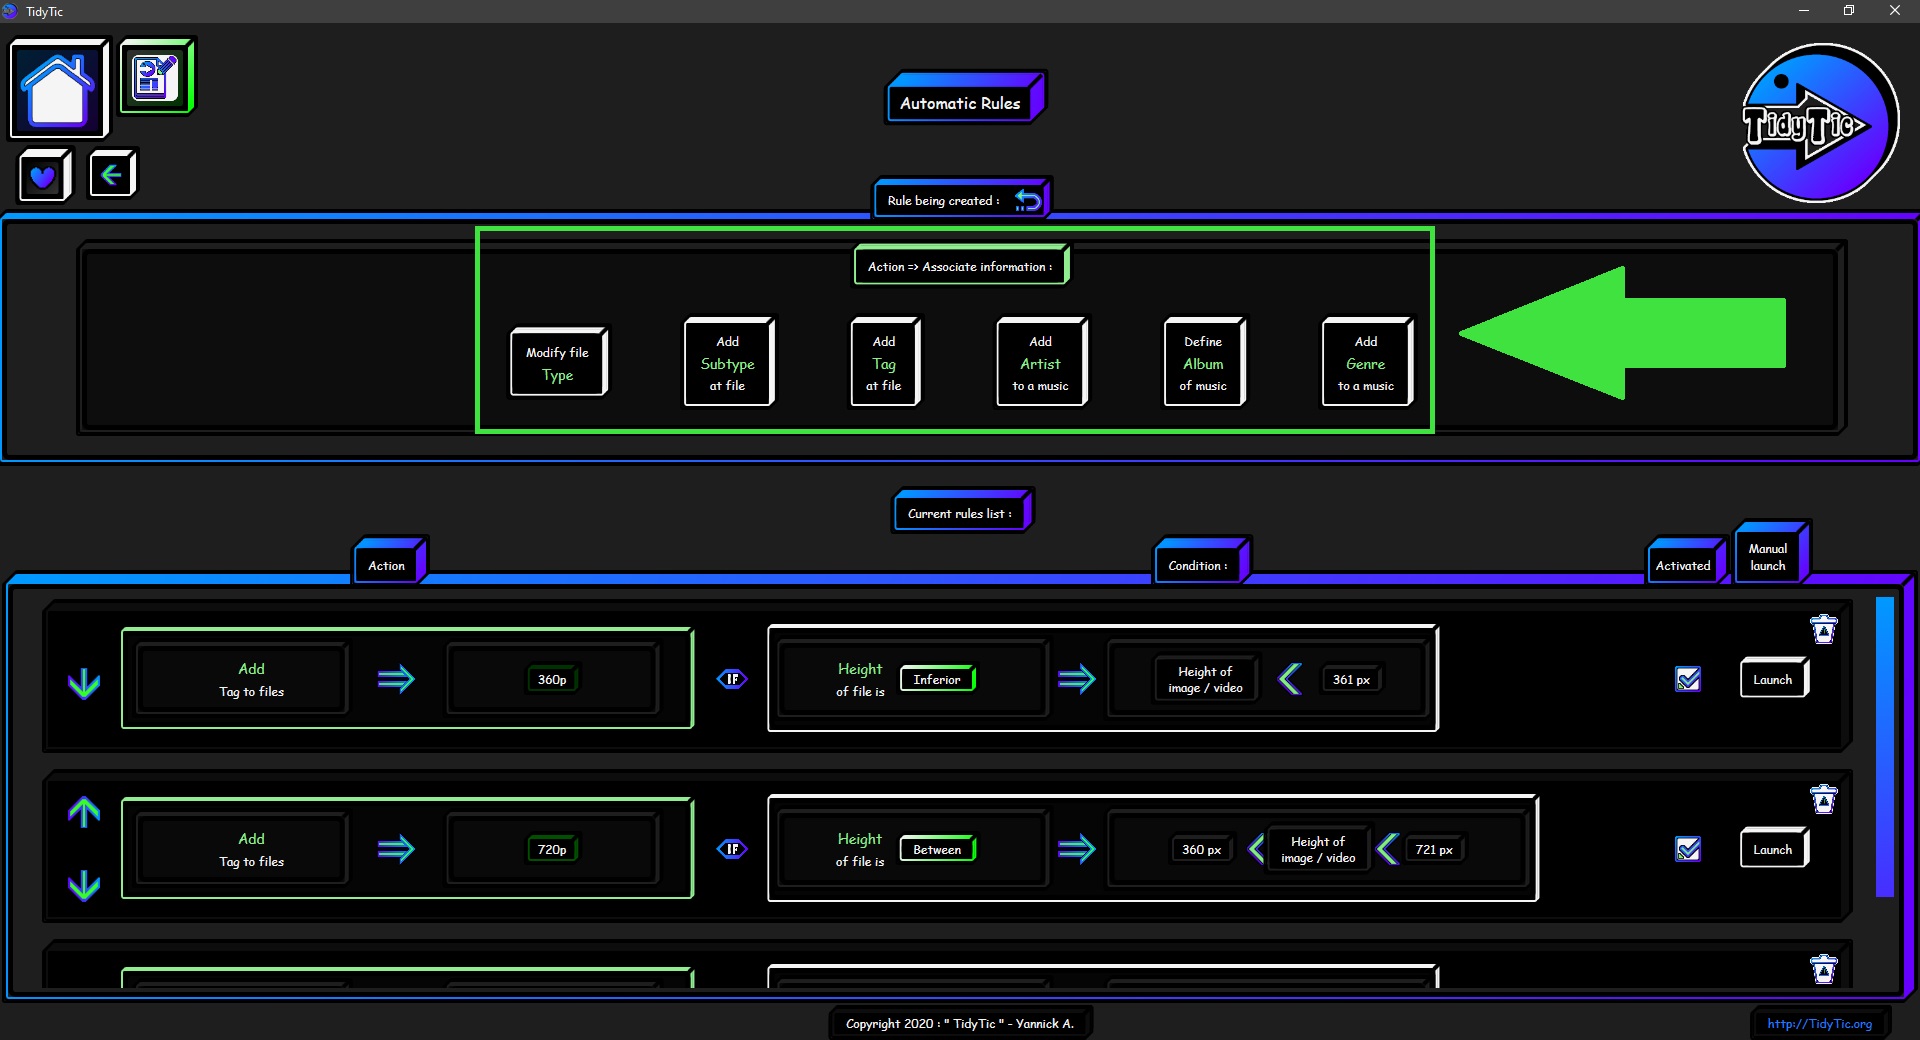
This action leaves you 6 options that will allow you to associate or update the information in your files :
- Change the file type.
- Add a subtype to the file.
- Add a tag to the file.
- Add an artist to music.
- Set album of an music.
- Add a genre to music.
 ____
____ 
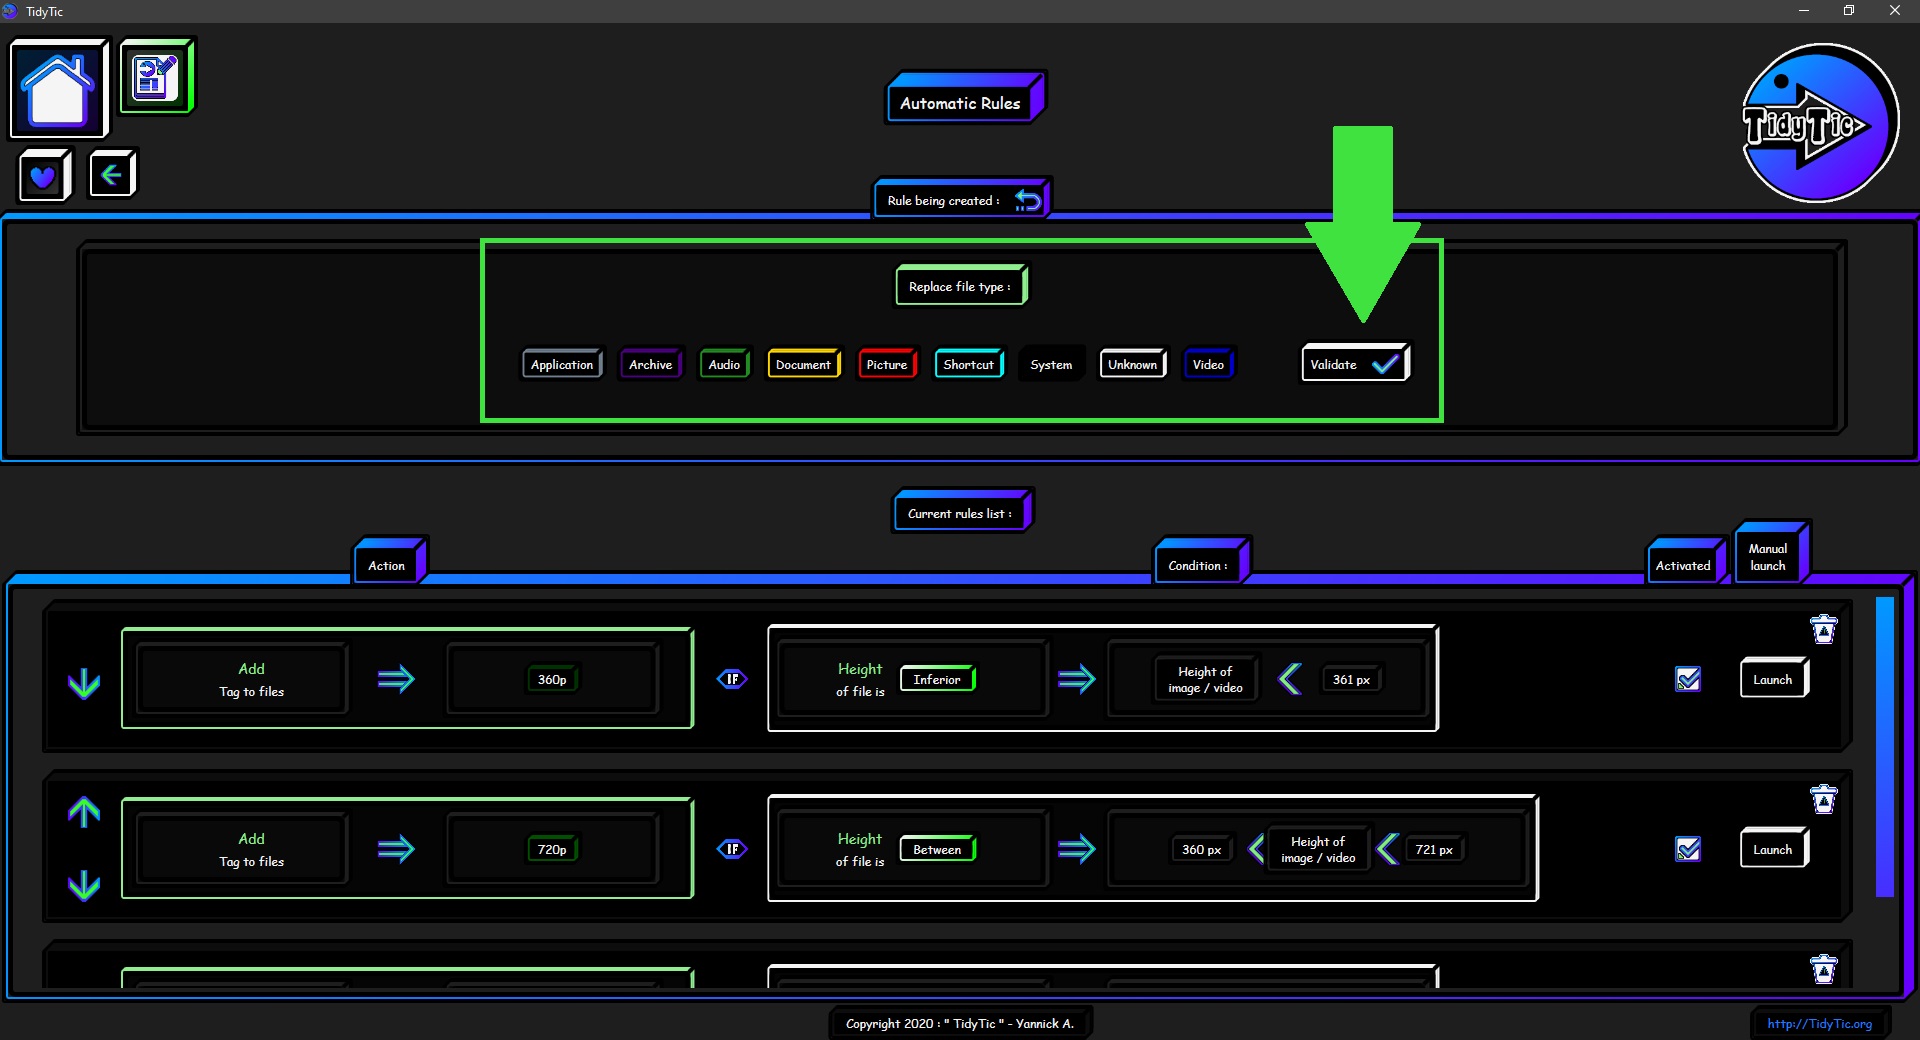
The "Edit file type" option :
This option is very simple, just select the new type that will be assigned to the file by this rule.
You will have the list of all types known by TidyTic.
When you select a type by clicking on it, its name changes to green.
All you have to do next is validate your choice.
 ____
____ 
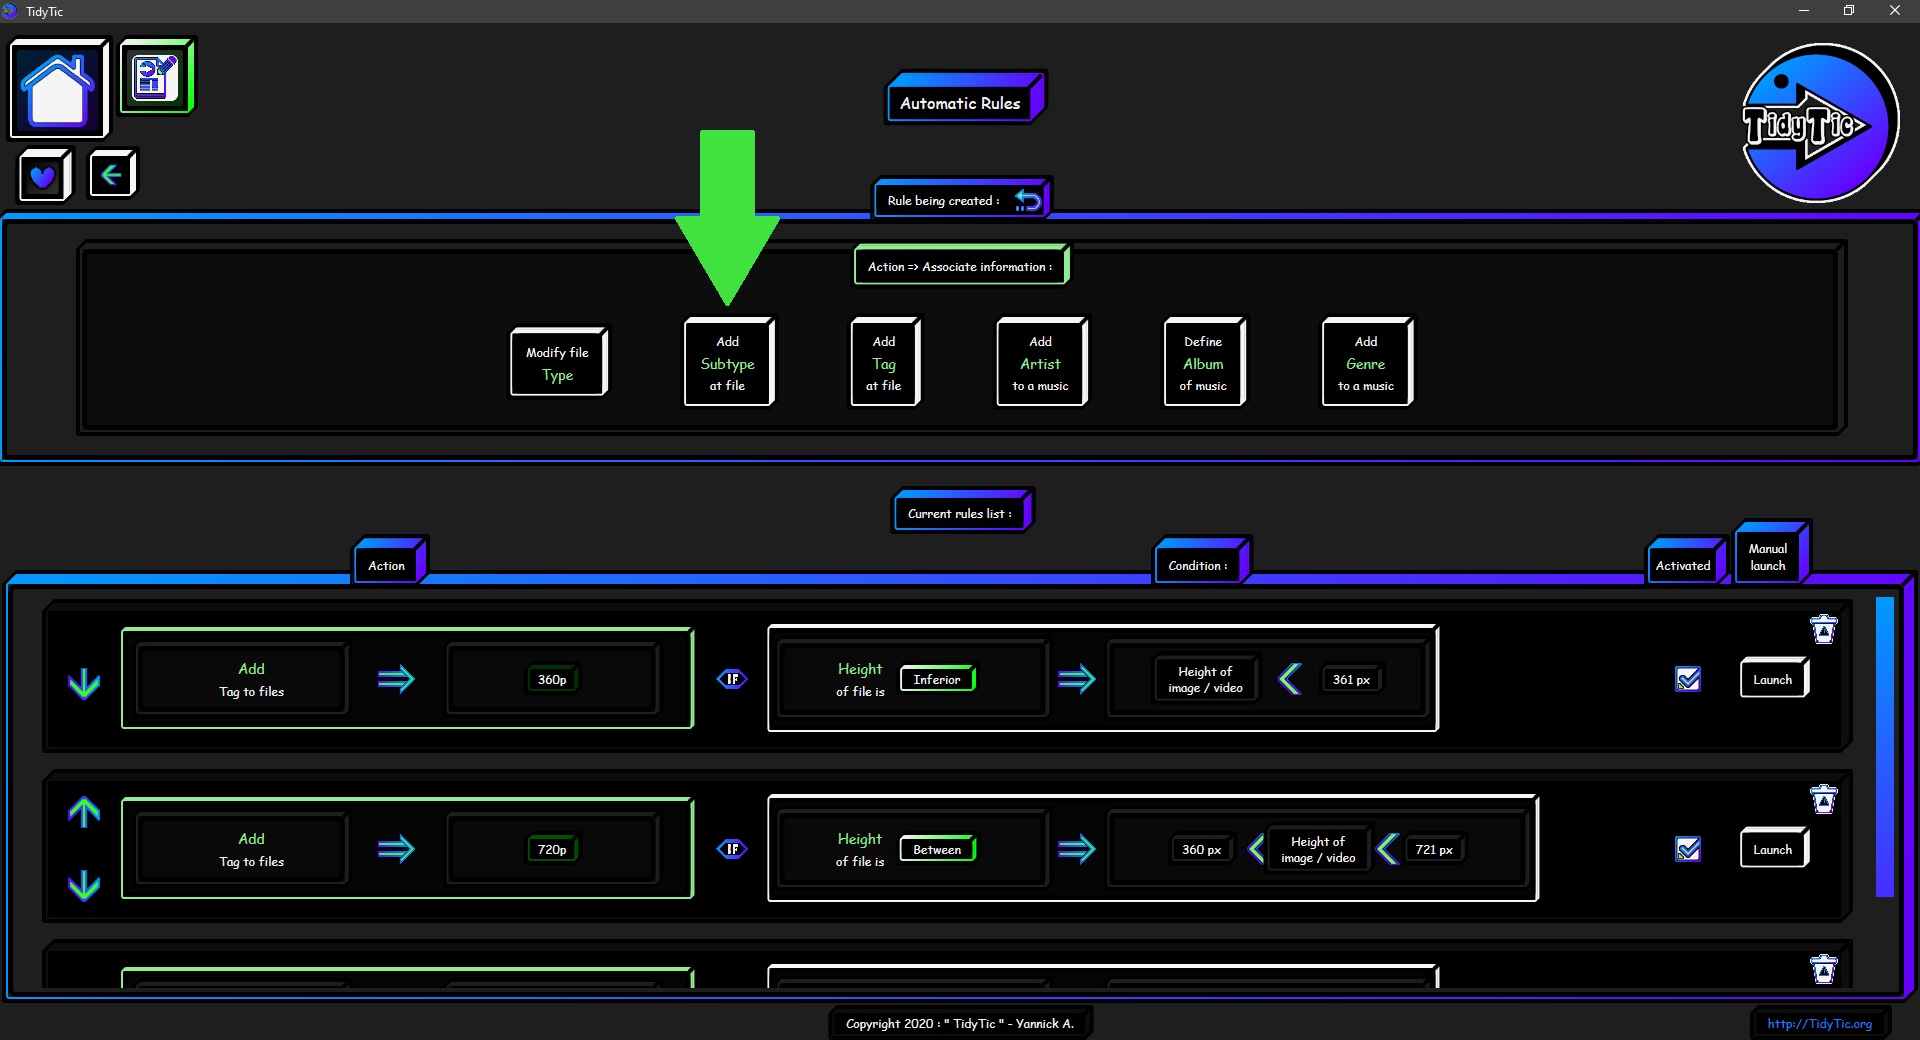
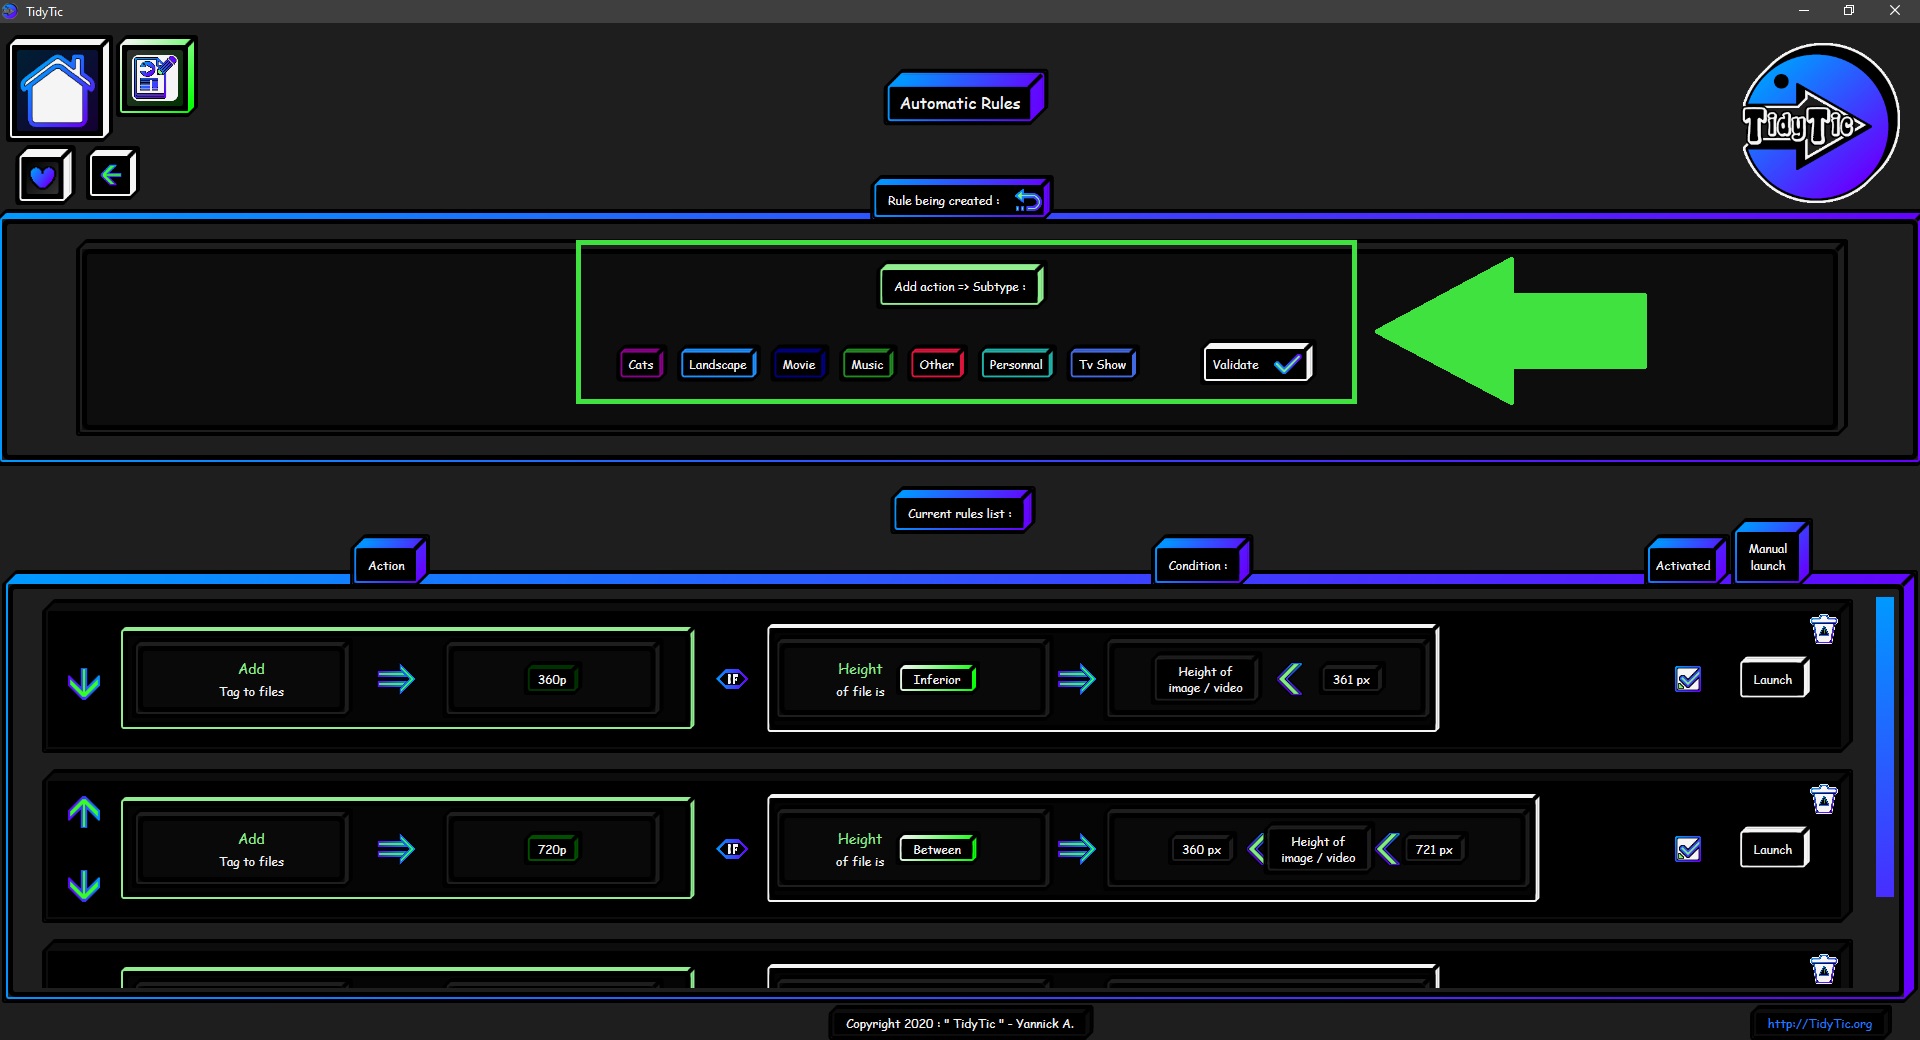
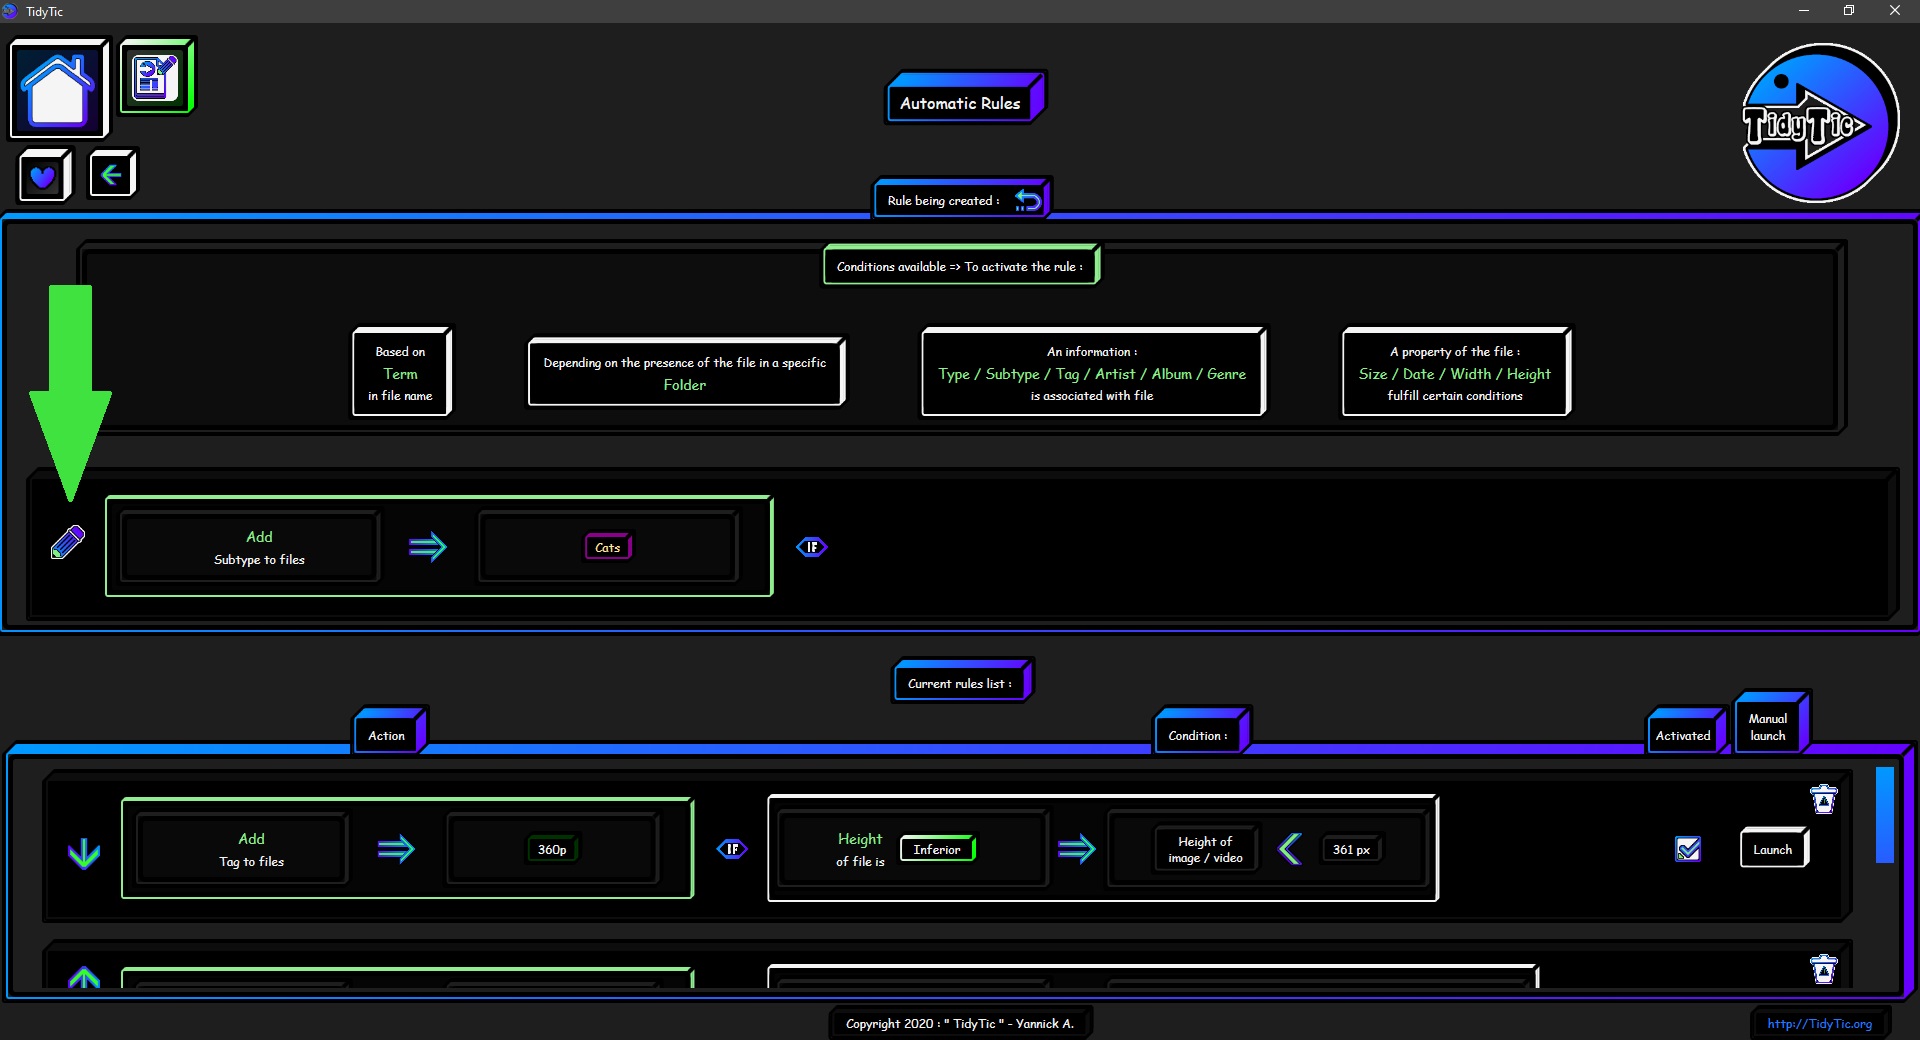
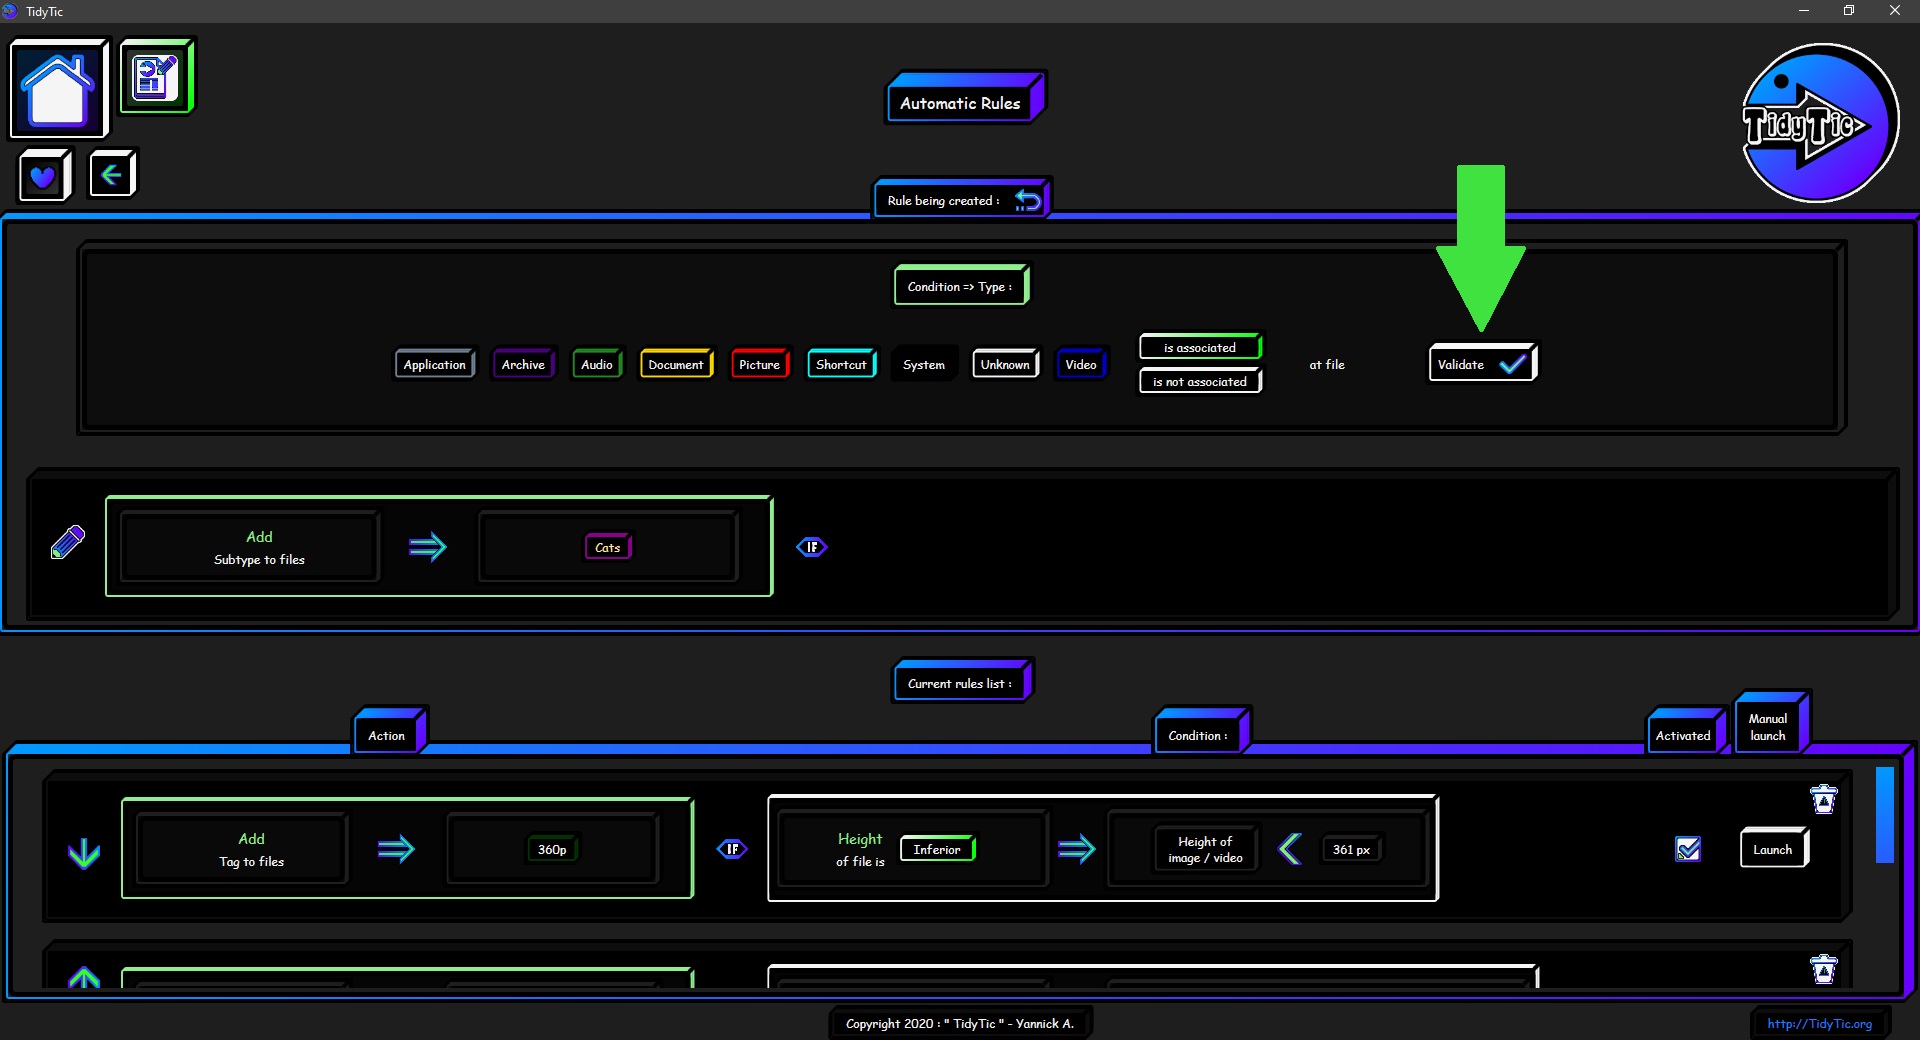
The "Add a subtype to the file" option :
In this option you just need to select the subtype that will be added to the files by this rule.
You will have the list of all subtype known by TidyTic.
When you select a subtype by clicking on it, its name changes to green.
All you have to do next is validate your choice.
 ____
____ 
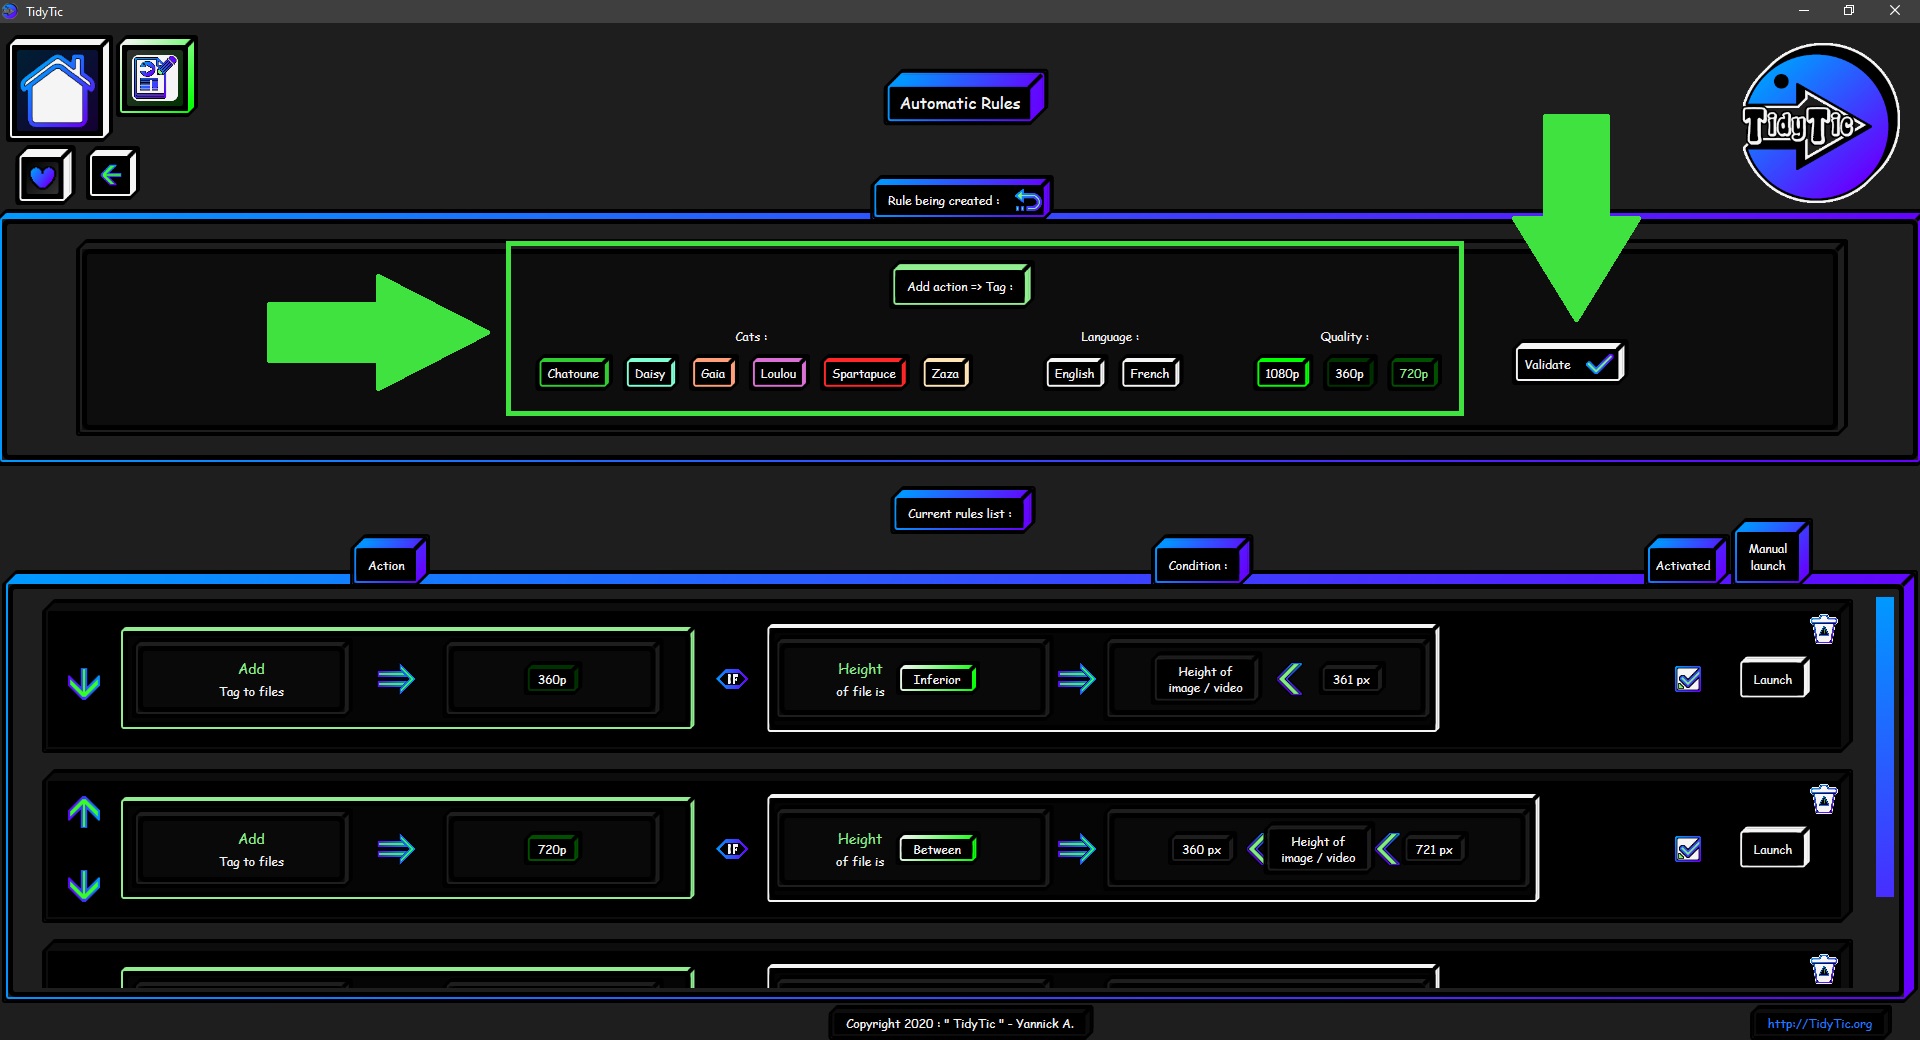
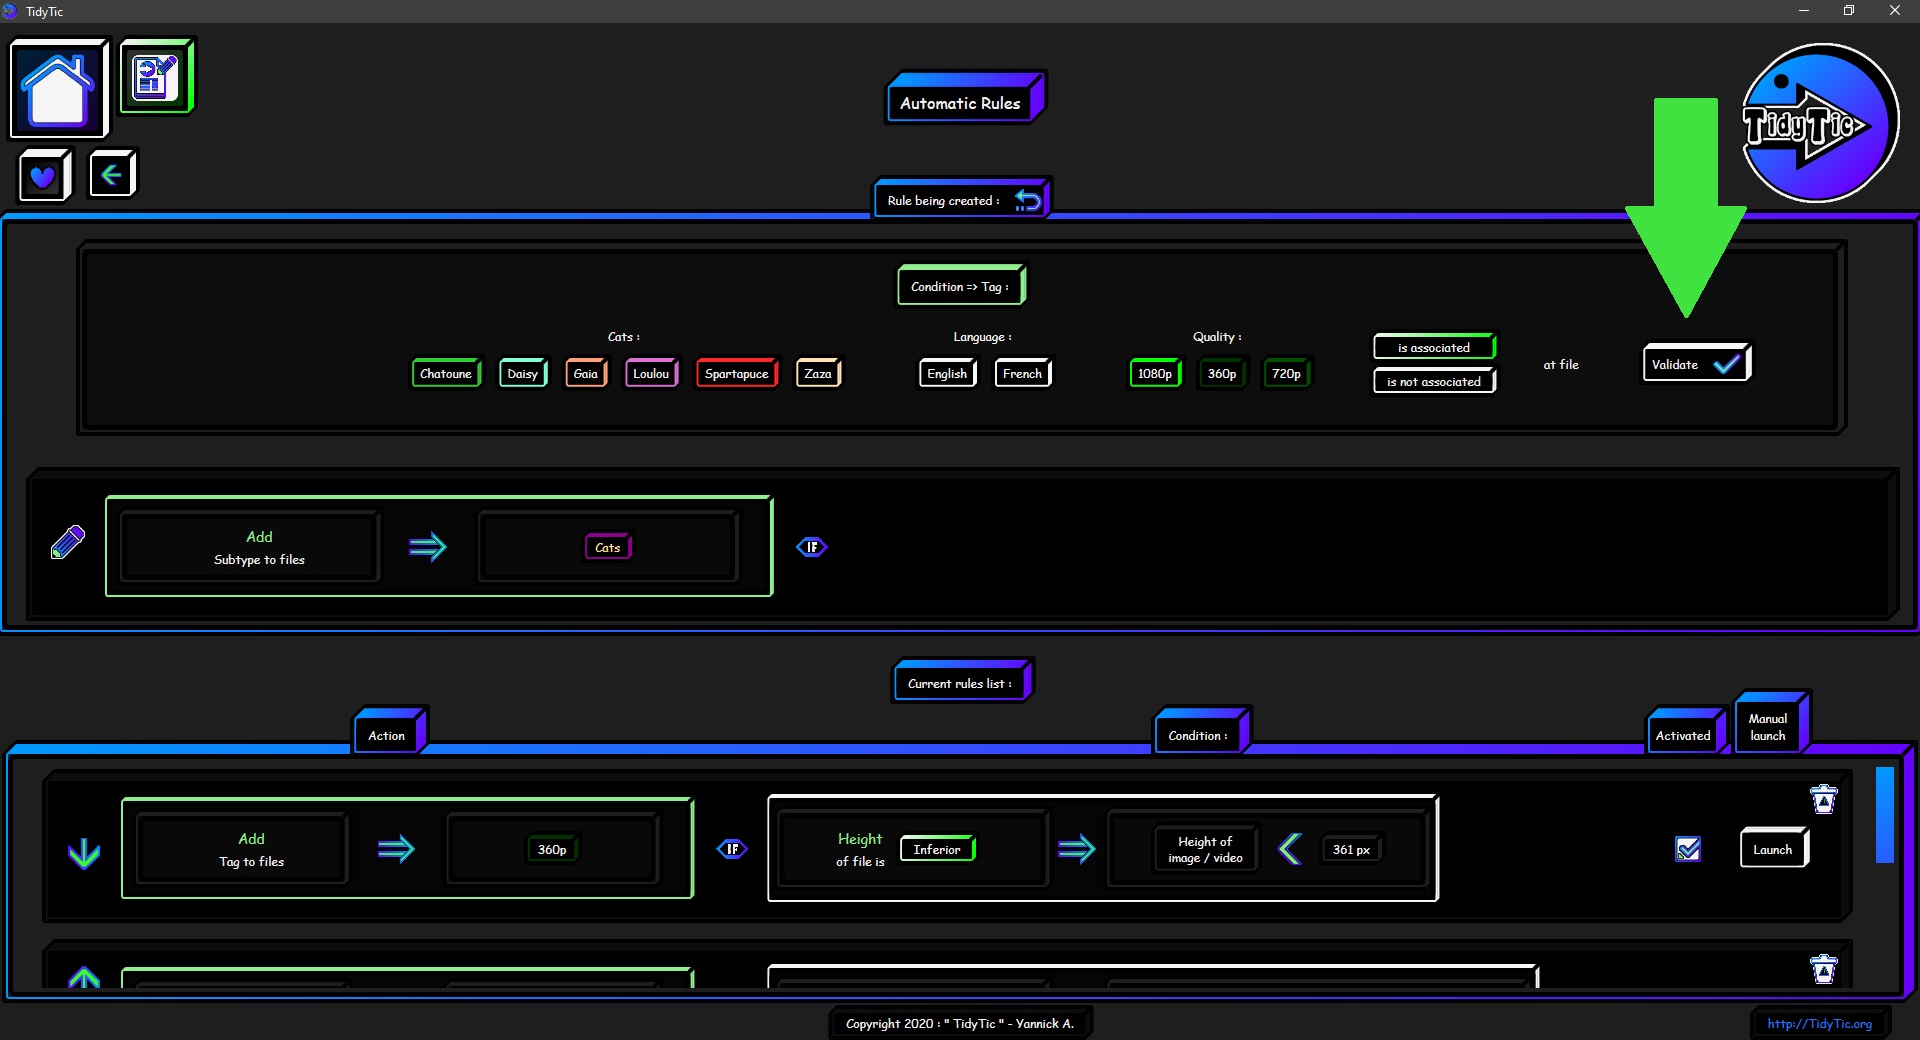
The "Add a tag to the file" option :
In this option you just need to select the tag that will be added to the files by this rule.
You will have the list of all tag known by TidyTic.
When you select a tag by clicking on it, its name changes to green.
All you have to do next is validate your choice.
 ____
____ 
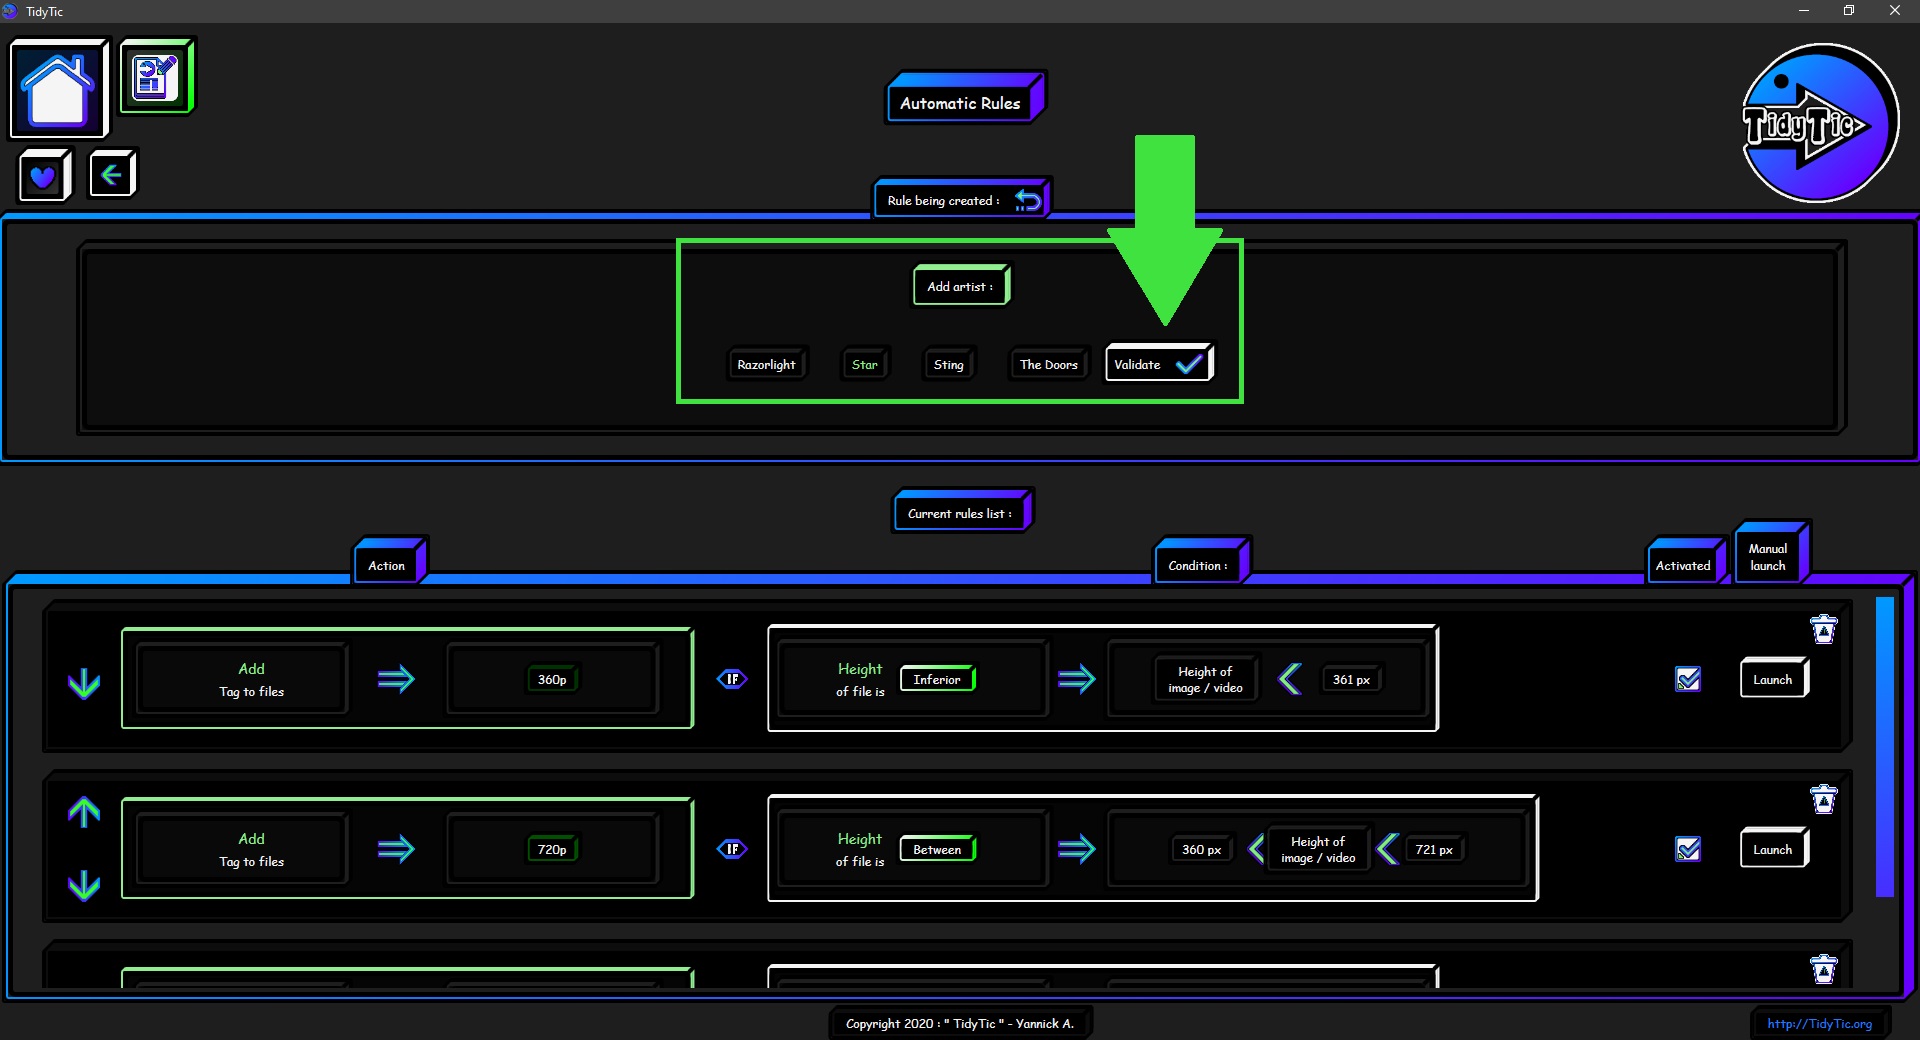
The "Add a artist to the file" option :
In this option you just need to select the artist that will be added to the files by this rule.
You will have the list of all artist known by TidyTic.
When you select a artist by clicking on it, its name changes to green.
All you have to do next is validate your choice.
 ____
____ 
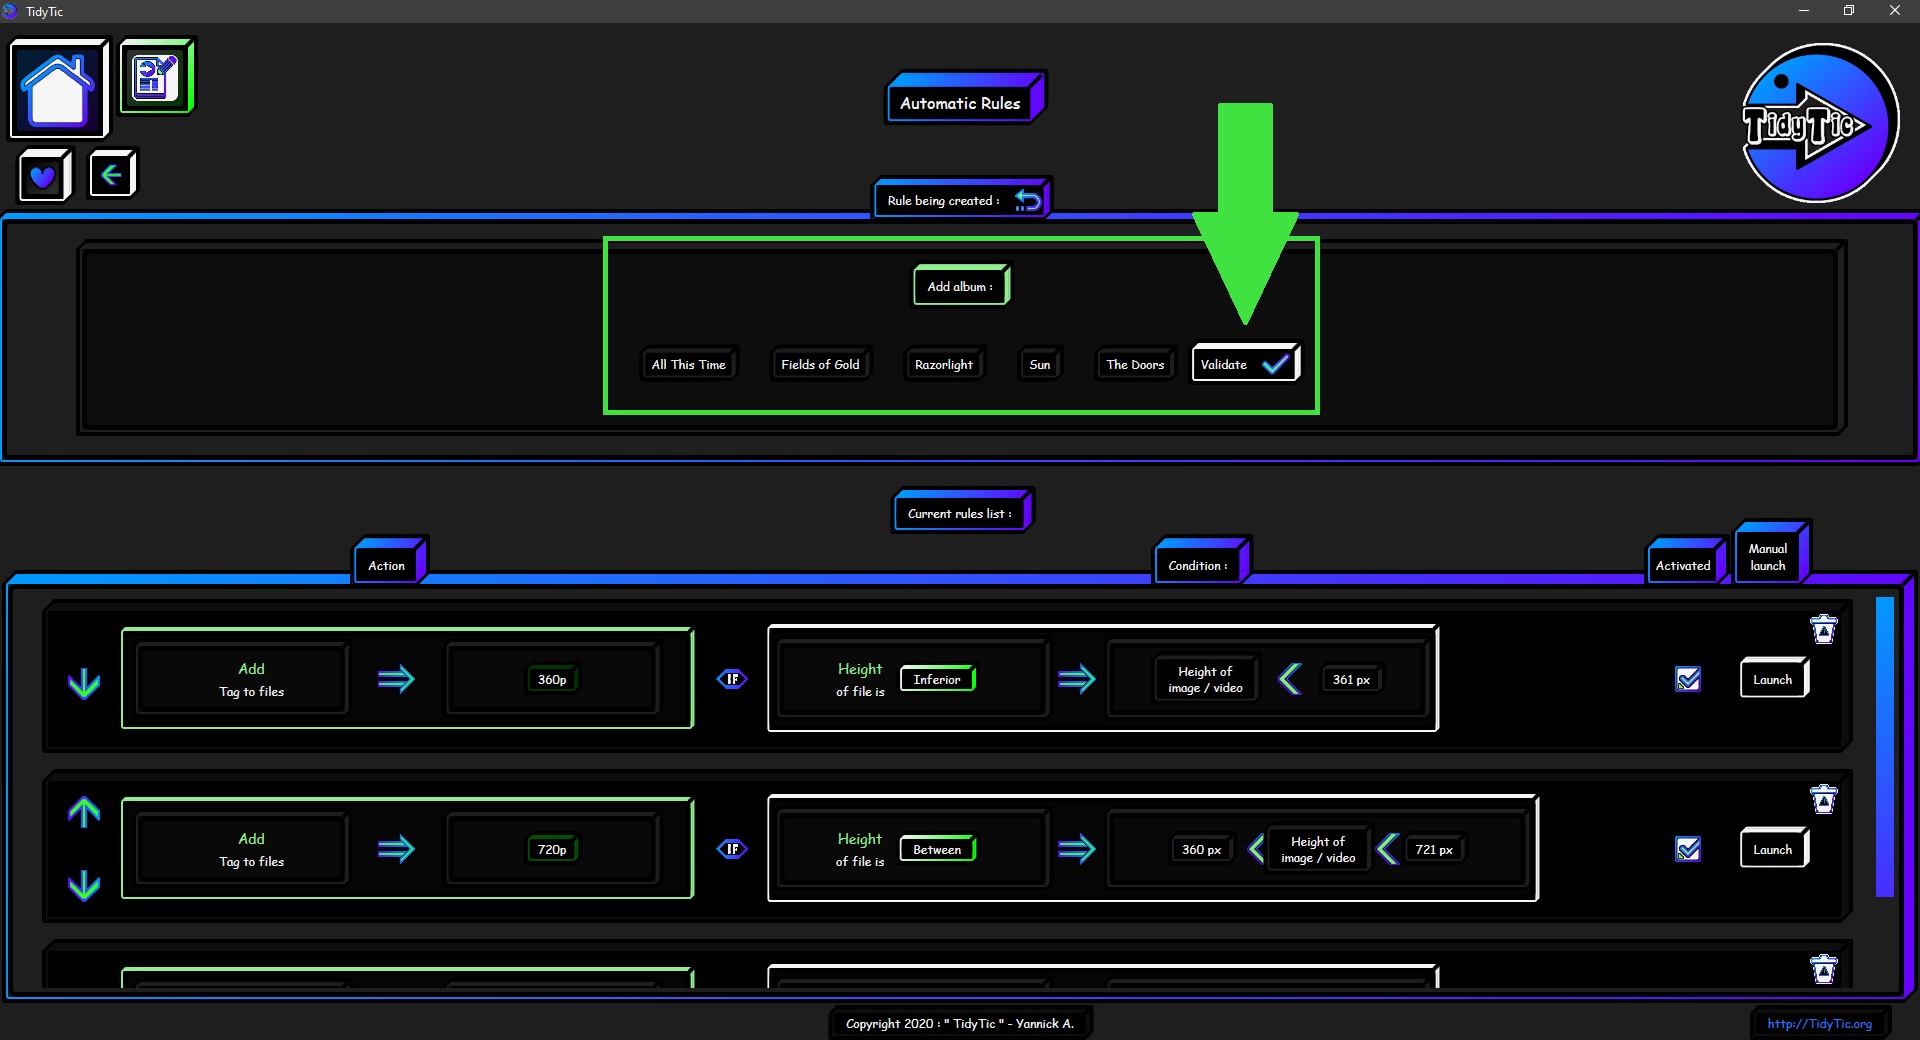
The "Add a album to the file" option :
In this option you just need to select the album that will be added to the files by this rule.
You will have the list of all album known by TidyTic.
When you select a album by clicking on it, its name changes to green.
All you have to do next is validate your choice.
 ____
____ 
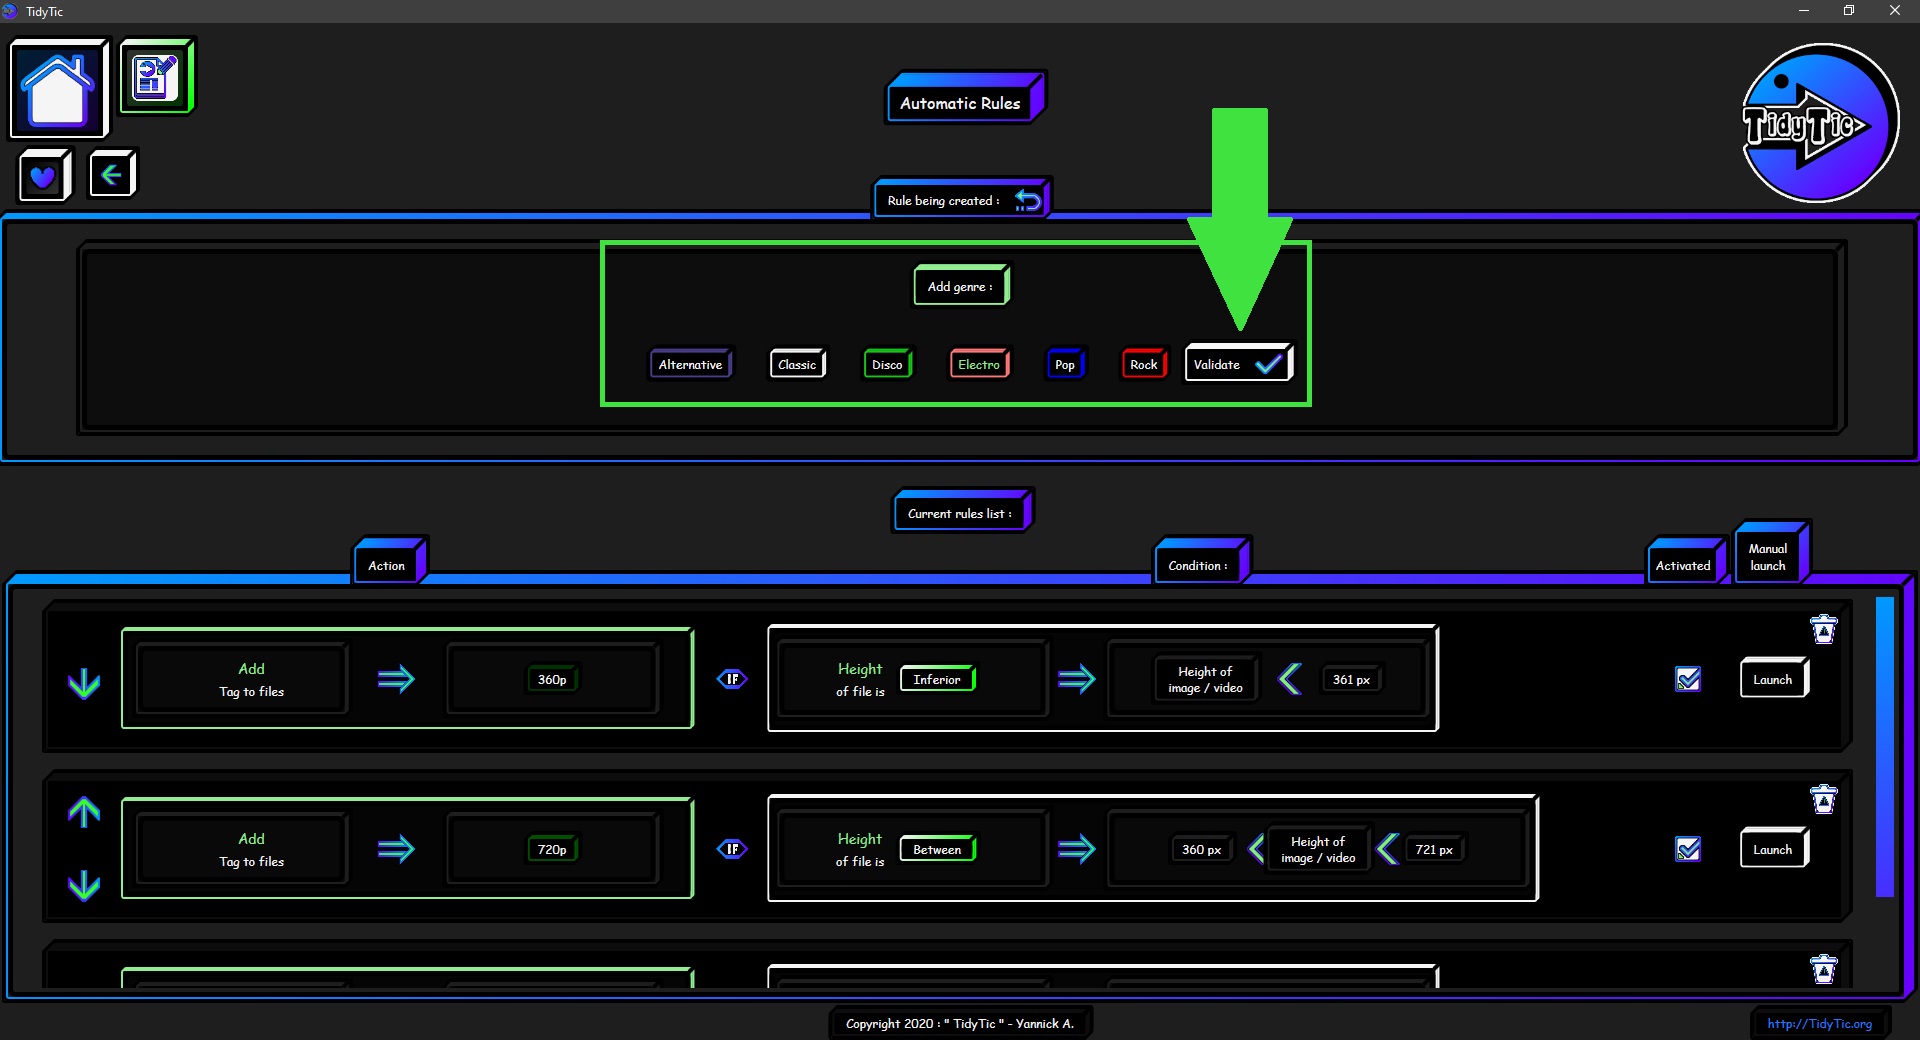
The "Add a genre to the file" option :
In this option you just need to select the genre that will be added to the files by this rule.
You will have the list of all genre known by TidyTic.
When you select a genre by clicking on it, its name changes to green.
All you have to do next is validate your choice.
 ____
____ 
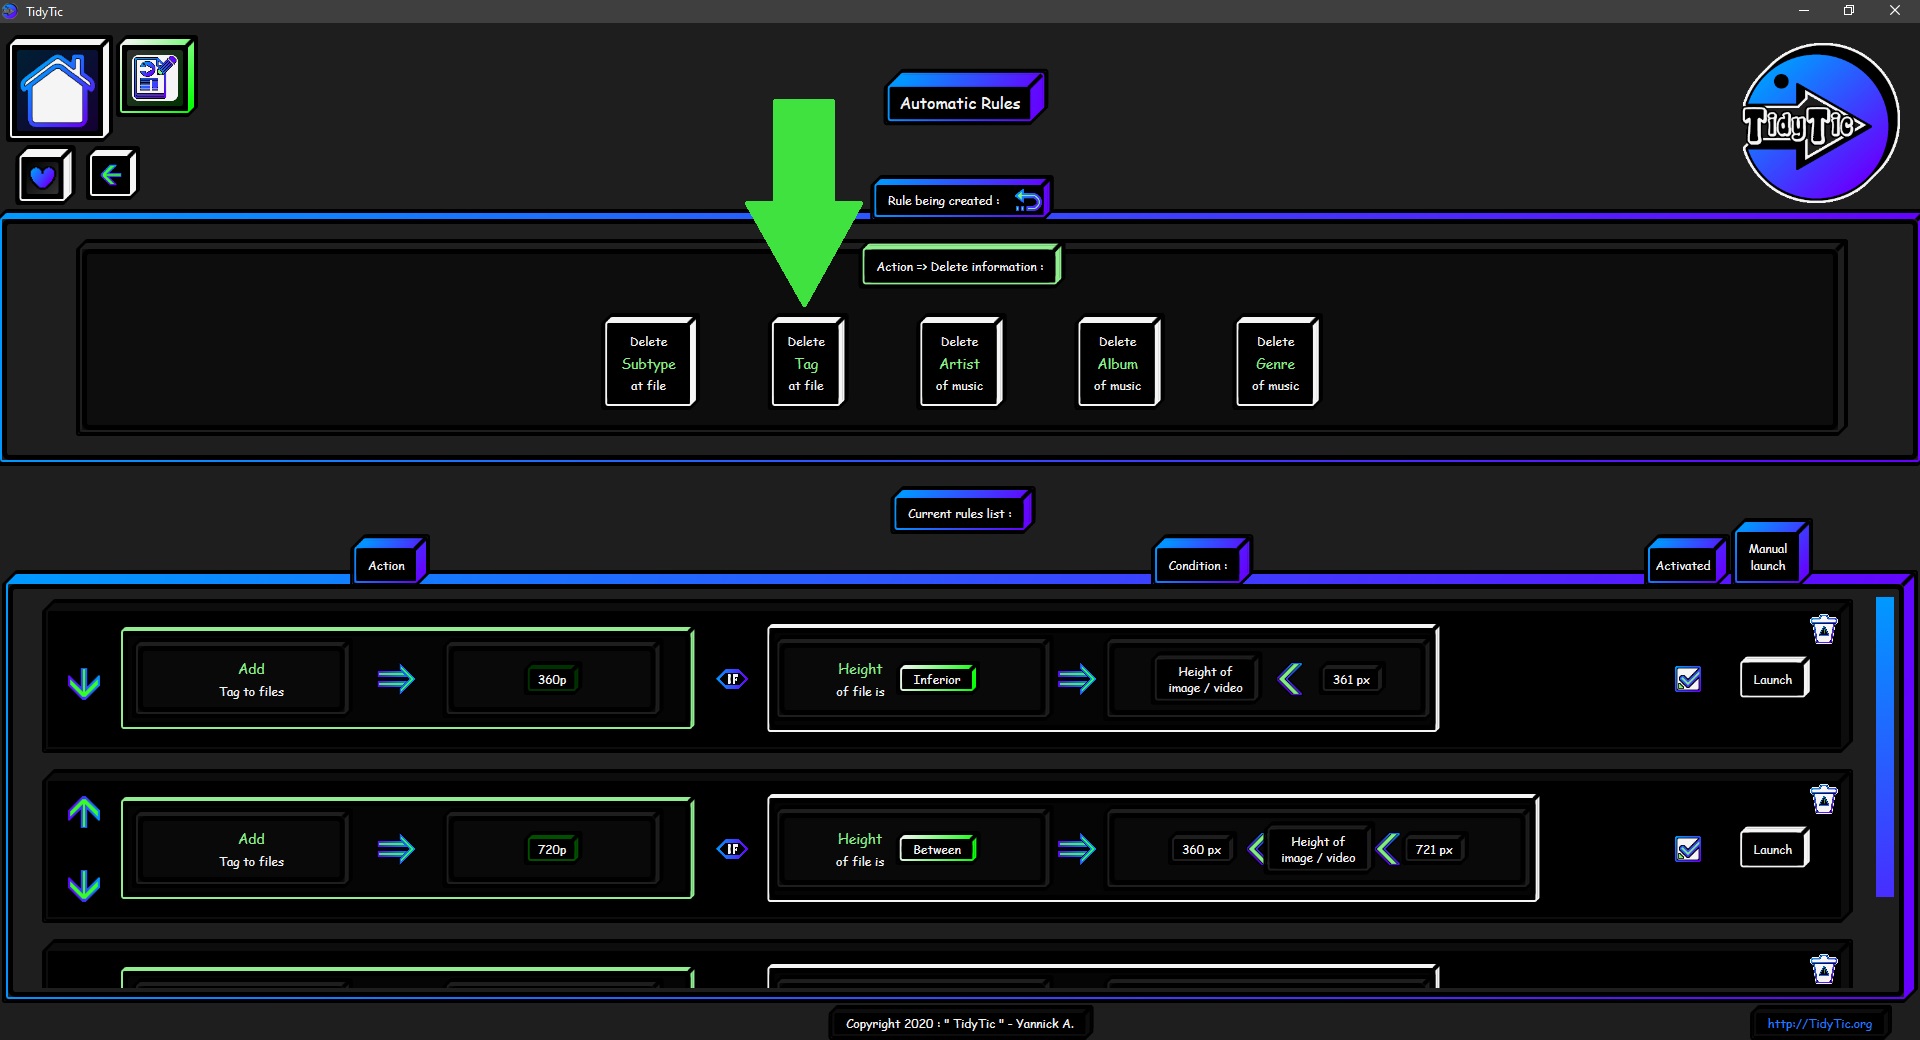
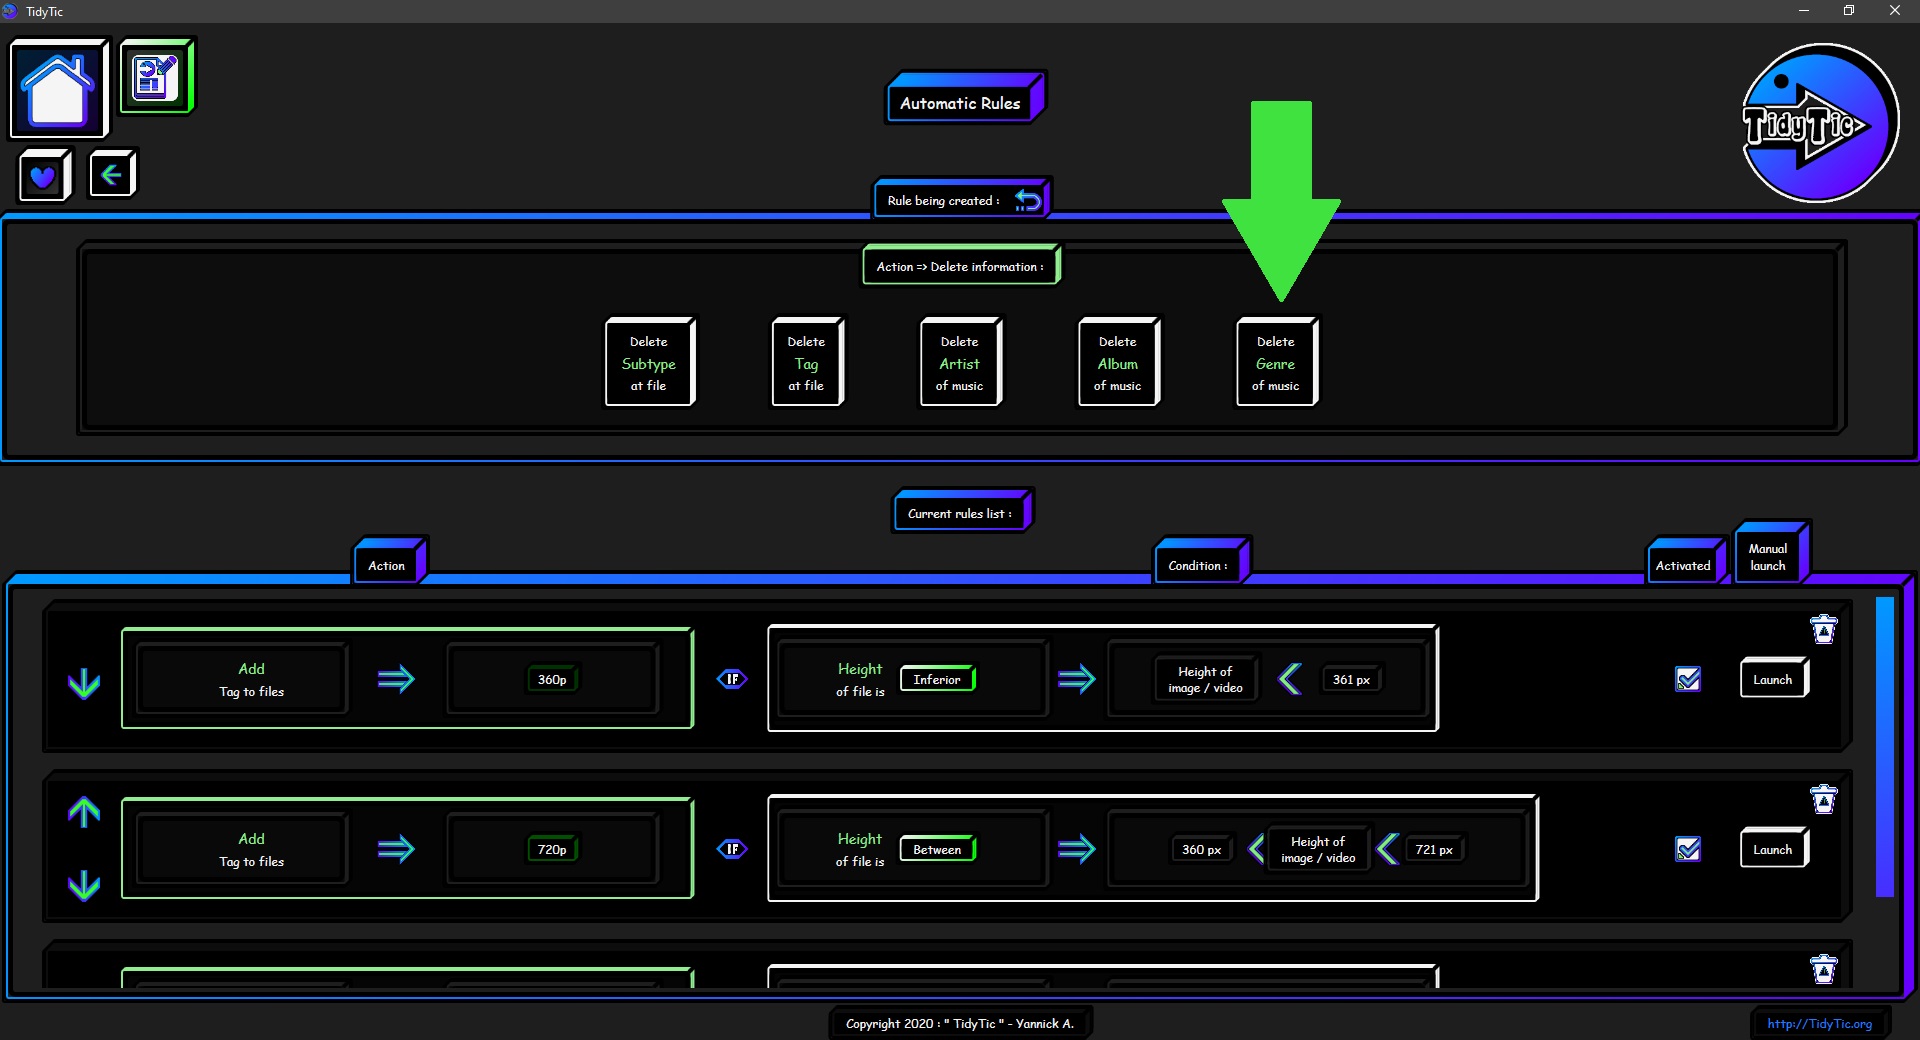
Action: "Delete : Subtype / Tag / Artist / Album / Genre to files" :
This action leaves you with 5 options that will allow you to delete information from your files :
- Delete a subtype of a files.
- Delete a tag of a files.
- Delete a artist of a music.
- Delete a album of a music.
- Delete a genre of a music.
 ____
____ 
The "Delete a subtype of a files" option :
In this option you just have to select the subtype that will be deleted of the files by this rule.
You will have the list of all subtype known by TidyTic.
You will also have at the beginning of the list the option "All" in order to delete all subtypes of the files.
When you select a subtype by clicking on it, its name changes to green.
All you have to do next is validate your choice.
 ____
____ 
The "Delete a tag of a files" option :
In this option you just have to select the tag that will be deleted of the files by this rule.
You will have the list of all tag known by TidyTic.
You will also have at the beginning of the list the option "All" in order to delete all tags of the files.
When you select a tag by clicking on it, its name changes to green.
All you have to do next is validate your choice.
 ____
____ 
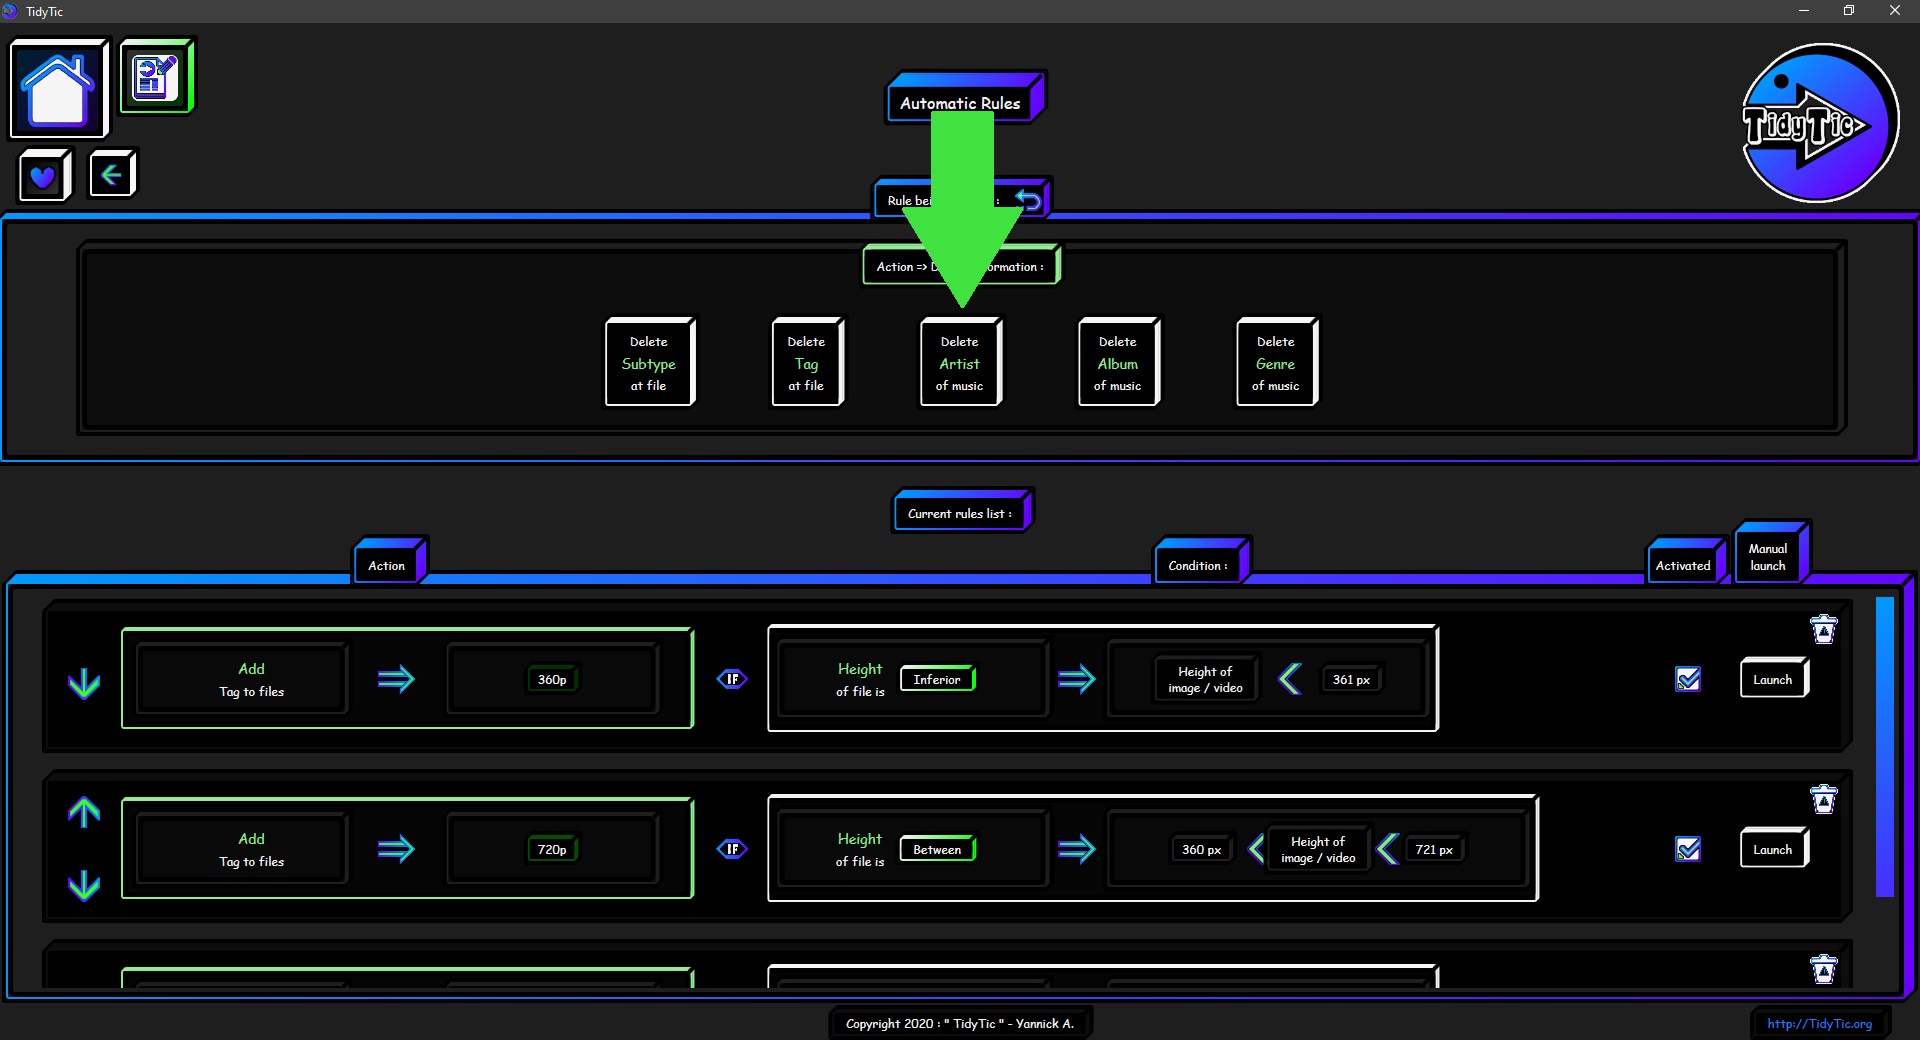
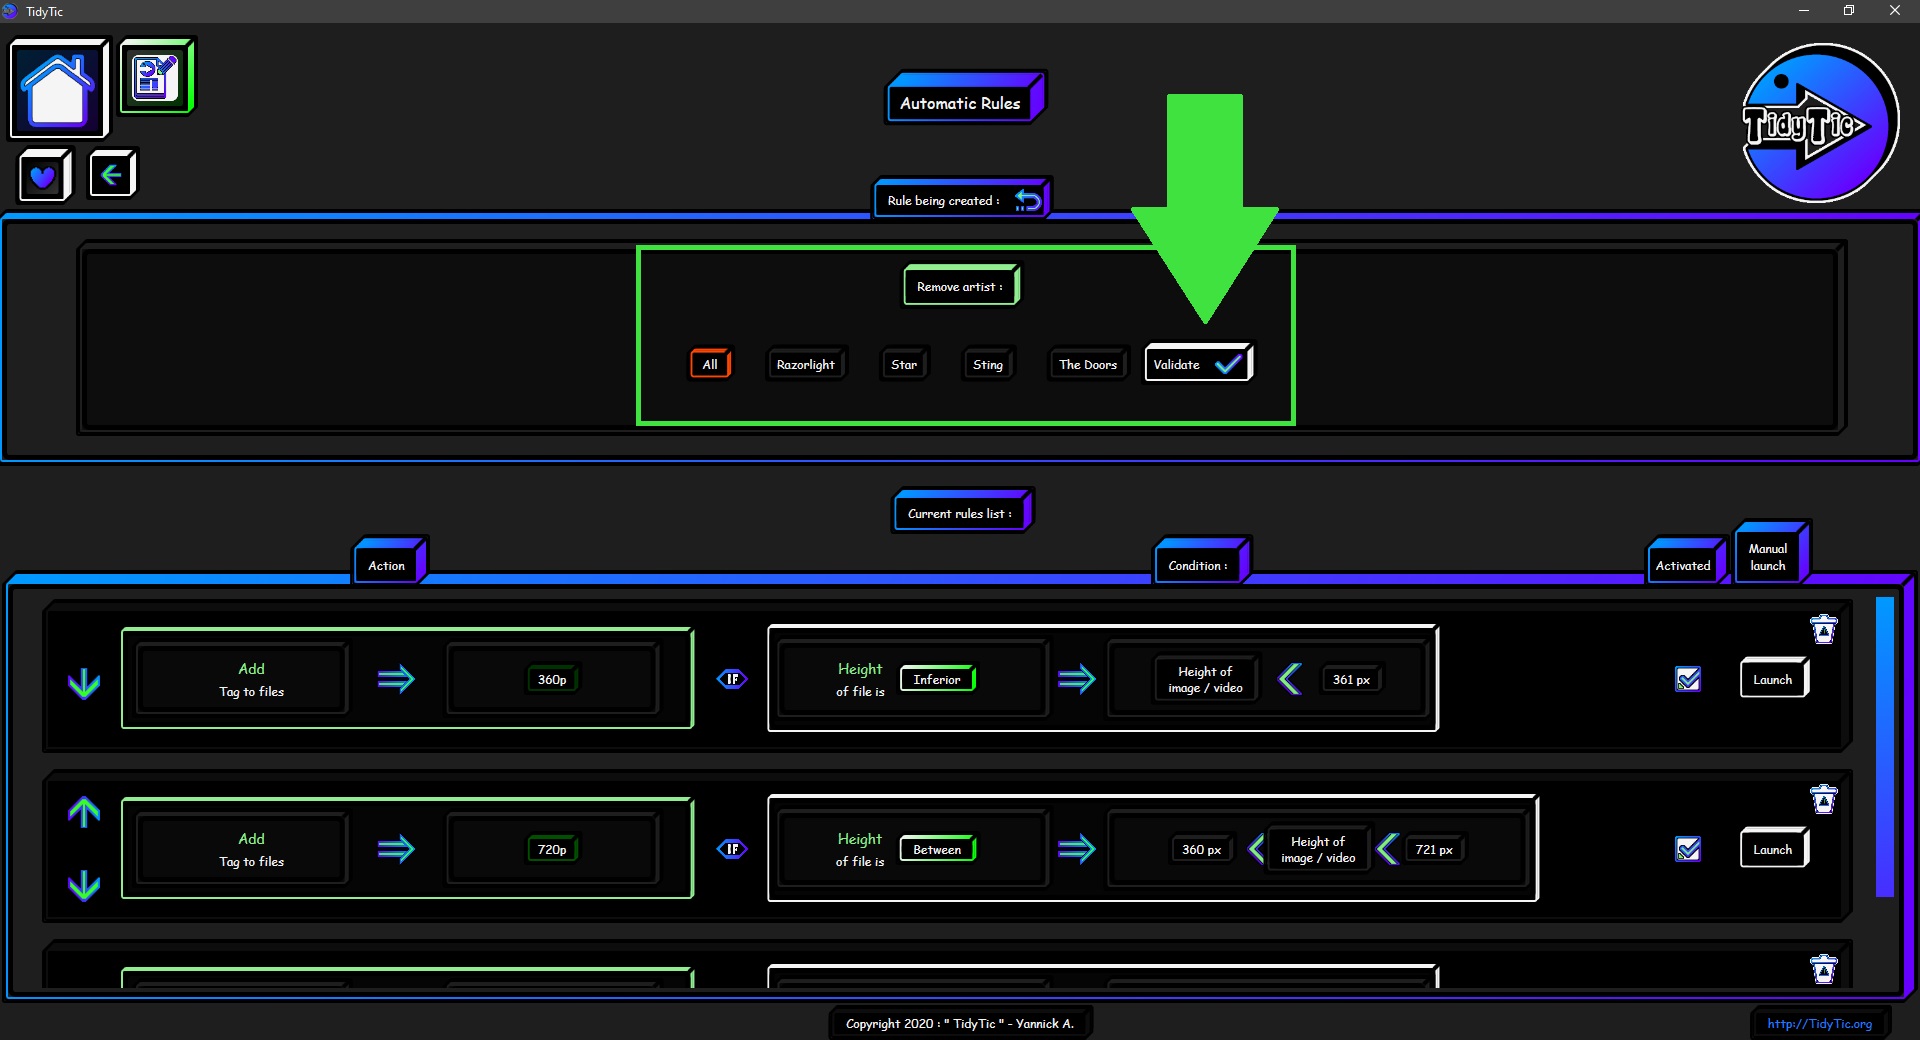
The "Delete a artist of a files" option :
In this option you just have to select the artist that will be deleted of the files by this rule.
You will have the list of all artist known by TidyTic.
You will also have at the beginning of the list the option "All" in order to delete all artists of the files.
When you select a artist by clicking on it, its name changes to green.
All you have to do next is validate your choice.
 ____
____ 
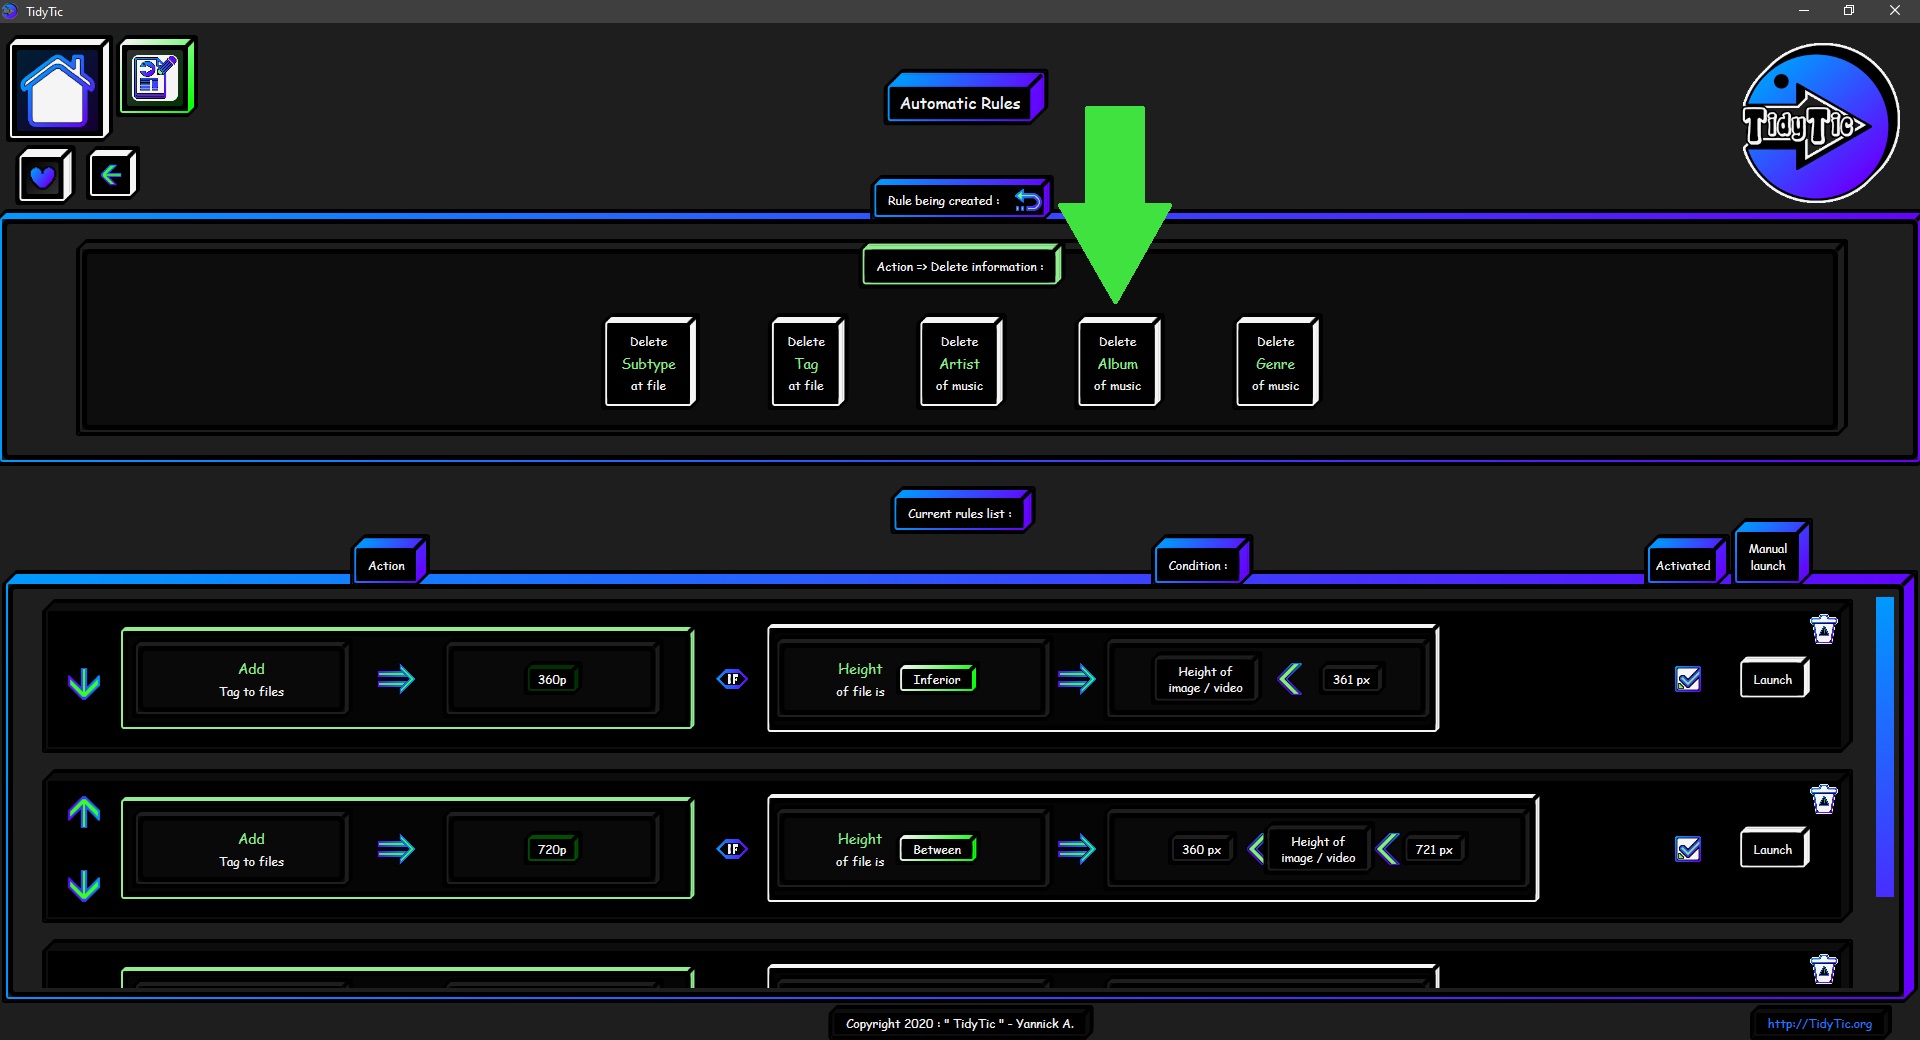
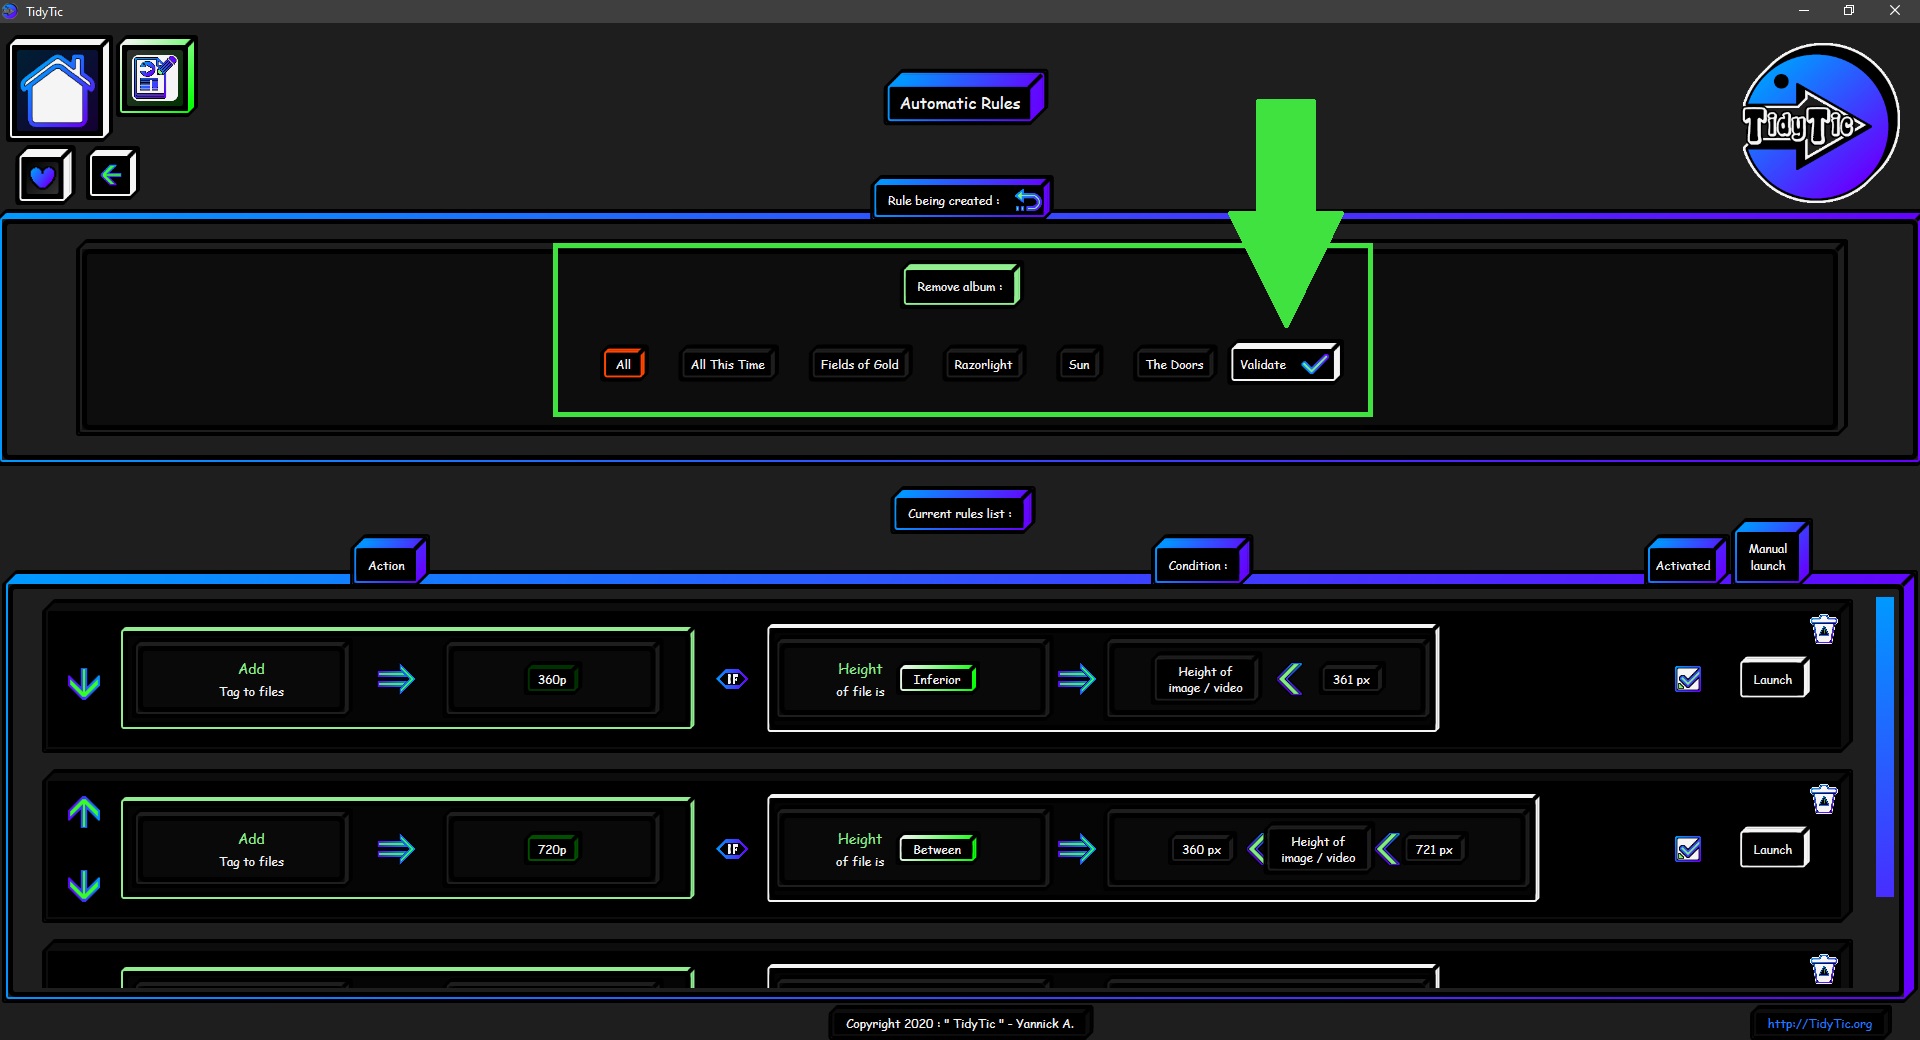
The "Delete a album of a files" option :
In this option you just have to select the album that will be deleted of the files by this rule.
You will have the list of all album known by TidyTic.
You will also have at the beginning of the list the option "All" in order to delete all albums of the files.
When you select a album by clicking on it, its name changes to green.
All you have to do next is validate your choice.
 ____
____ 
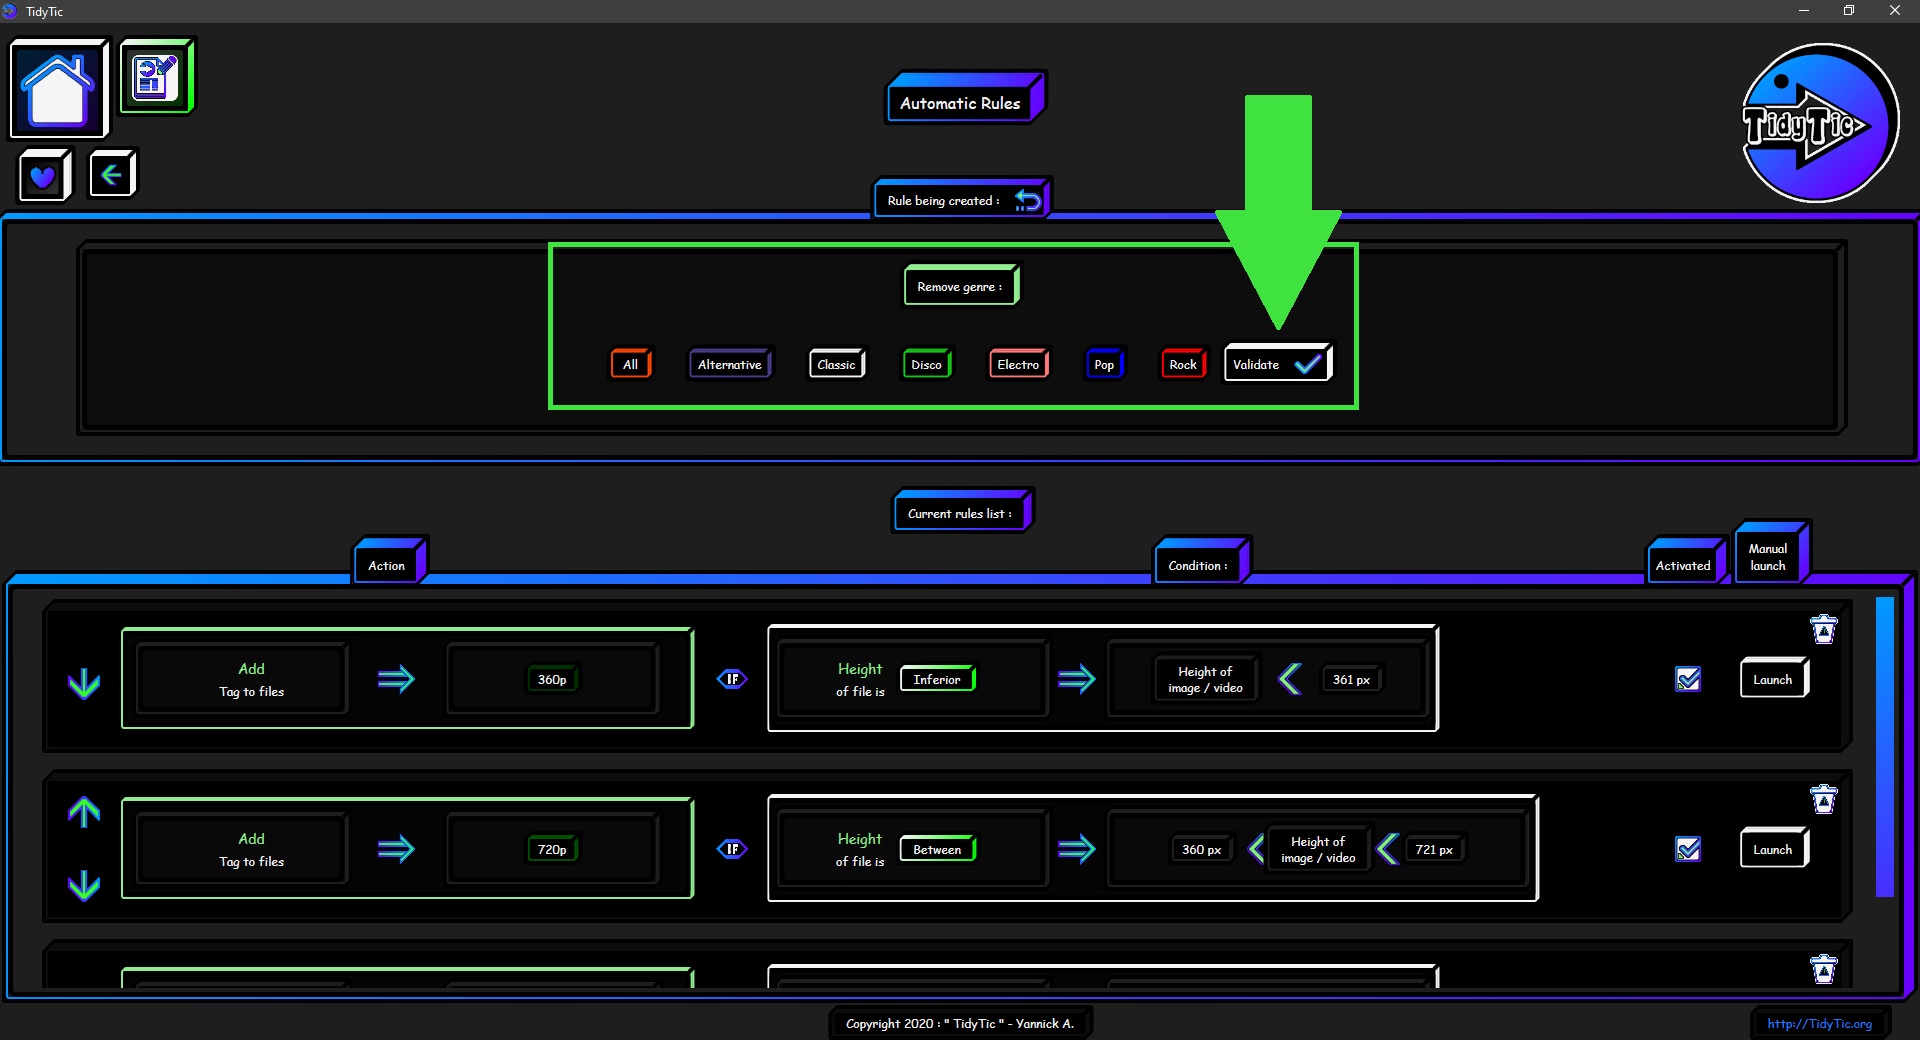
The "Delete a genre of a files" option :
In this option you just have to select the genre that will be deleted of the files by this rule.
You will have the list of all genre known by TidyTic.
You will also have at the beginning of the list the option "All" in order to delete all genres of the files.
When you select a genre by clicking on it, its name changes to green.
All you have to do next is validate your choice.
 ____
____ 
See the action of a rule being created :
Once the action has been chosen, you will see that the rule being created appears below the menu allowing you to choose the condition.
At the left you can therefore see the action you have just chosen :
The first part describes the model of the chosen action.
The second part gives you the value of this action.
 ____
____  ____
____  ____
____ 
Modify the action of a rule being created :
To modify the action of a rule being created, simply click on the " ![]() " icon.
" icon.
The rule will then temporarily disappear and the menu for creating the rule will return to the action choices.
You can change the action of a rule being created even after you have defined conditions.
These will be kept in the rule being created and you will find them after selecting the new action.
 ____
____ 
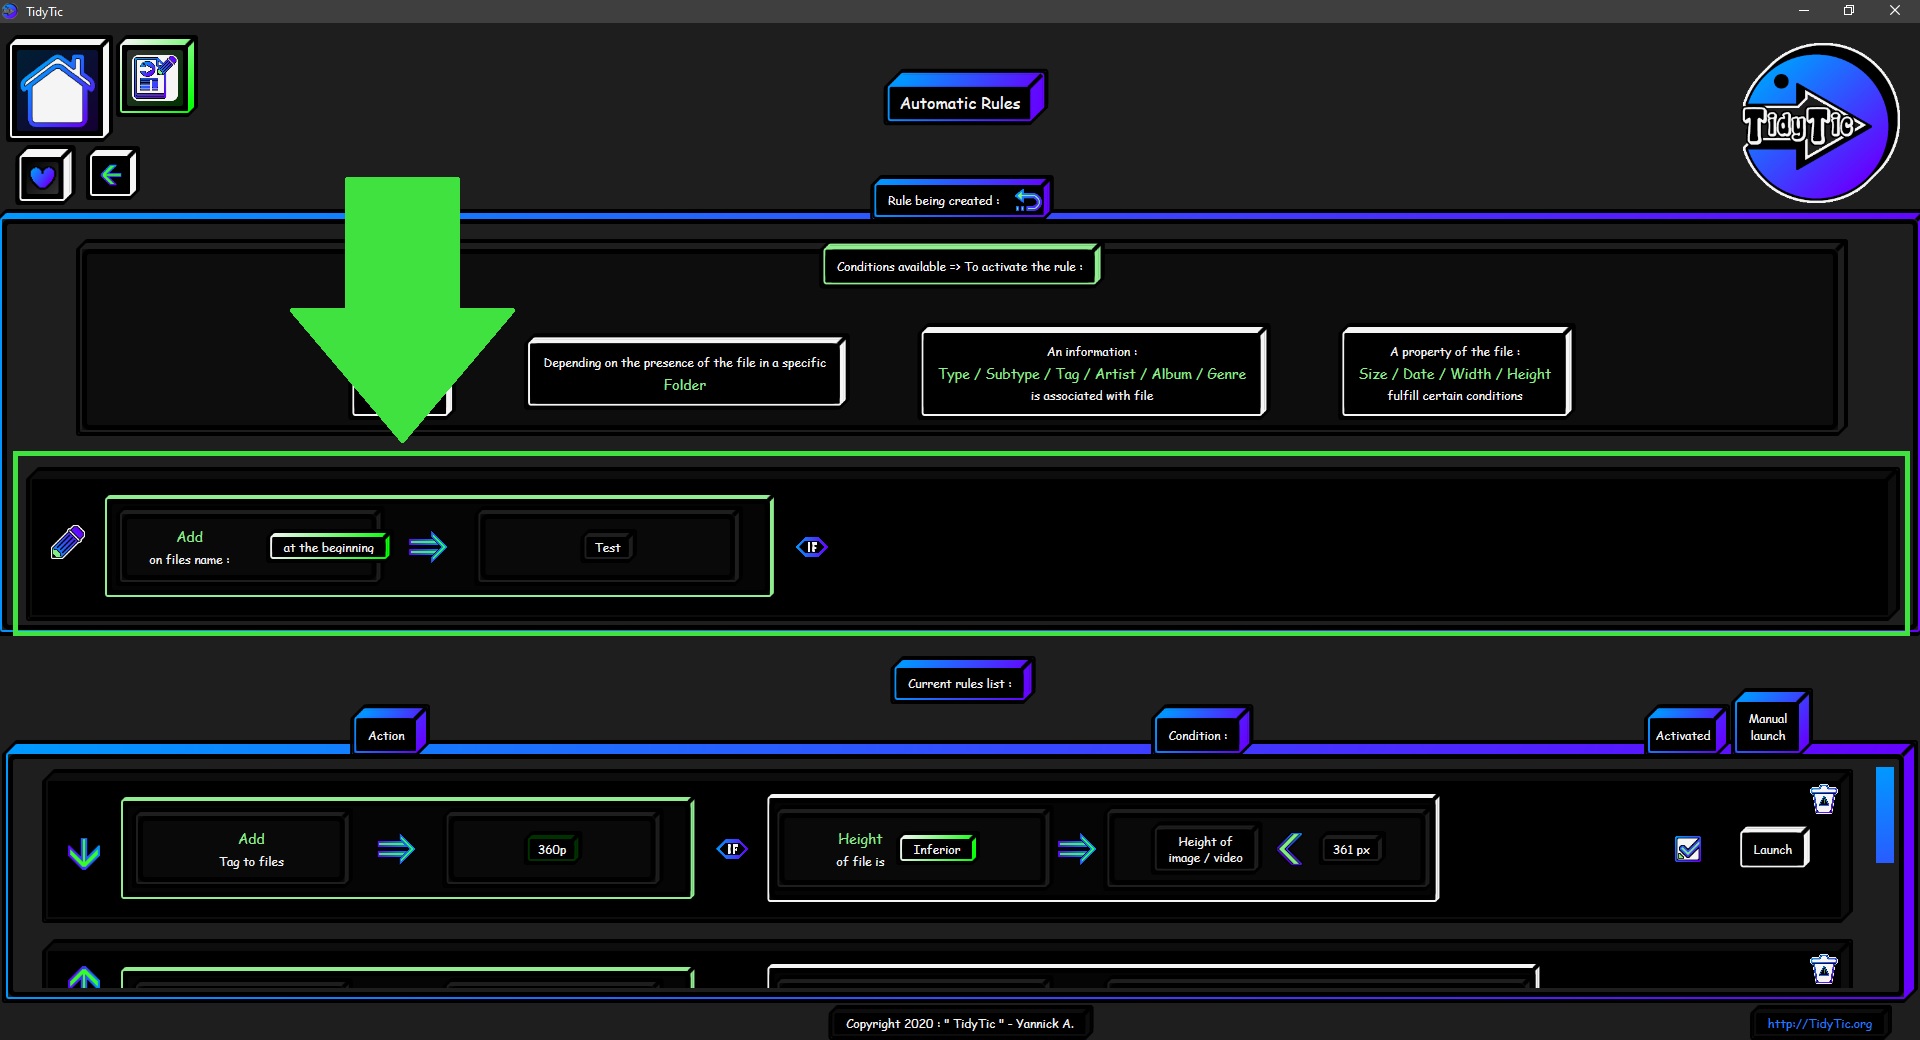
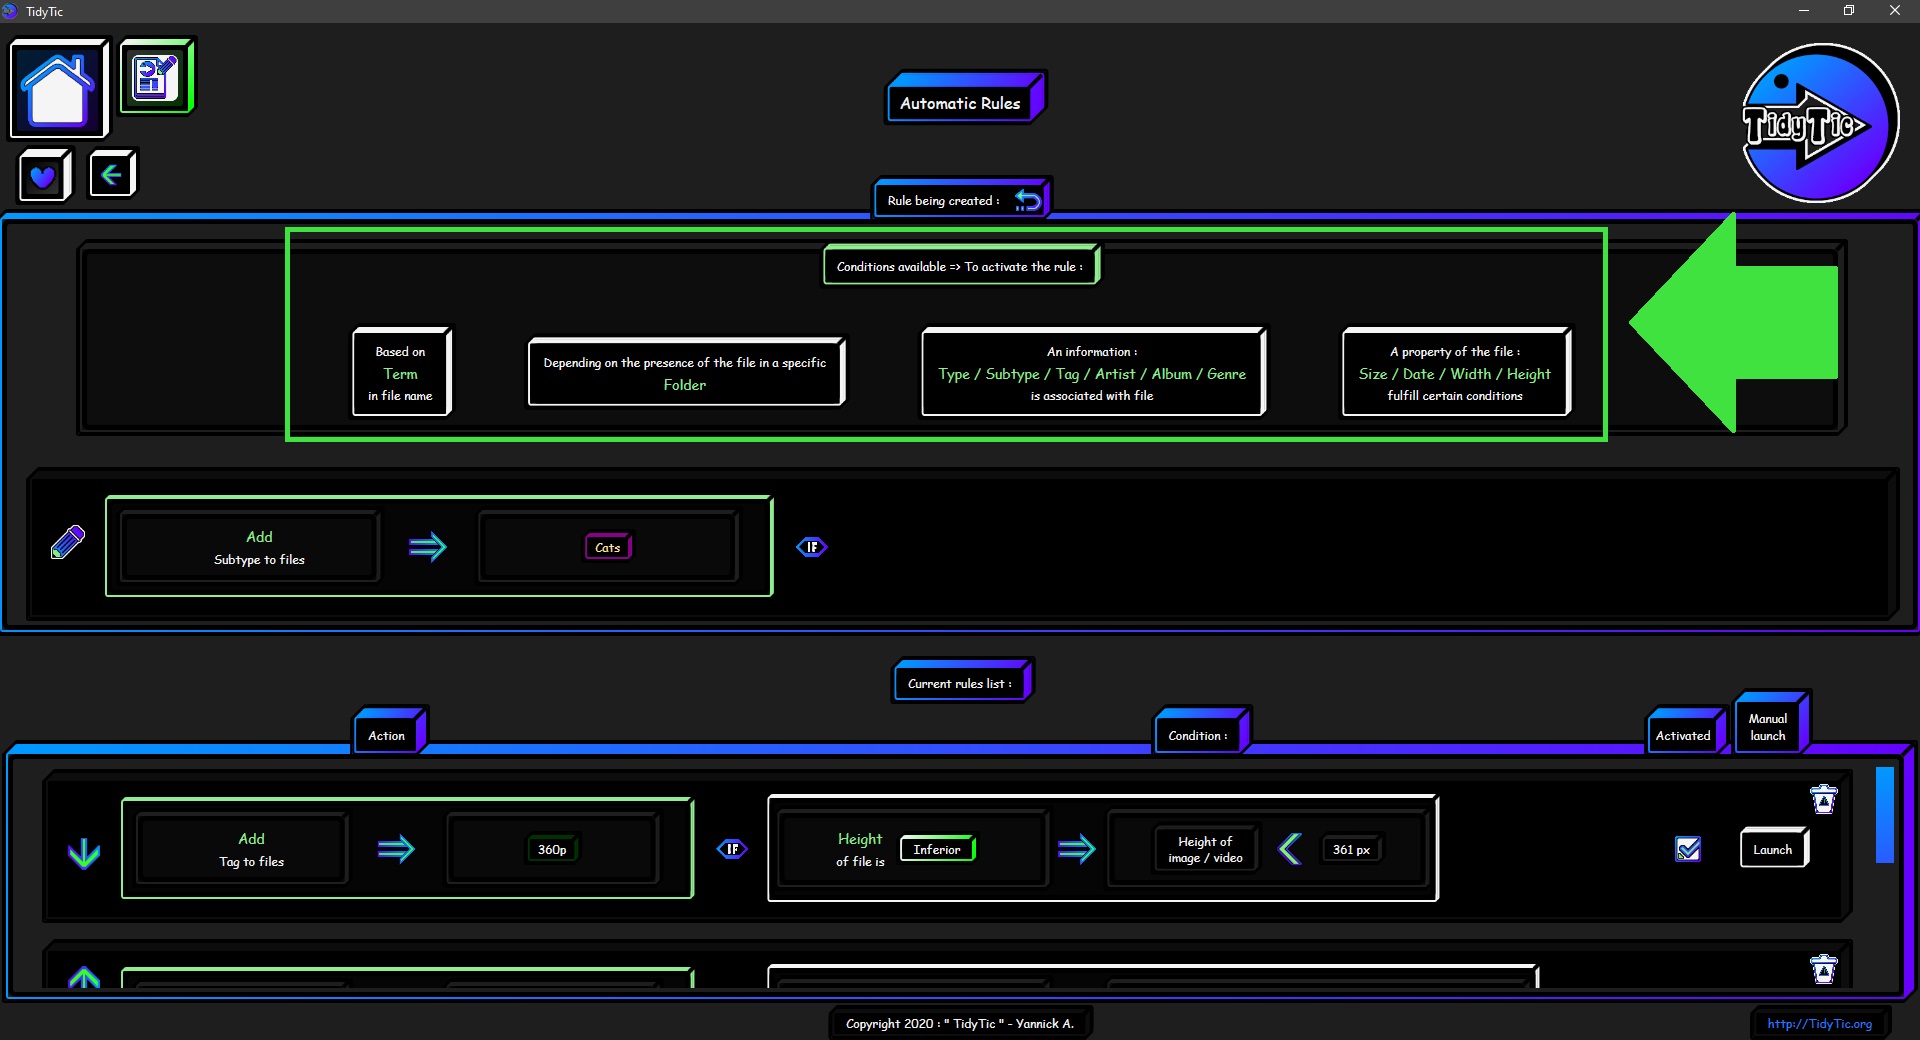
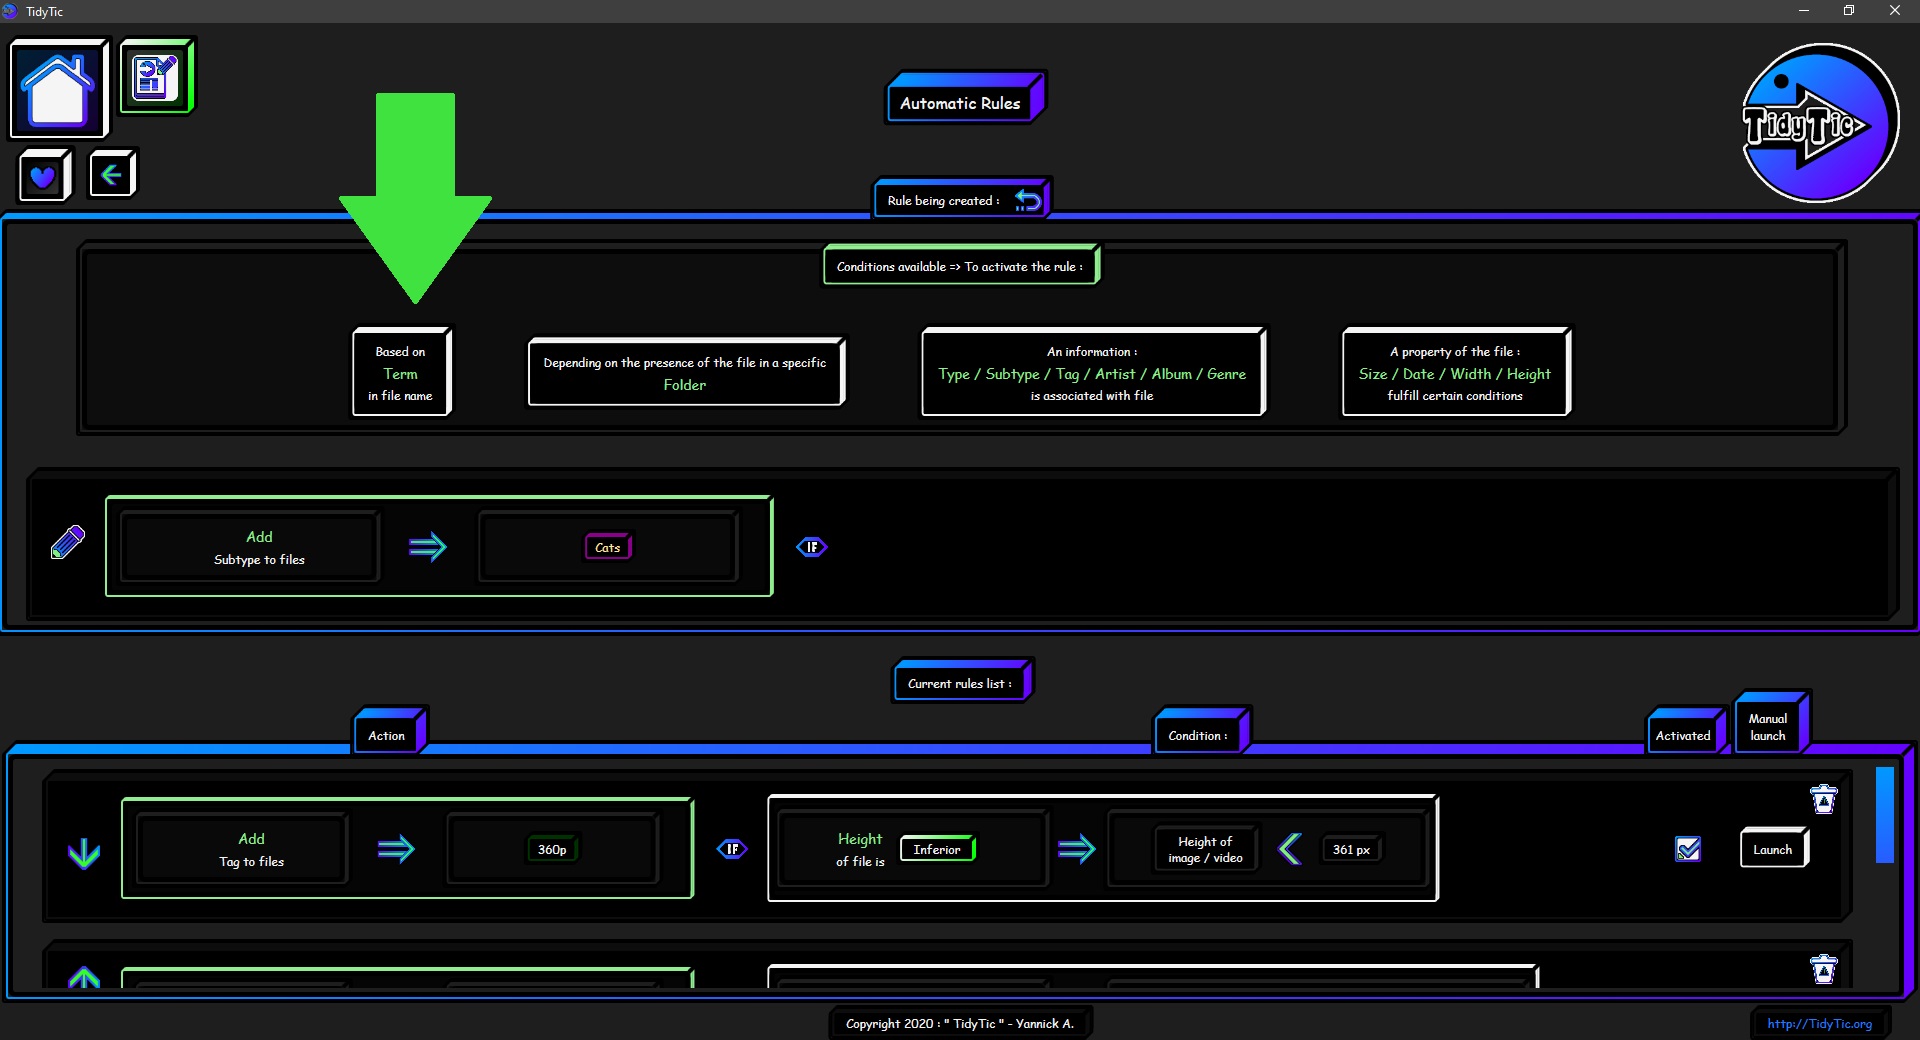
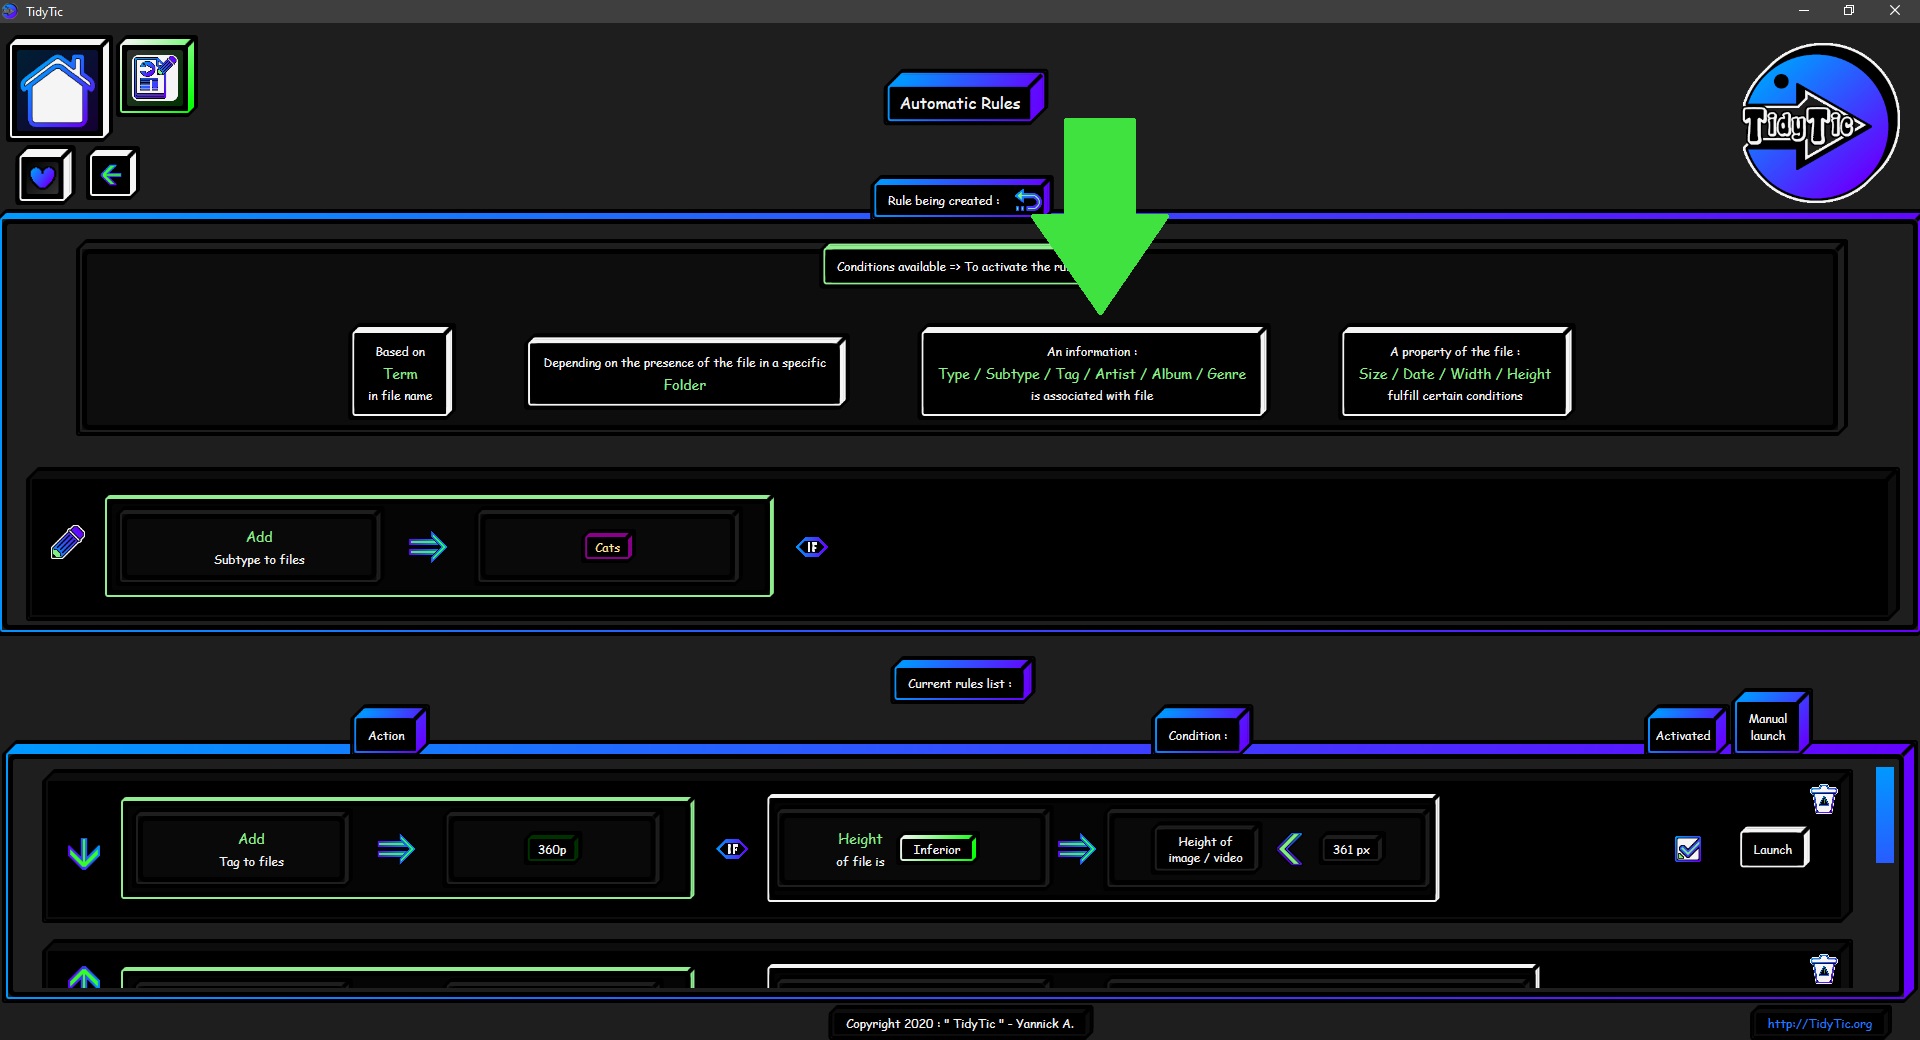
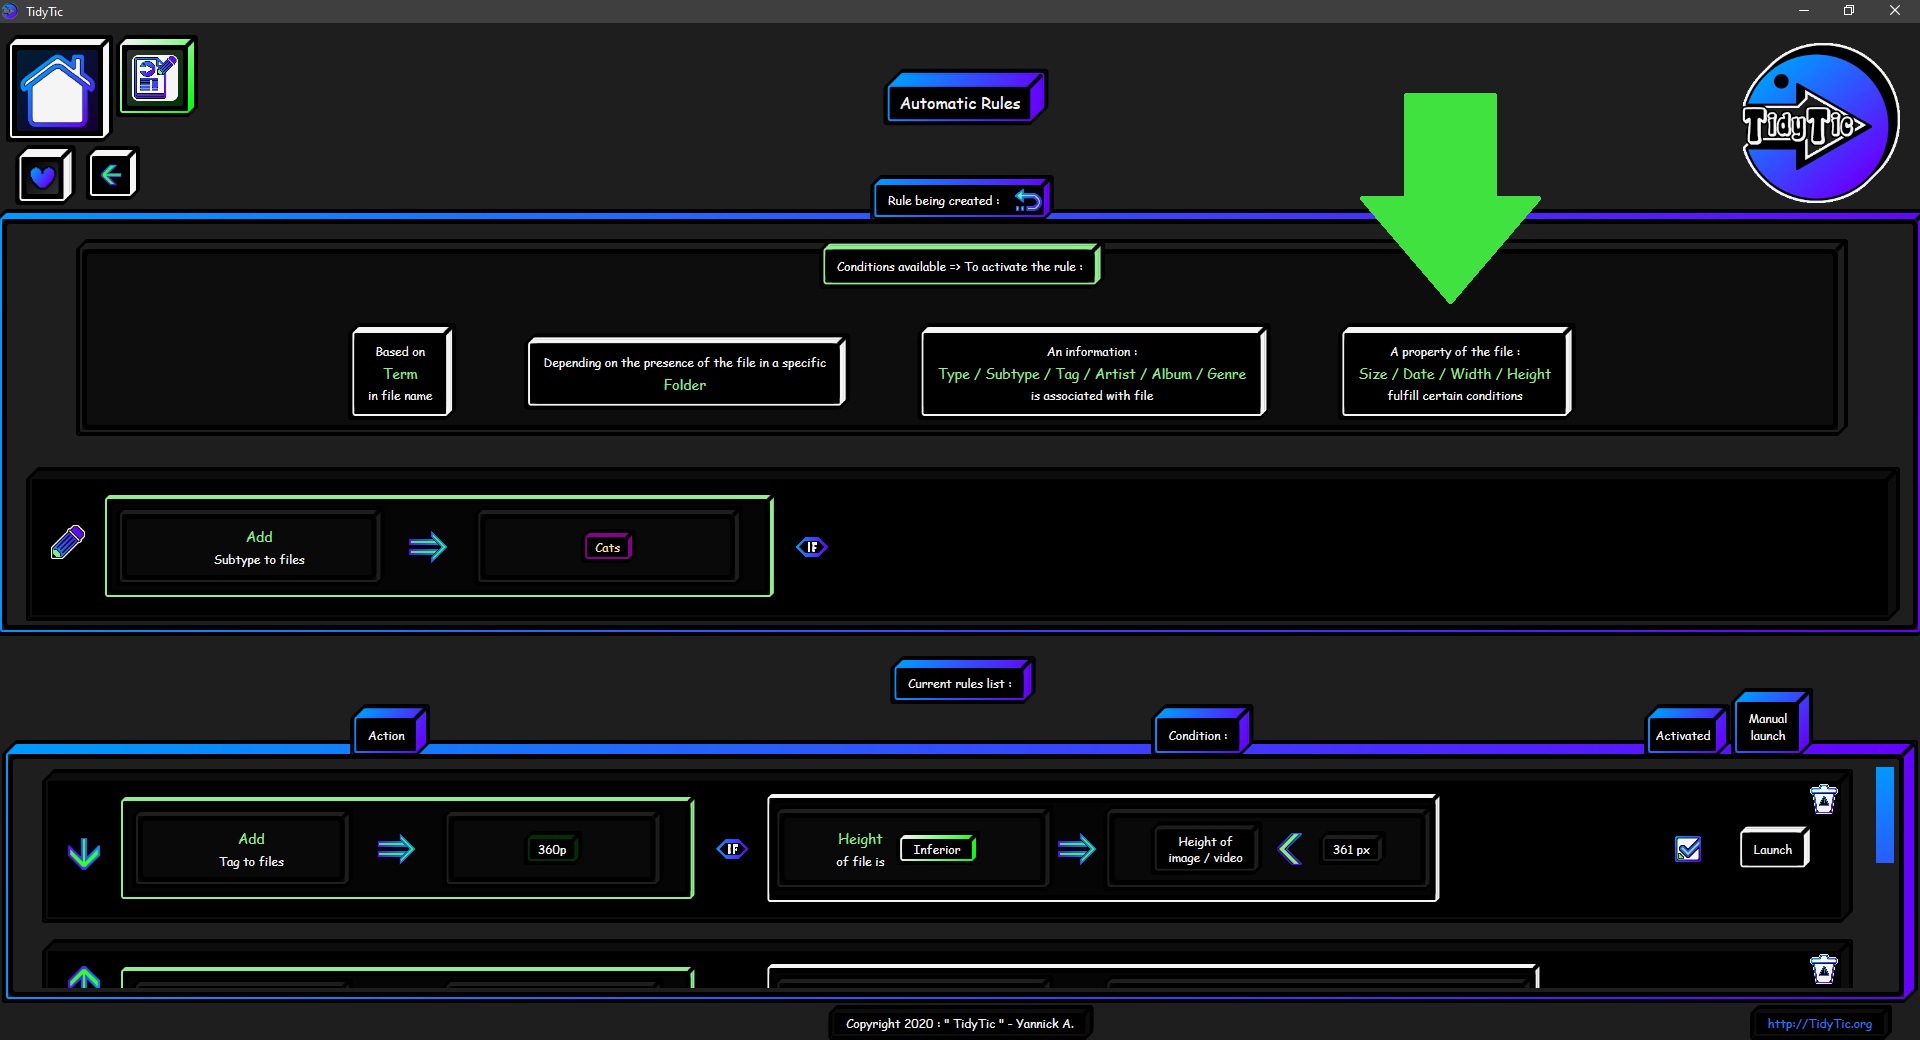
The conditions available for triggering your automatic rules :
For the trigger conditions of your automatic rules, therefore of the chosen action, you will have 4 main categories which will leave you each with several options :
- Based on a term in the file name.
- Depending on the presence of the file in a specific folder.
- An Information : type / subtype / tag / artist / album / genre is associated with the file.
- A property of the file : size / date / width / height meets certain conditions.
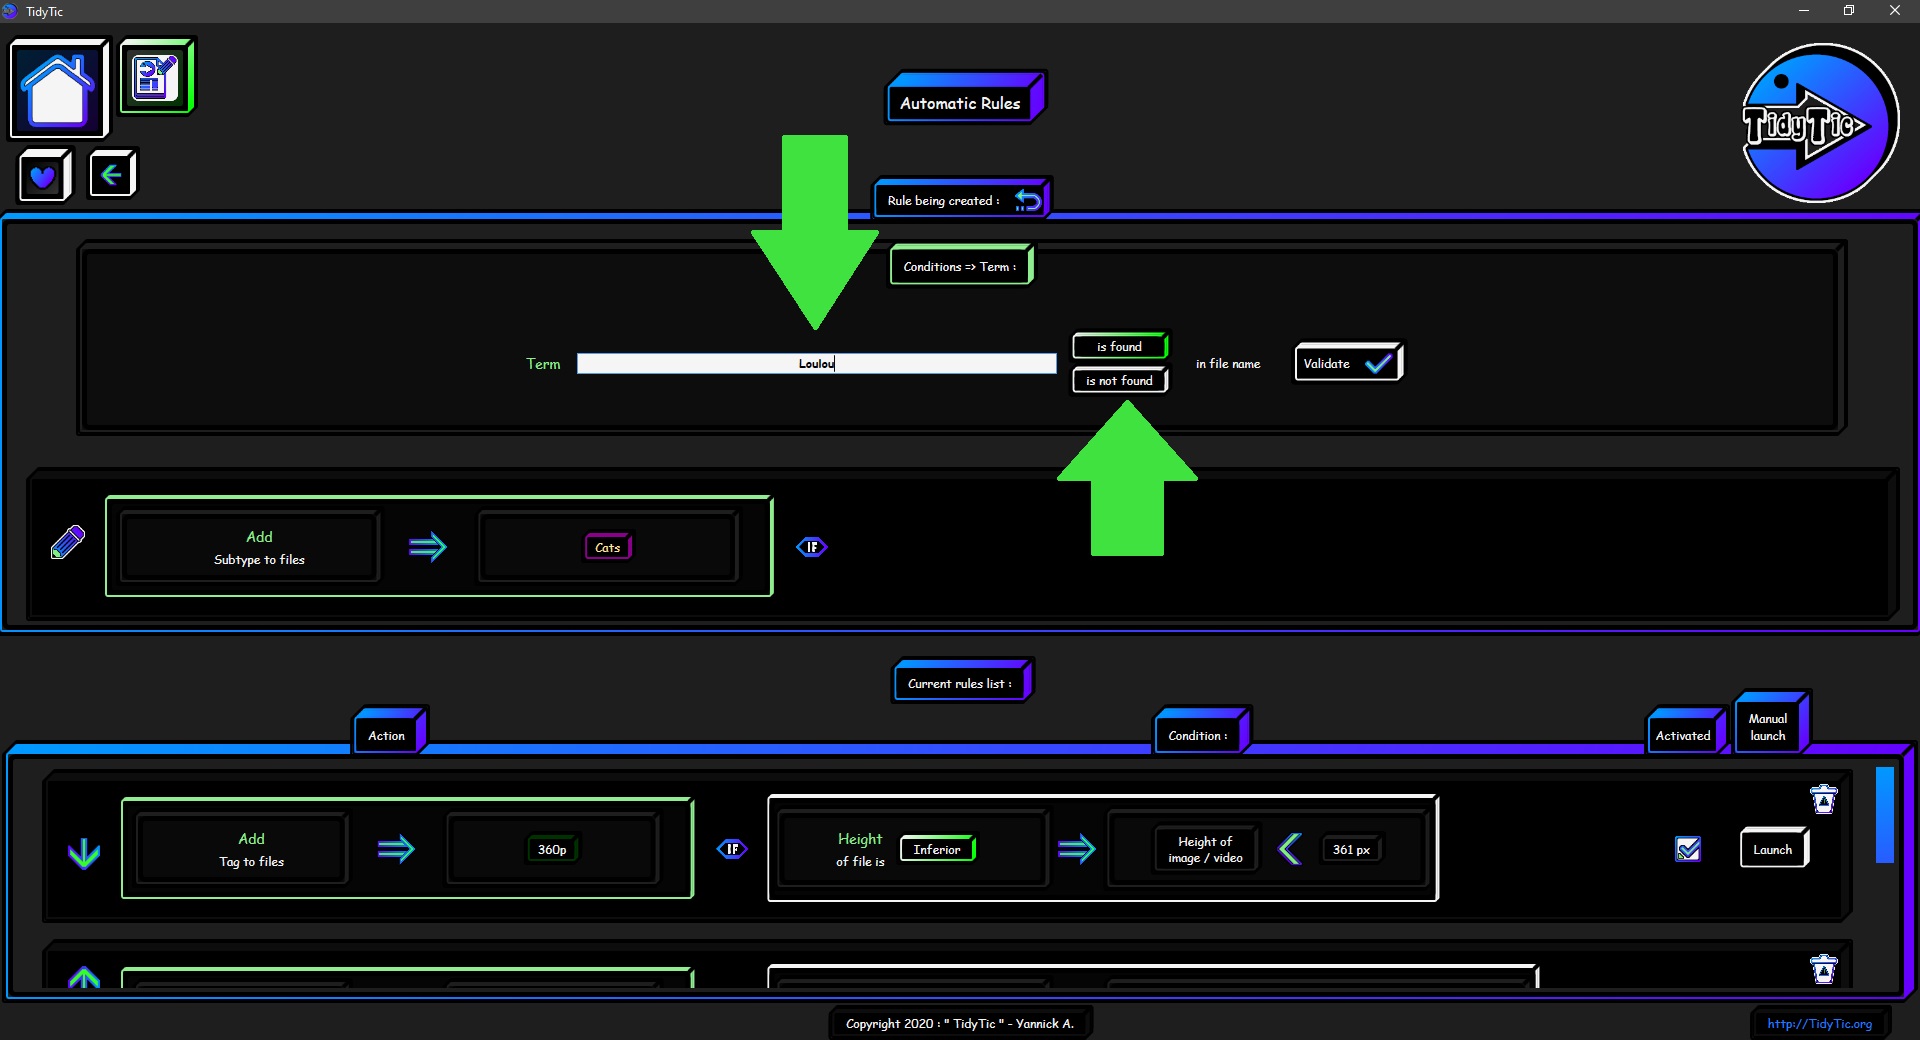
Condition : "Based on a term in the file name" :
This condition is very simple, it leaves you with two options :
- Trigger the action of the rule if the term is found in the filename.
- Trigger the action of the rule if the term is NOT found in the file name.
Just write the search term in the box and choose to trigger the action if the term is found in the file name, or on the contrary if it is not found.
The option selected will have its border in green once you click on it.
Then you just have to validate the condition in order to add it to the rule.
 ____
____ 
Condition : "Depending on the presence of the file in a specific folder" :
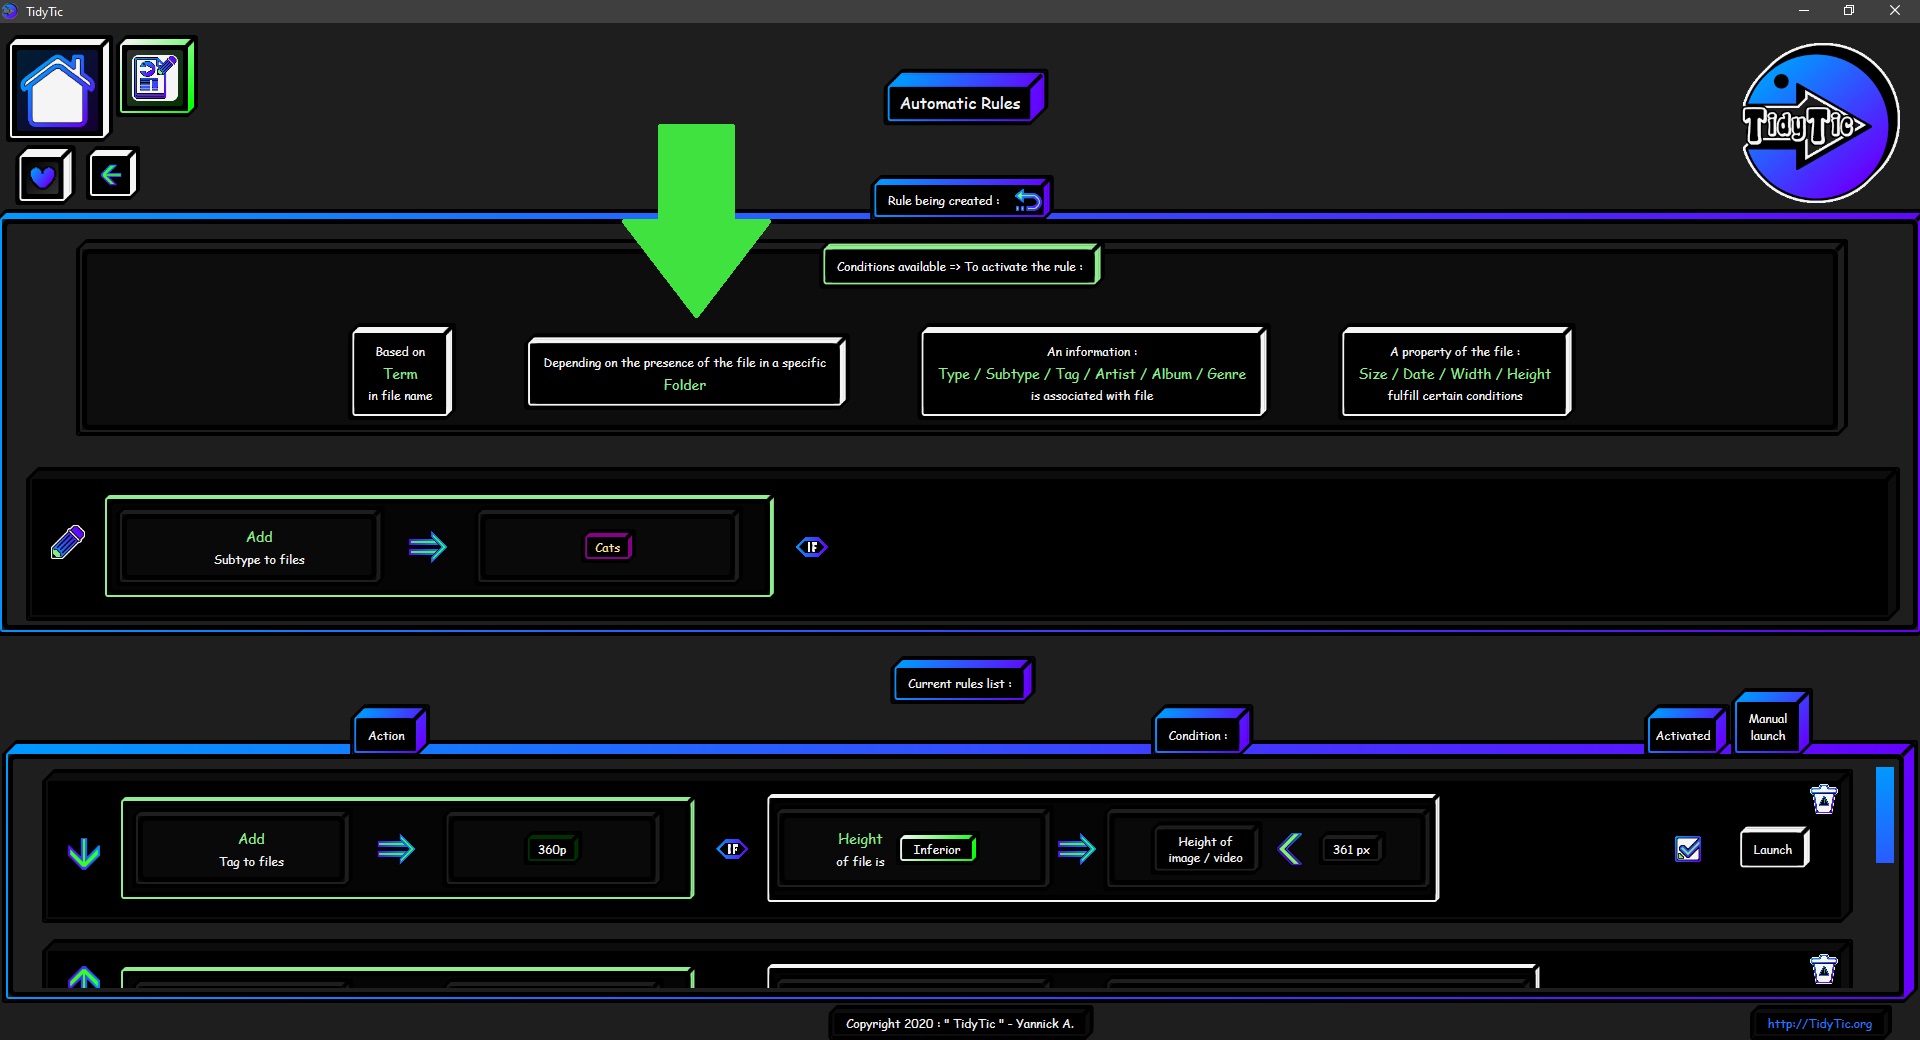
This condition is also very simple, it leaves you with two options :
- Trigger the action of the rule if the file is found in the folder that you are going to indicate.
- Trigger the action of the rule if the file is NOT found in the folder that you are going to indicate .
You just have to choose whether the action is triggered if the file is found in the folder, or on the contrary if it is not found.
The option selected will have its border in green once you click on it.
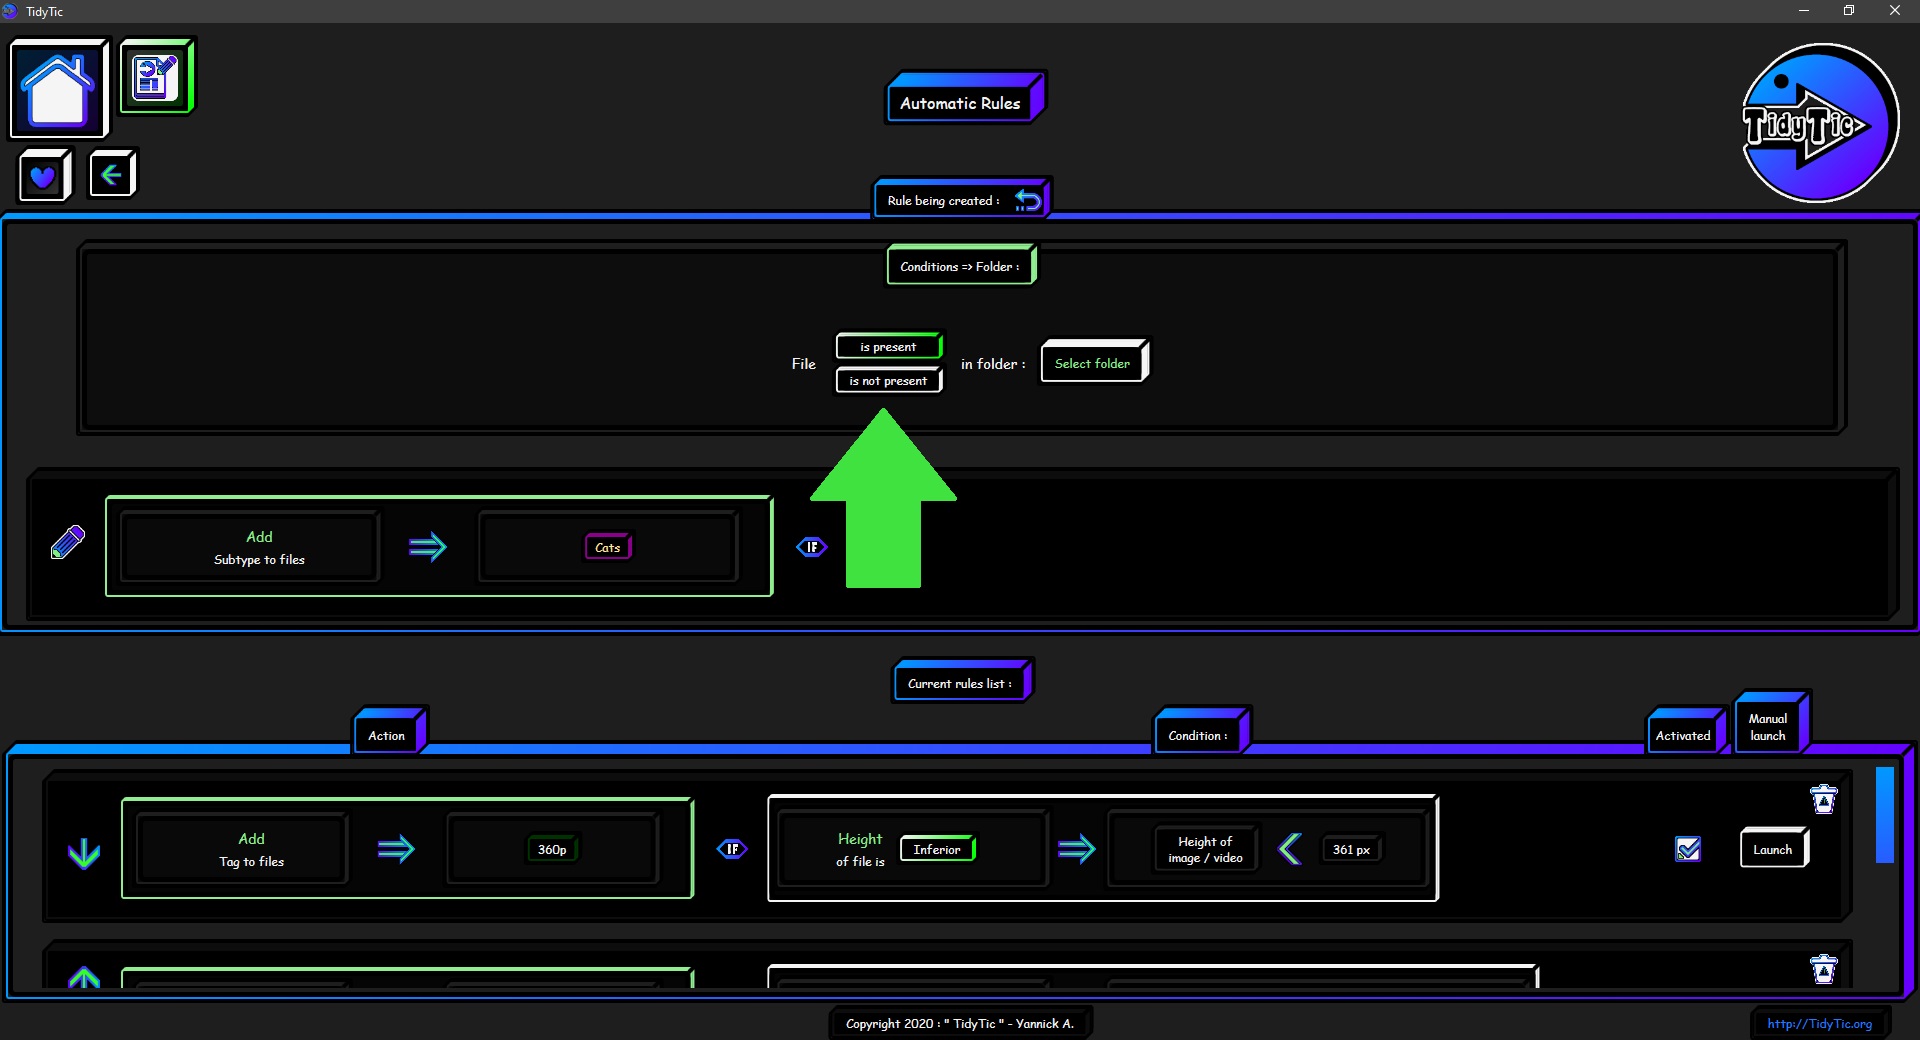
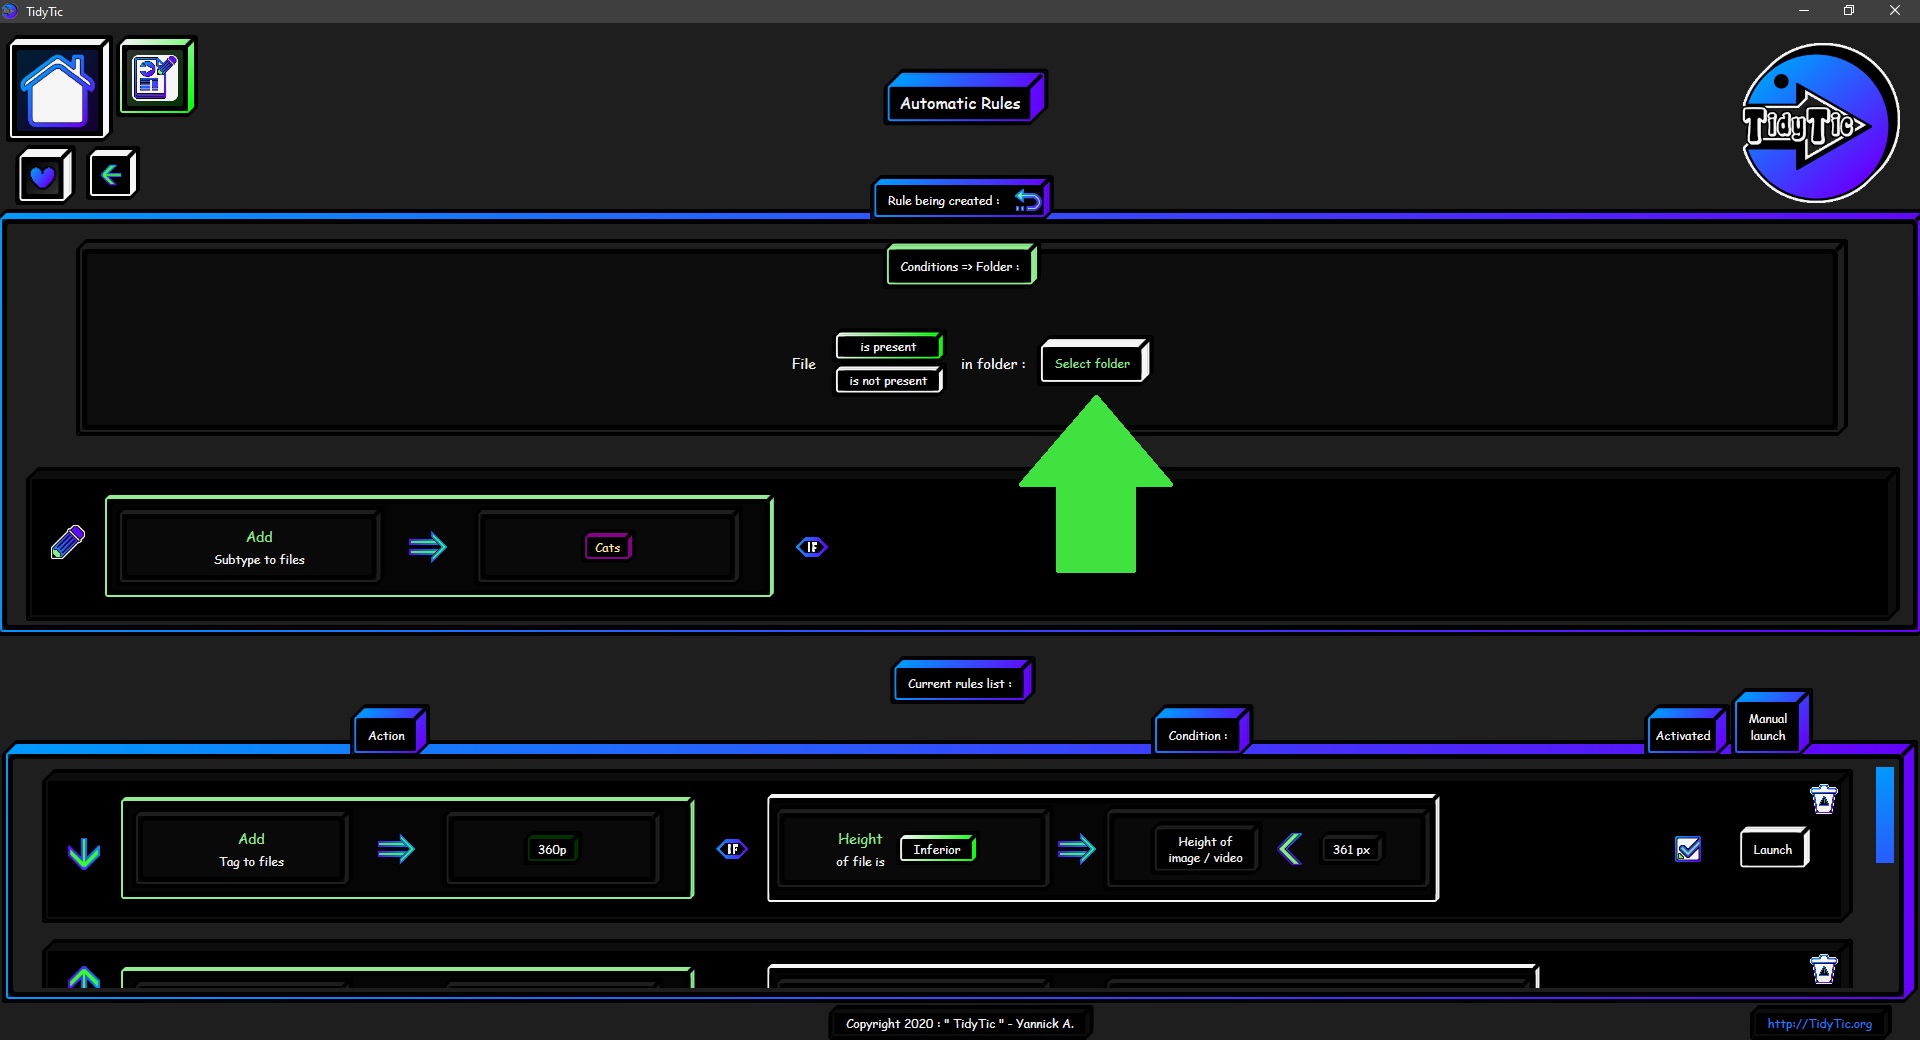
You will then only have to choose the folder in question with the corresponding button.
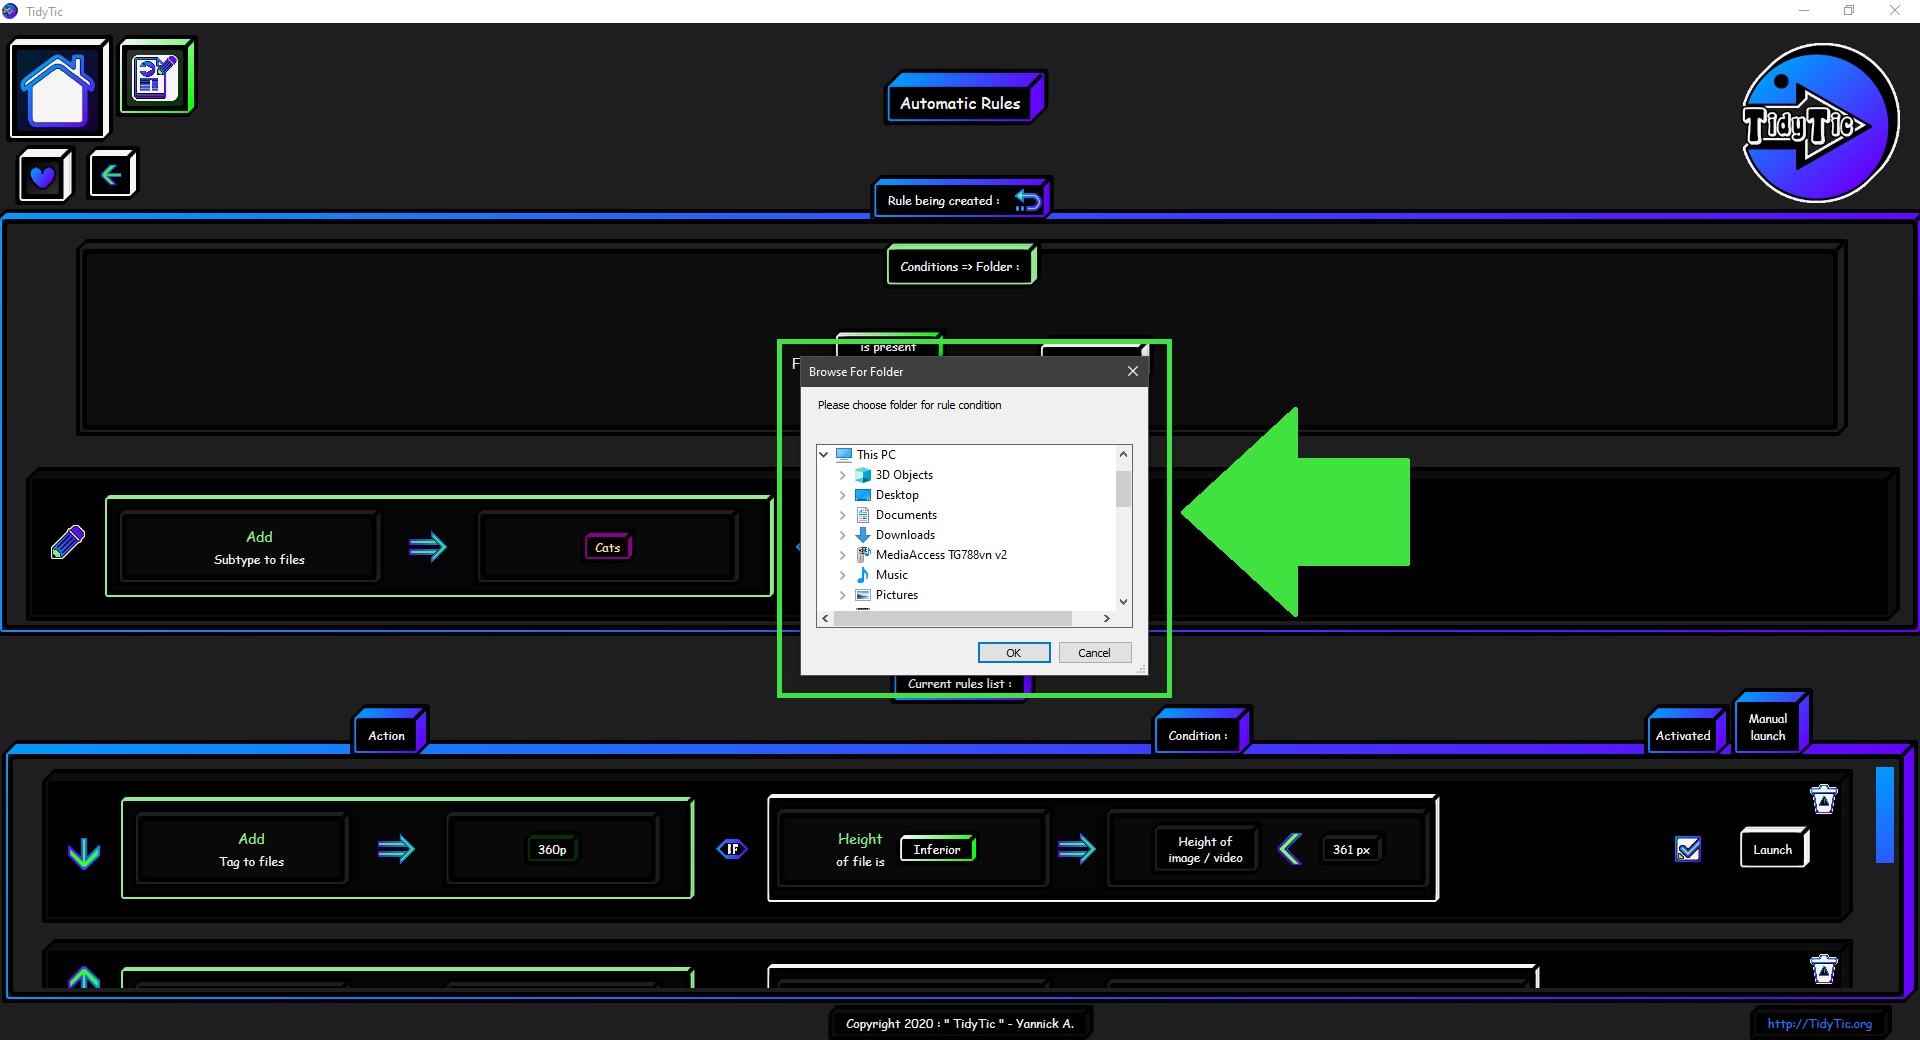
This button will open a window allowing you to choose the folder for this condition.
However, you can only choose a folder that is part of the list of monitored folders or one of its subfolders.
Once the folder has been chosen, the condition will be added to the rule being created.
 ____
____ 
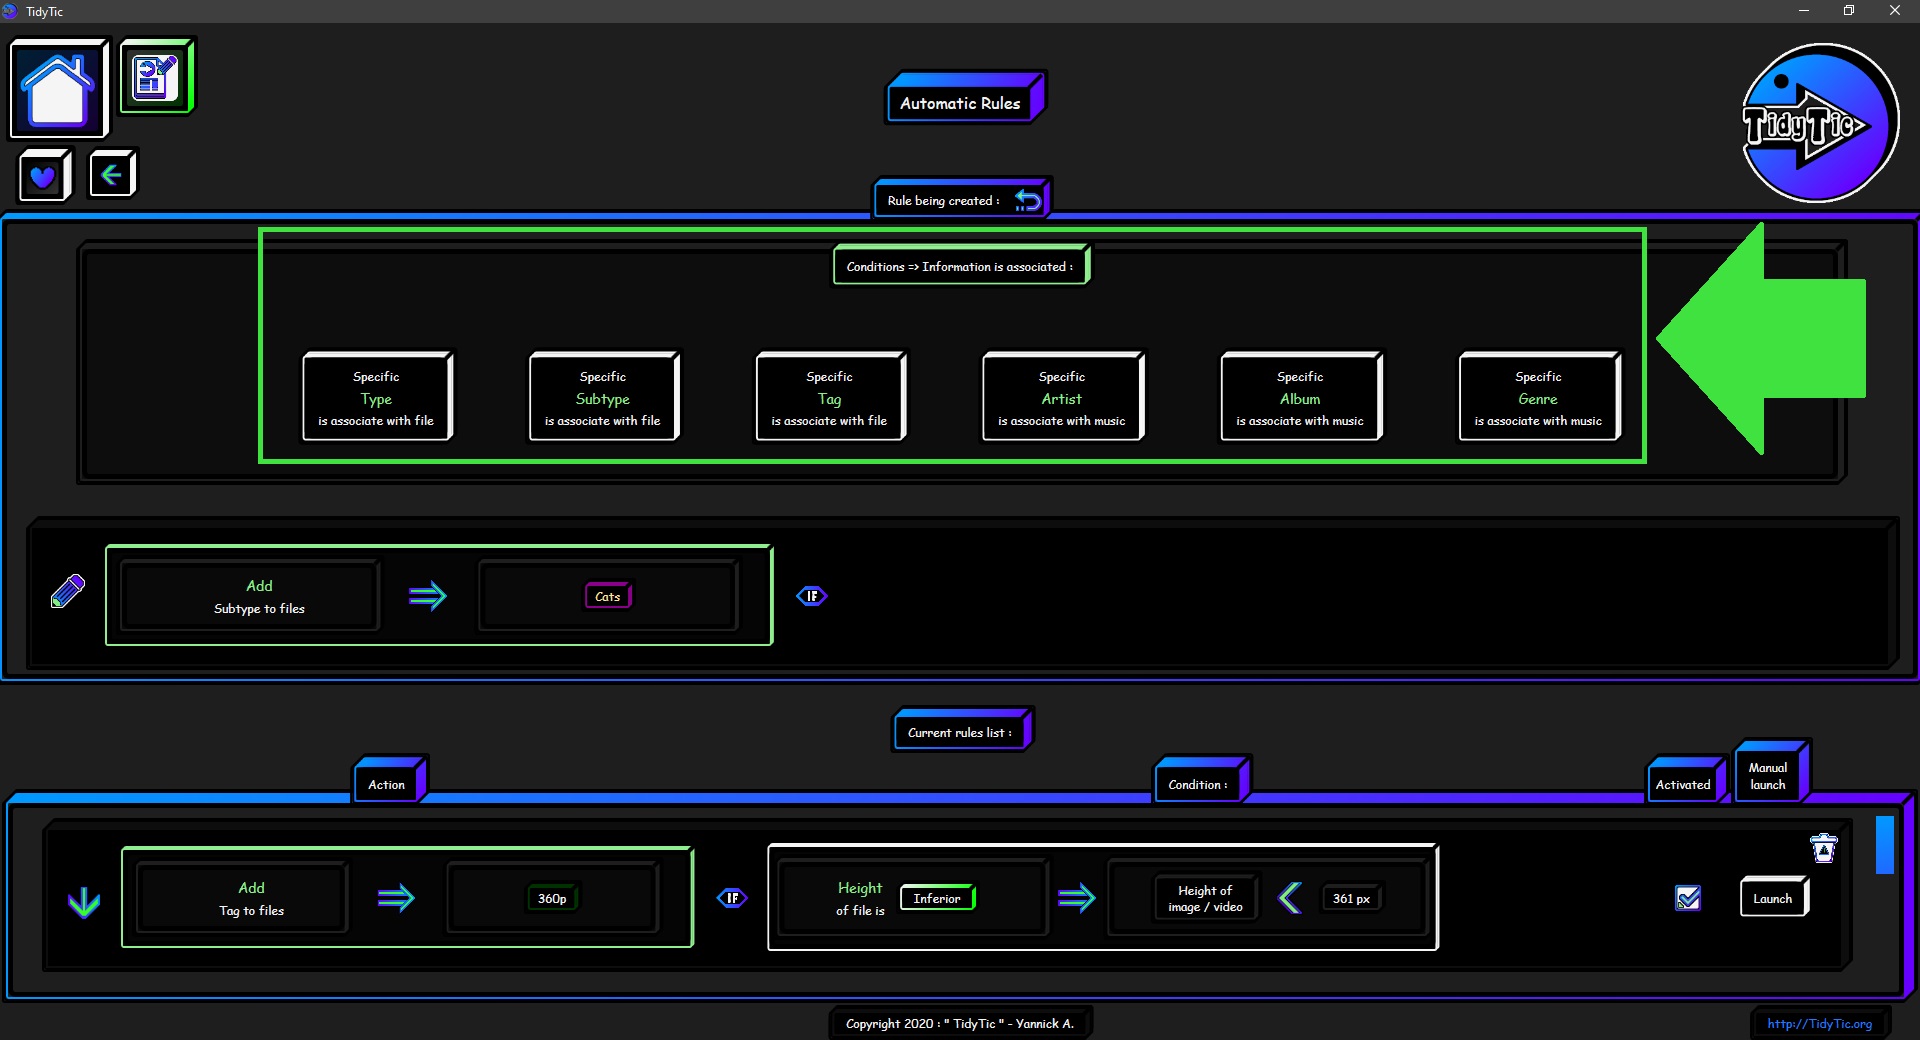
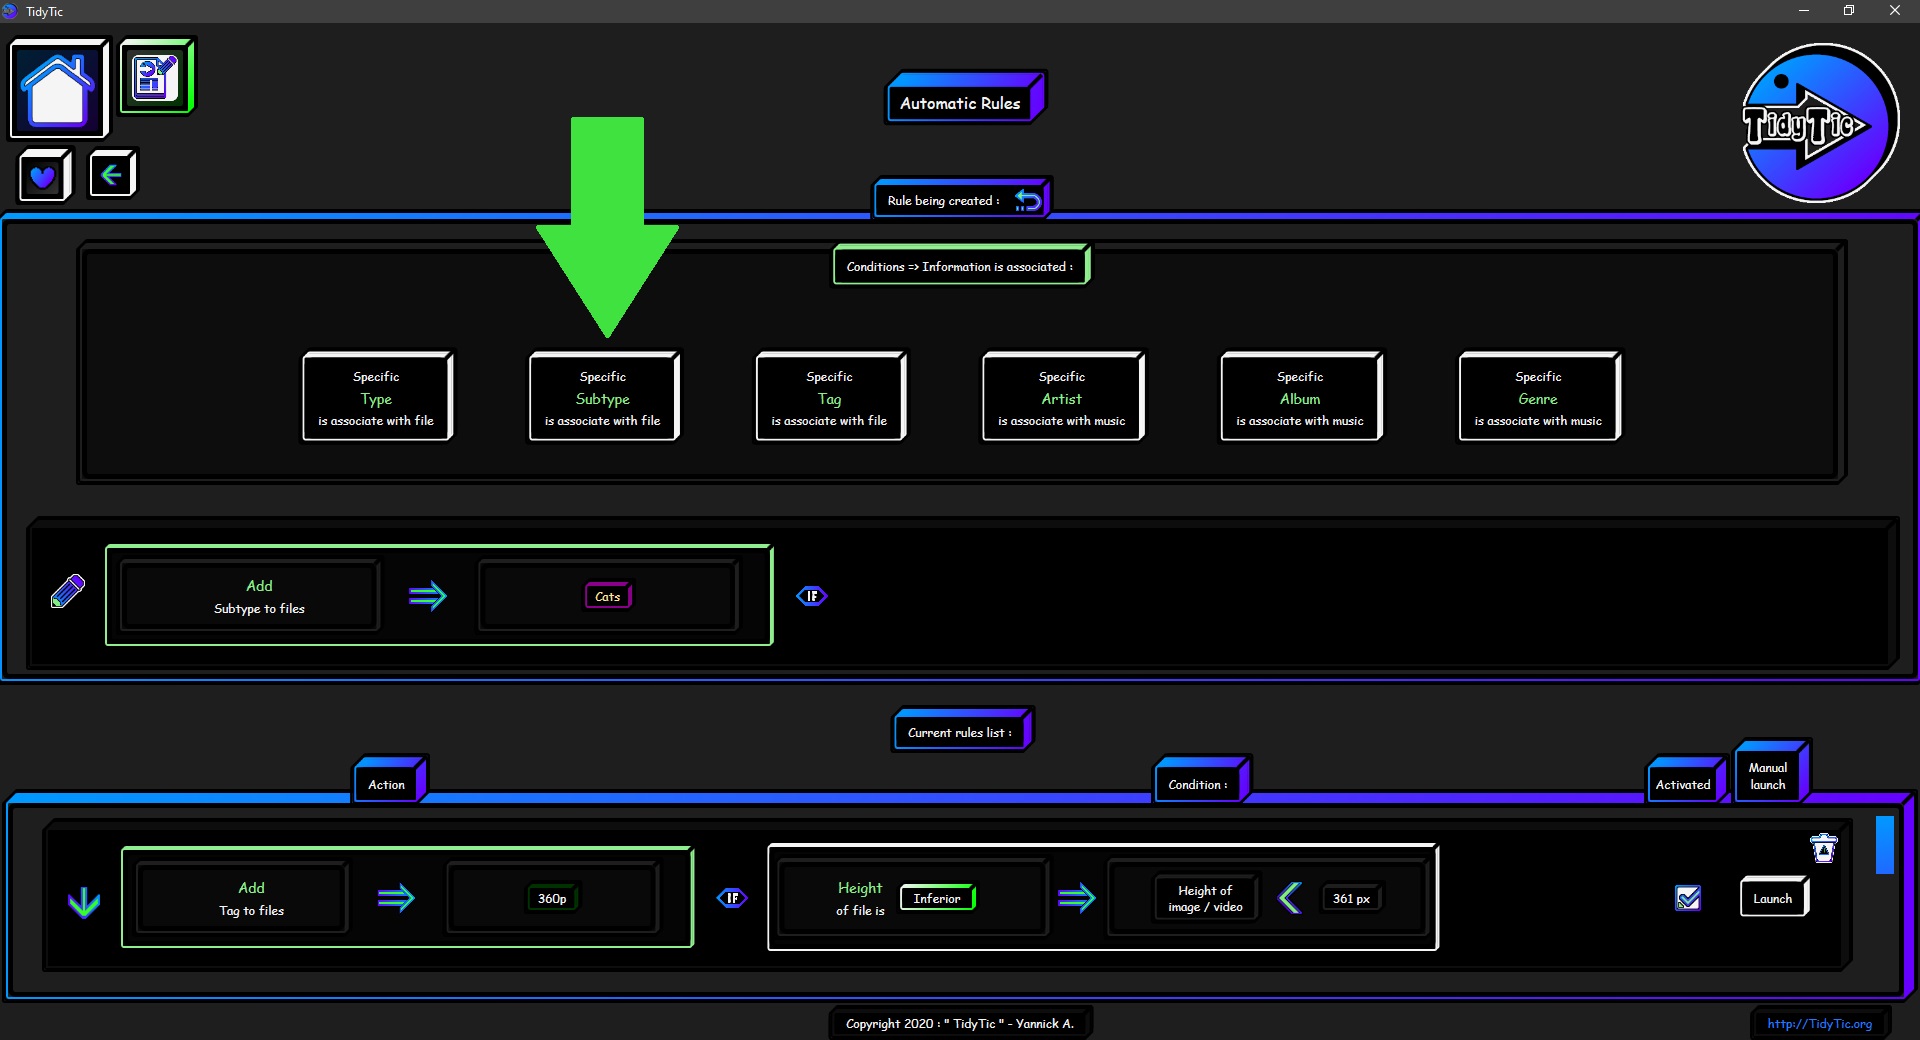
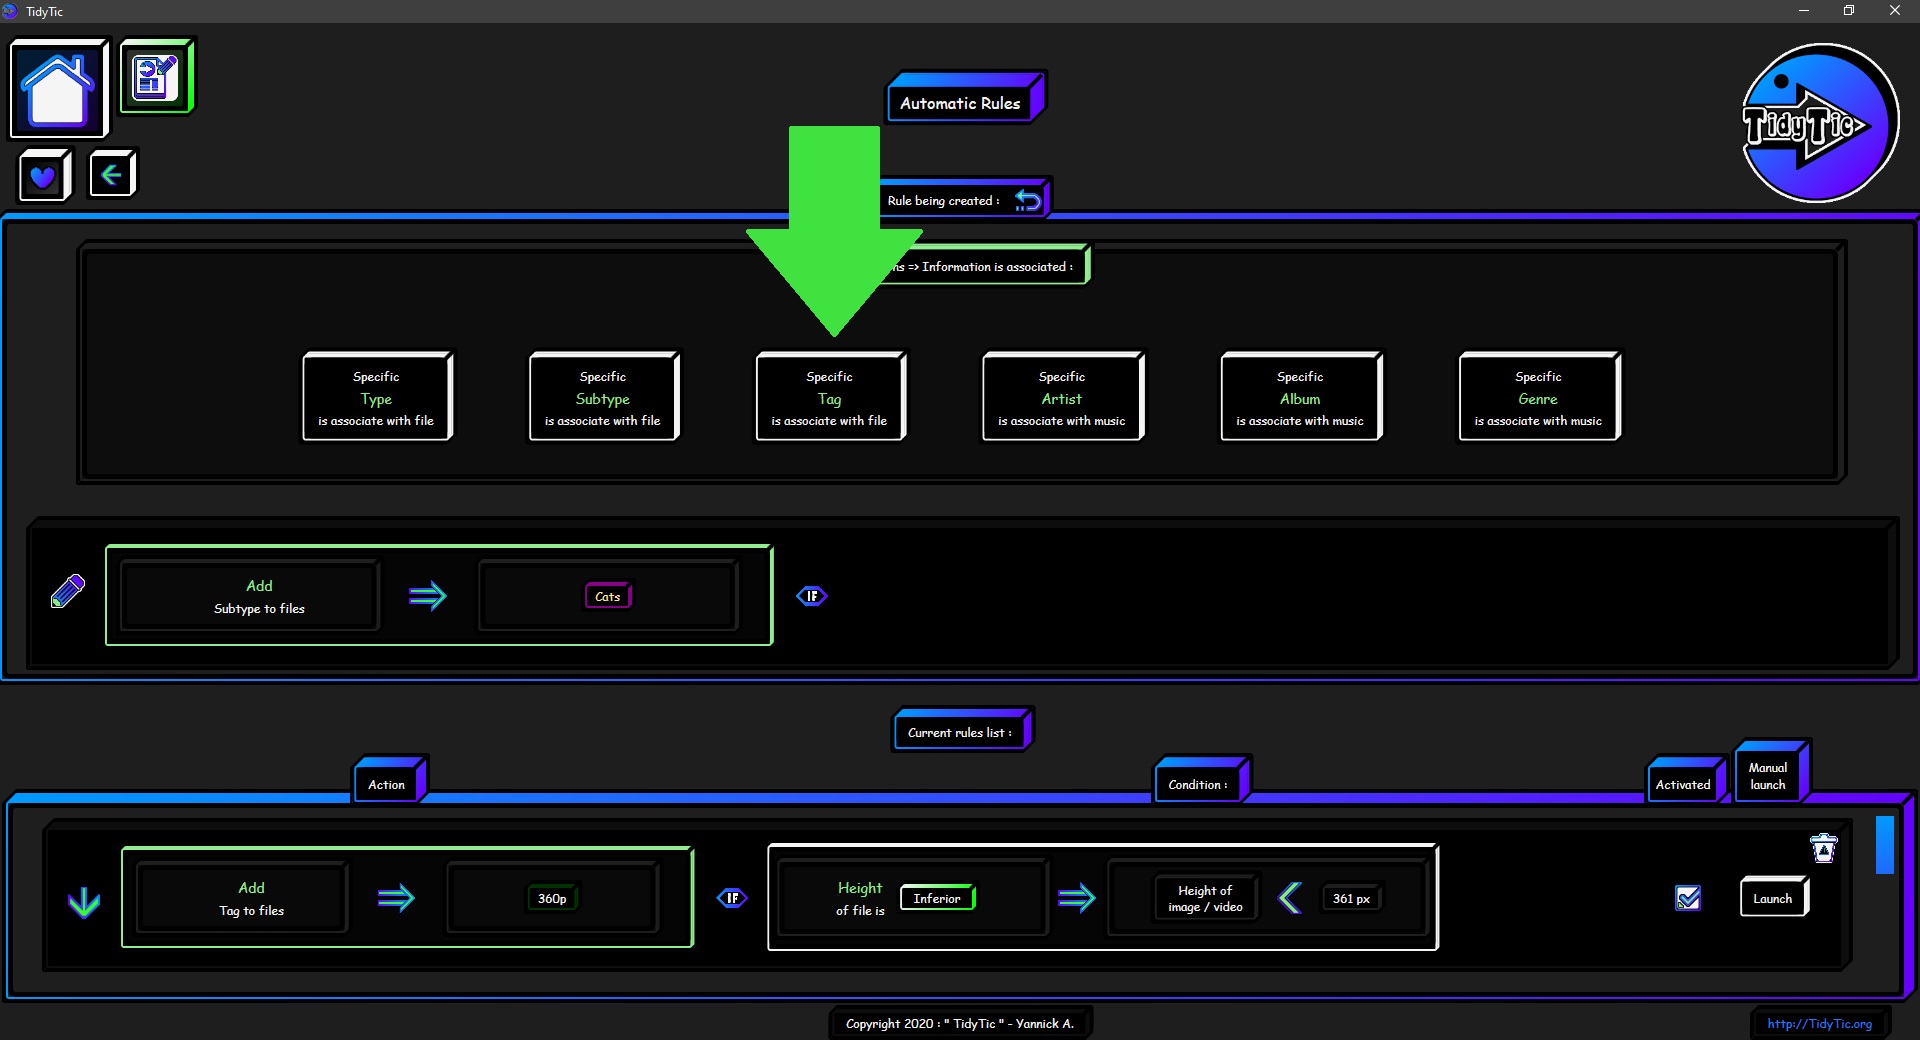
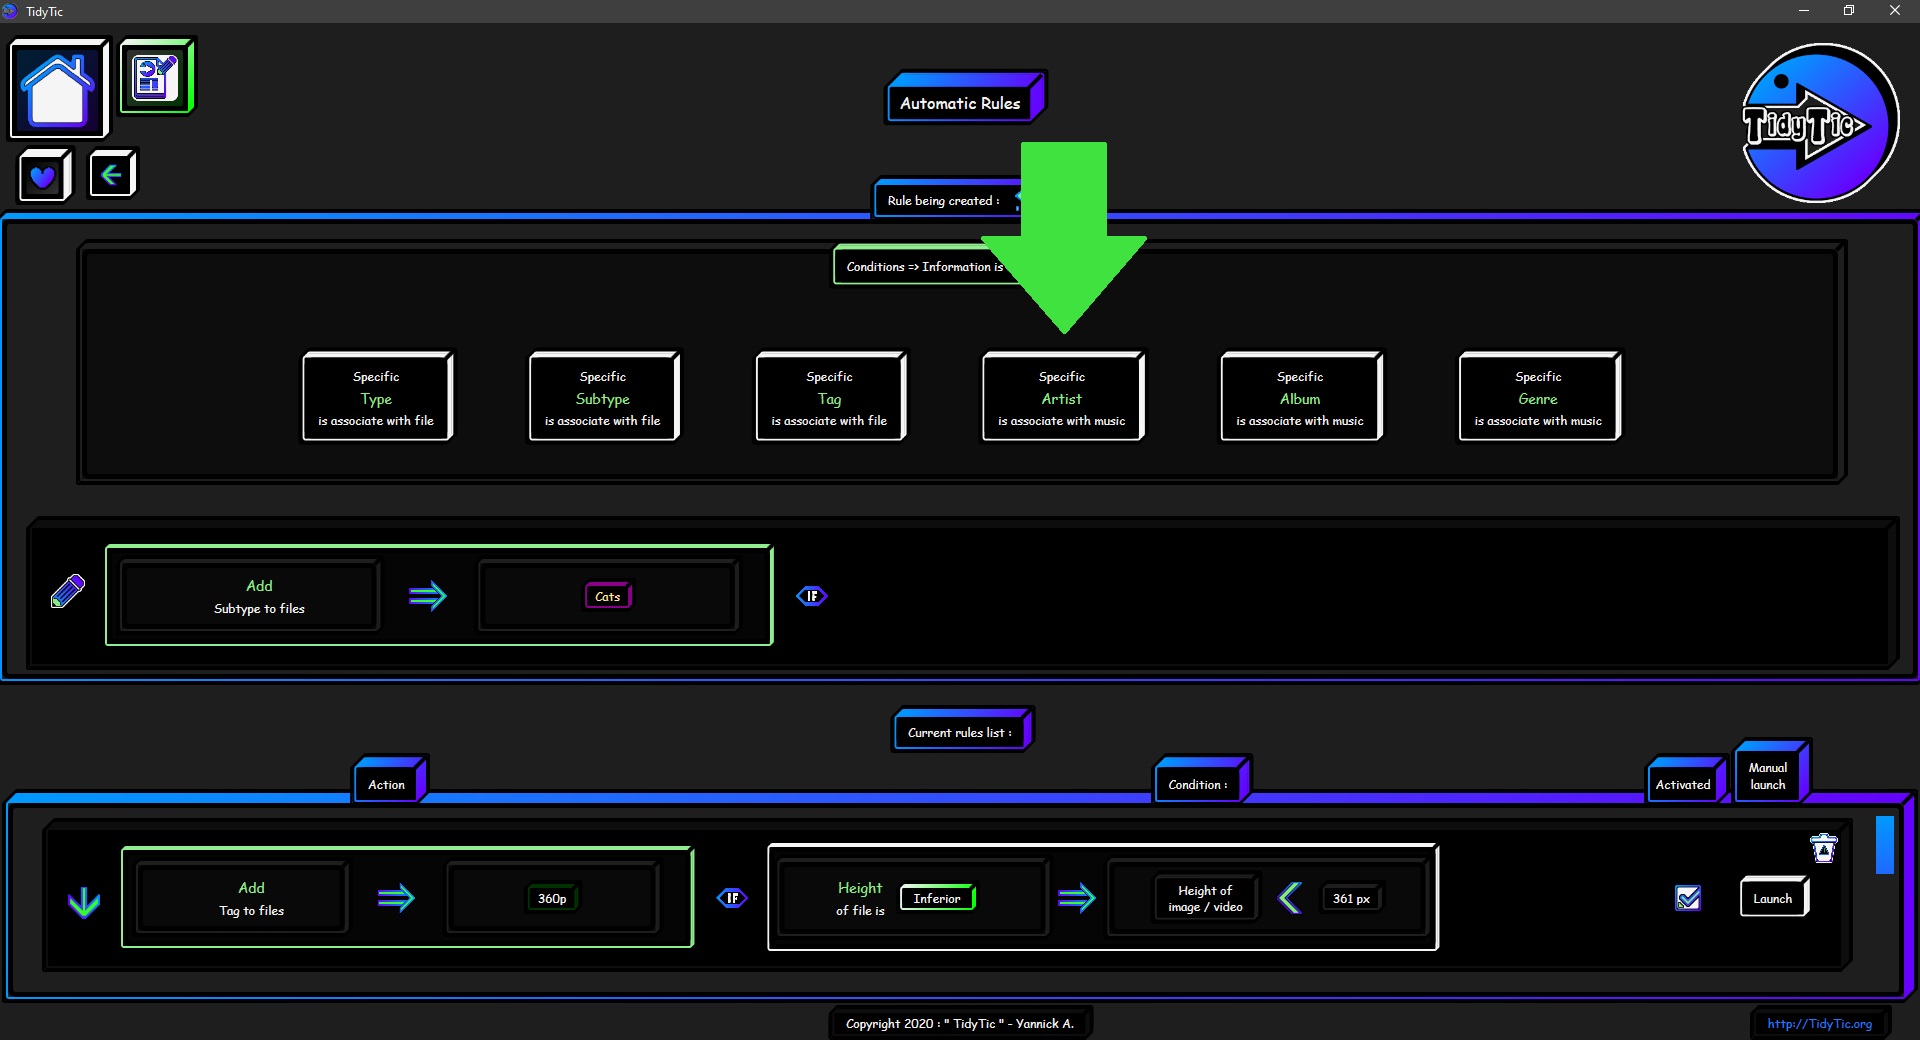
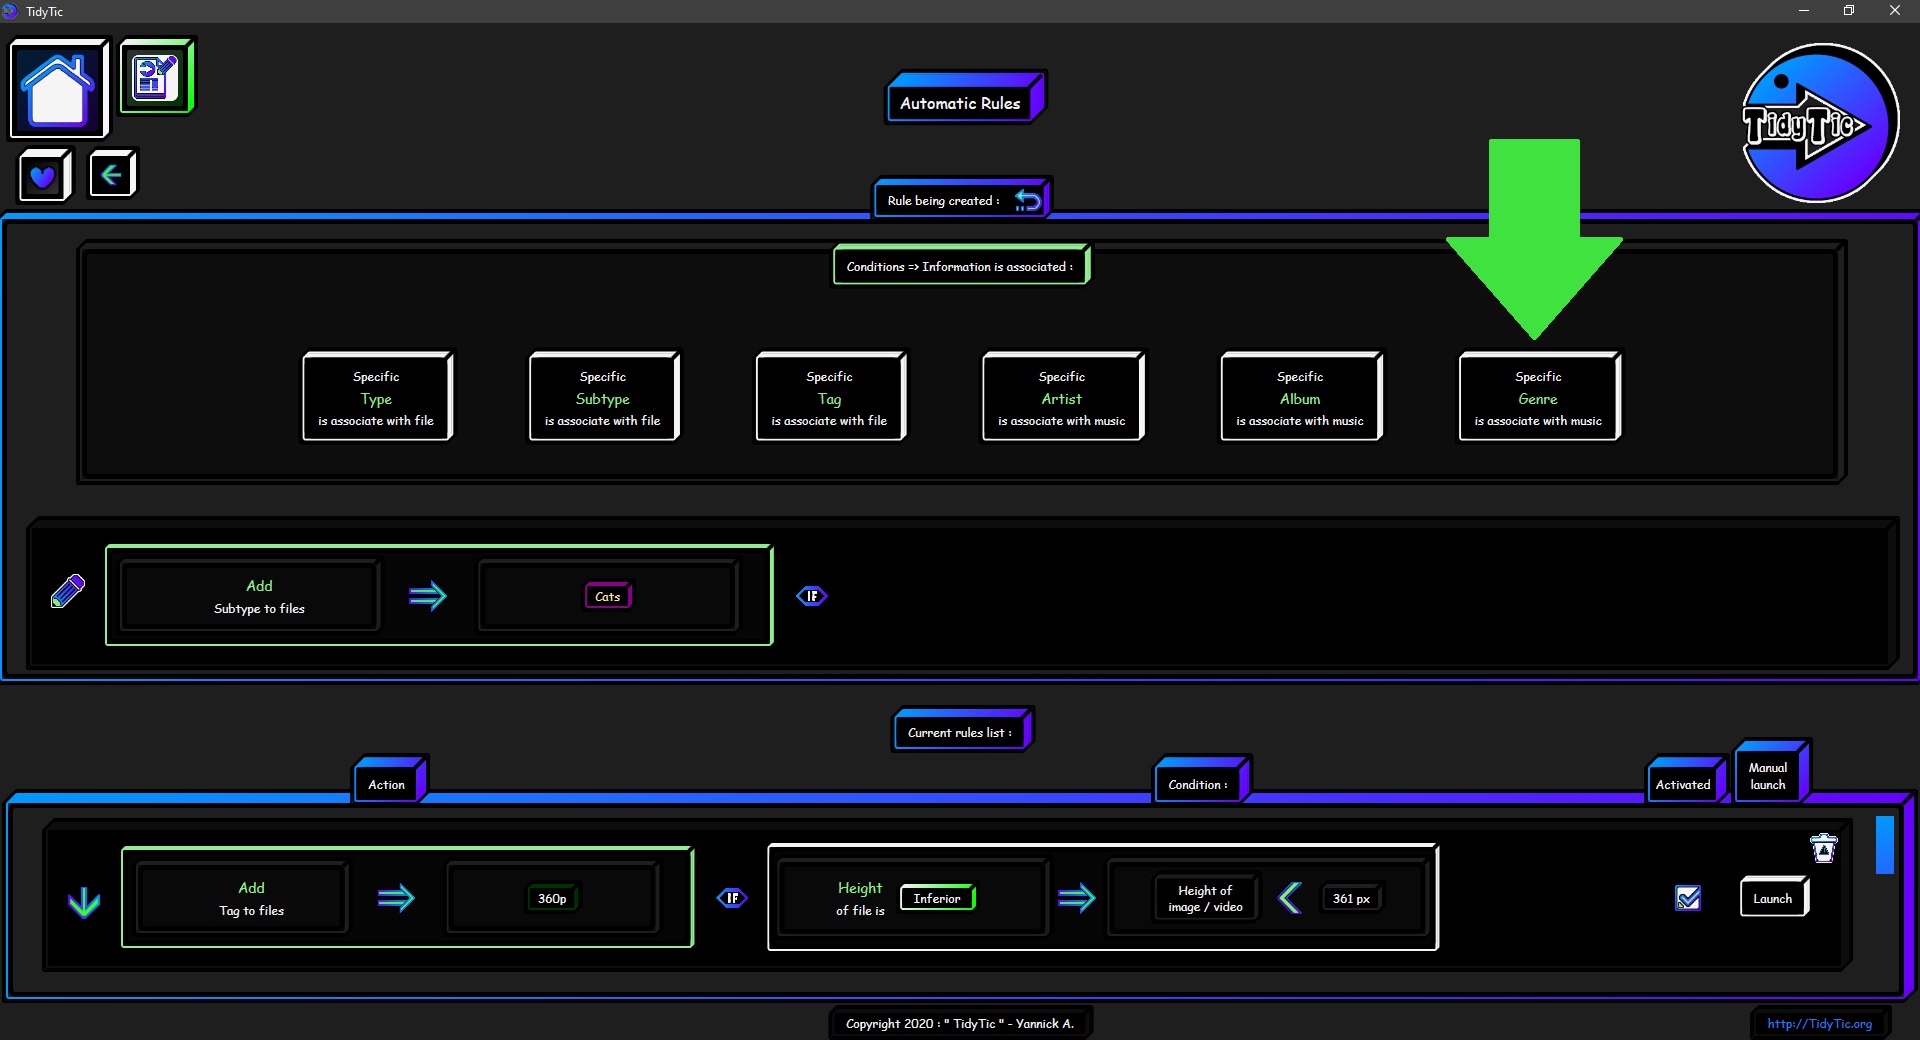
Condition : “An Information: type / subtype / tag / artist / album / genre is associated with the file” :
This condition leaves you with 6 options that will allow you to define whether the action will be triggered or not on your files based on their information :
- A specific type is associated with the file.
- A specific subtype is associated with the file.
- A specific tag is associated with the file.
- A specific artist is associated with the music.
- A specific album is associated with the music.
- A specific genre is associated with music.
 ____
____ 
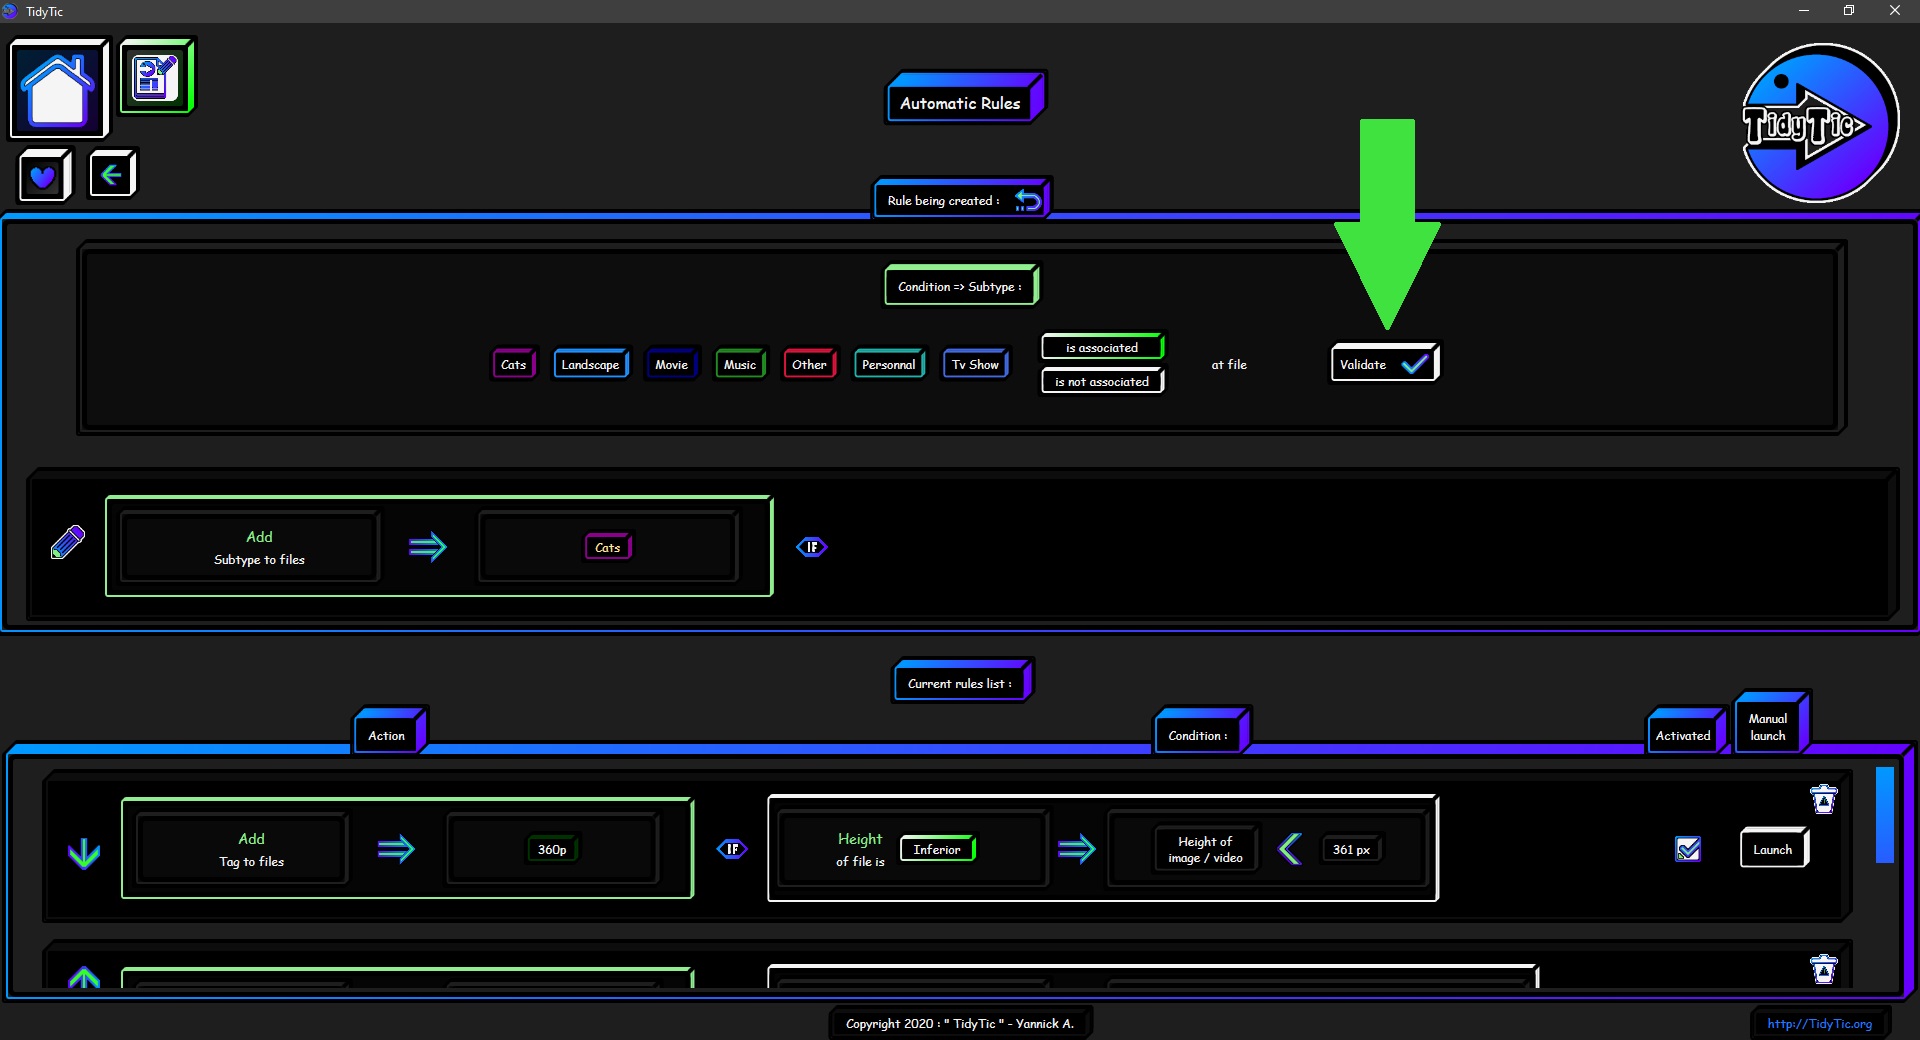
The "A specific type is associated with the file" option :
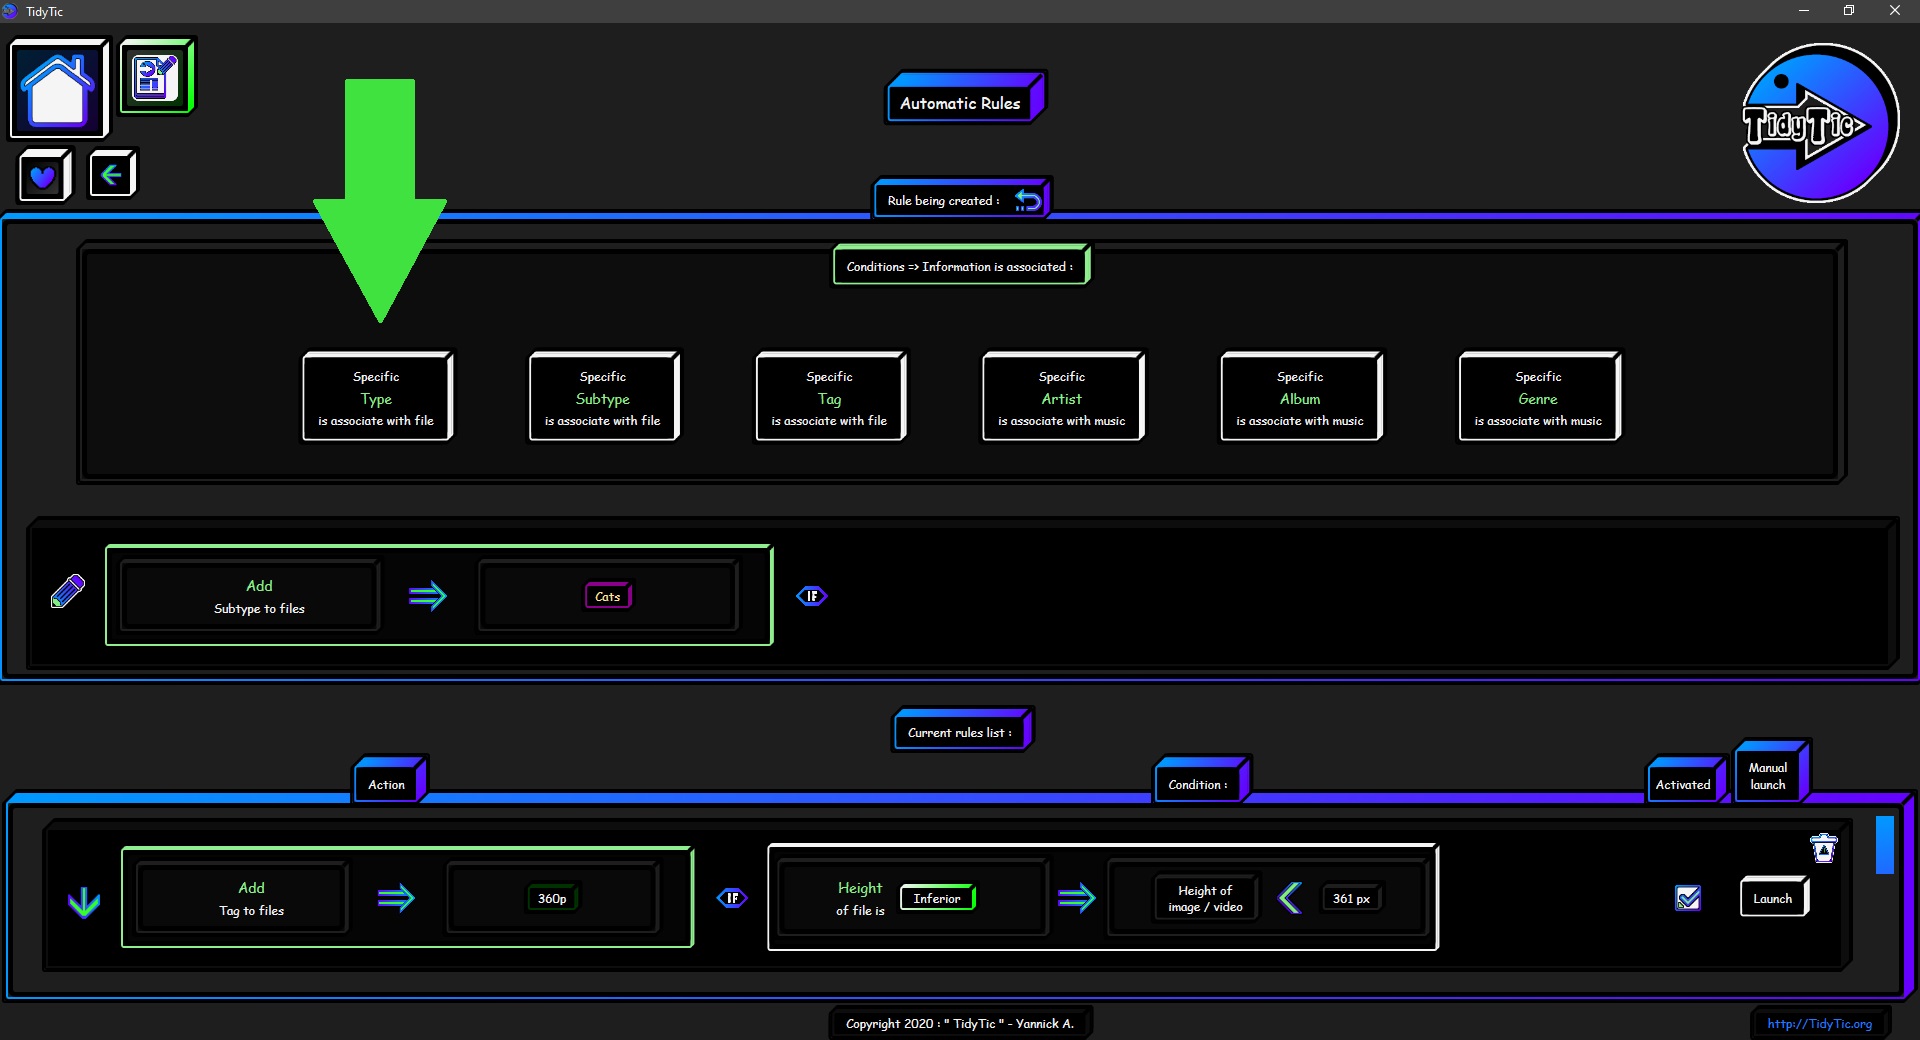
For this option it will be necessary to select the type which will be search by the condition.
You will have the list of all type known by TidyTic.
When you select a type by clicking on it, its name changes to green.
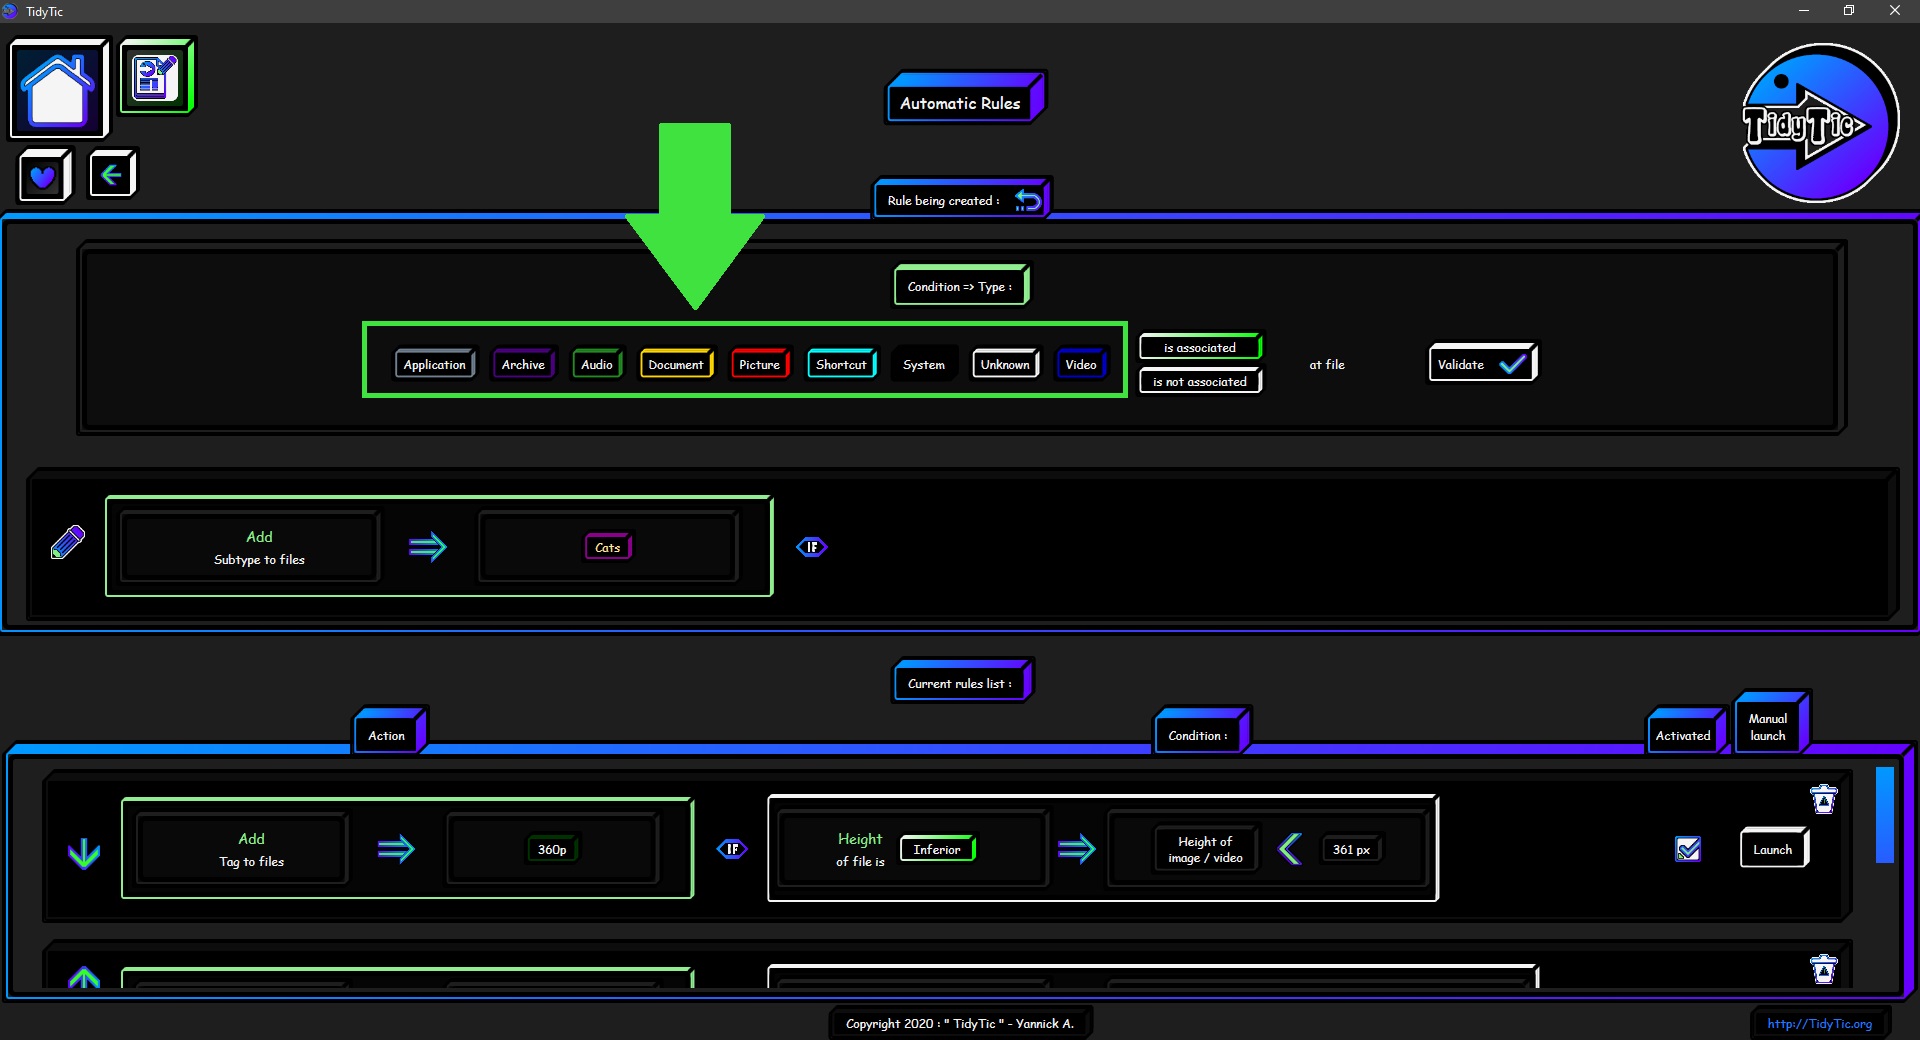
Then you will have to choose when the condition is met and therefore when it will trigger the action :
- When the type chosen is the one of the file.
- Or on the contrary if the type is different from the one you indicated.
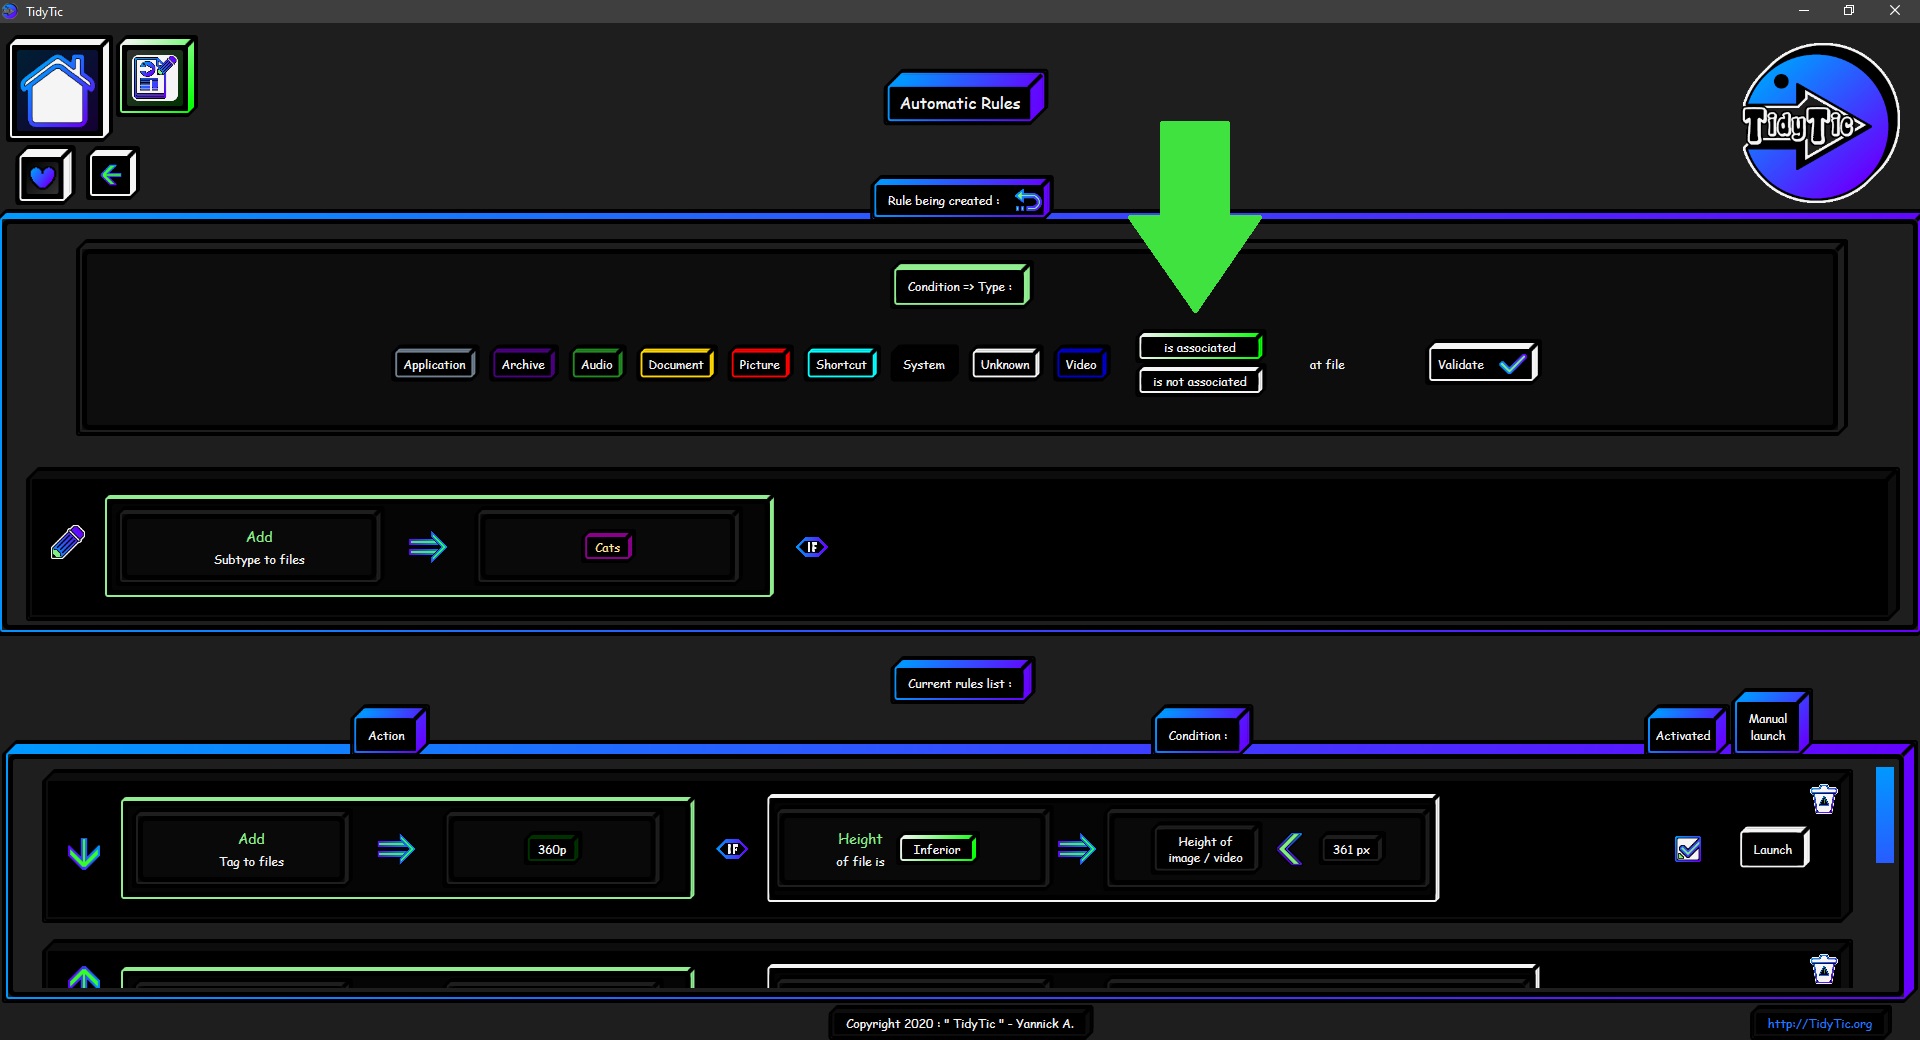
Then you just have to validate this condition.
The "A specific subtype is associated with the file" option :
For this option it will be necessary to select the subtype which will be search by the condition.
You will have the list of all subtype known by TidyTic.
When you select a subtype by clicking on it, its name changes to green.
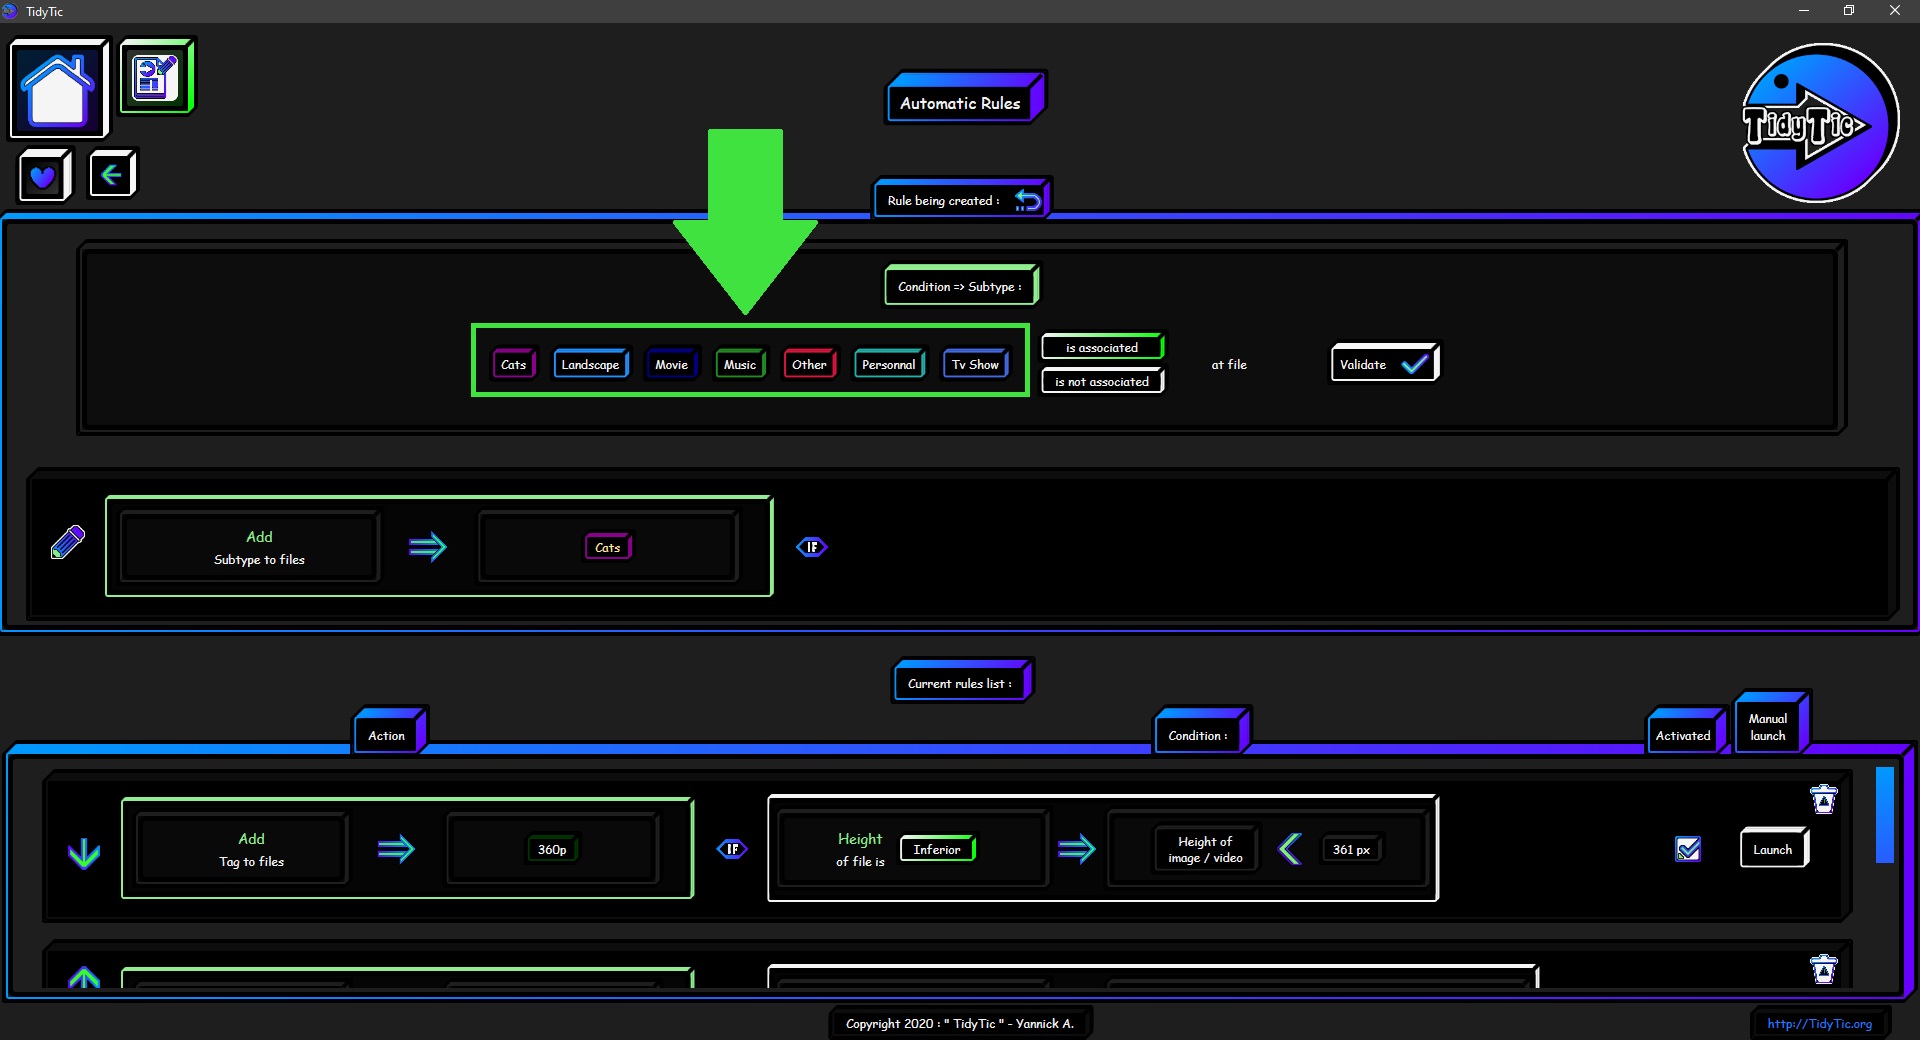
Then you will have to choose when the condition is met and therefore when it will trigger the action :
- When the chosen subtype is associated with the file.
- Or on the contrary the subtype is NOT associated with the file.
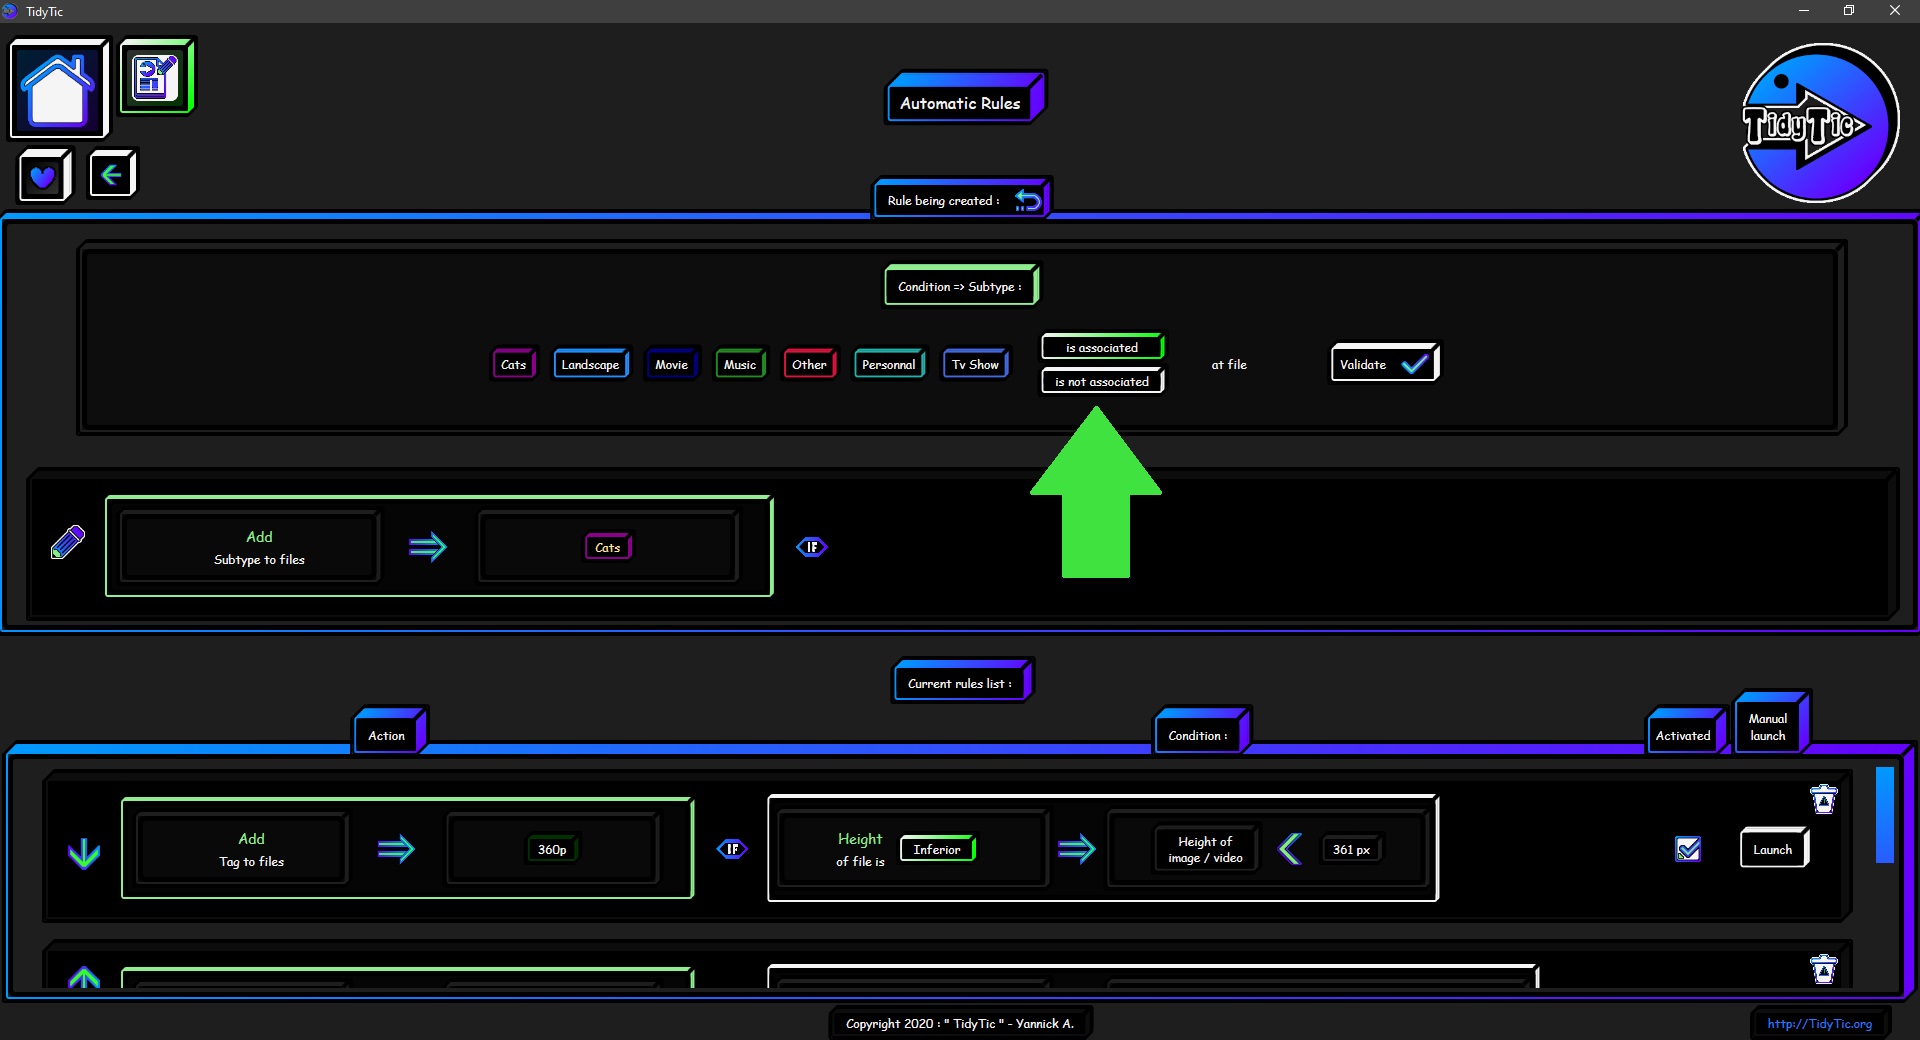
Then you just have to validate this condition.
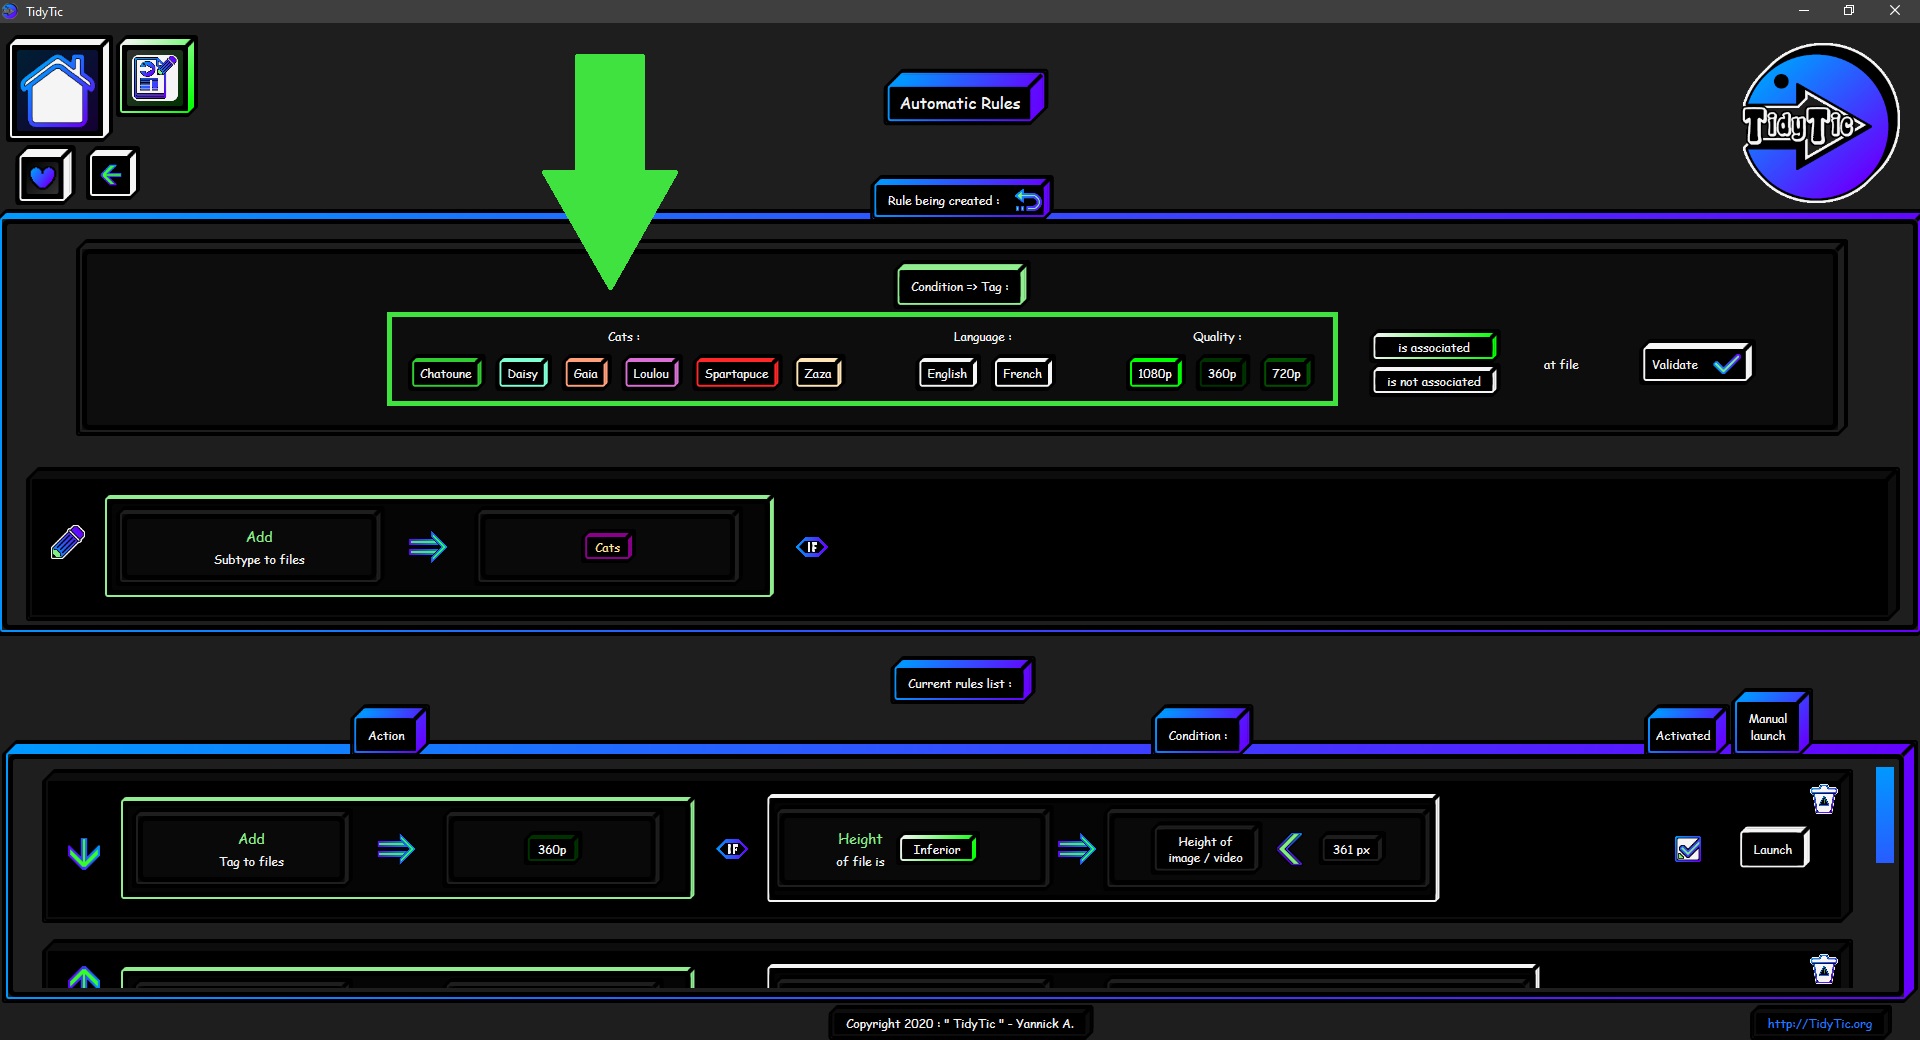
The "A specific tag is associated with the file" option :
For this option it will be necessary to select the tag which will be search by the condition.
You will have the list of all tag known by TidyTic.
When you select a tag by clicking on it, its name changes to green.
Then you will have to choose when the condition is met and therefore when it will trigger the action :
- When the chosen tag is associated with the file.
- Or on the contrary the tag is NOT associated with the file.
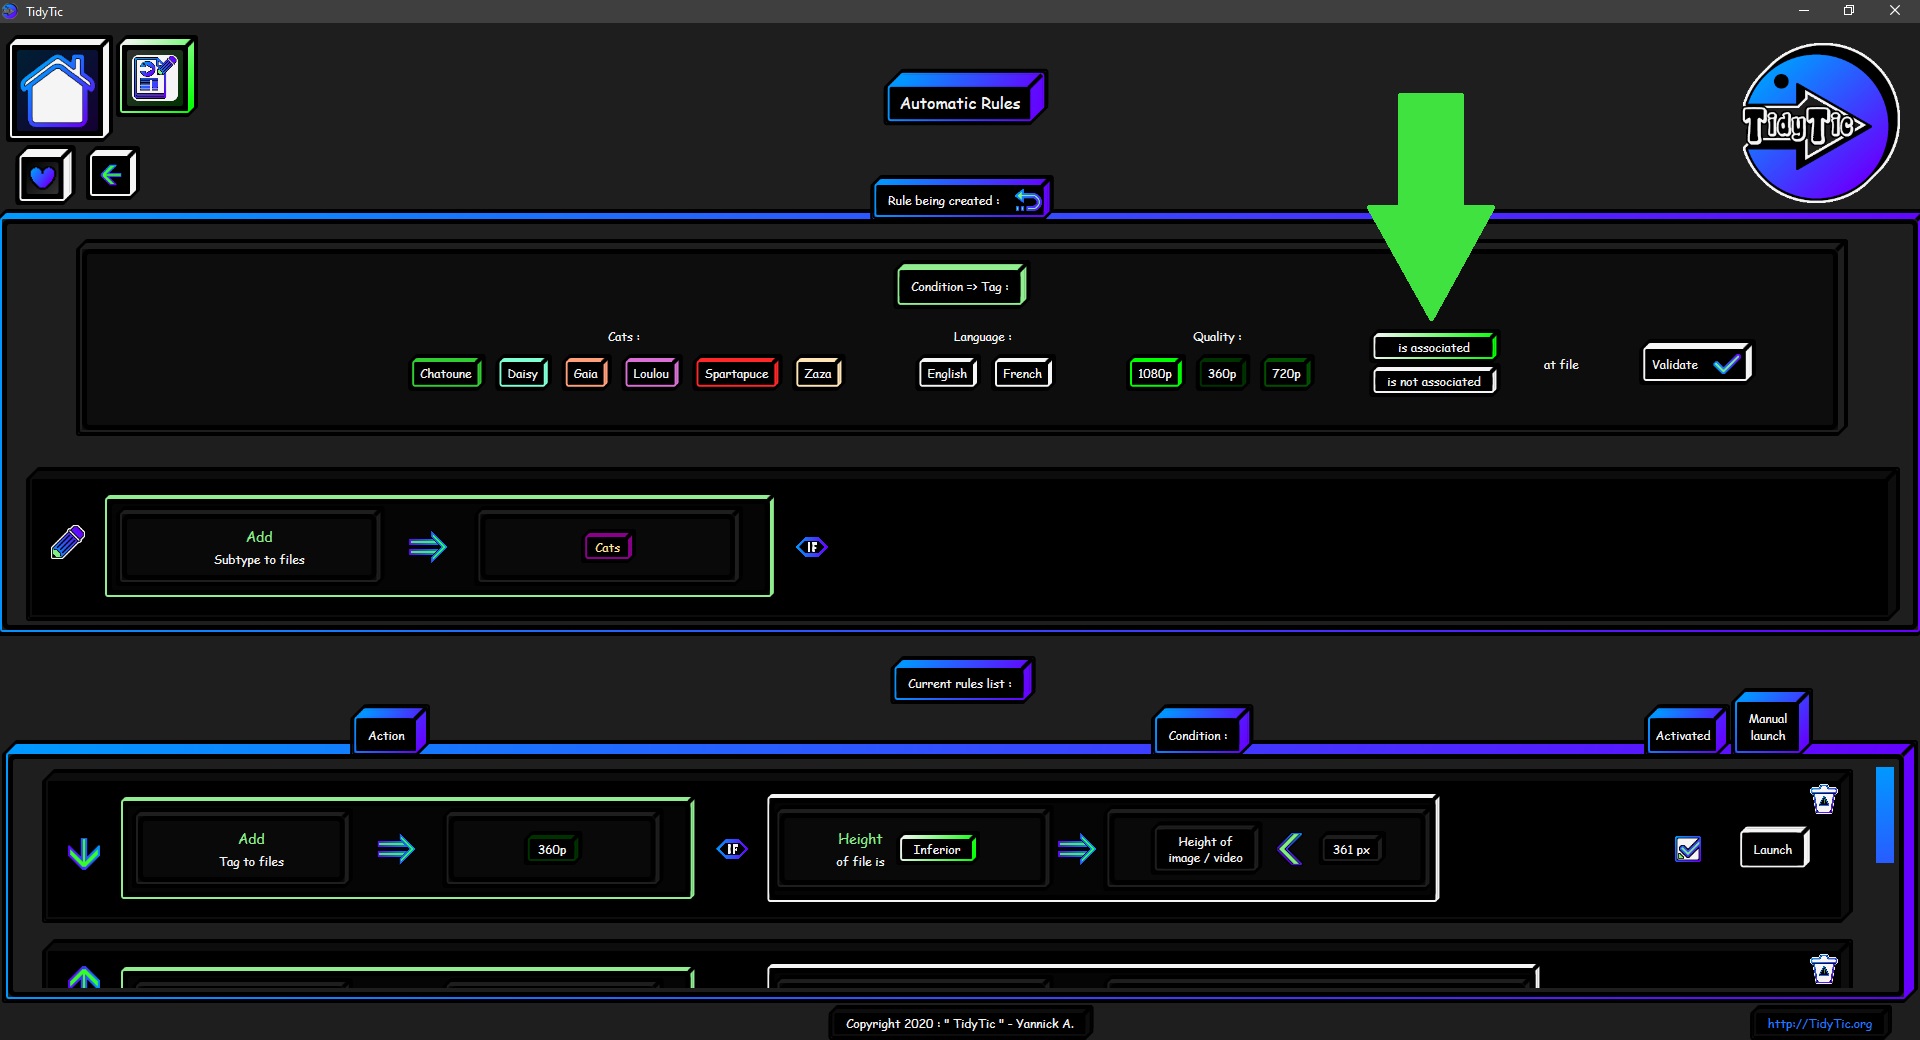
Then you just have to validate this condition.
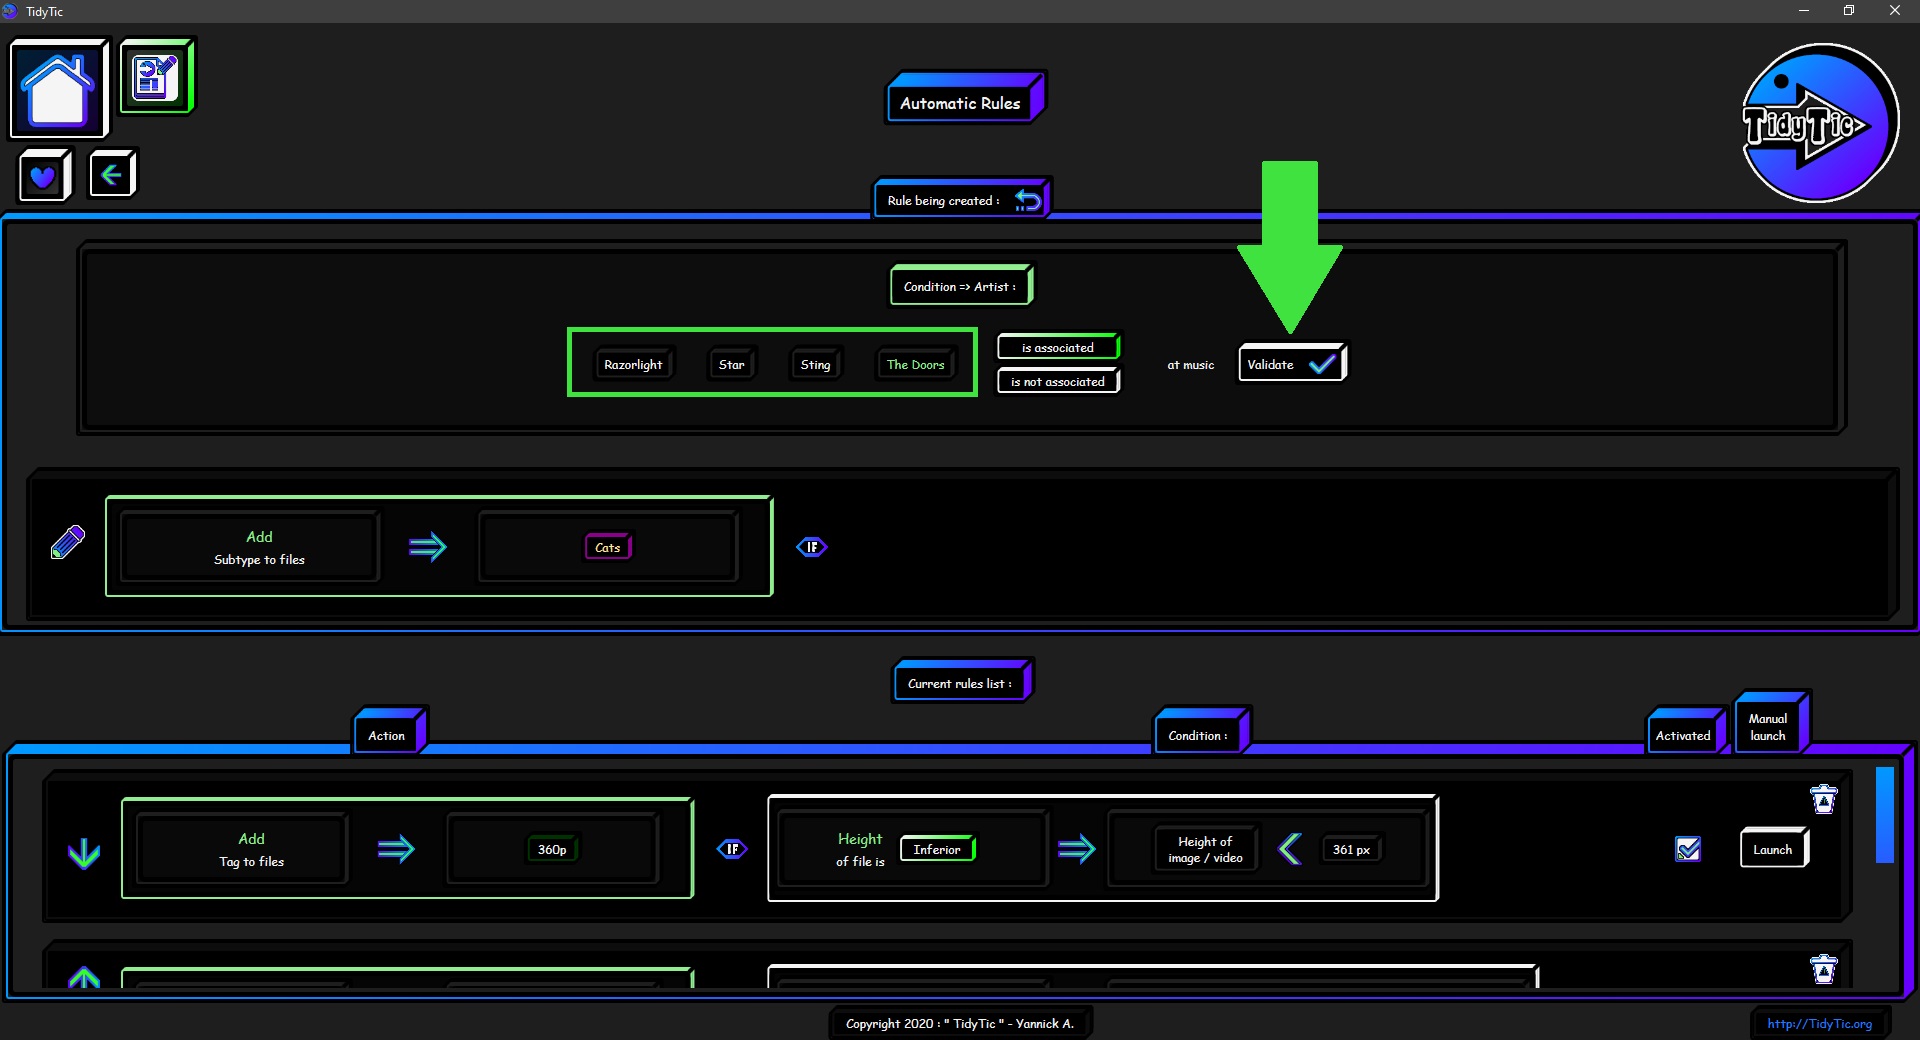
The "A specific artist is associated with the music" option :
For this option it will be necessary to select the artist which will be search by the condition.
You will have the list of all artist known by TidyTic.
When you select a artist by clicking on it, its name changes to green.
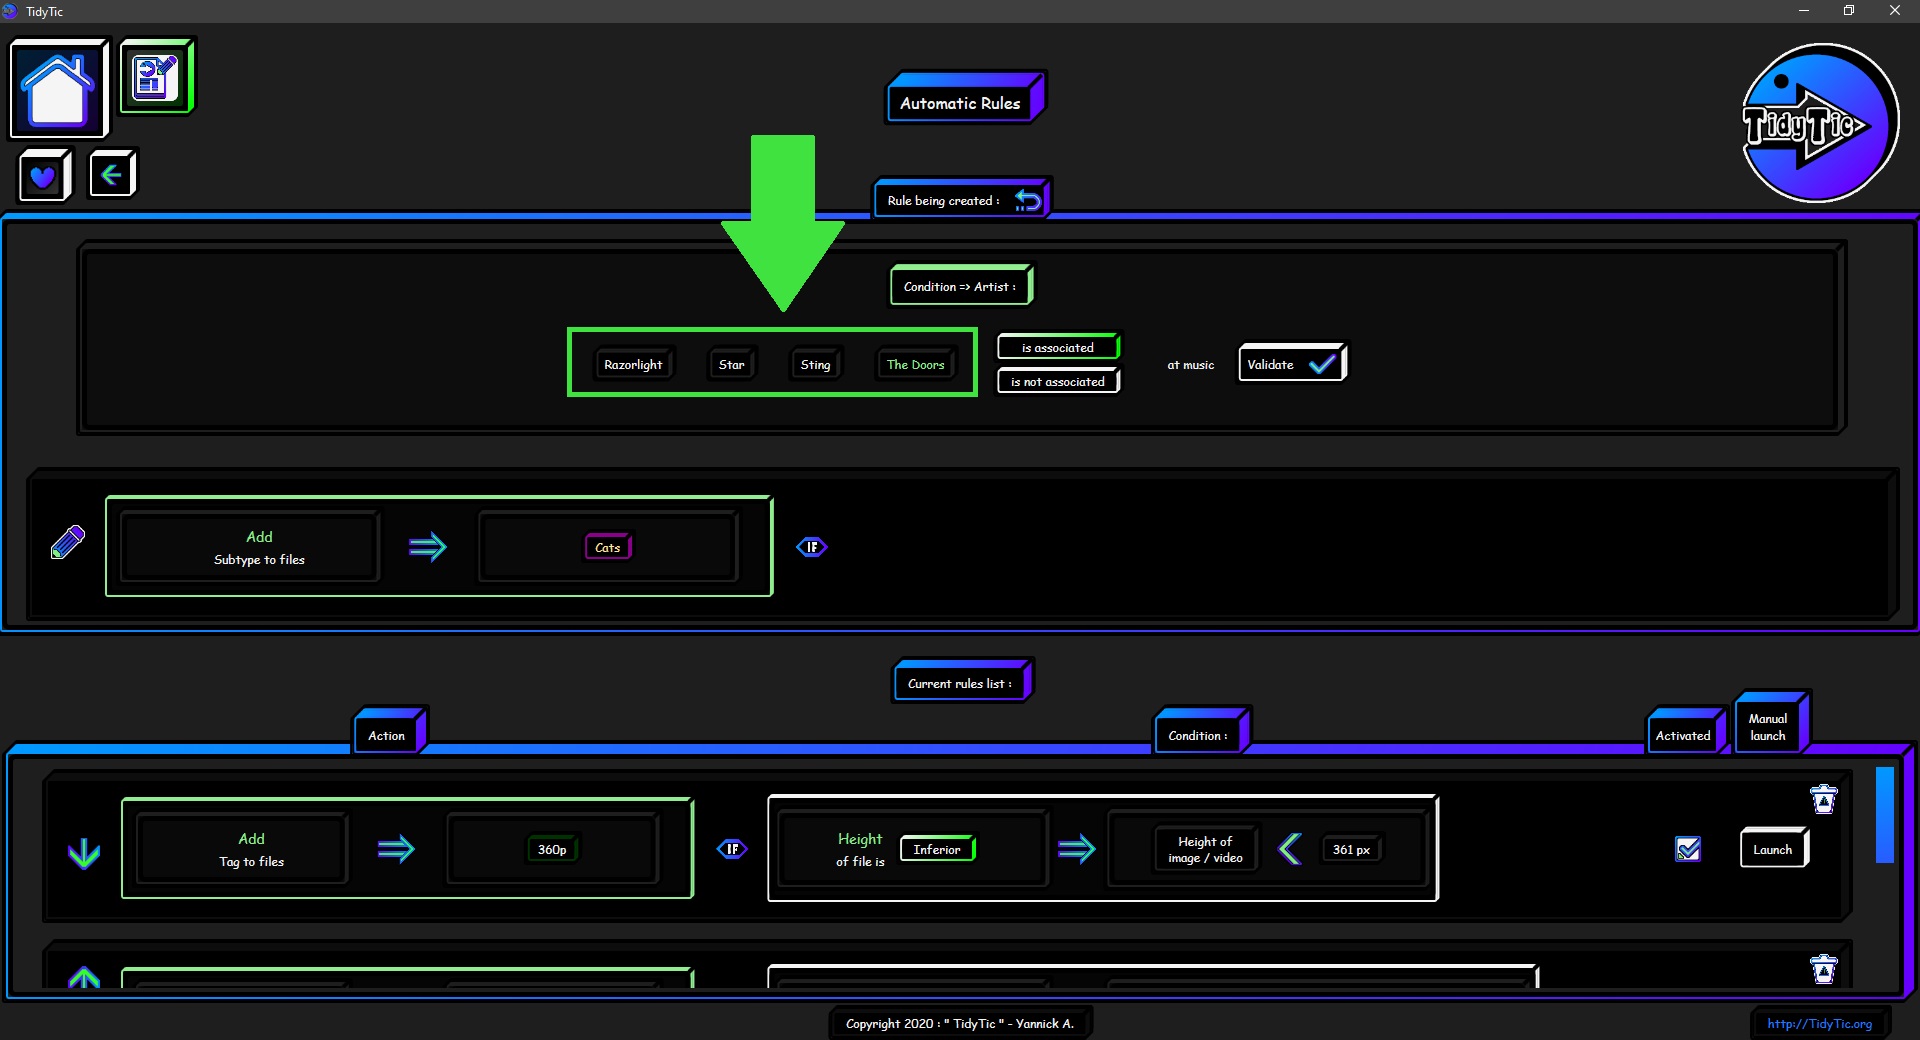
Then you will have to choose when the condition is met and therefore when it will trigger the action :
- When the chosen artist is associated with the music.
- Or on the contrary the artist is NOT associated with the music.
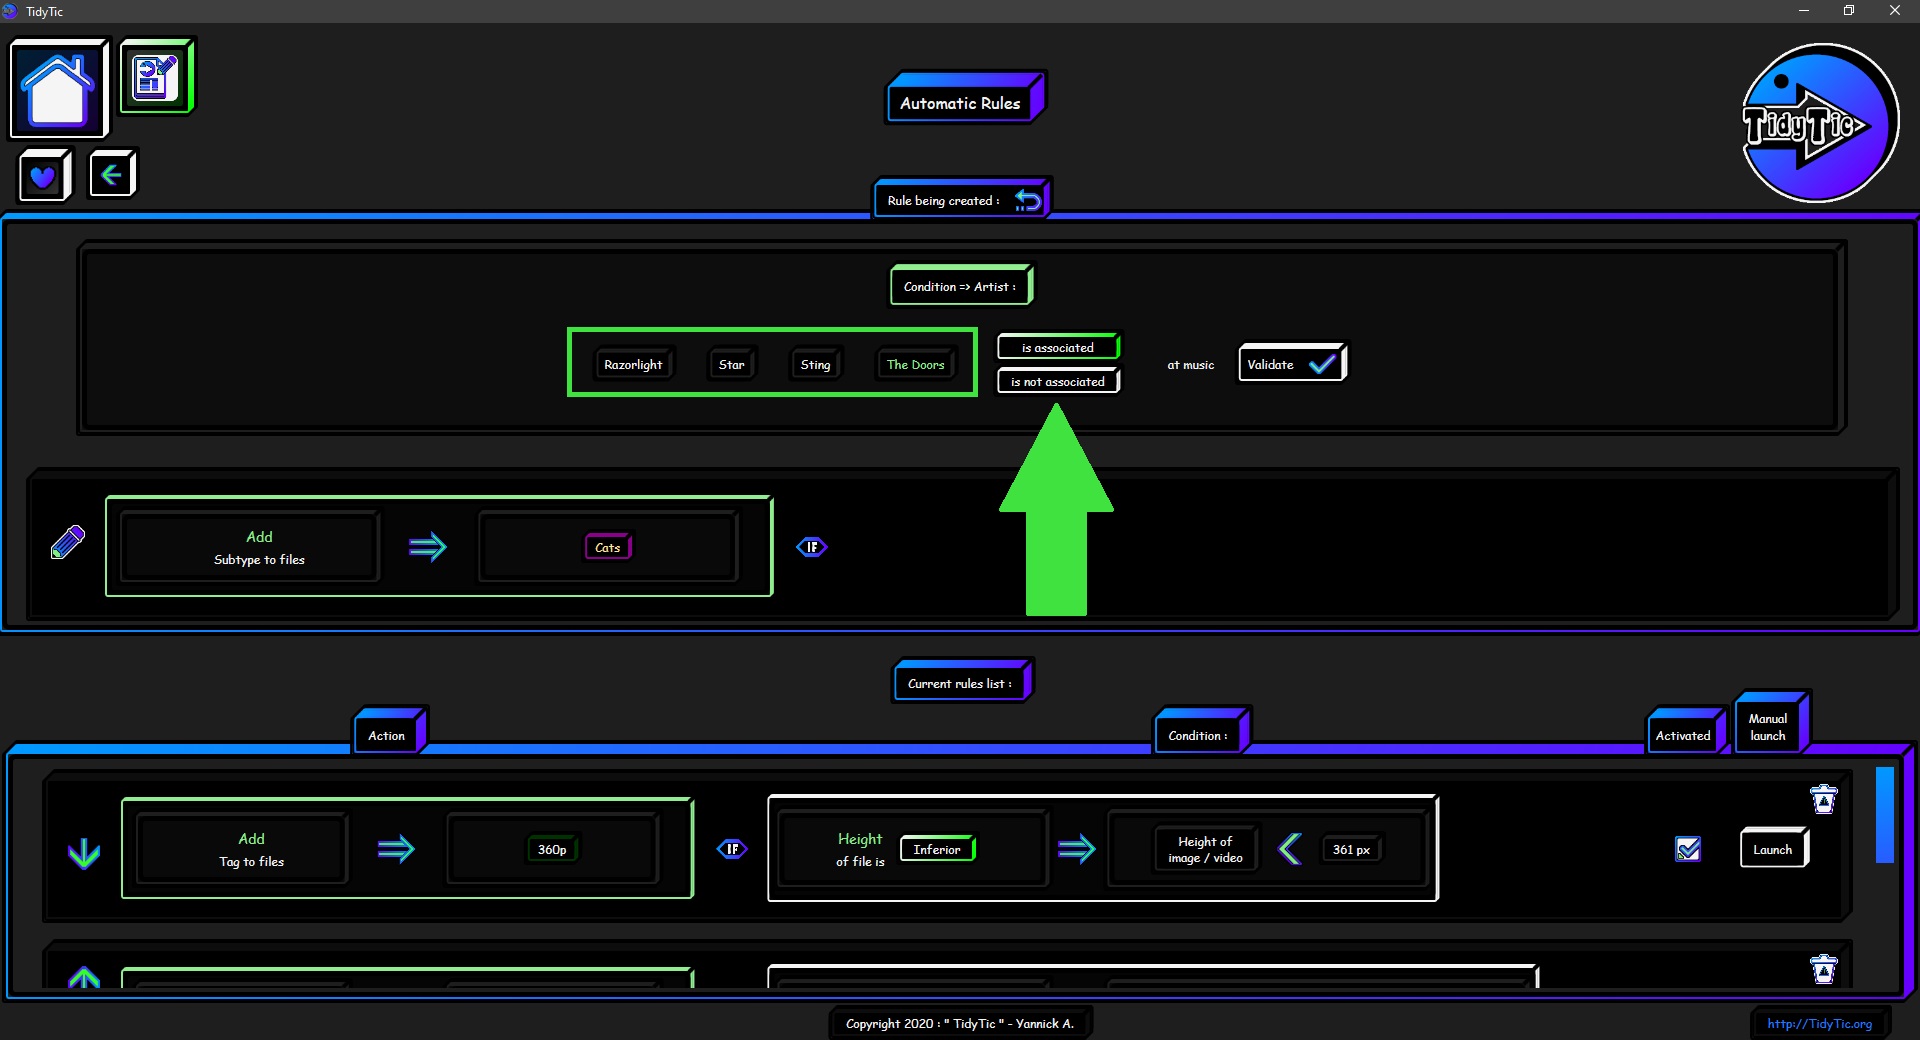
Then you just have to validate this condition.
The "A specific album is associated with the music" option :

For this option it will be necessary to select the album which will be search by the condition.
You will have the list of all album known by TidyTic.
When you select a album by clicking on it, its name changes to green.
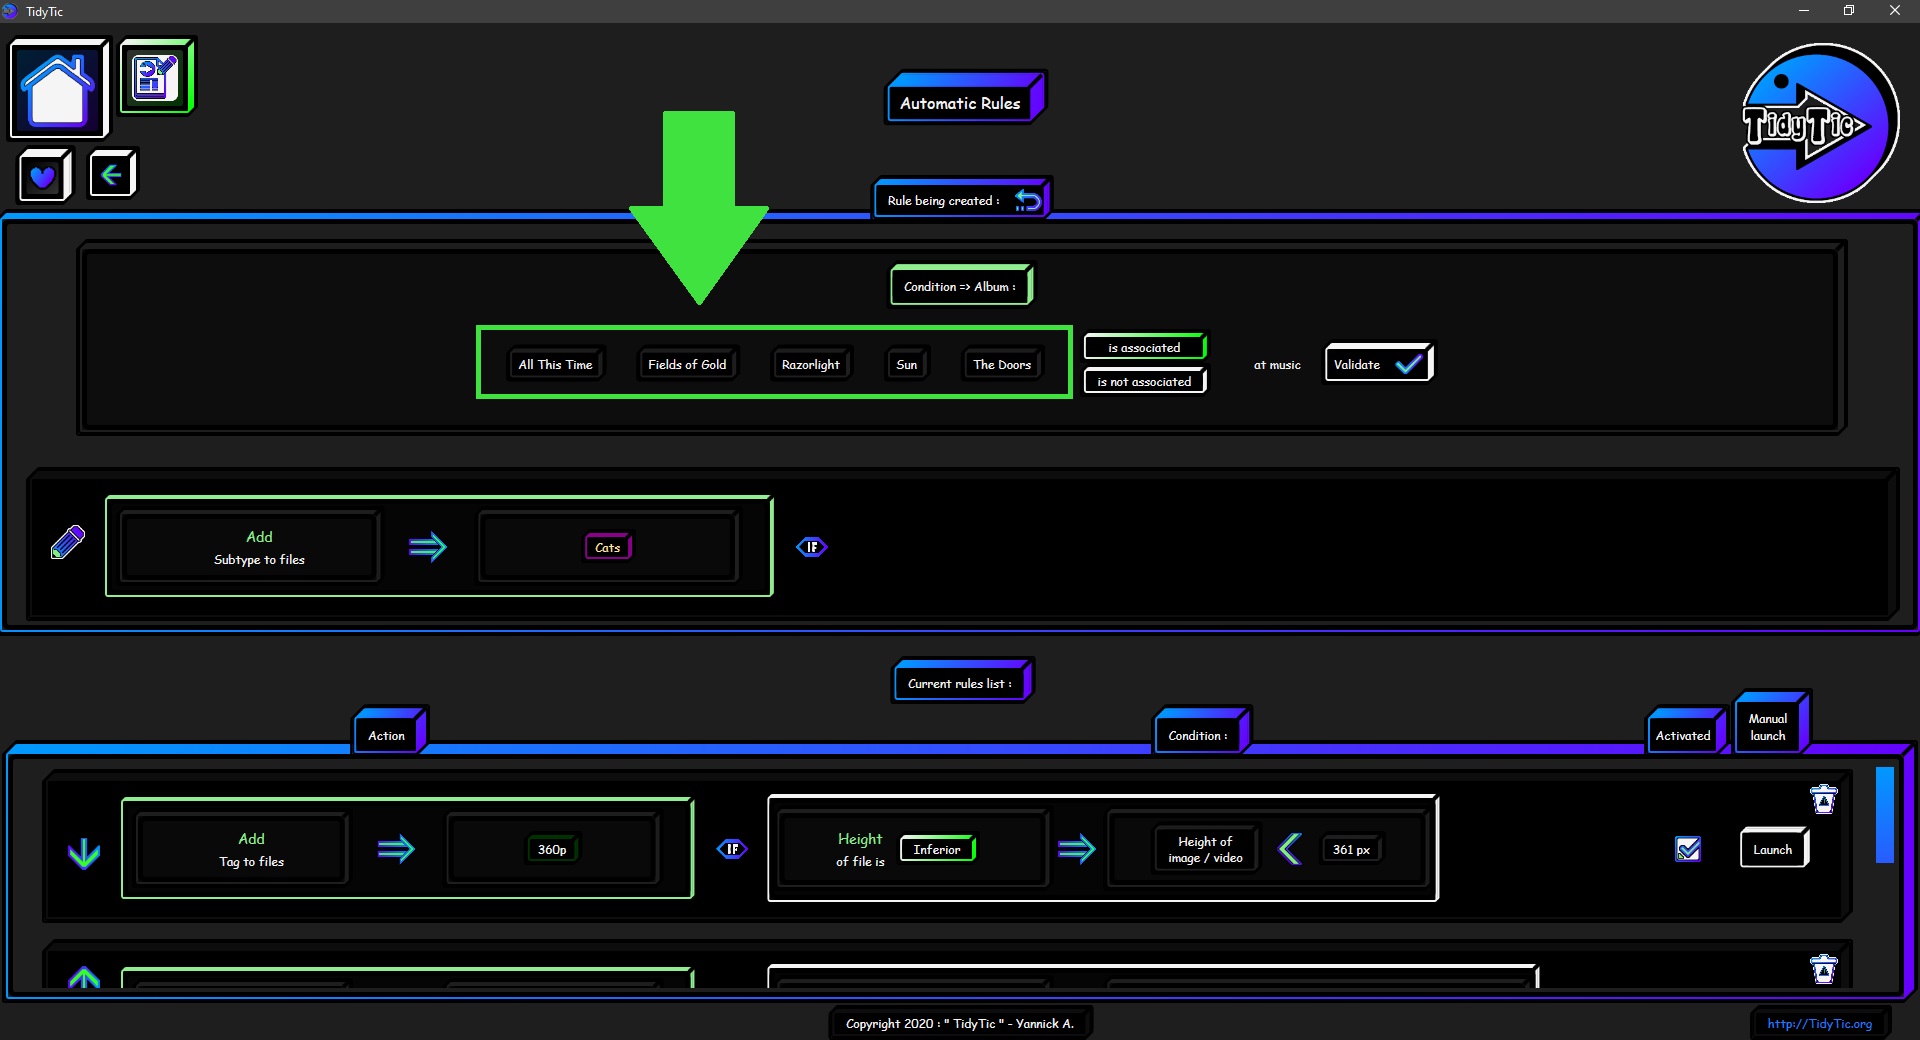
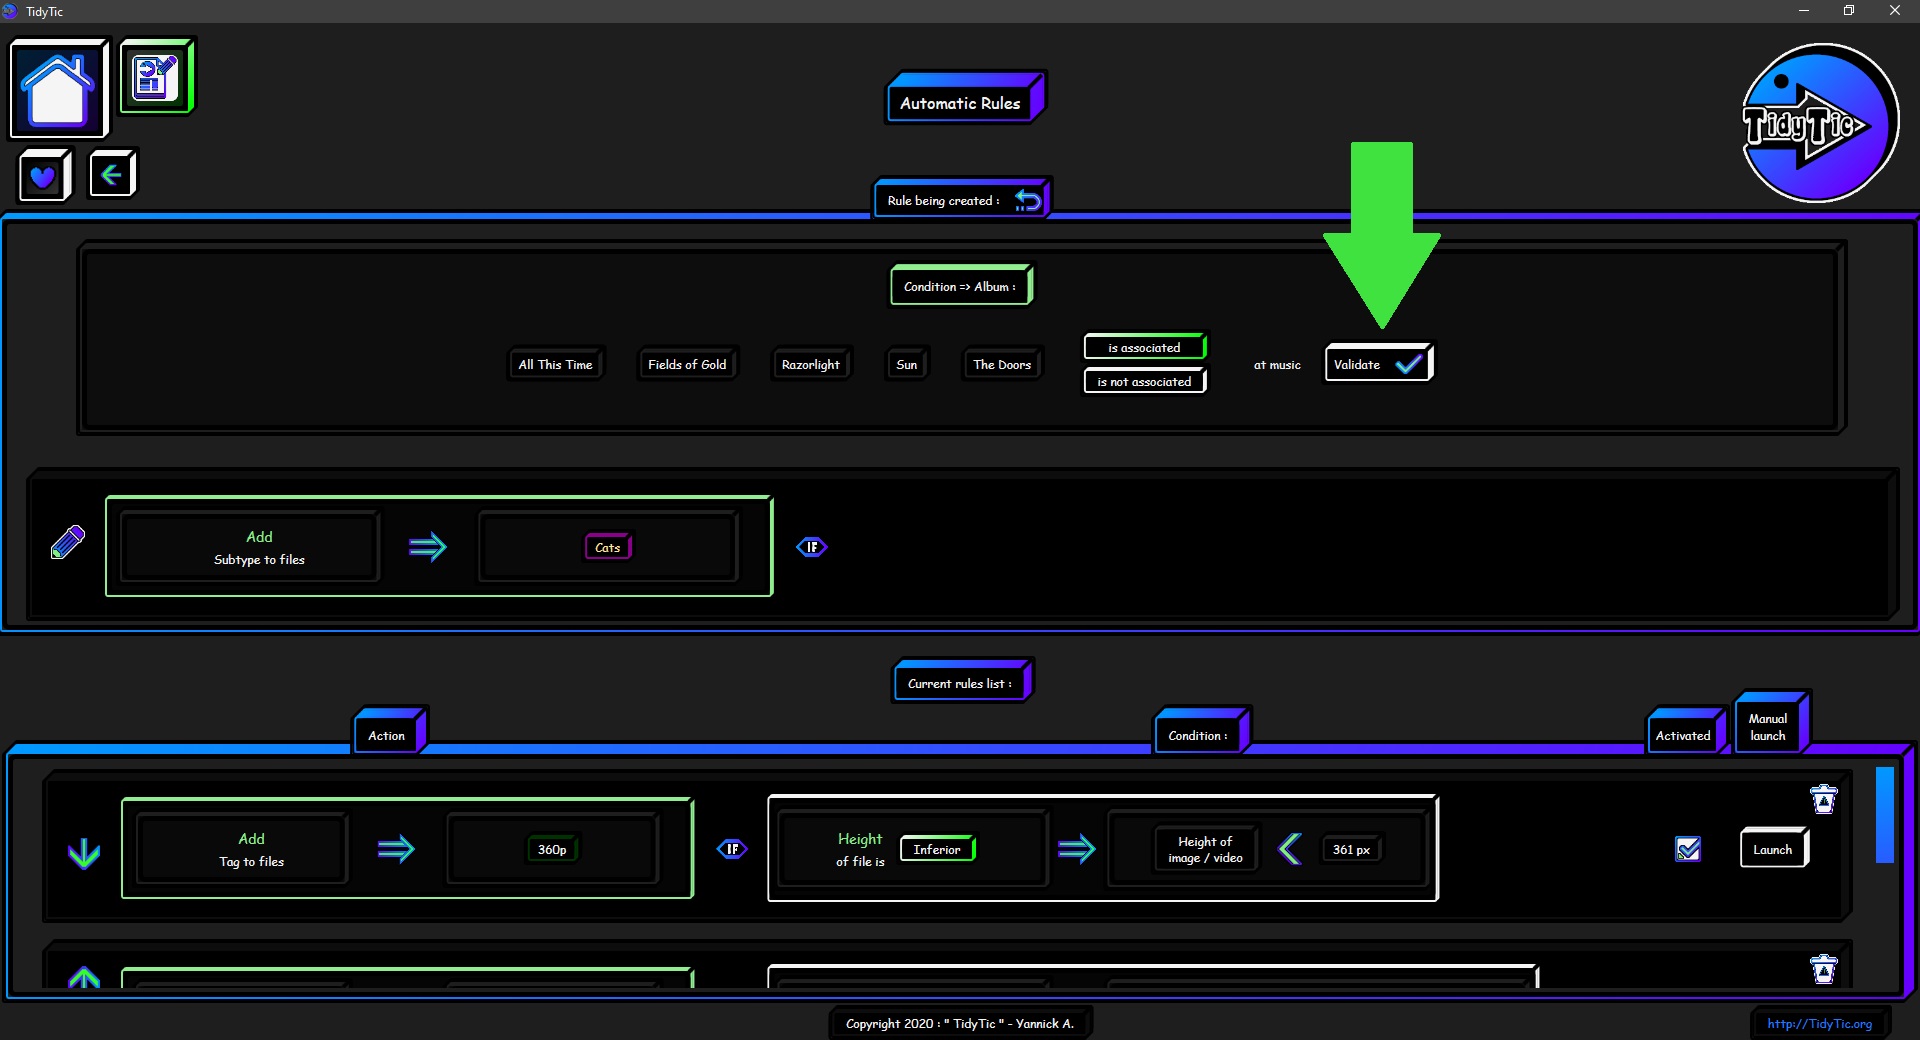
Then you will have to choose when the condition is met and therefore when it will trigger the action :
- When the chosen album is associated with the music.
- Or on the contrary the album is NOT associated with the music.
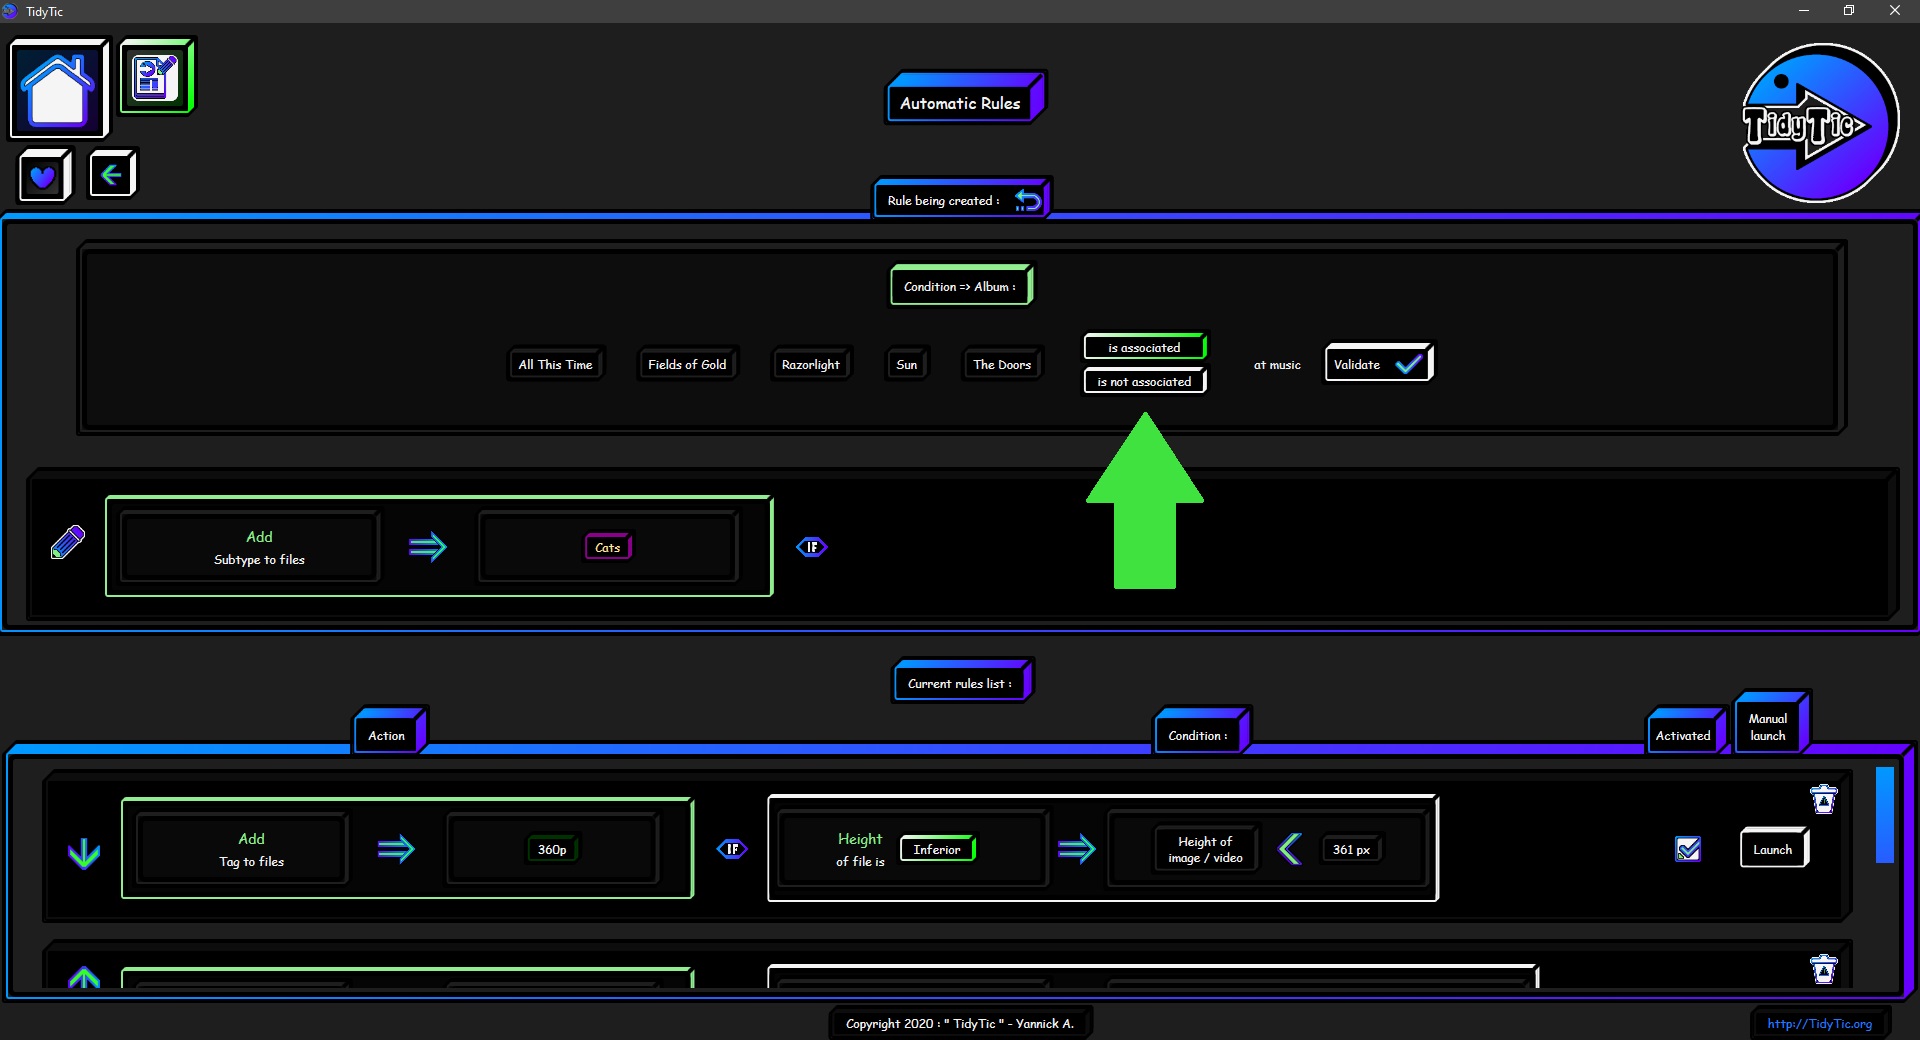
Then you just have to validate this condition.
The "A specific genre is associated with the music" option :
For this option it will be necessary to select the genre which will be search by the condition.
You will have the list of all genre known by TidyTic.
When you select a genre by clicking on it, its name changes to green.
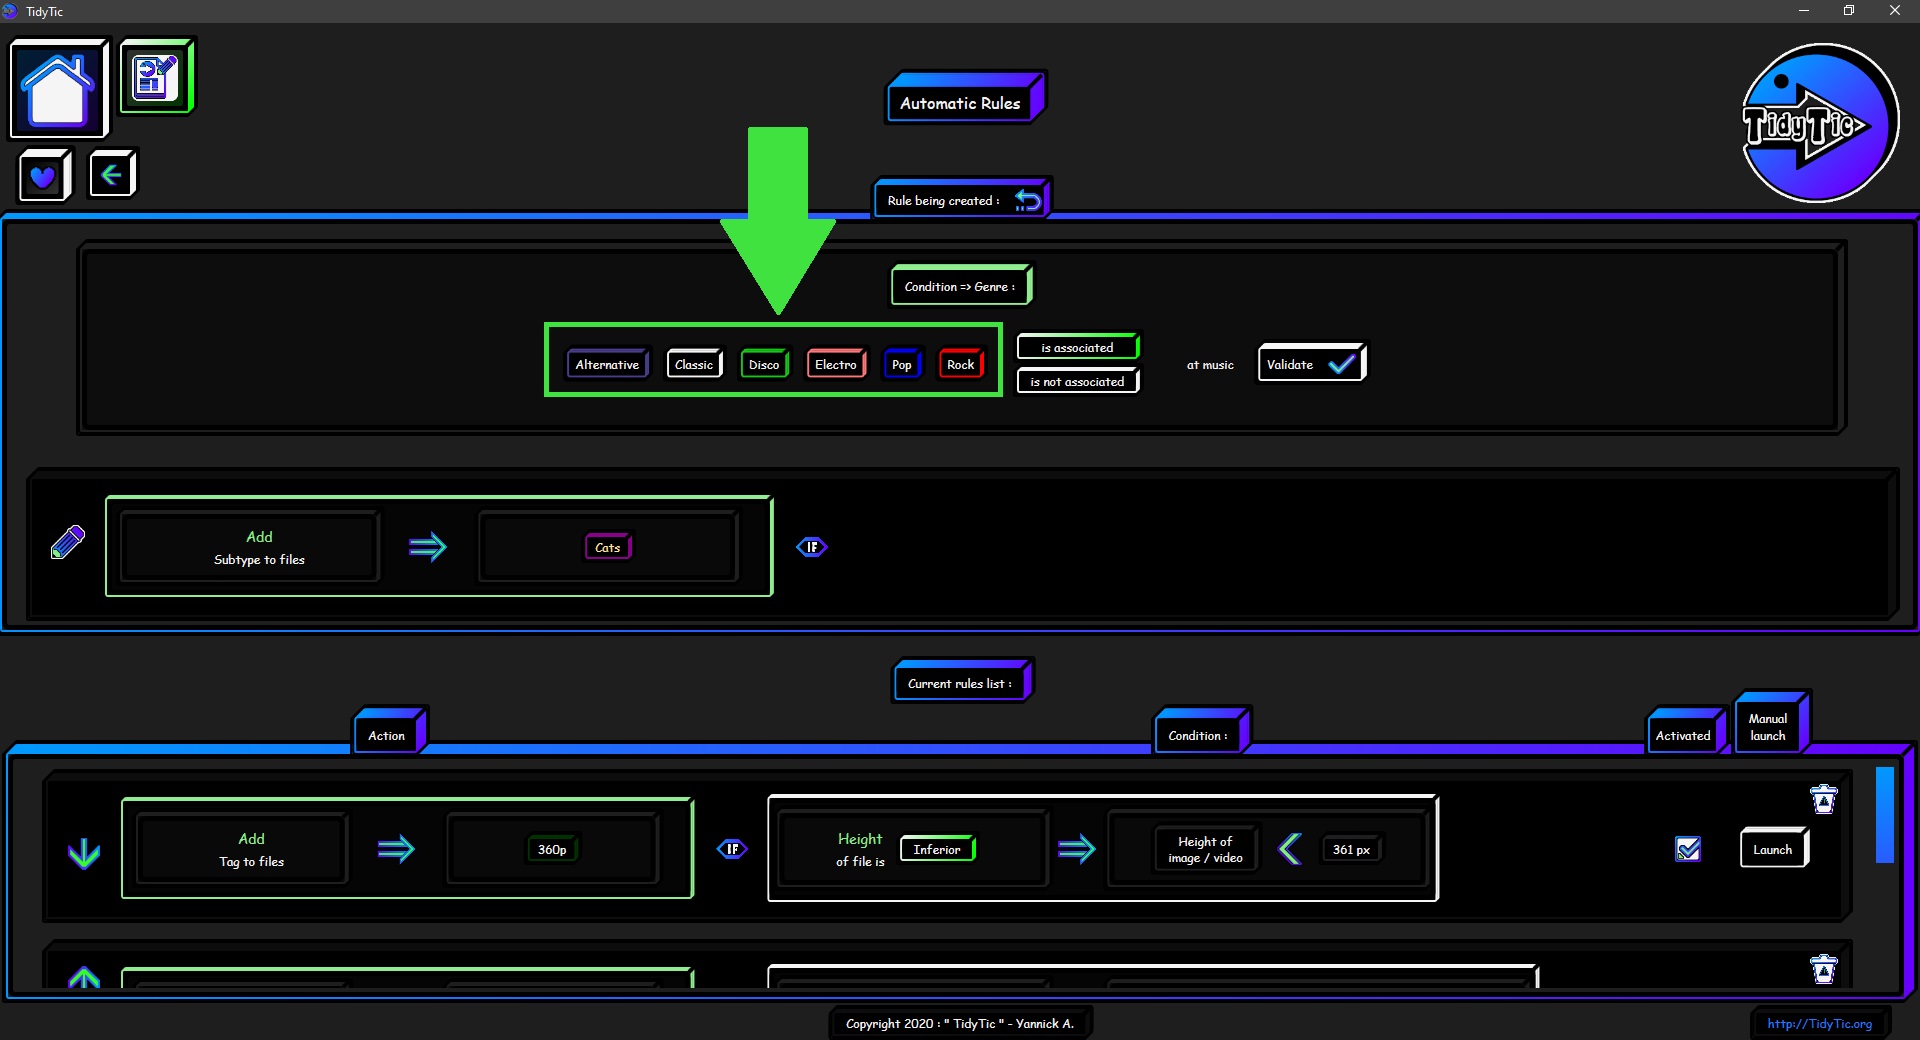
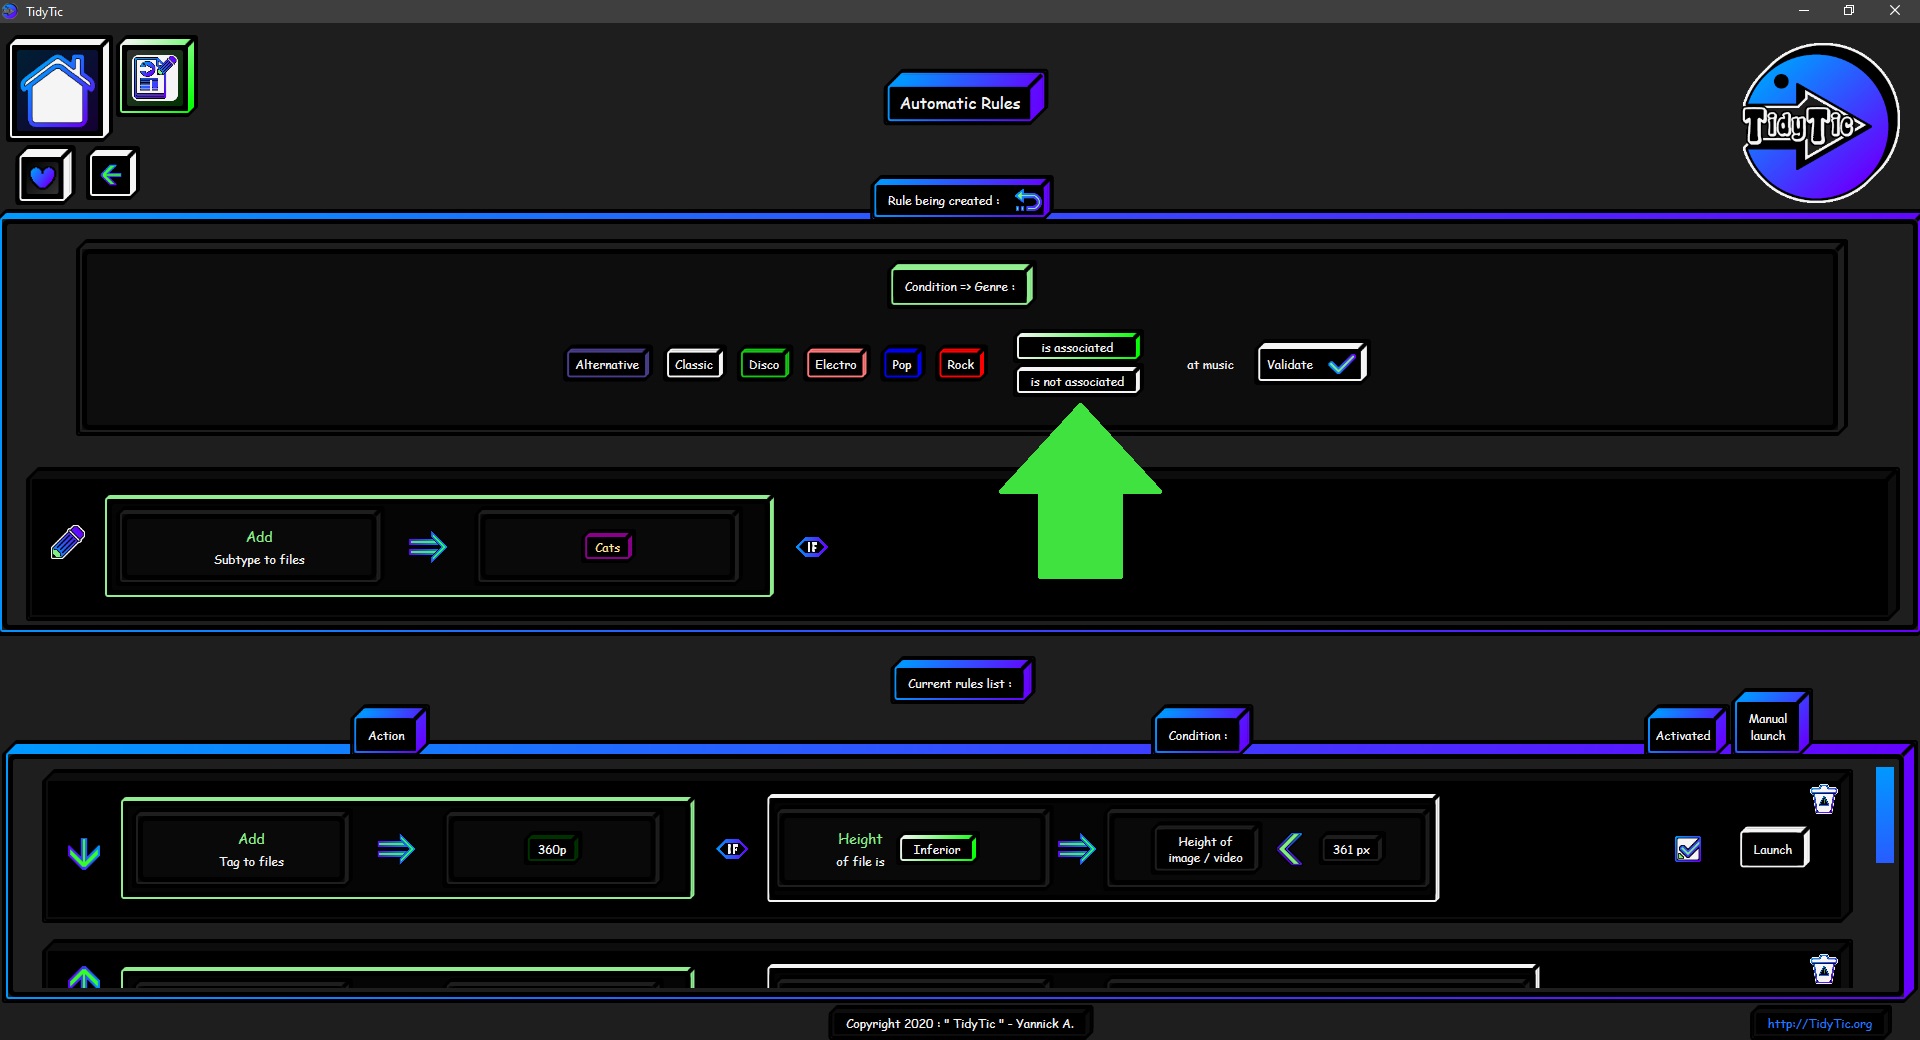
Then you will have to choose when the condition is met and therefore when it will trigger the action :
- When the chosen genre is associated with the music.
- Or on the contrary the genre is NOT associated with the music.
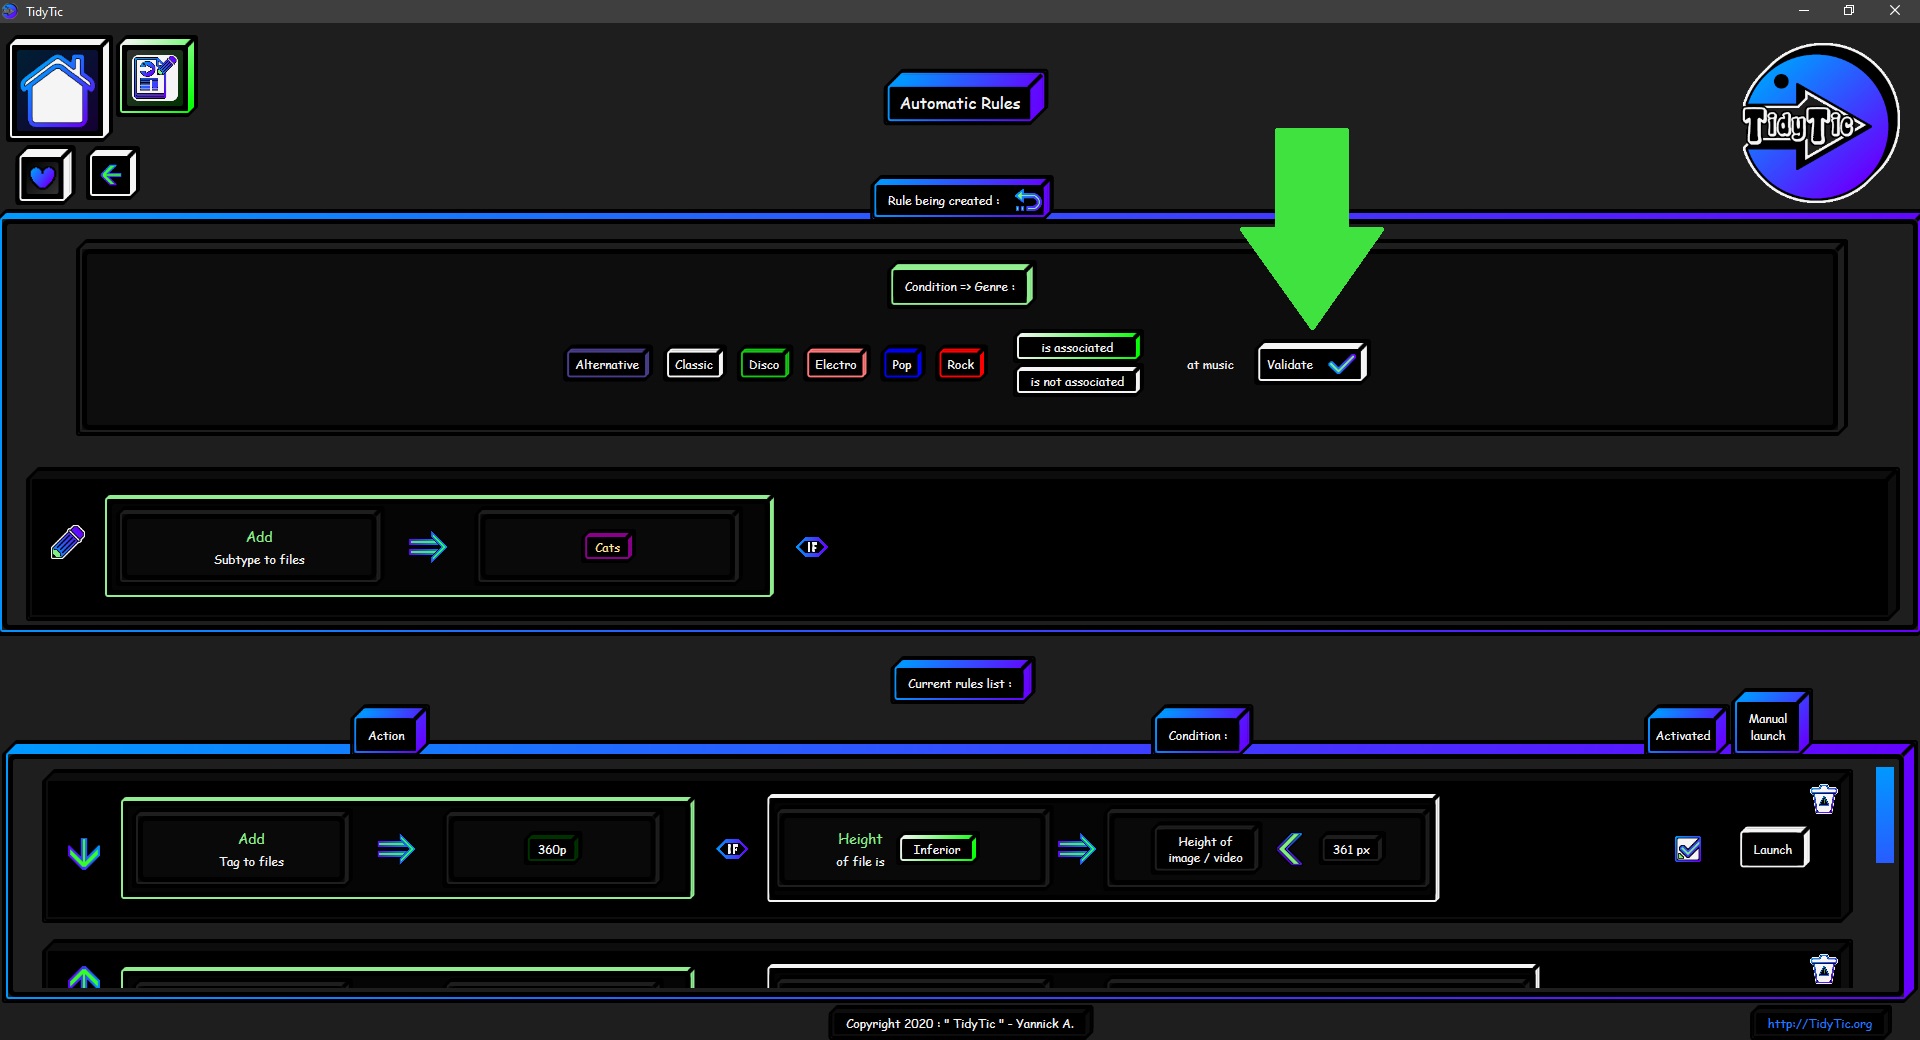
Then you just have to validate this condition.
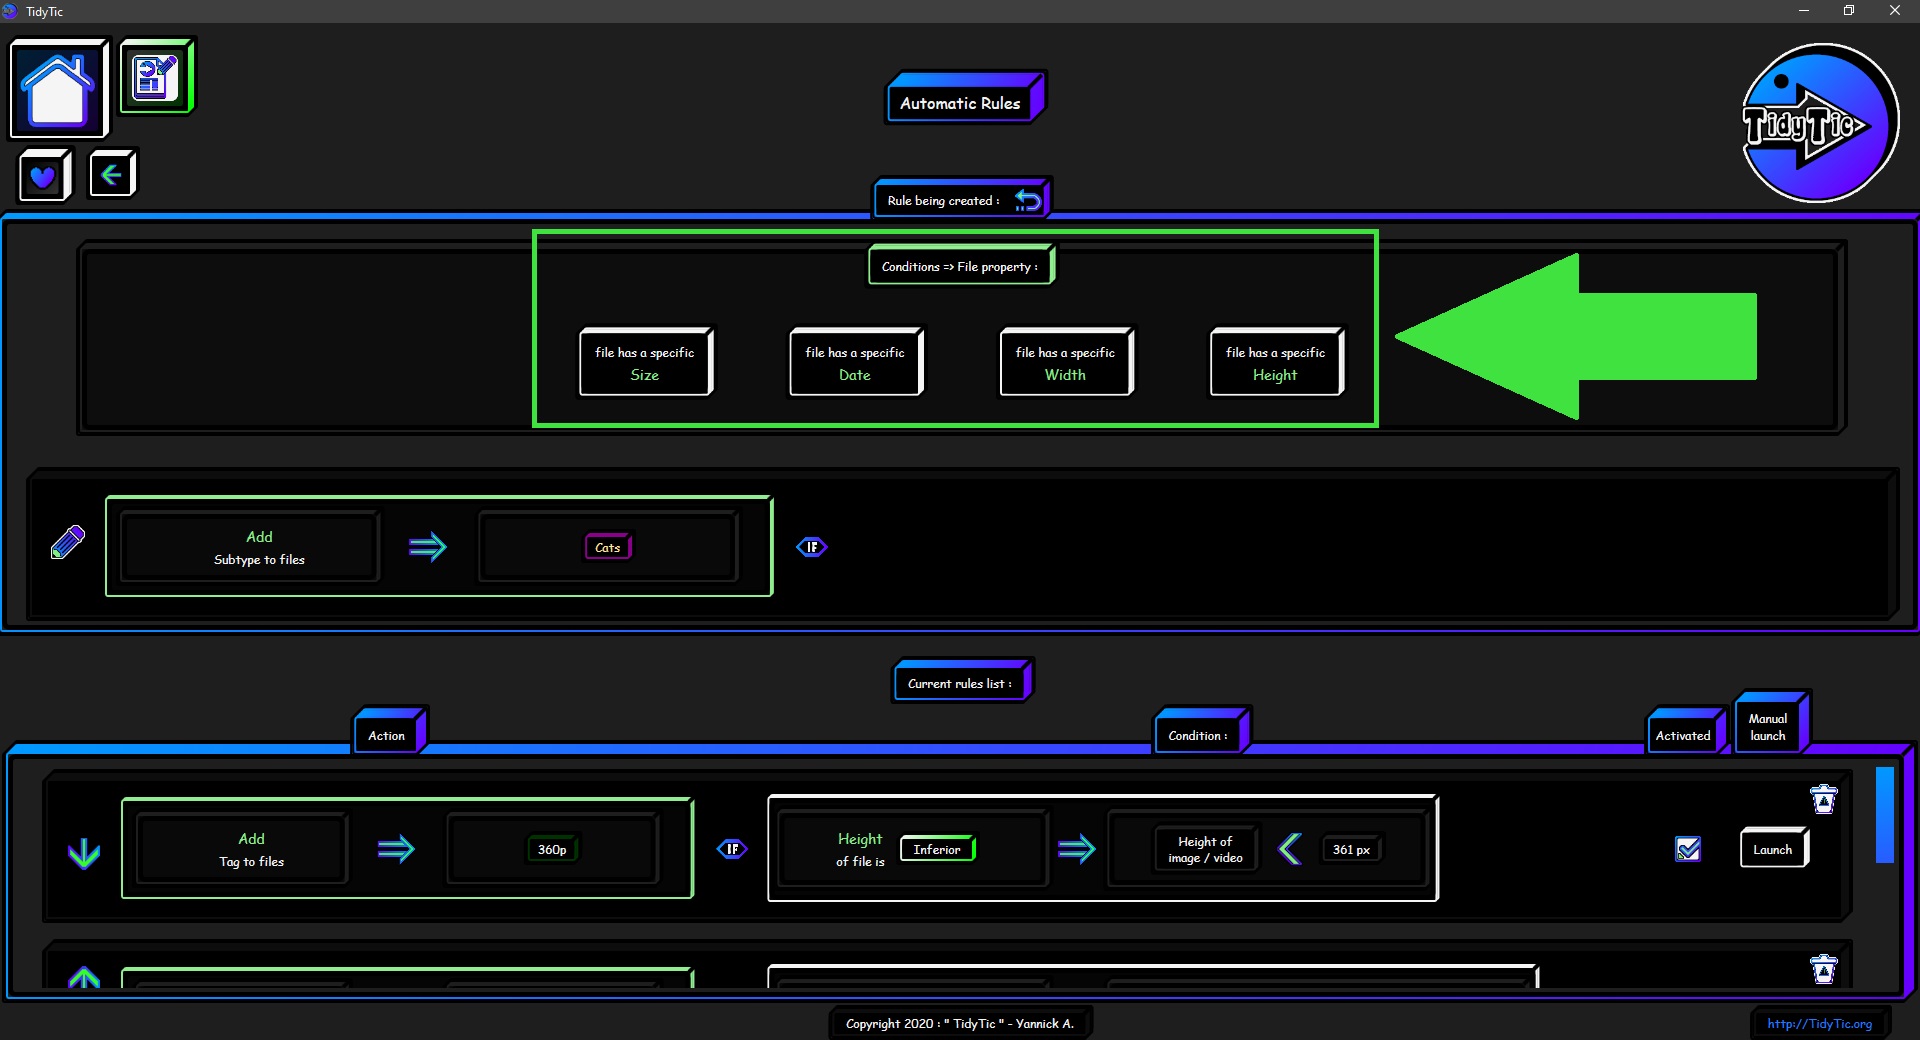
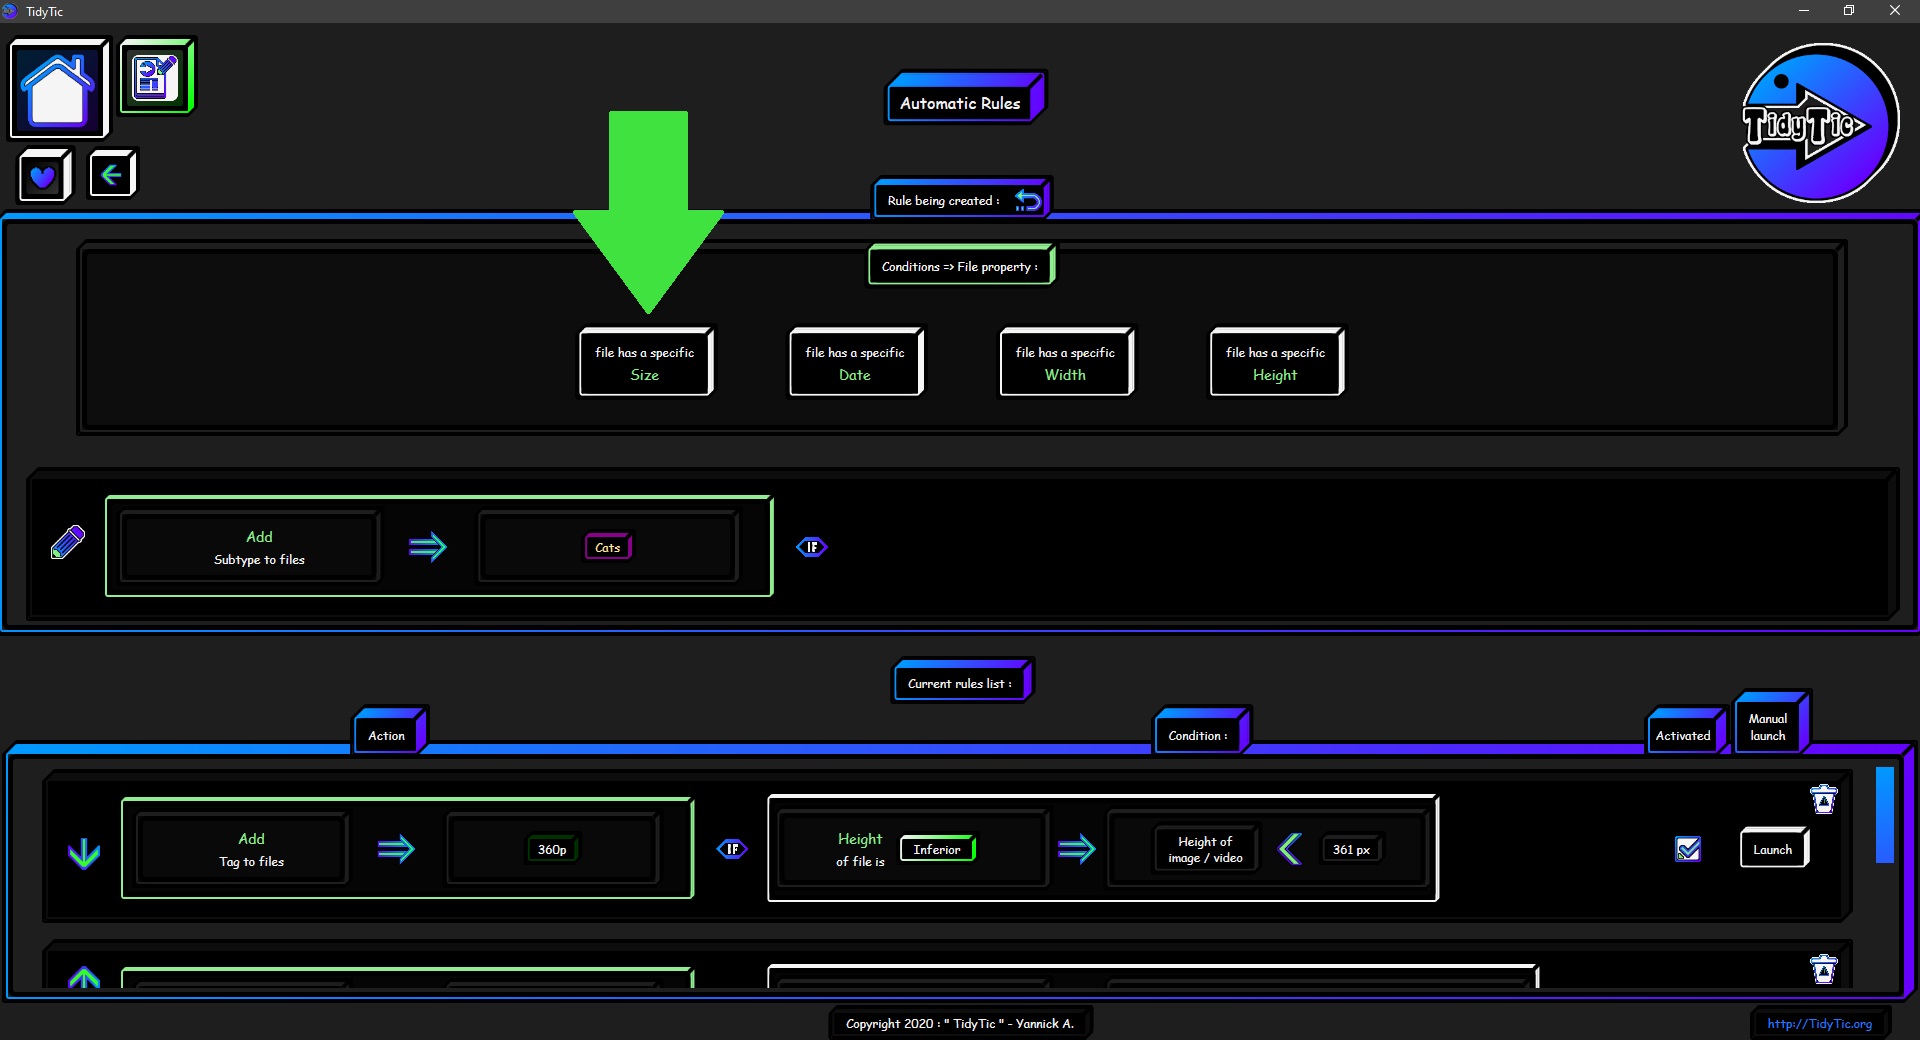
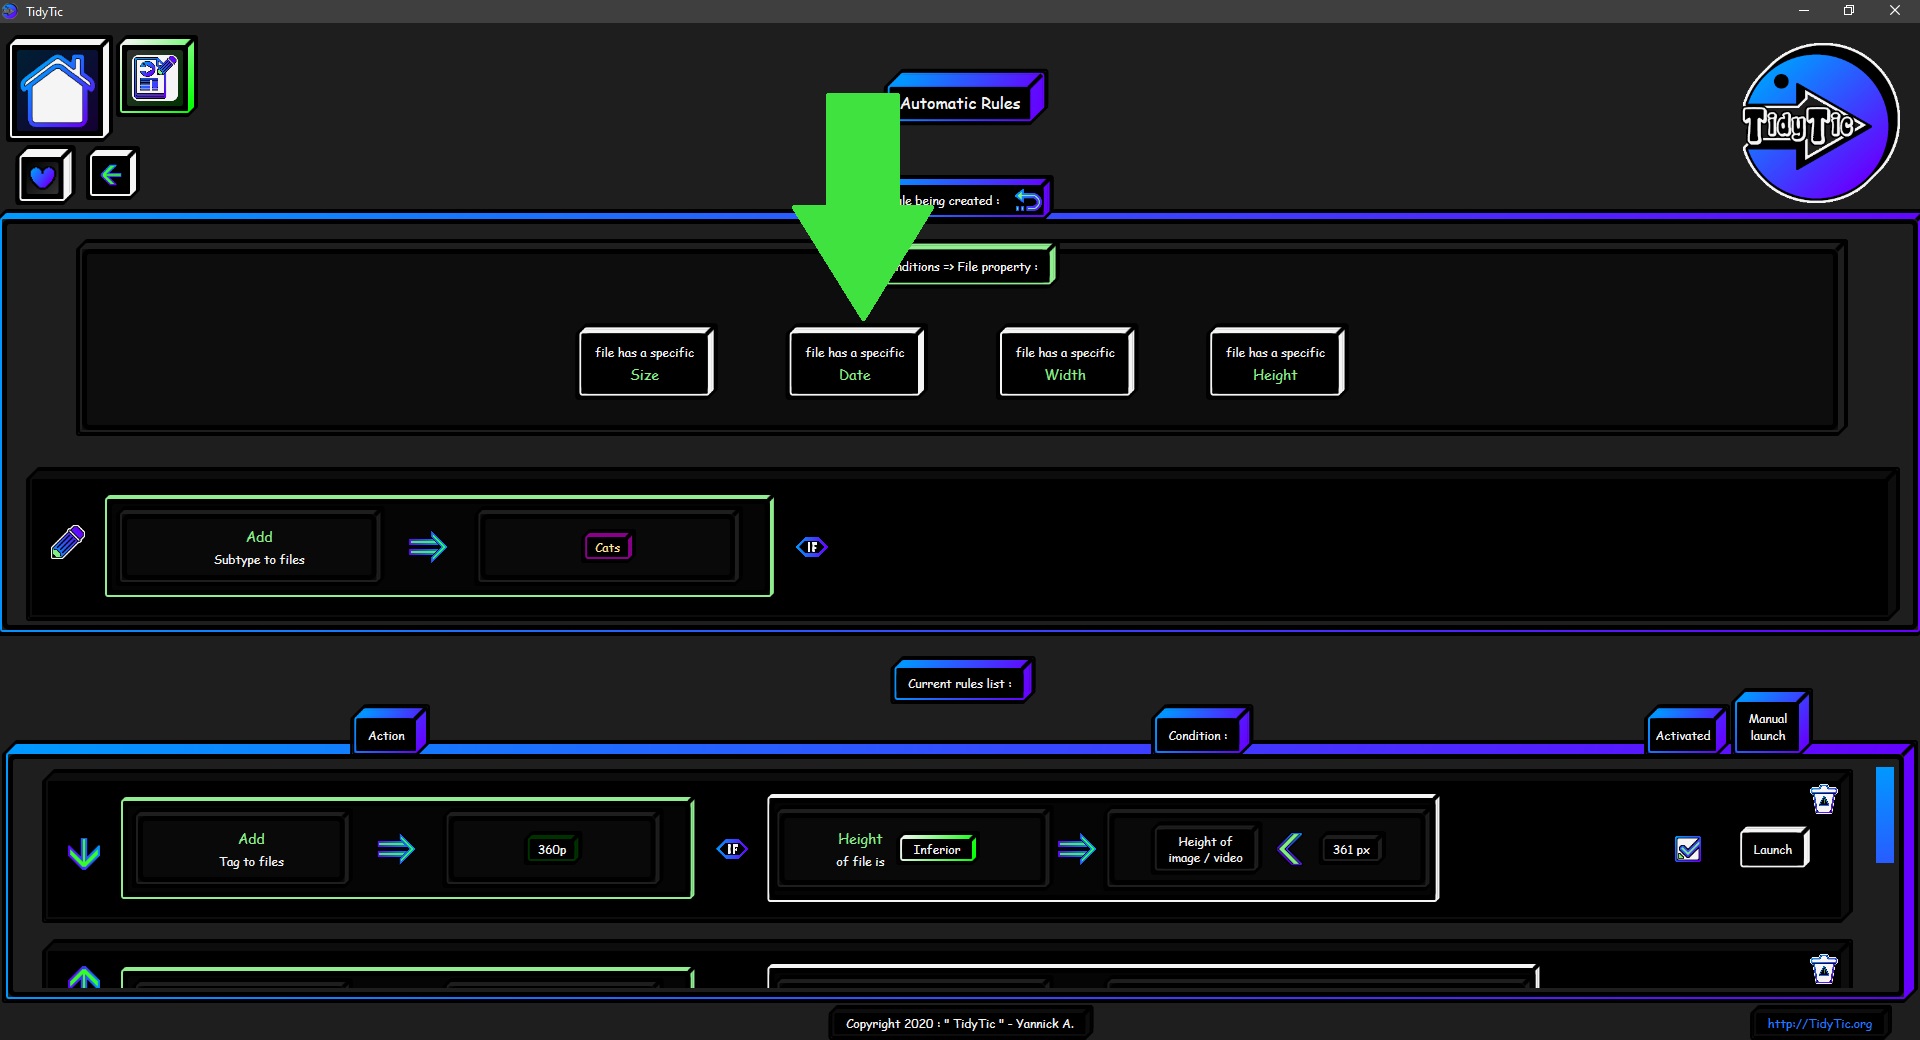
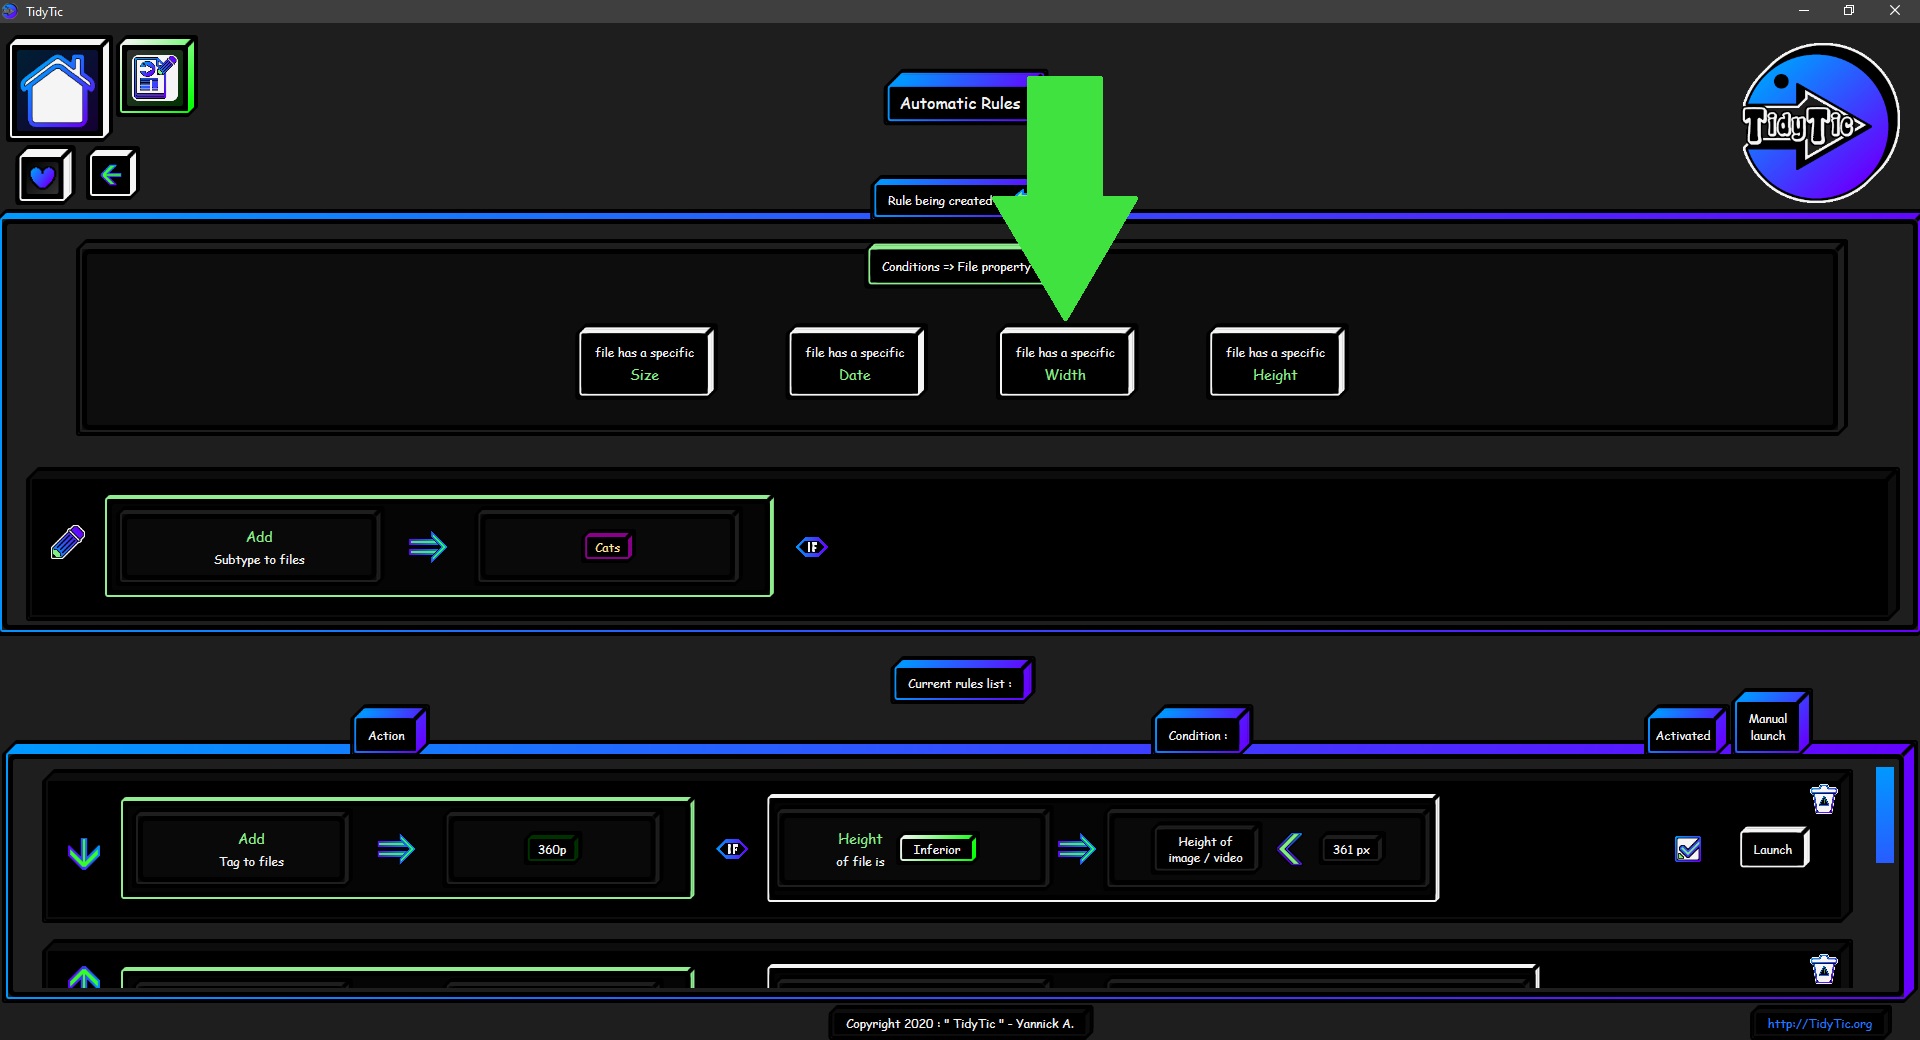
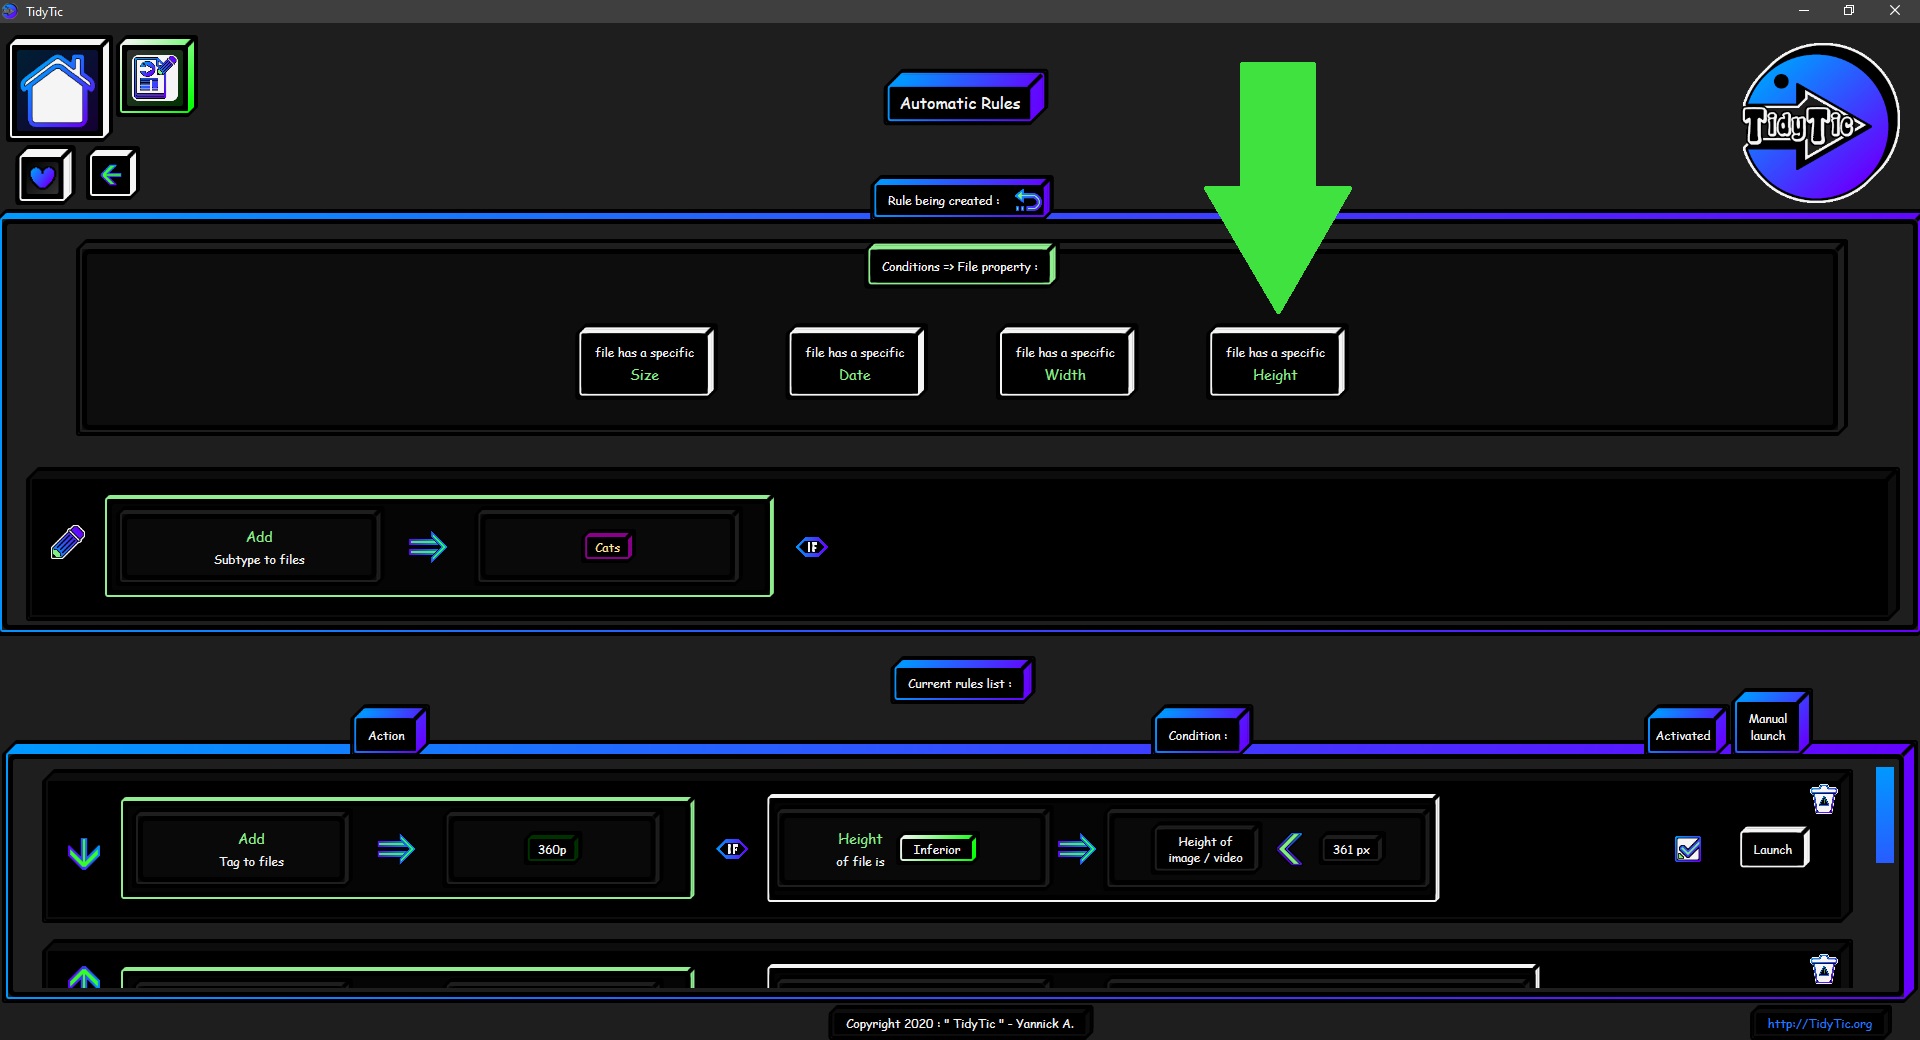
Condition : “A property of the file : size / date / width / height meets certain conditions” :
This condition leaves you with 4 options that will allow you to define whether the action will be triggered or not on your files based on their information :
- The file has a specific size.
- The file has a specific date.
- The file has a specific width.
- The file has a specific height.
 ____
____ 
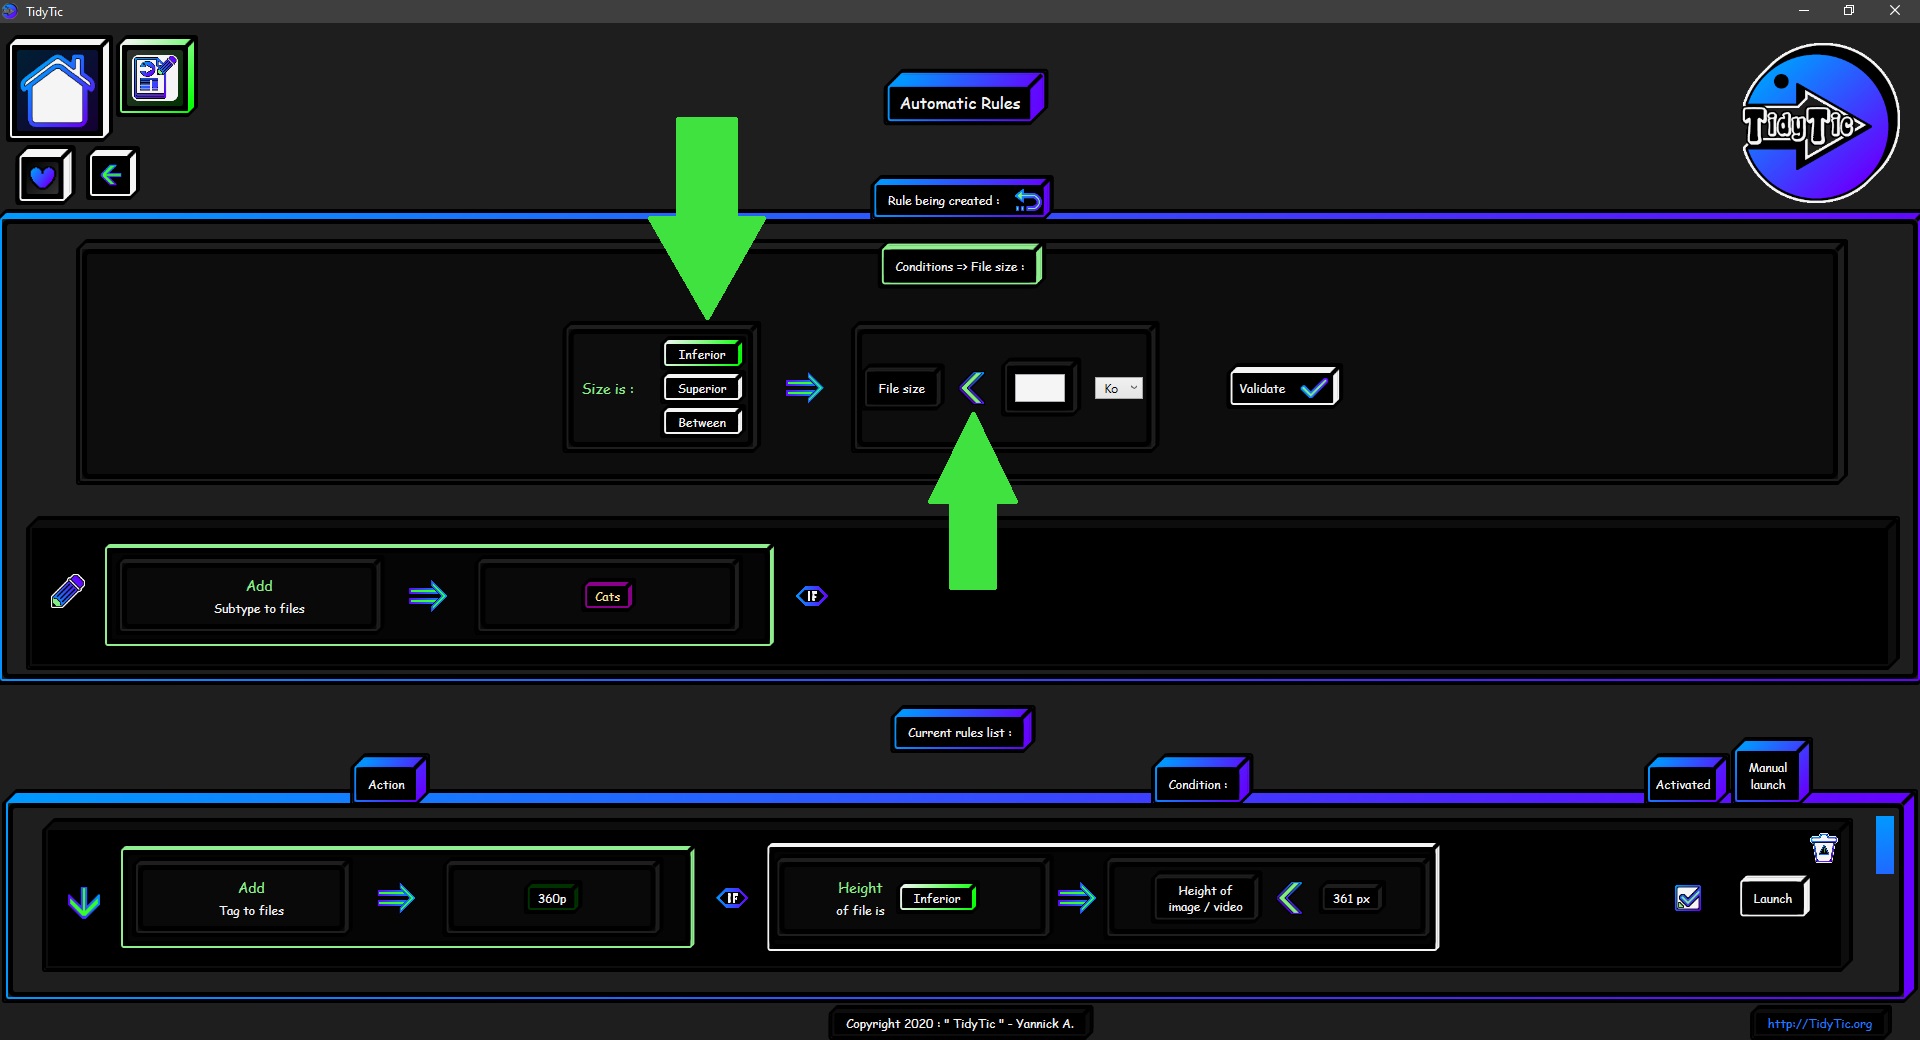
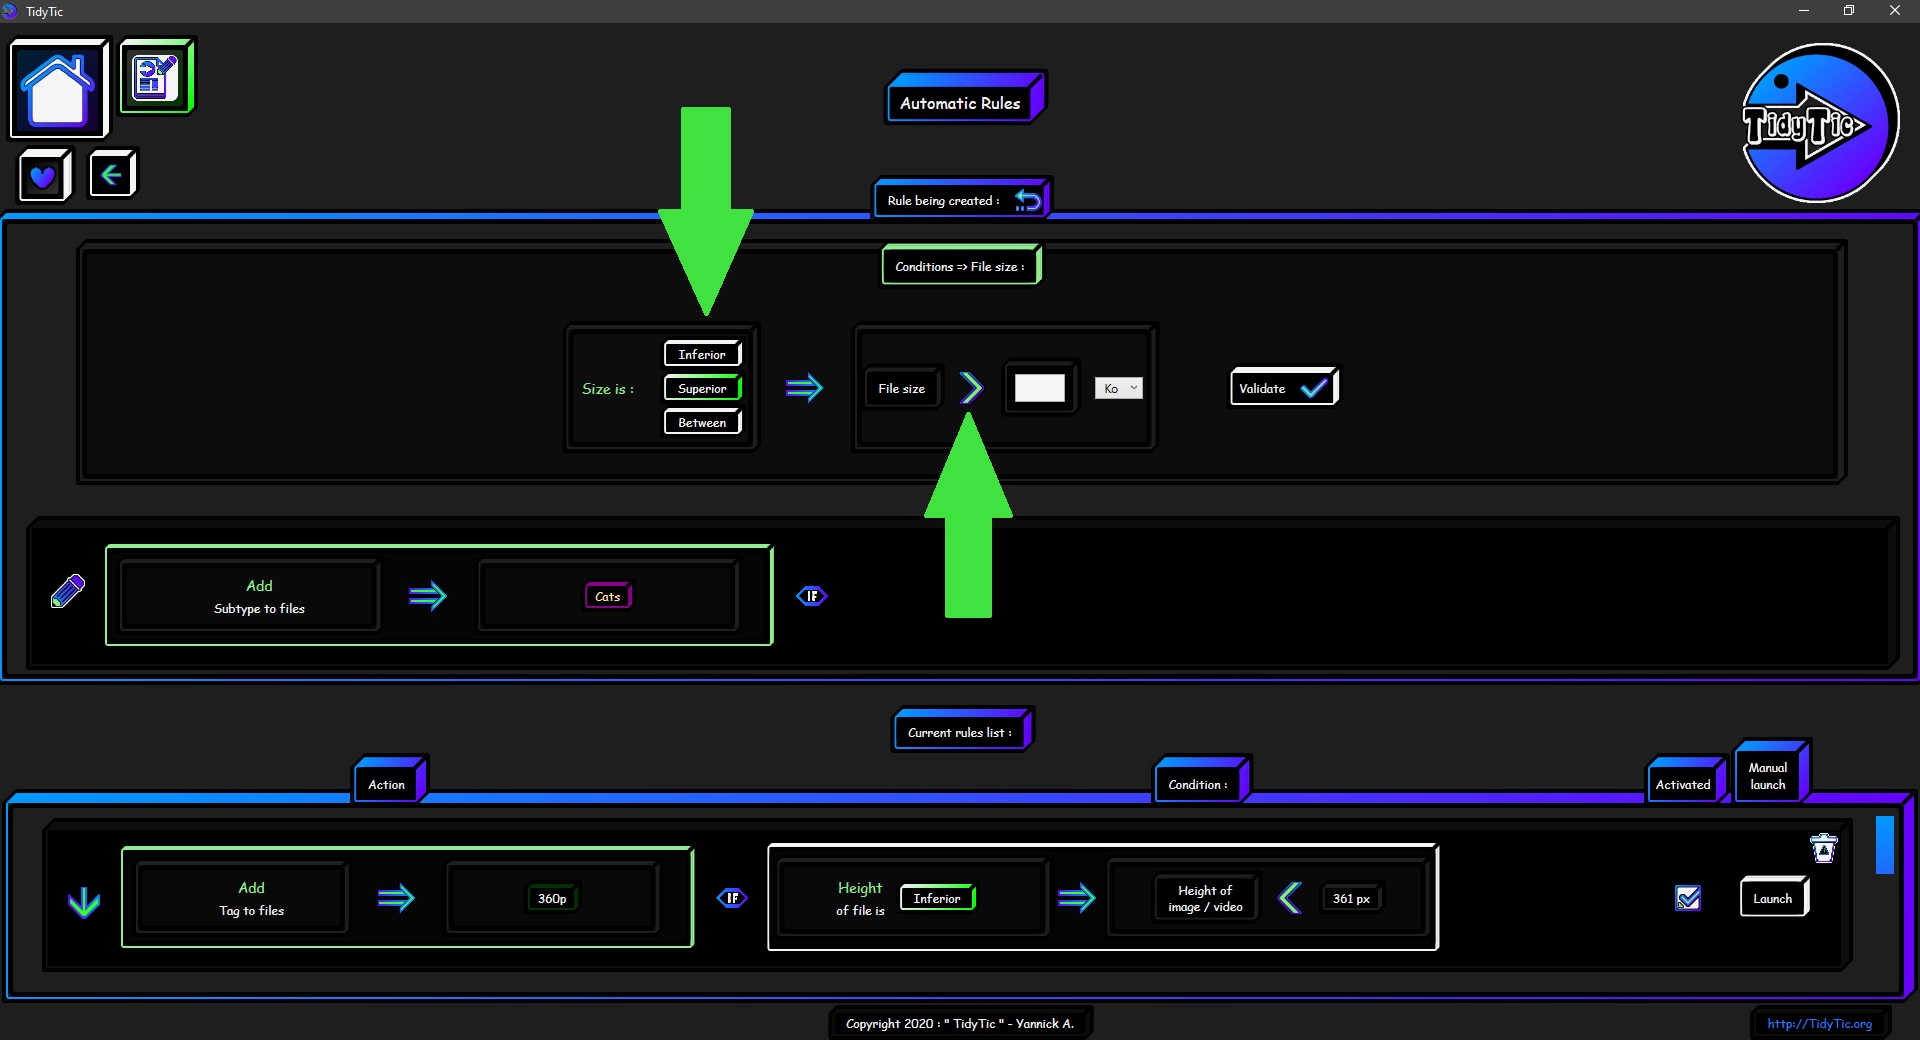
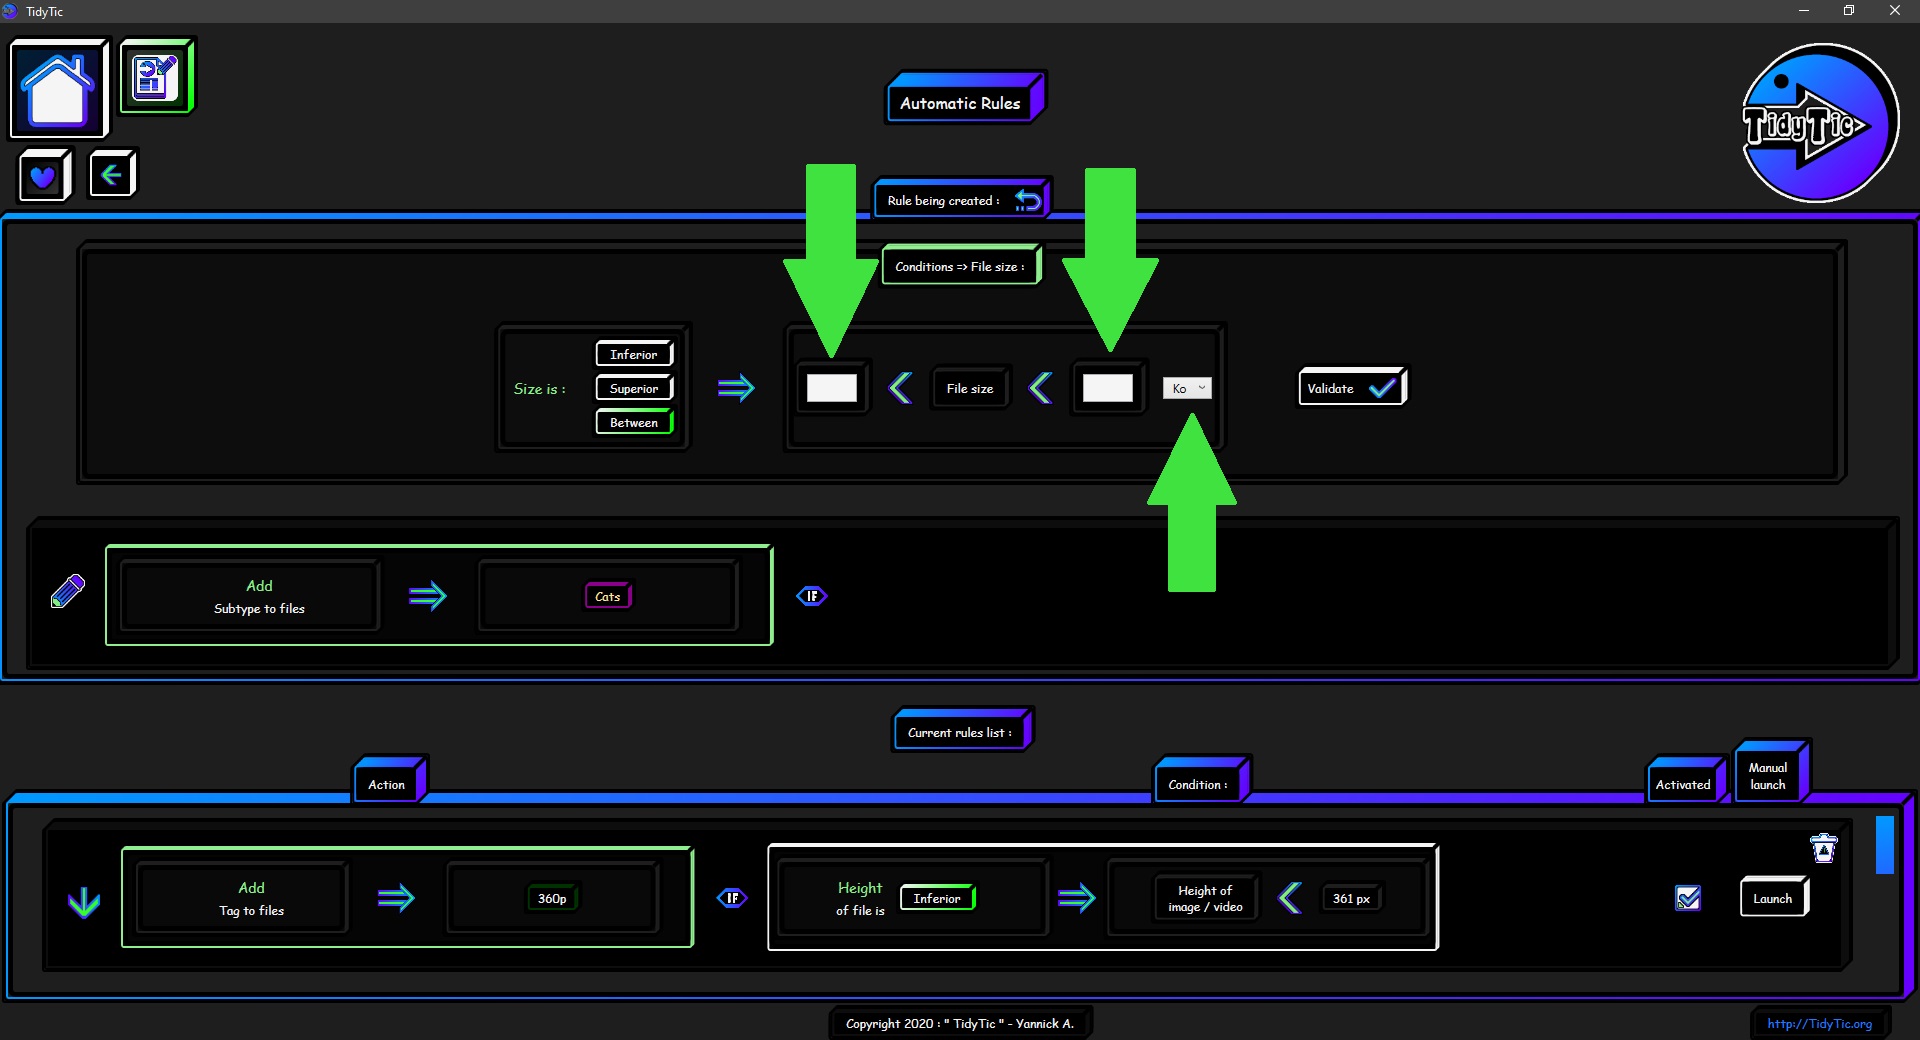
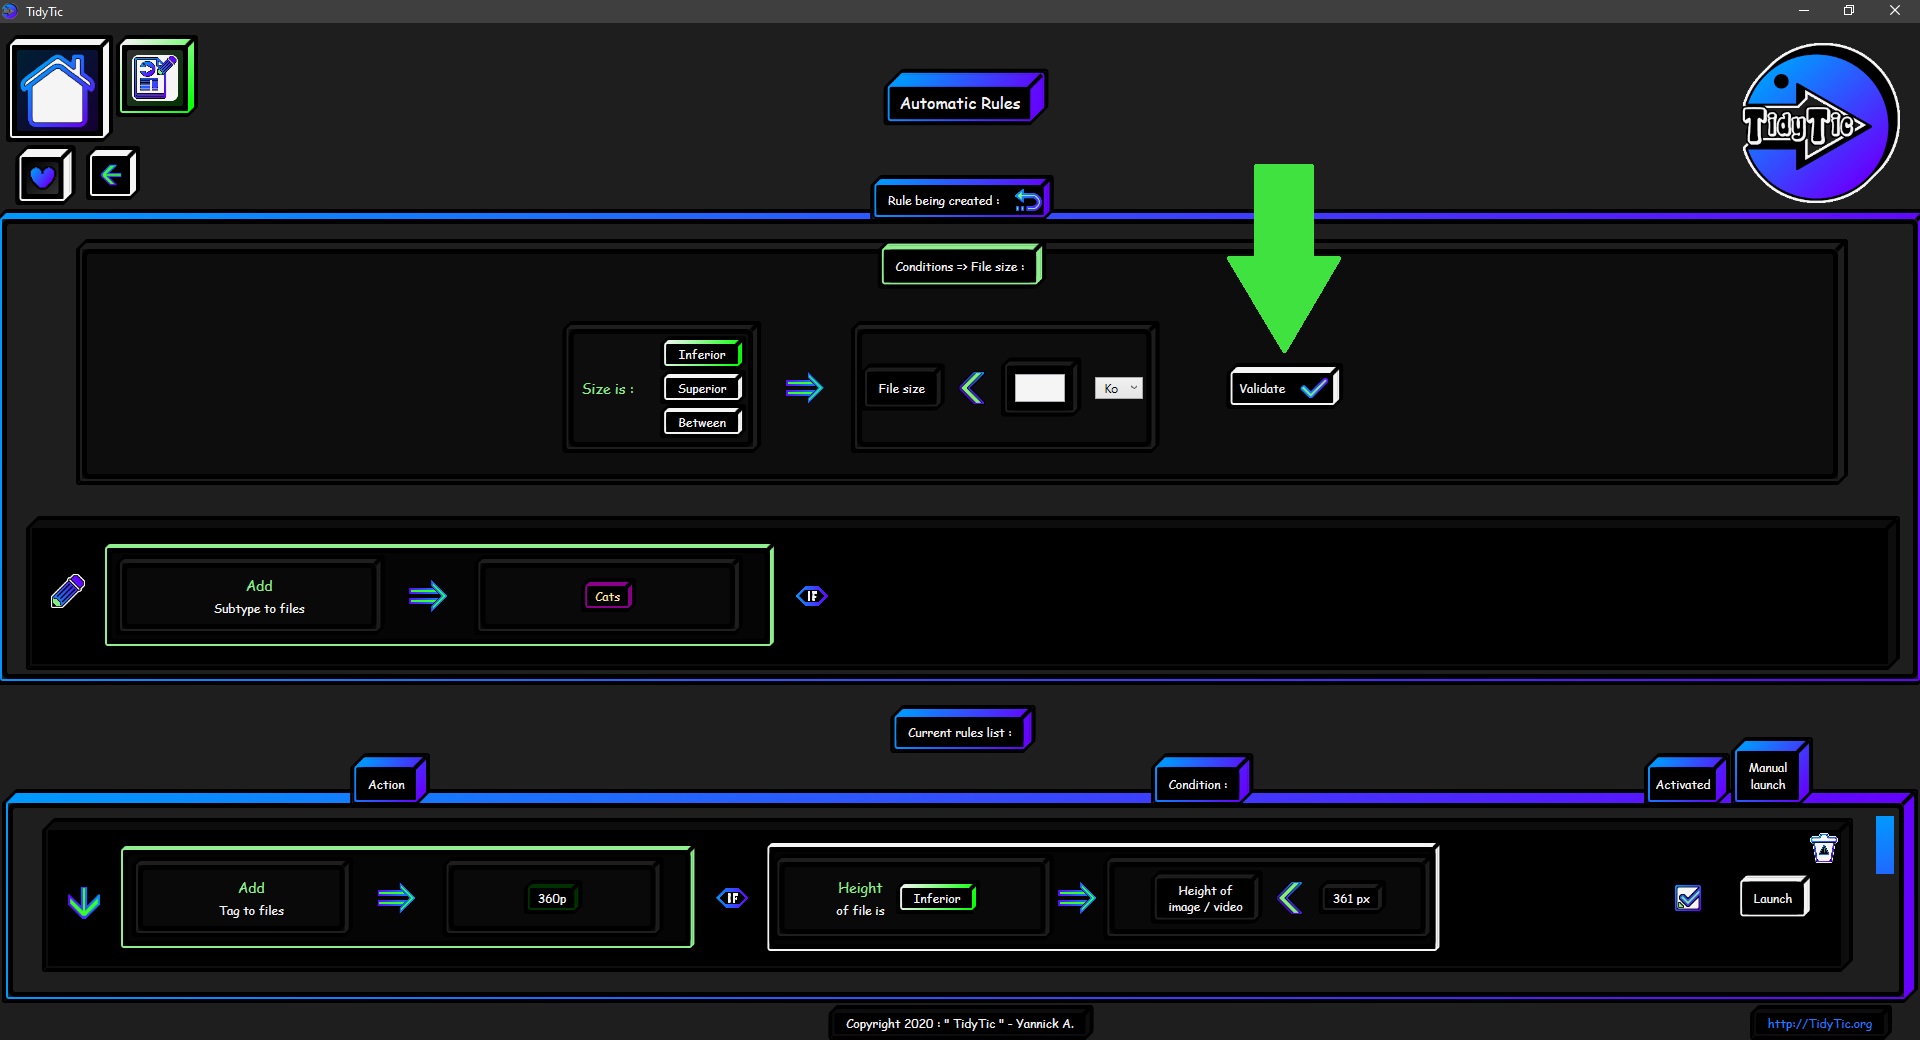
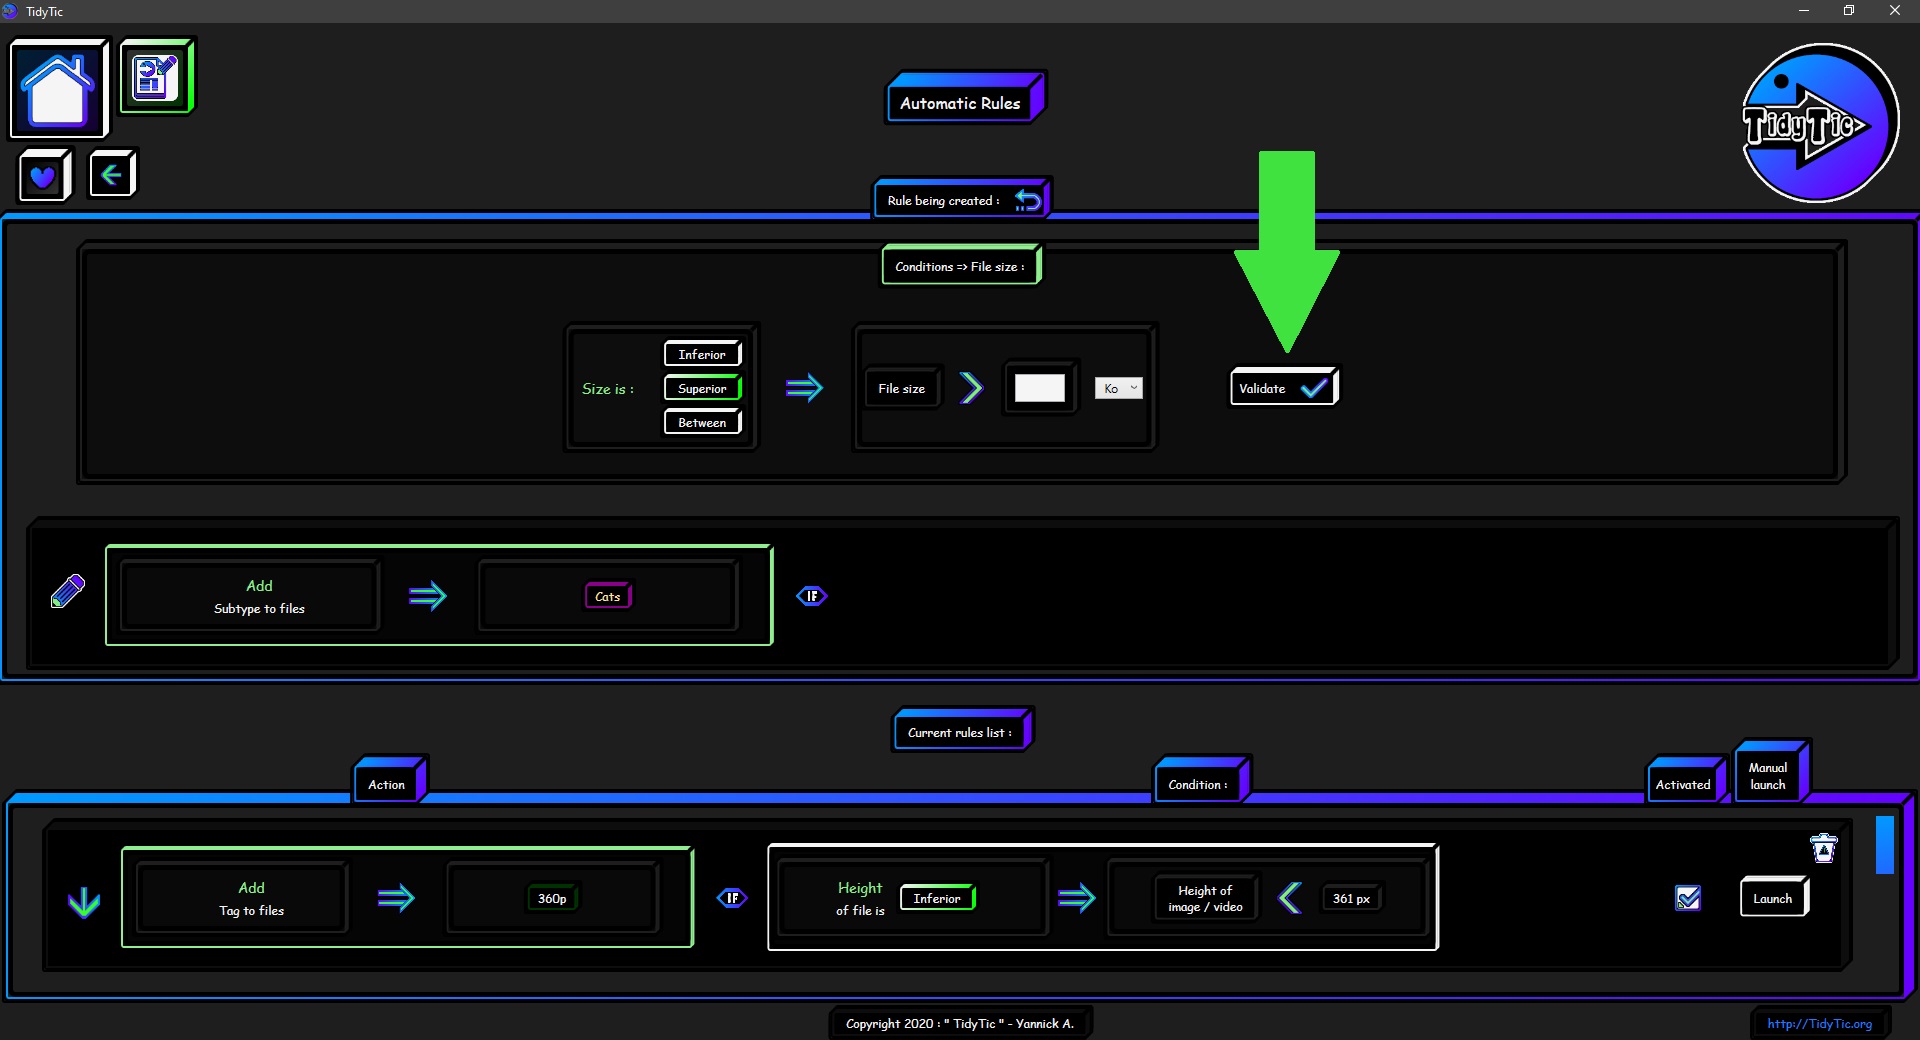
The "The file has a specific size" option :
Then you will have to choose when the condition is met and therefore when it will trigger the action :
- When the size is smaller than the size indicated.
- When the size is larger than the size indicated.
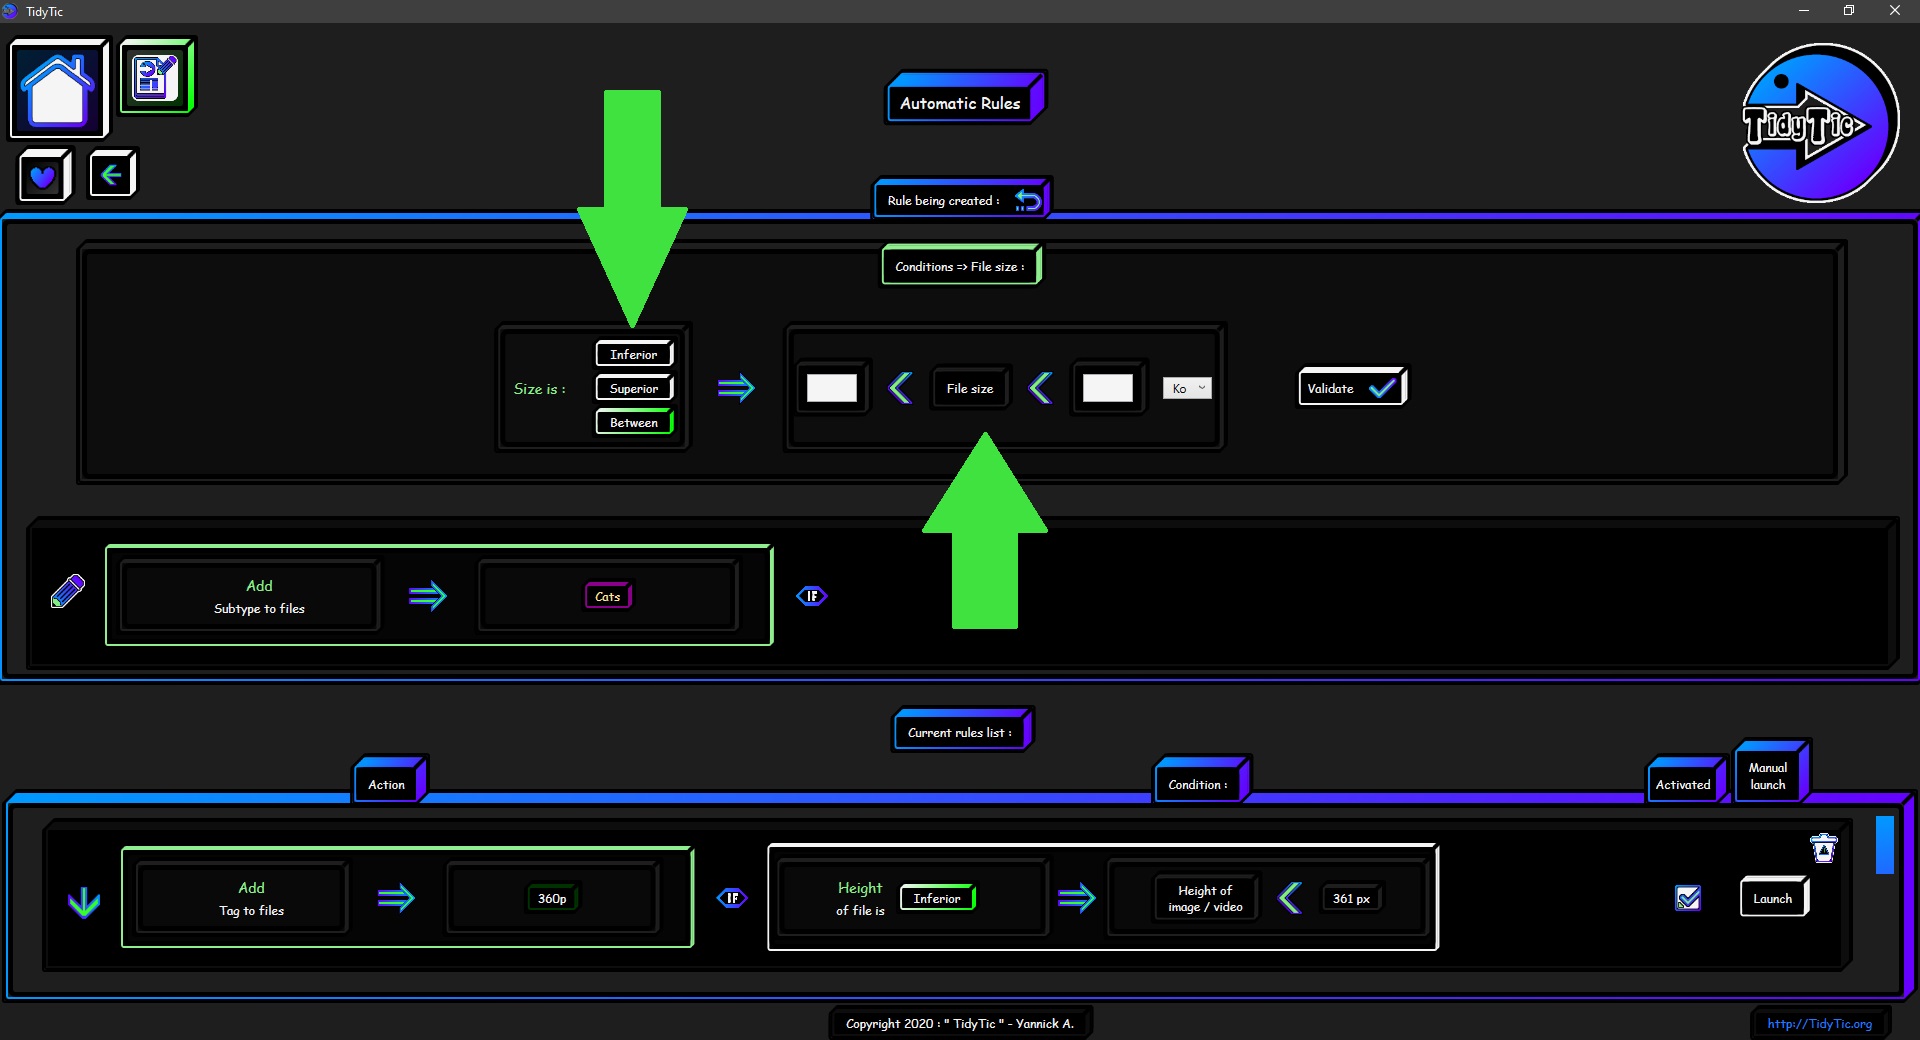
- When the size is between the sizes indicated.
When you select a comparison by clicking on it, its border turns green and the part where you indicate the size(s) will update.
 ____
____  ____
____ 
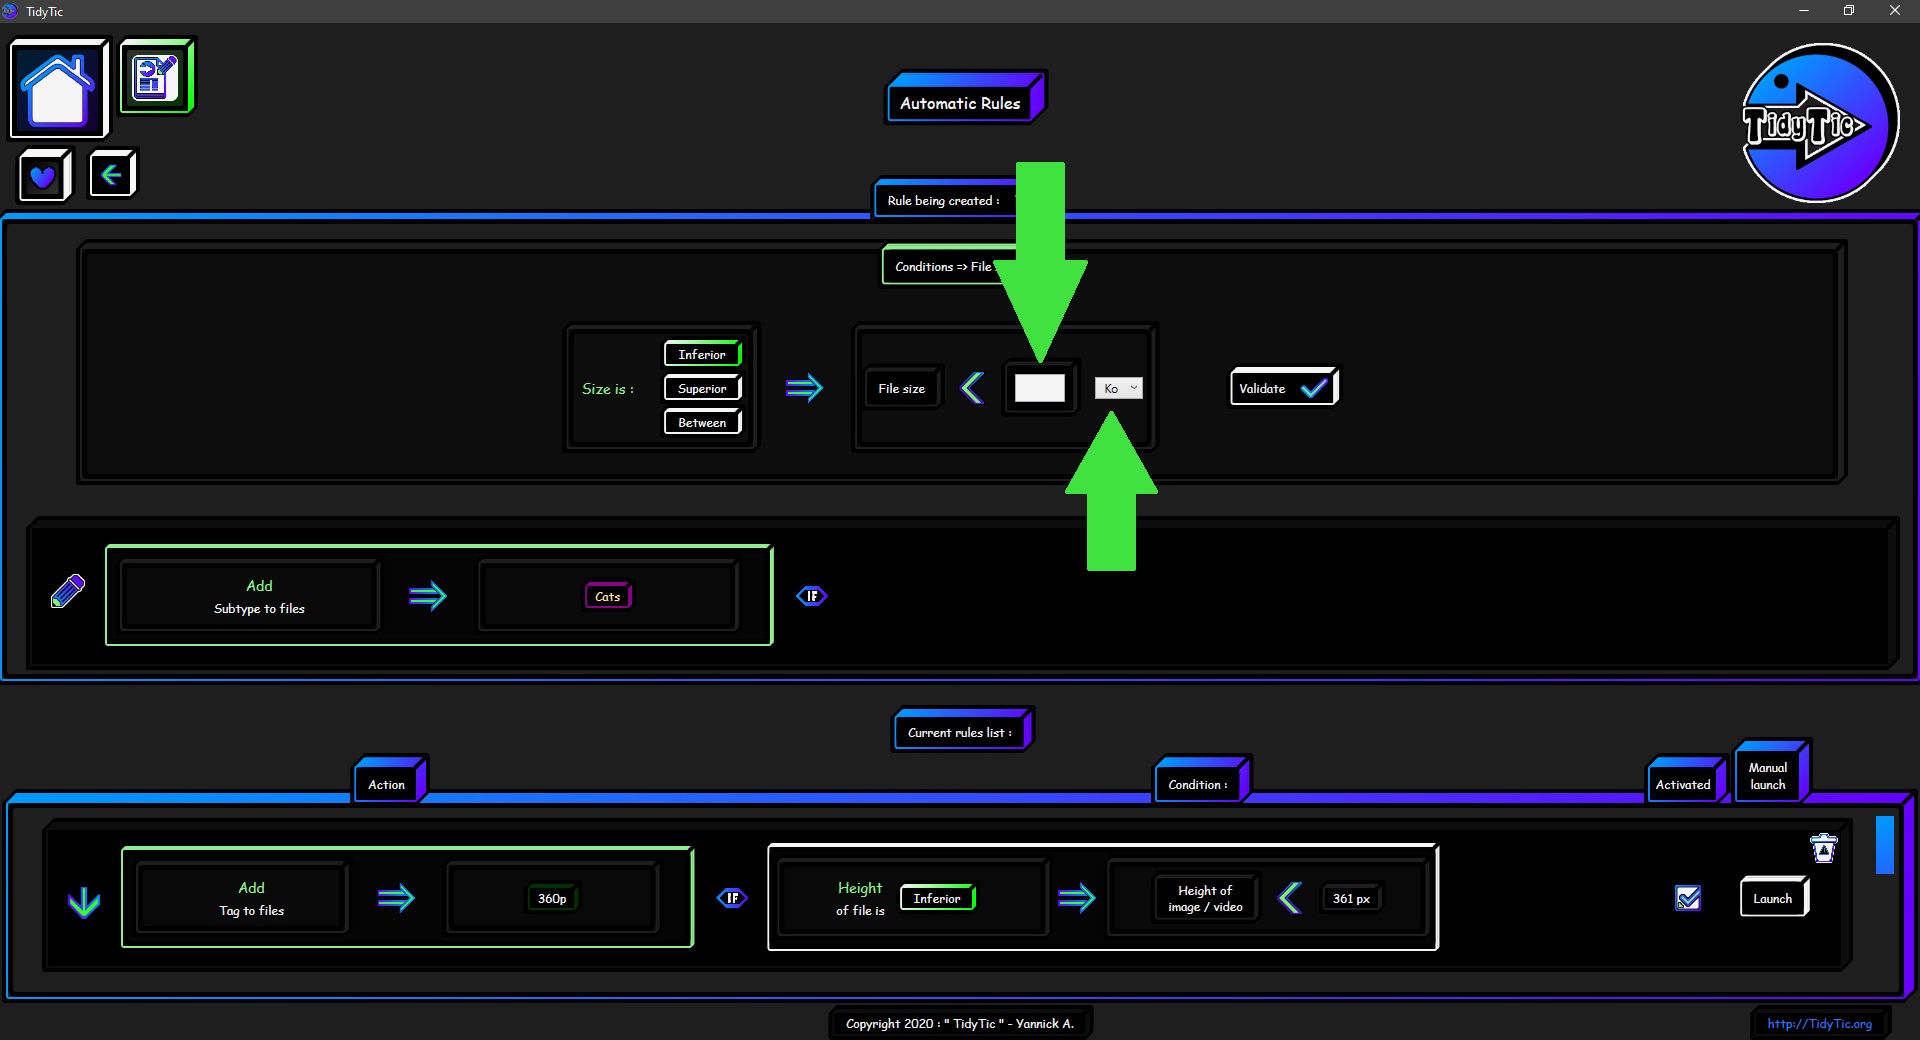
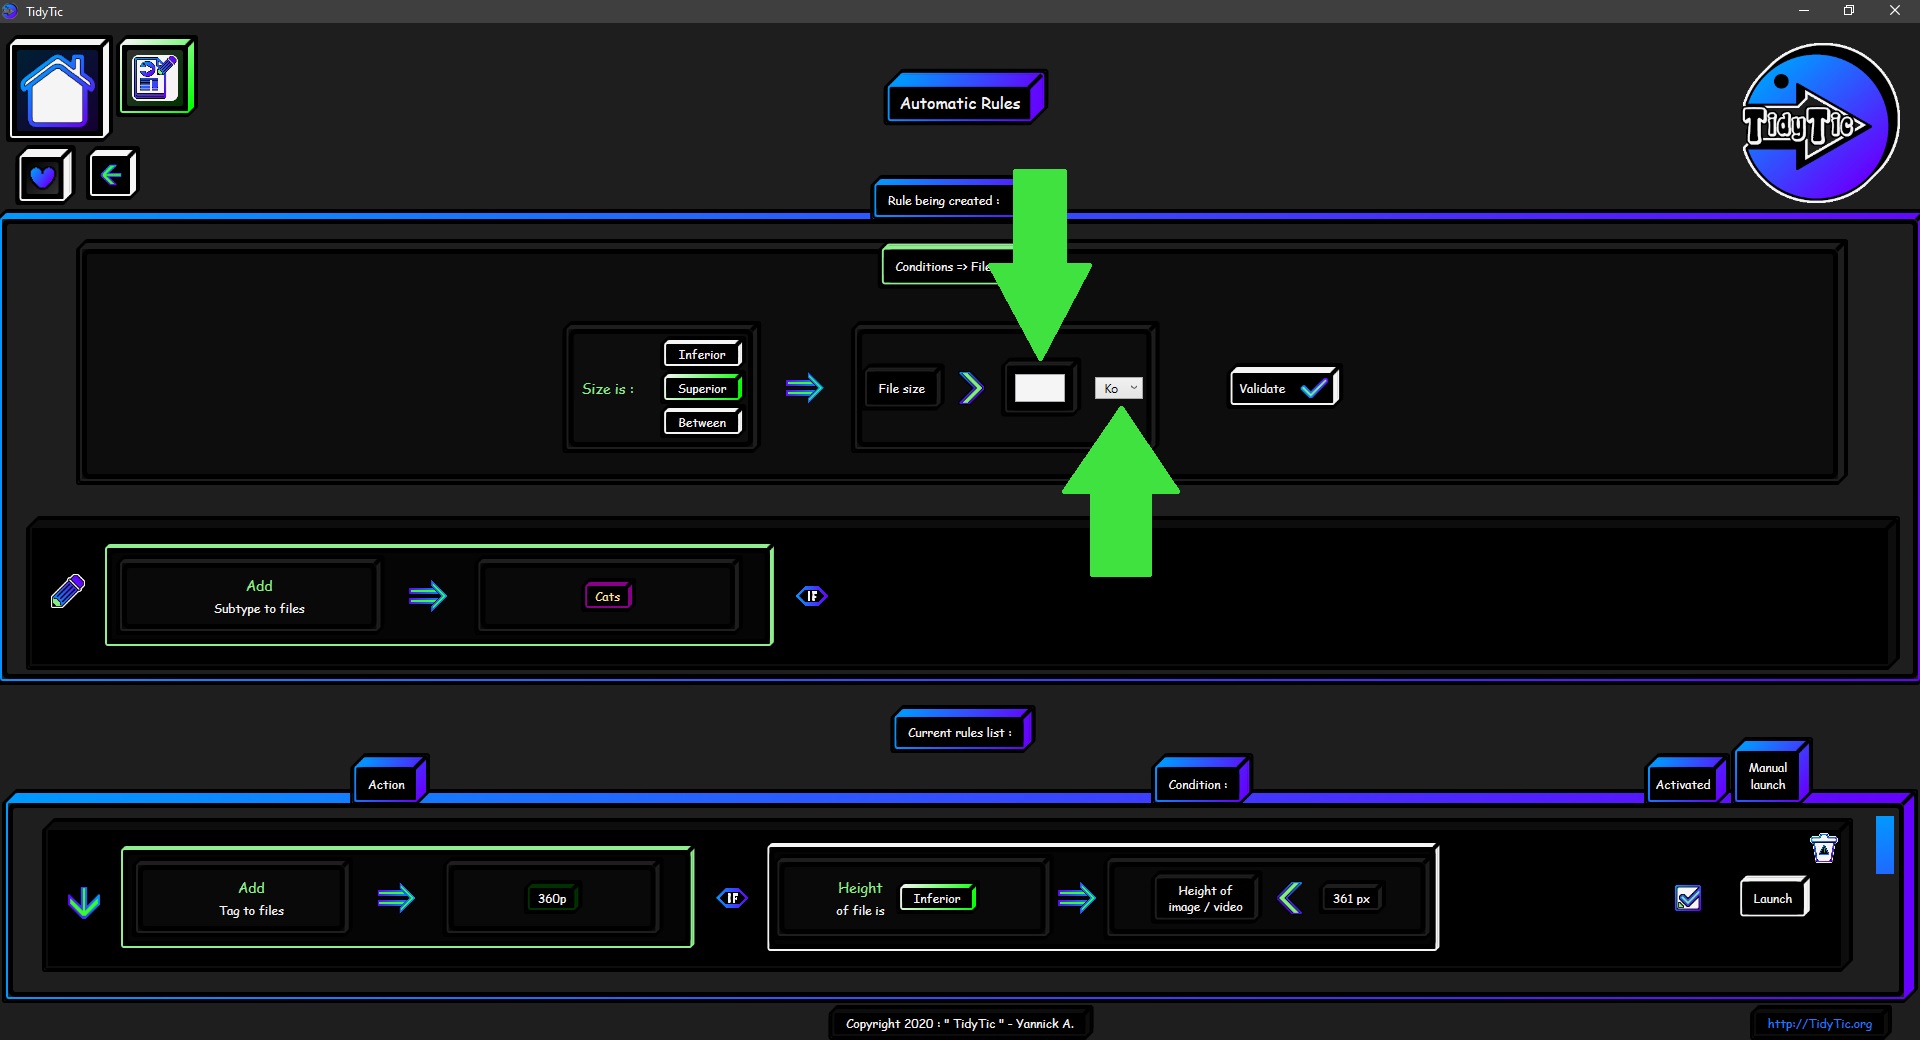
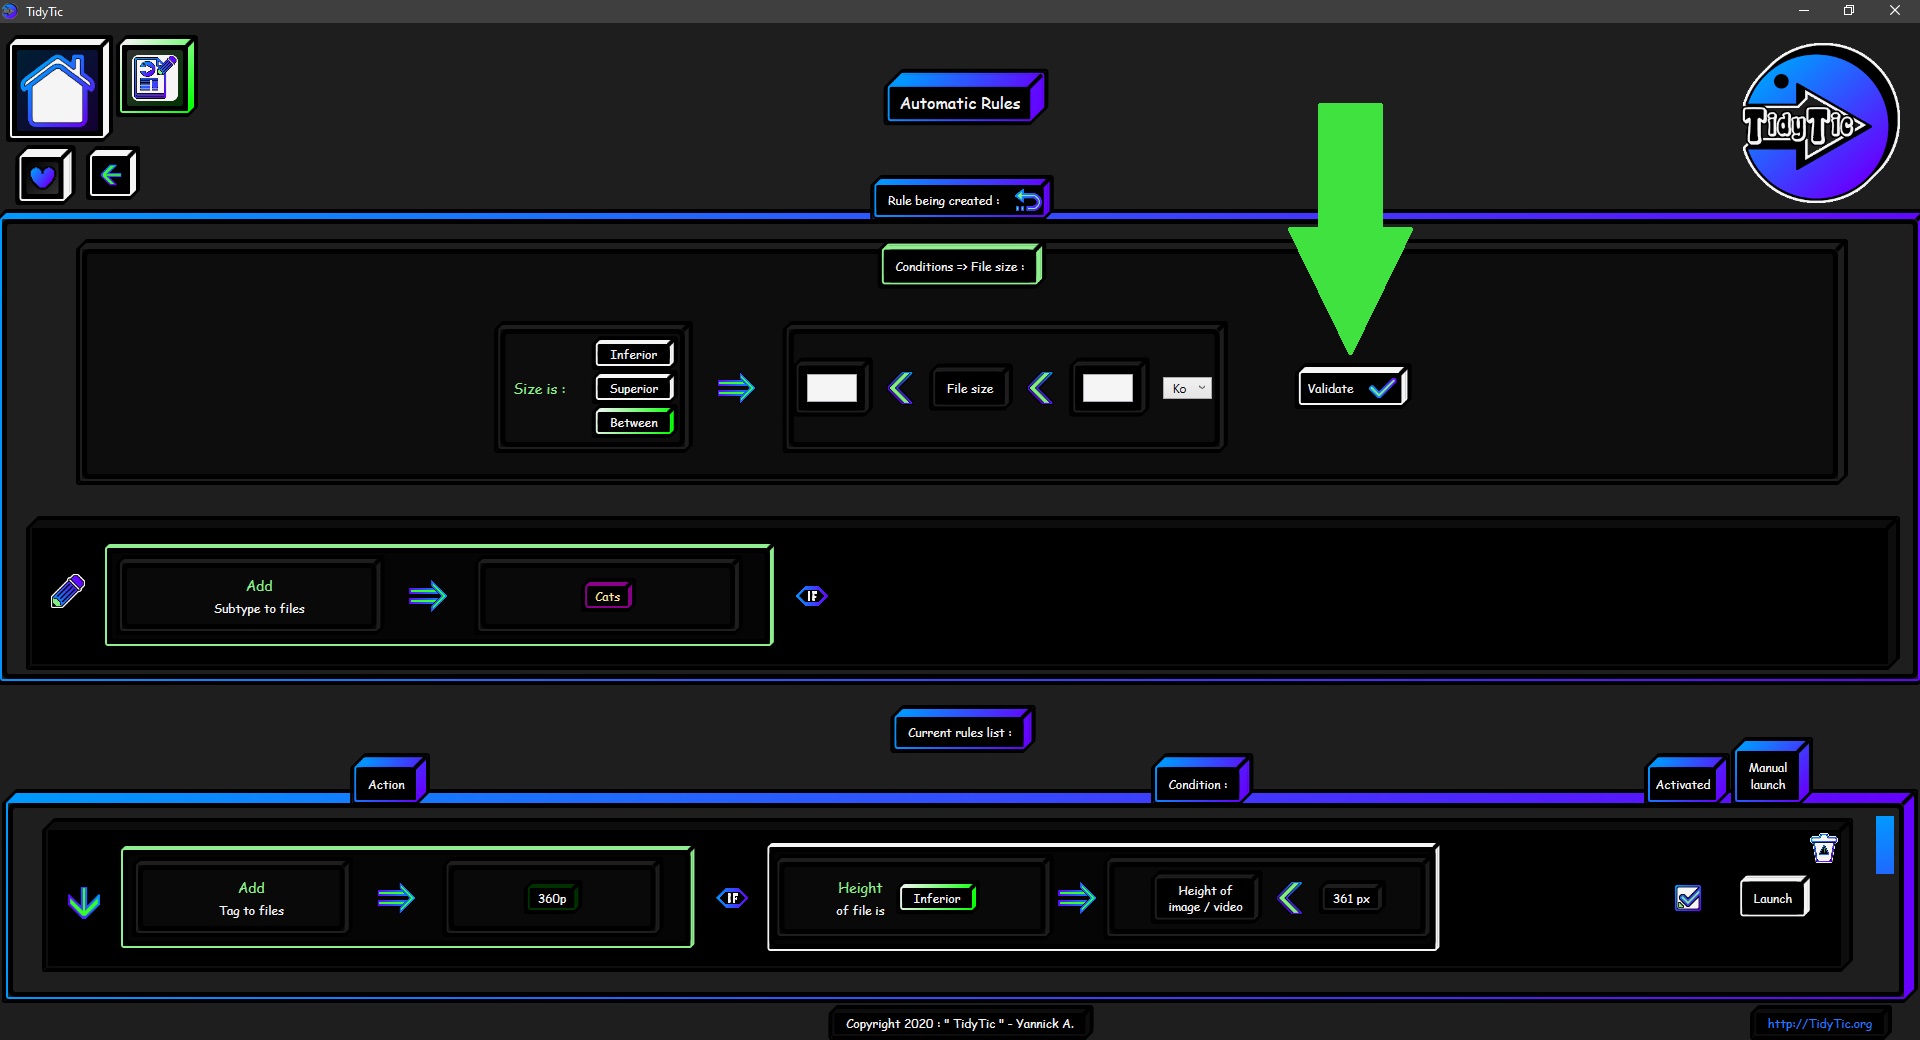
You will then have to indicate the size(s) with which the condition will compare that of the file.
You will also need to indicate the unit of the size : byte (B), Kilobyte (KB), Megabyte (MB), Gigabyte (GB).
 ____
____  ____
____ 
Then you just have to validate this condition.
 ____
____  ____
____ 
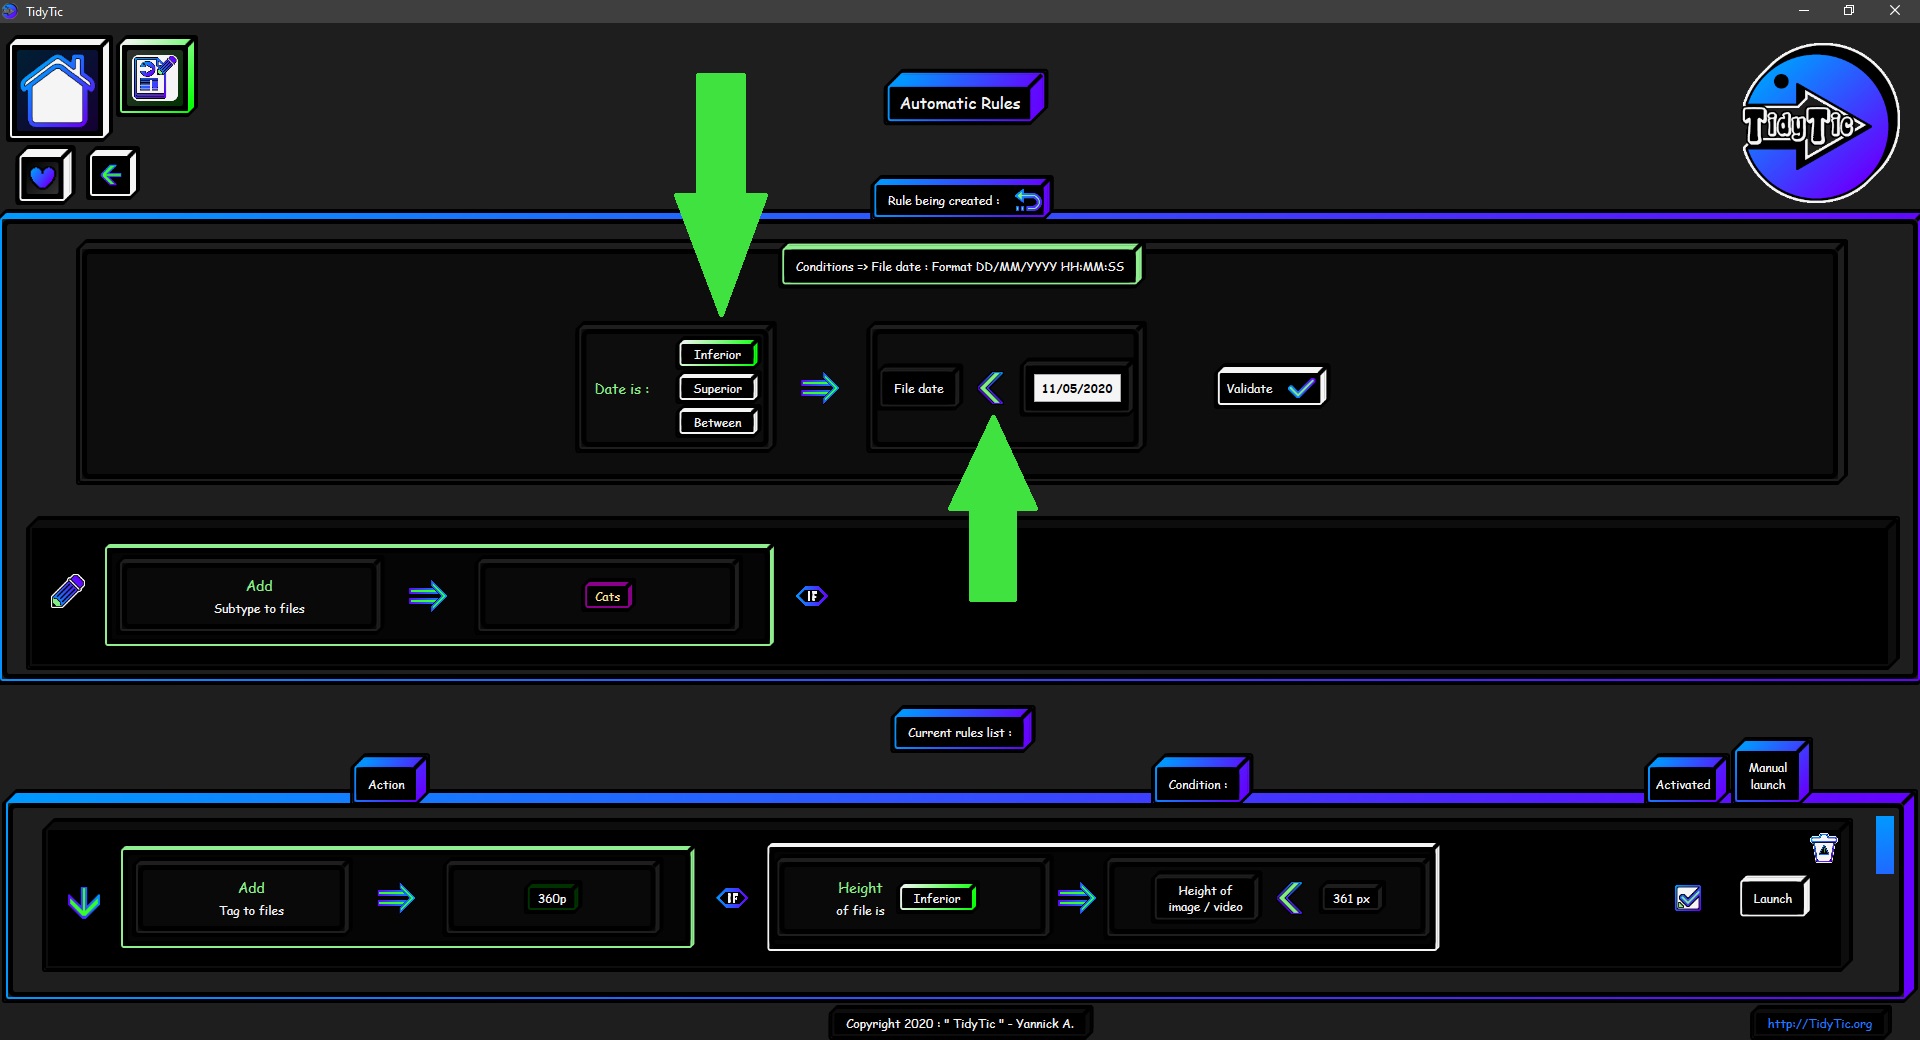
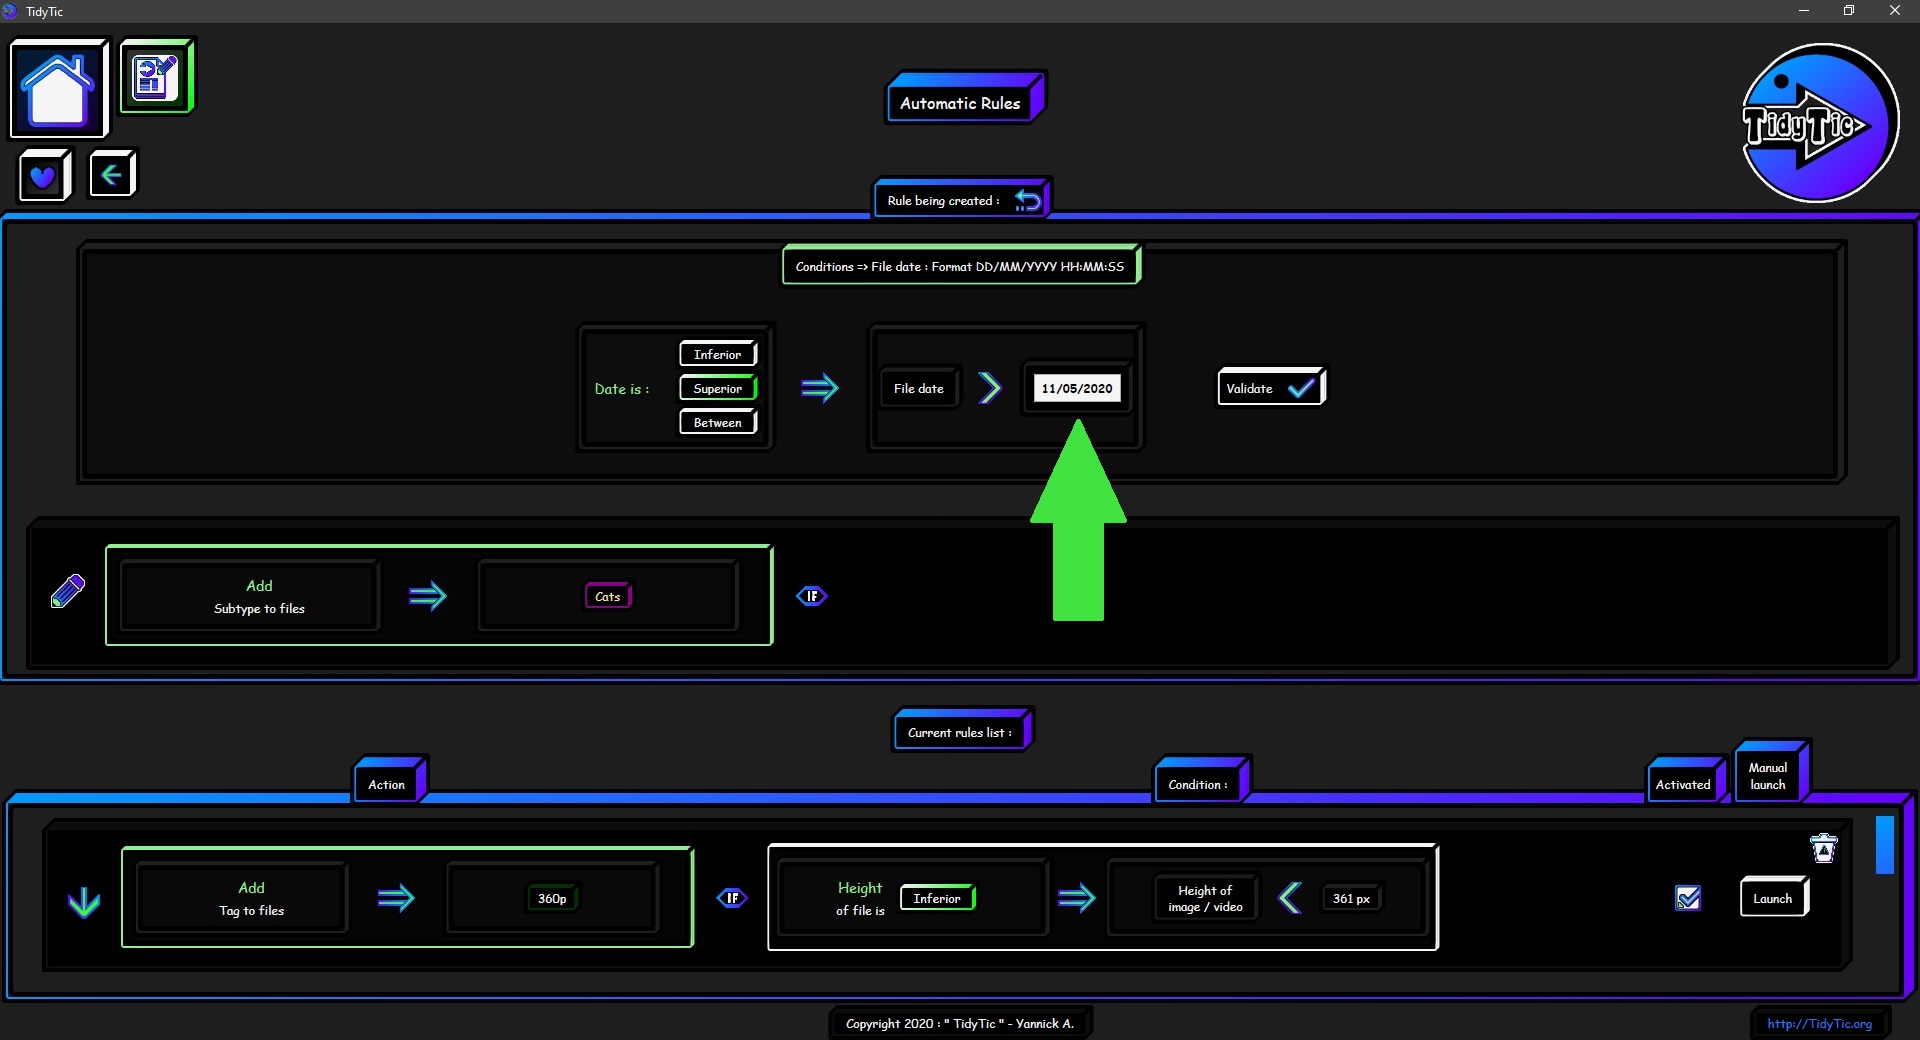
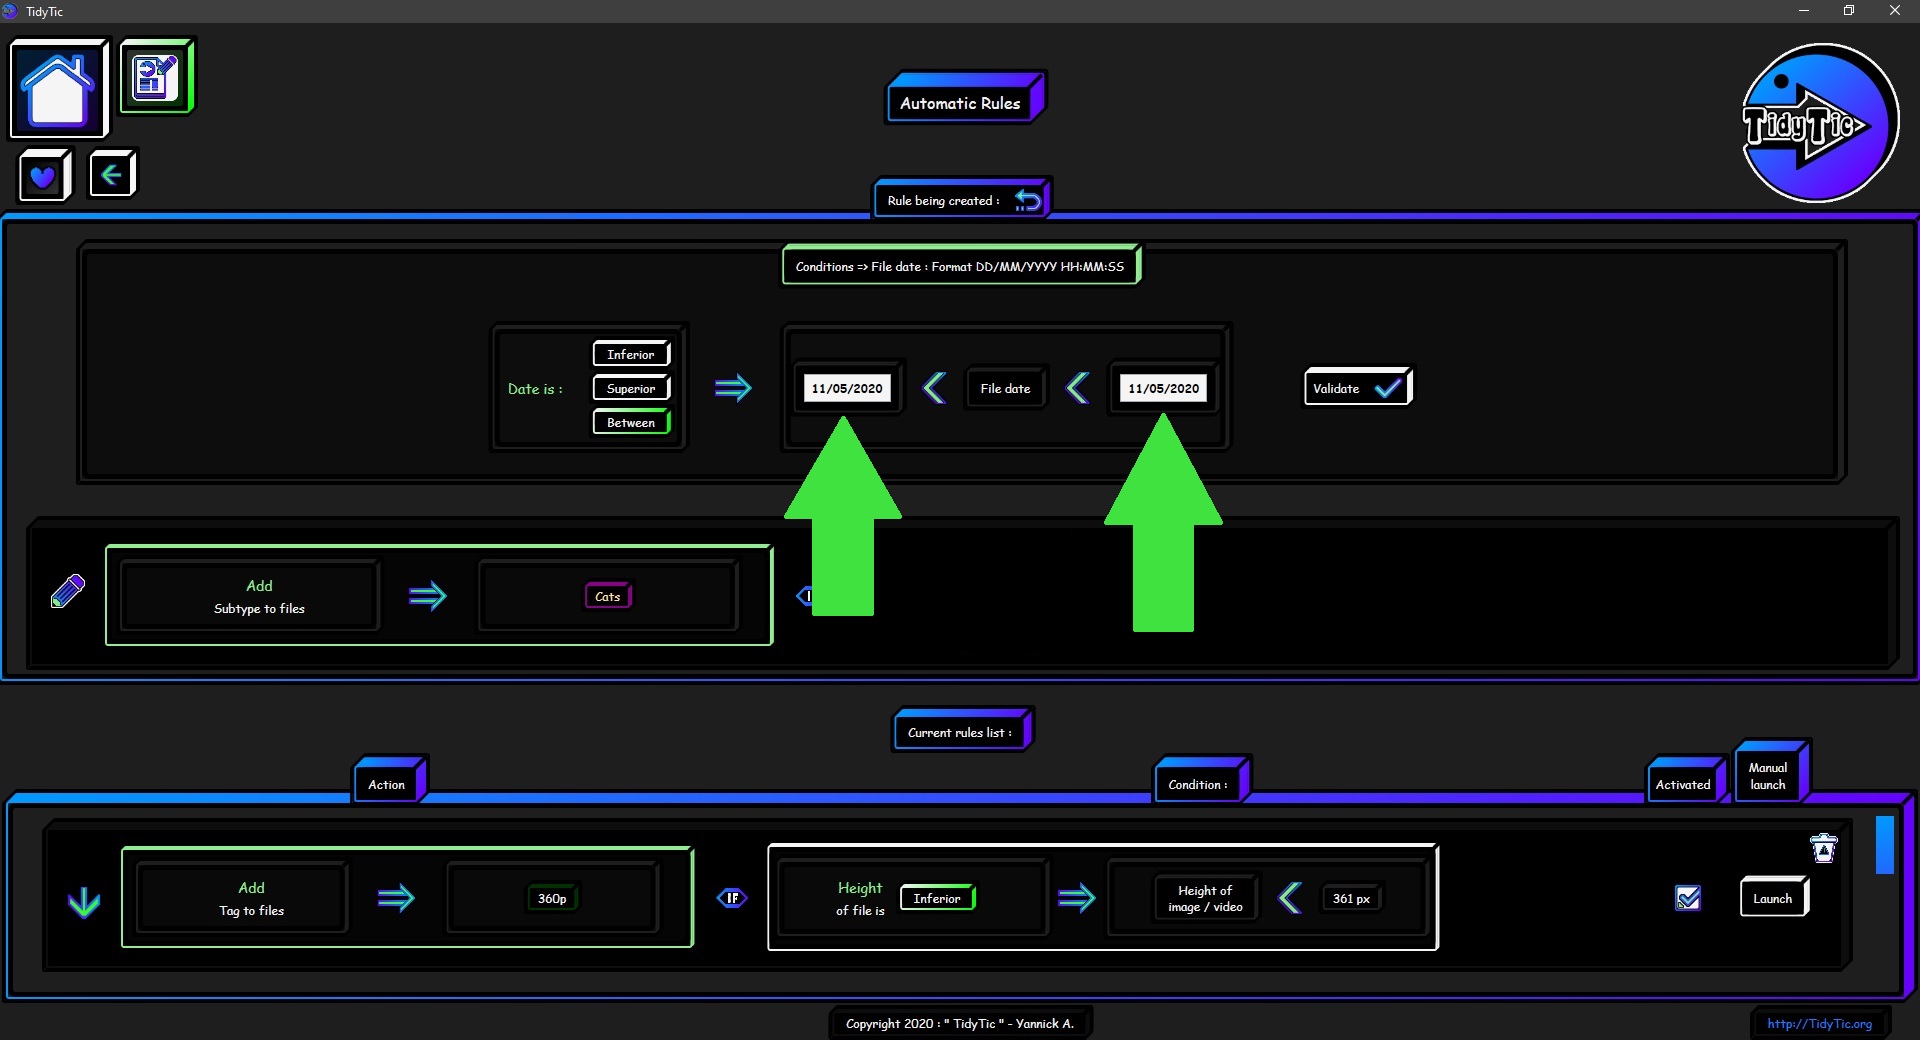
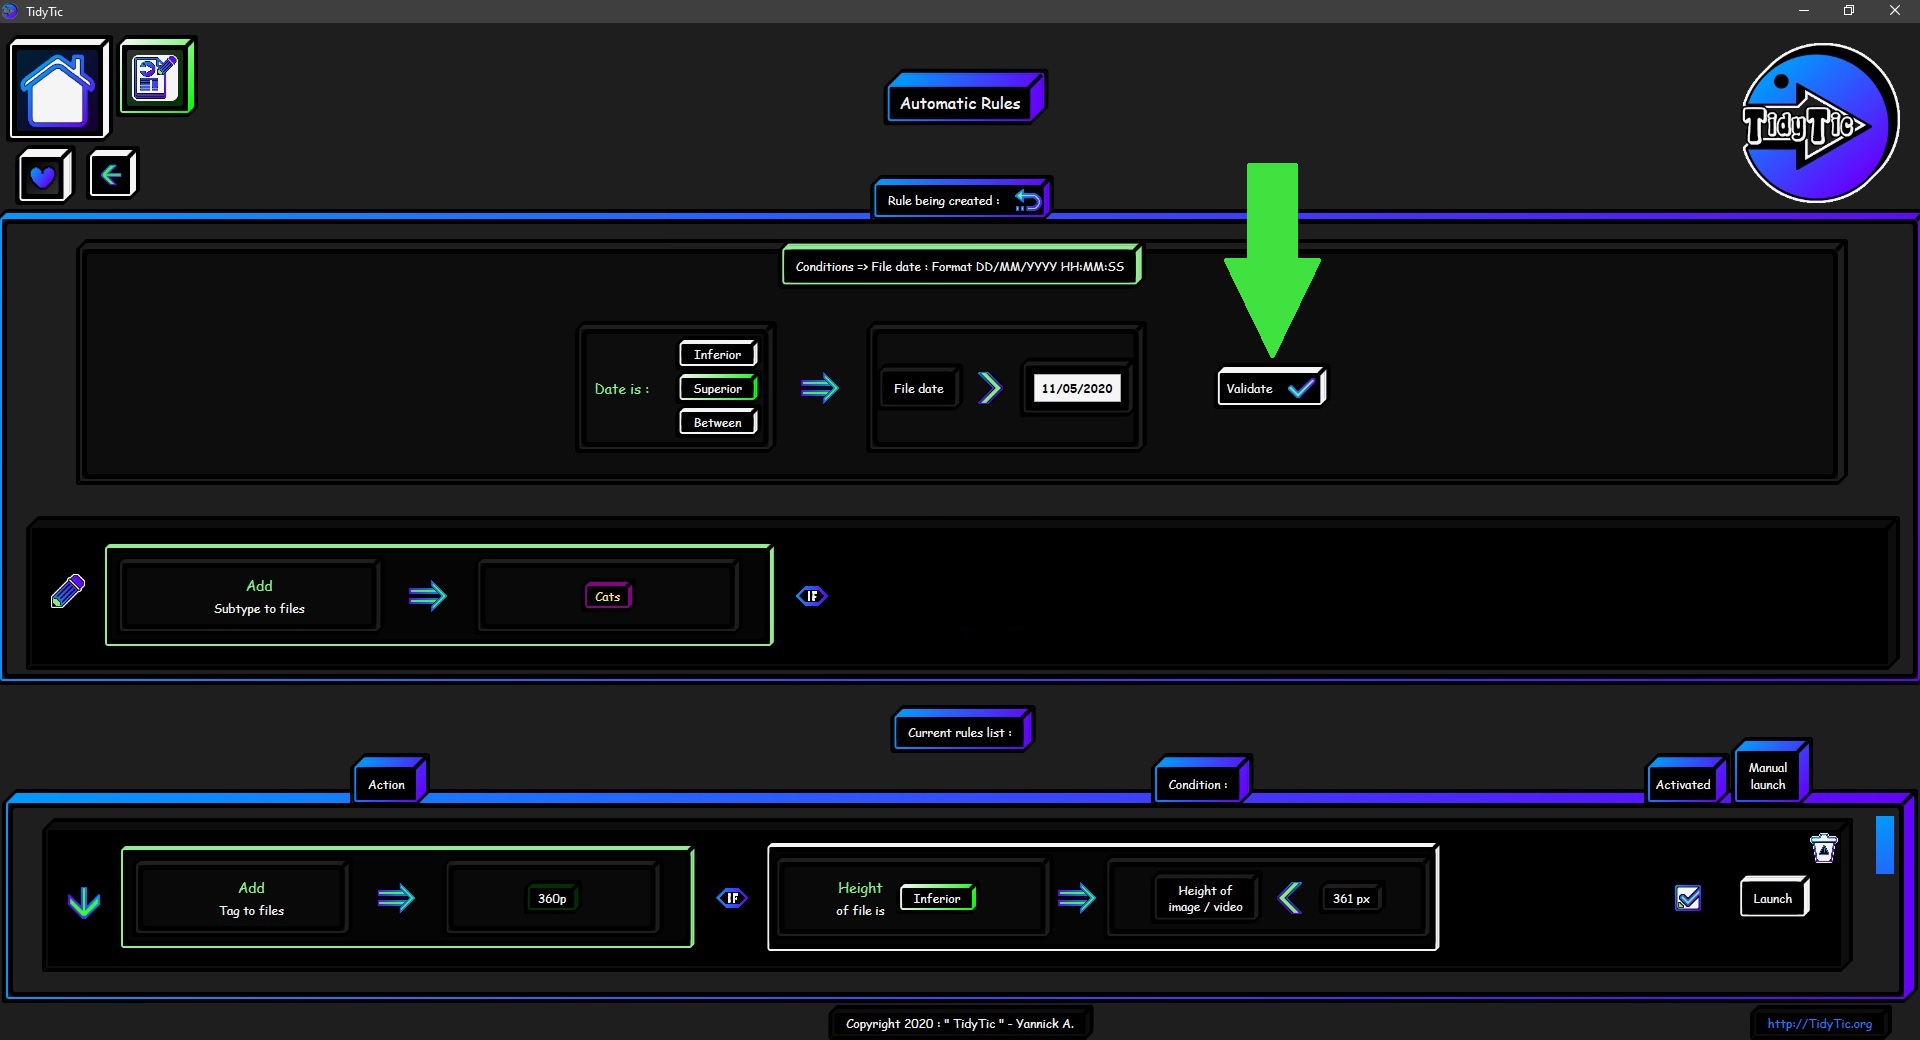
The "The file has a specific date" option :
Then you will have to choose when the condition is met and therefore when it will trigger the action :
- When the date is lower than the date indicated.
- When the date is greater than the date indicated.
- When the date is between the date indicated.
When you select a comparison by clicking on it, its border turns green and the part where you indicate the date(s) will update.
 ____
____  ____
____ 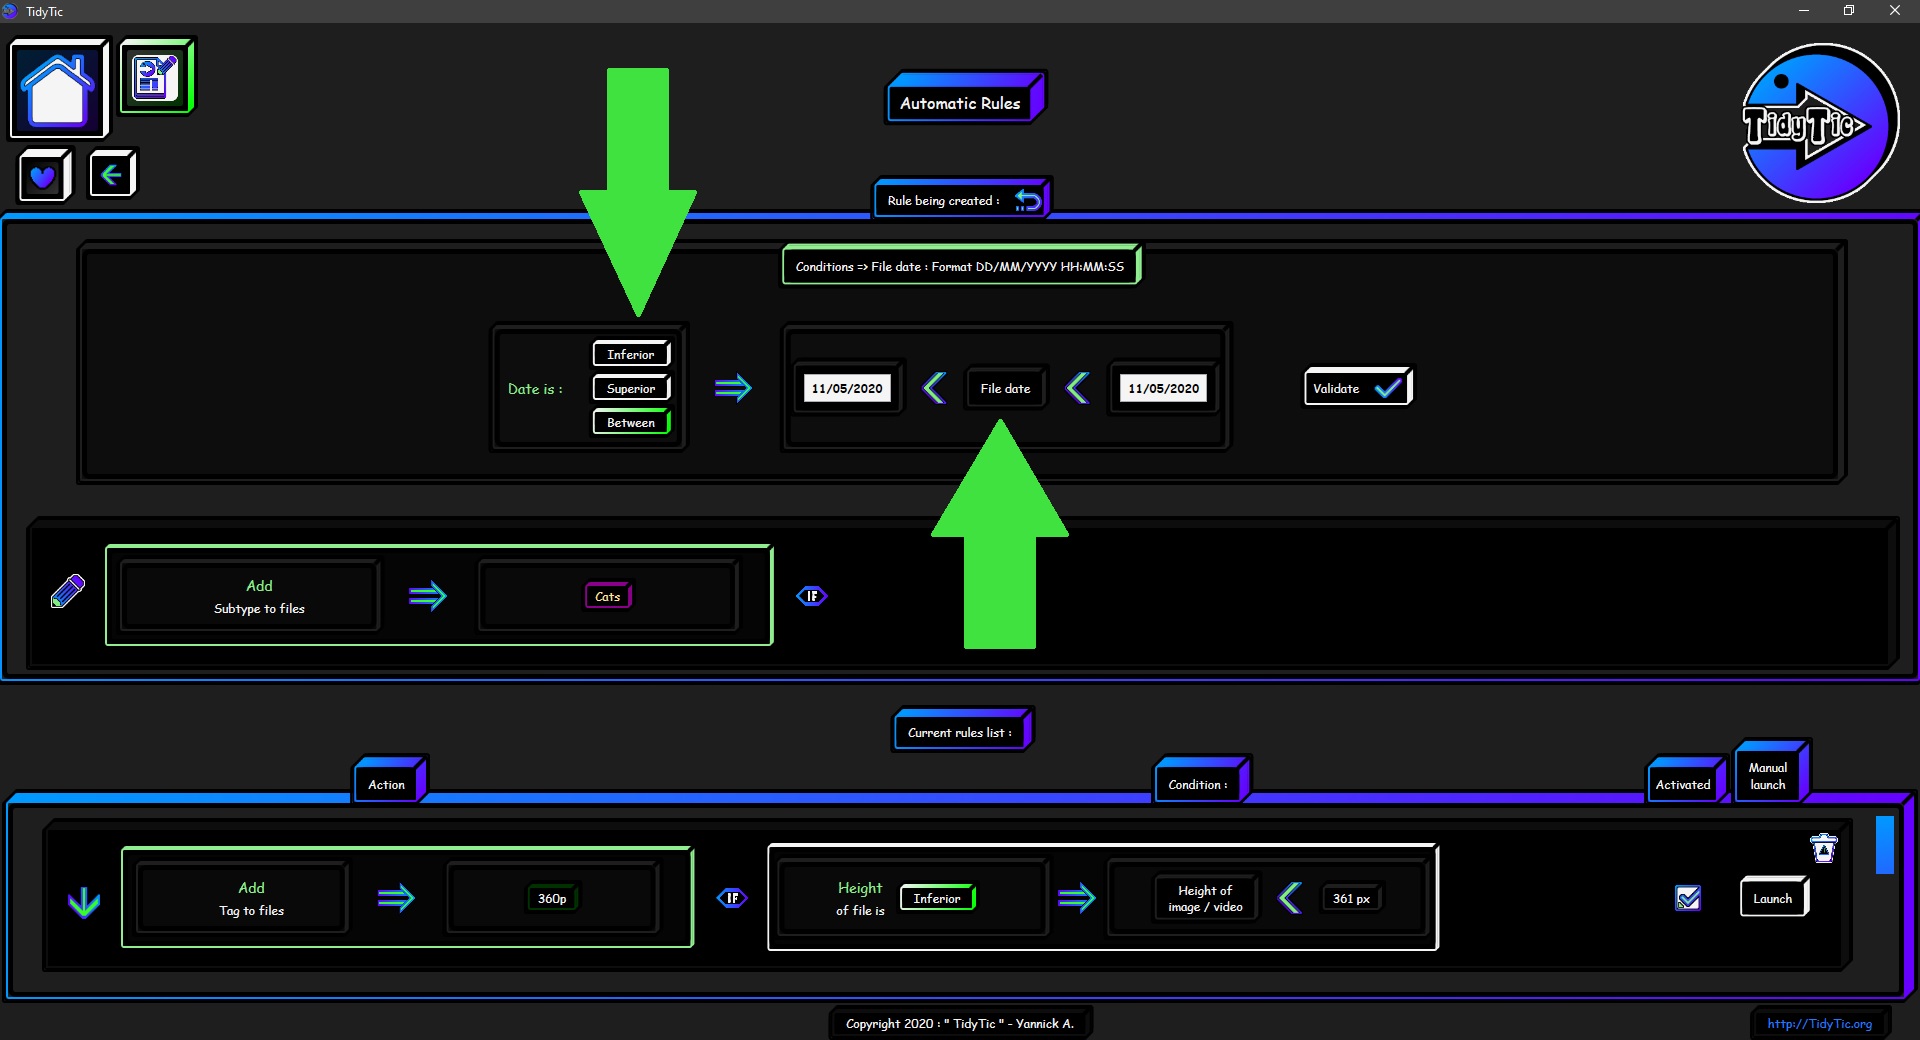
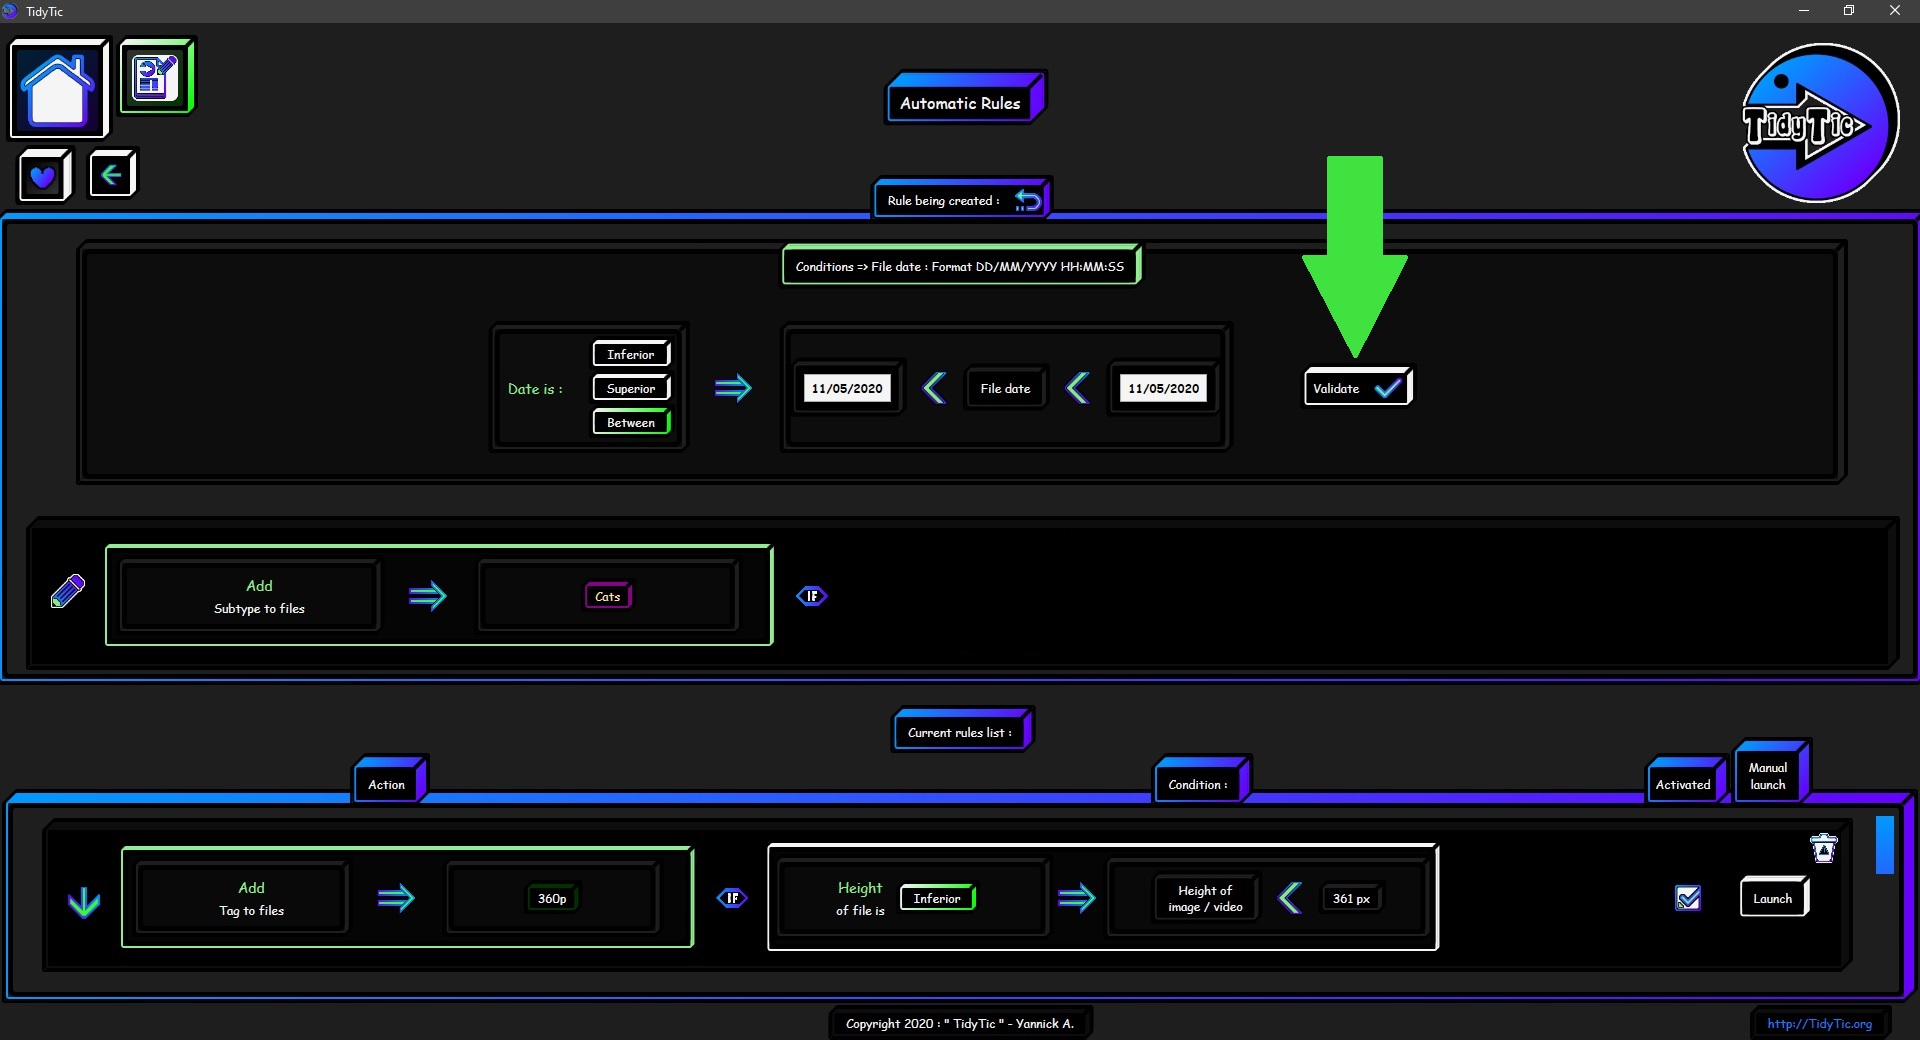
You will then have to indicate the date(s) with which the condition will compare that of the file.
The date box will be pre-filled with today's date.
The format for the date is "DD/MM/YYYY".
You can also specify the hour, minute and second in the following format : "DD/MM/YYYY HH:MM:SS".
 ____
____  ____
____ 
Then you just have to validate this condition.
 ____
____  ____
____ 
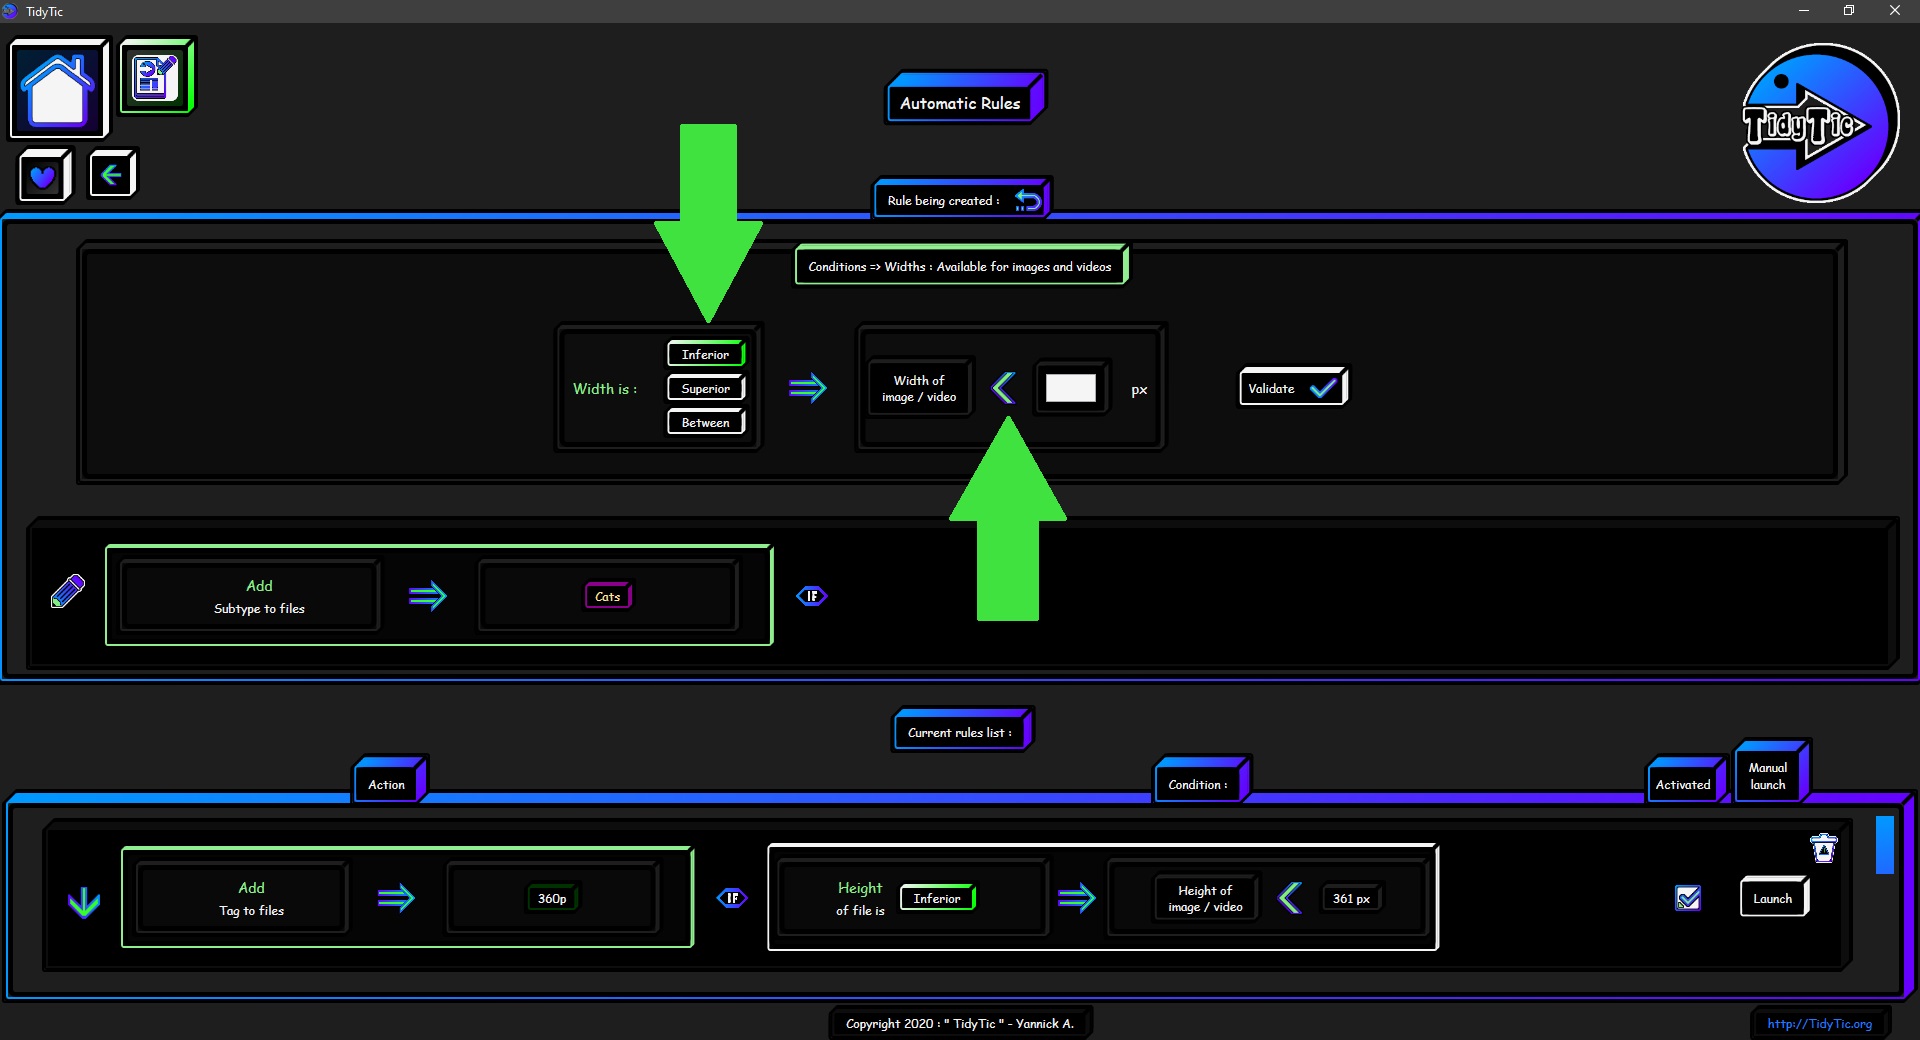
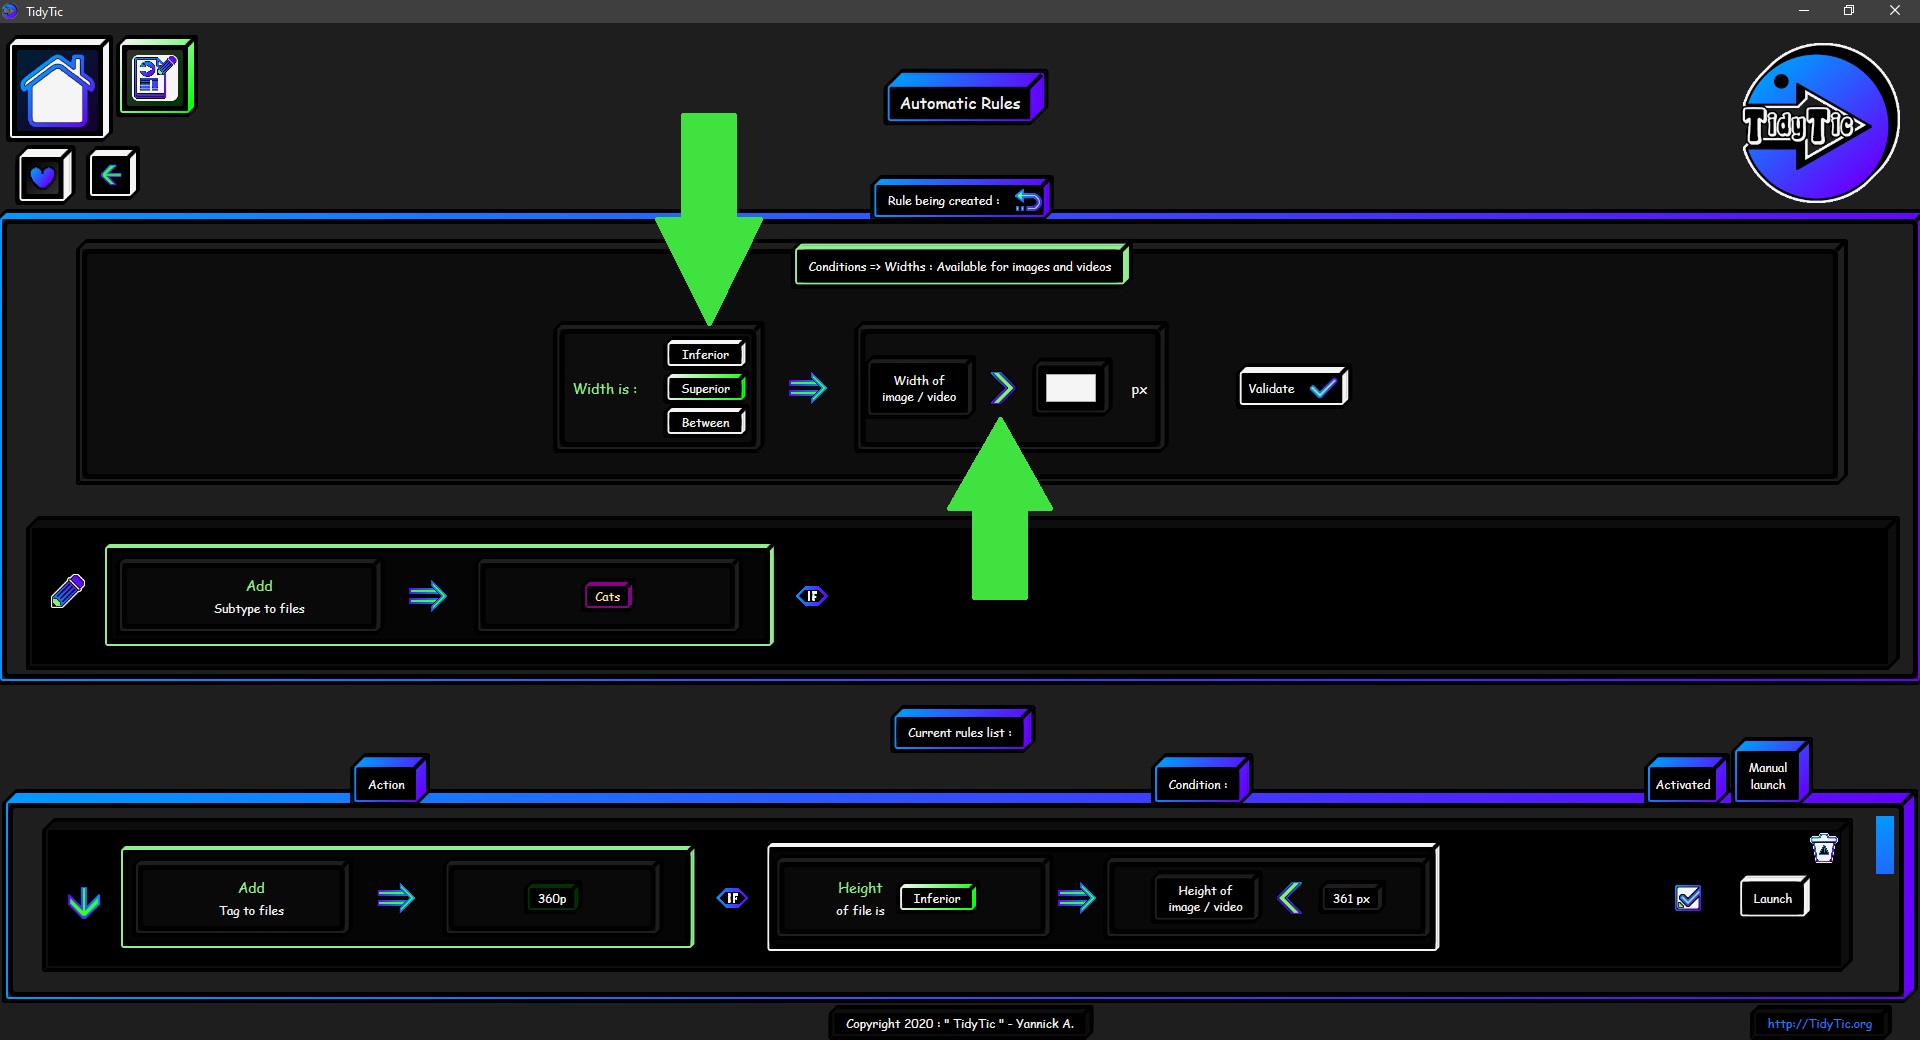
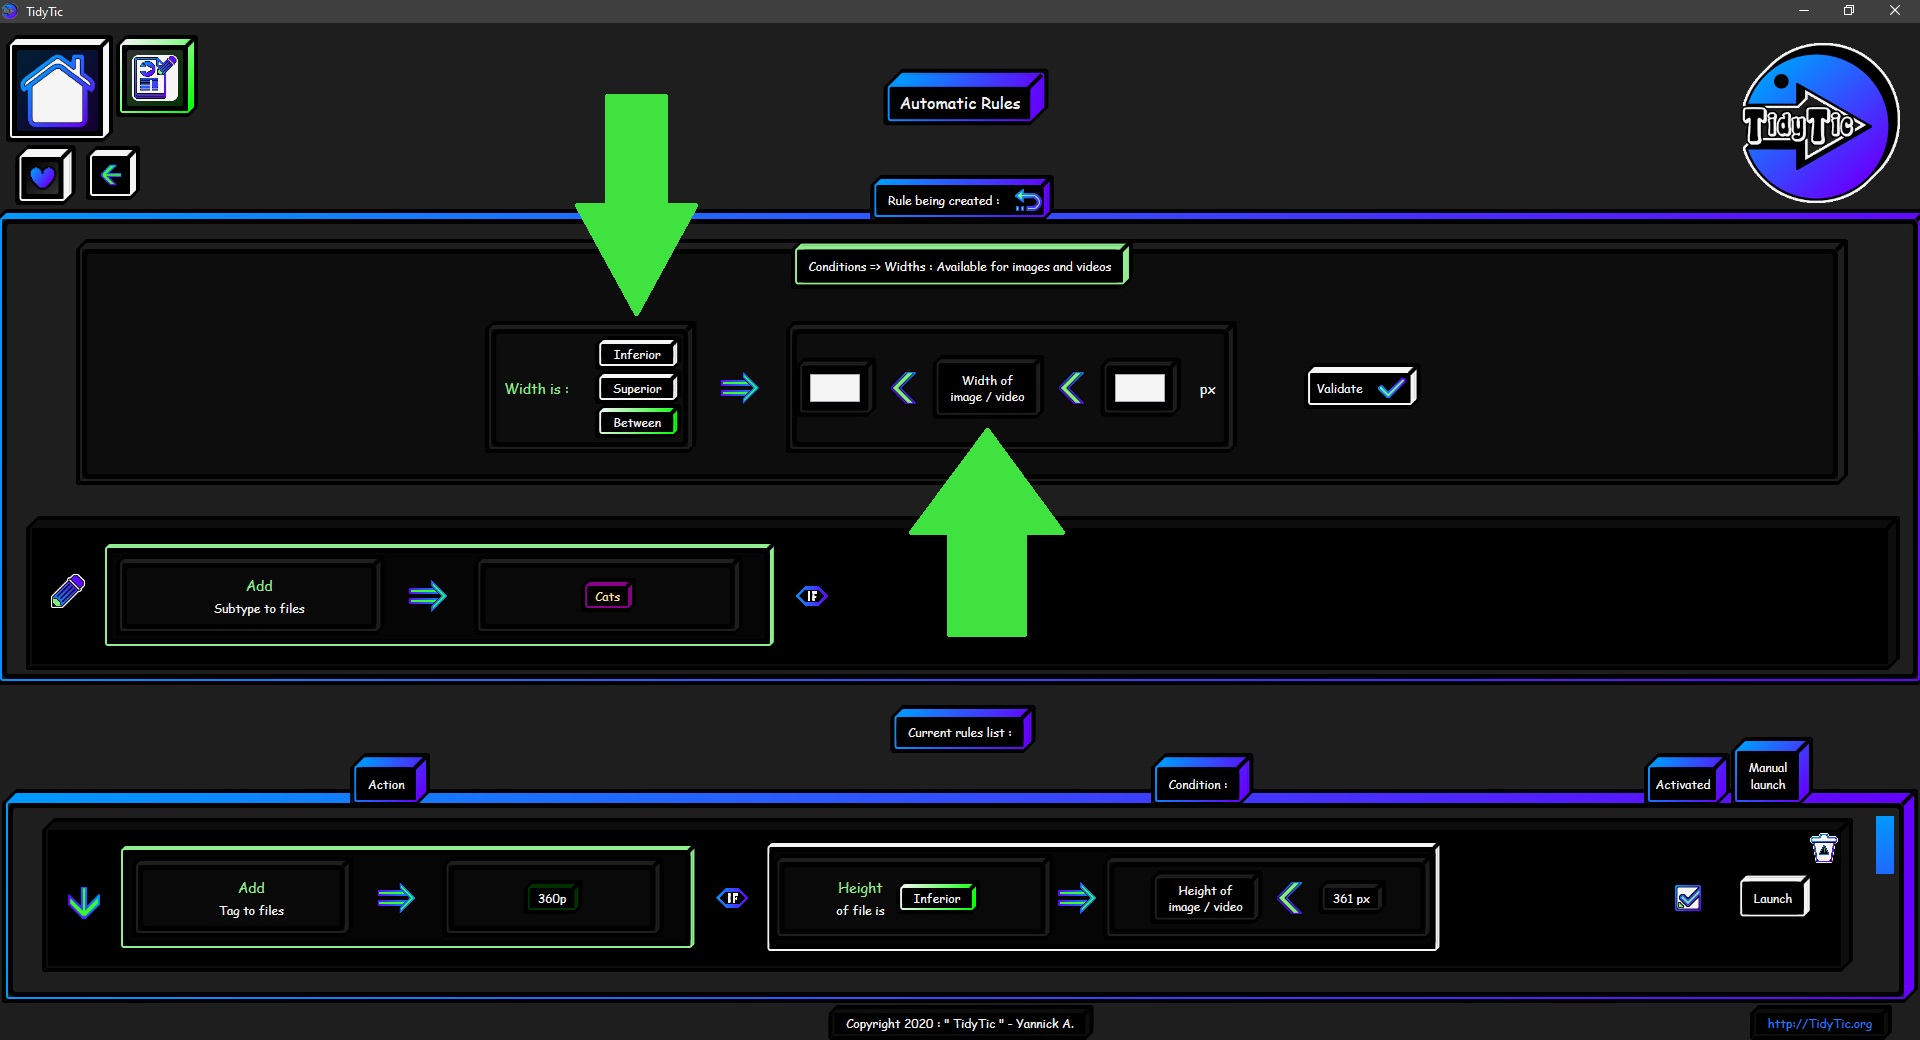
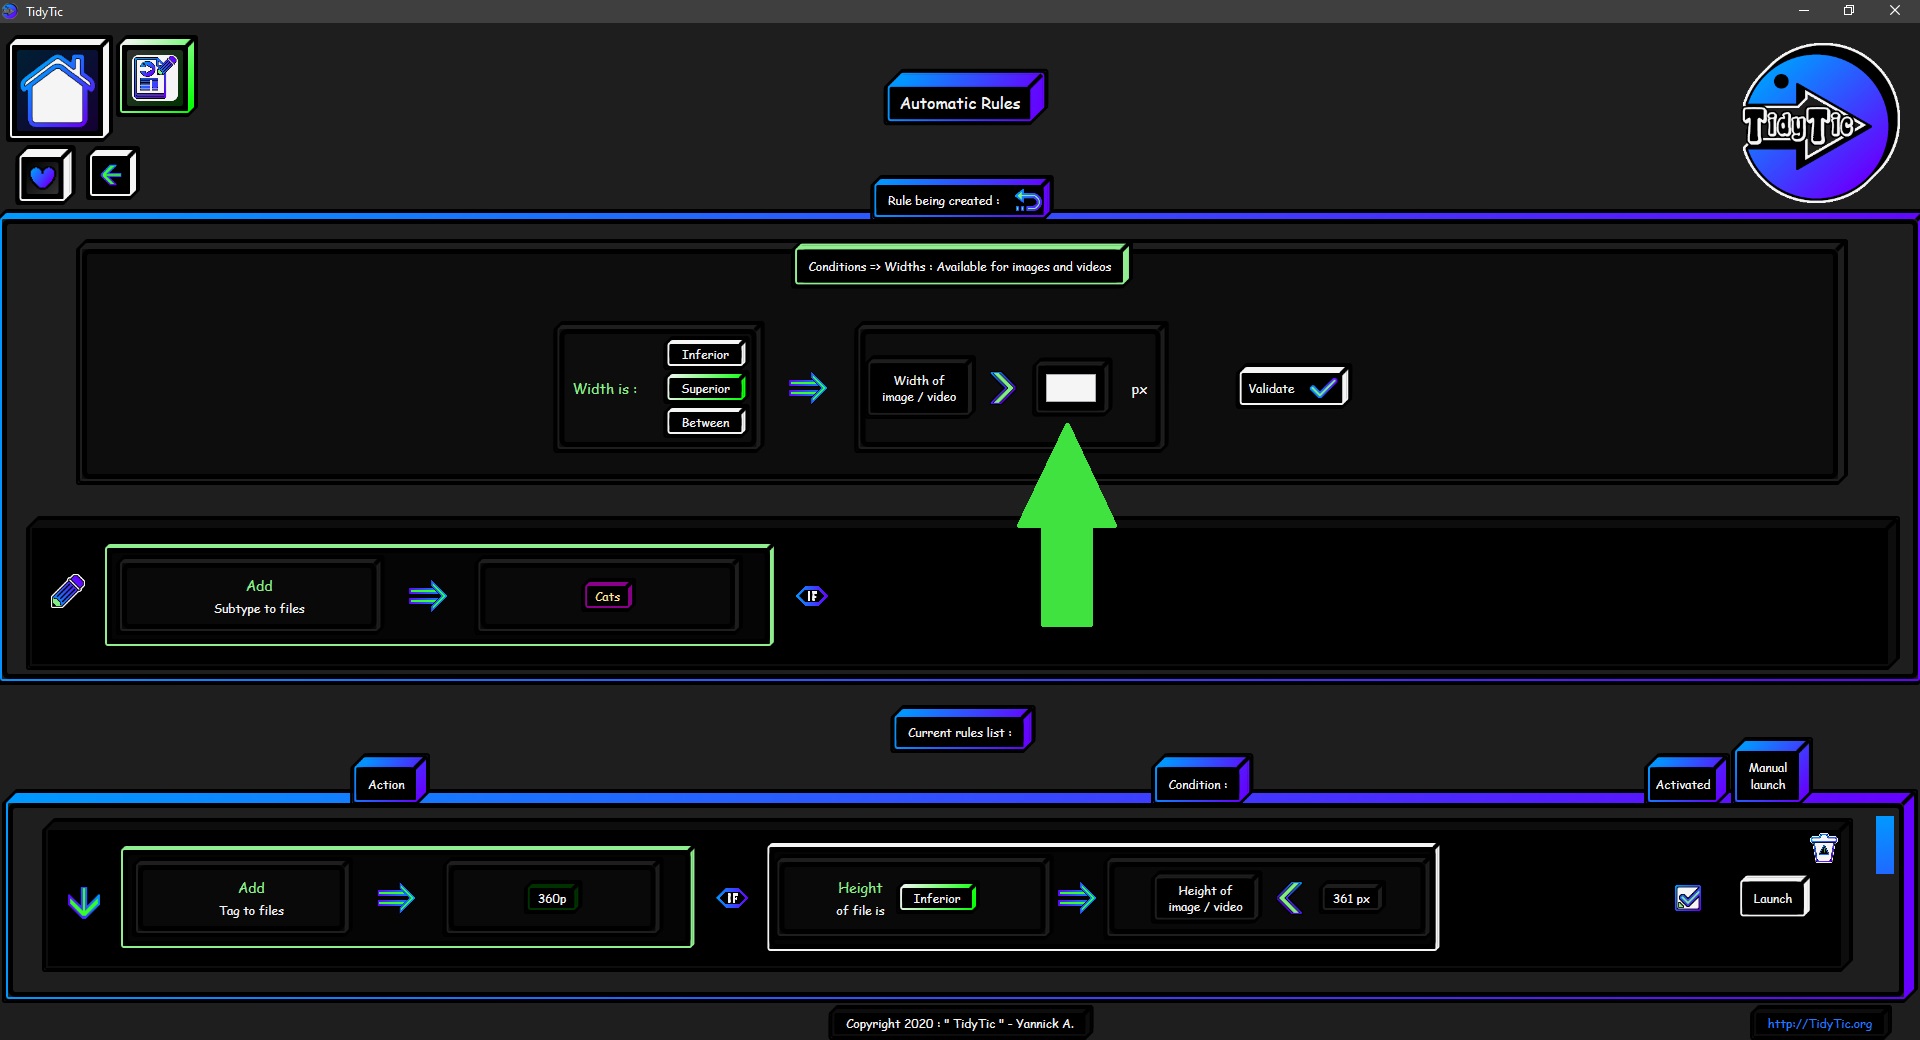
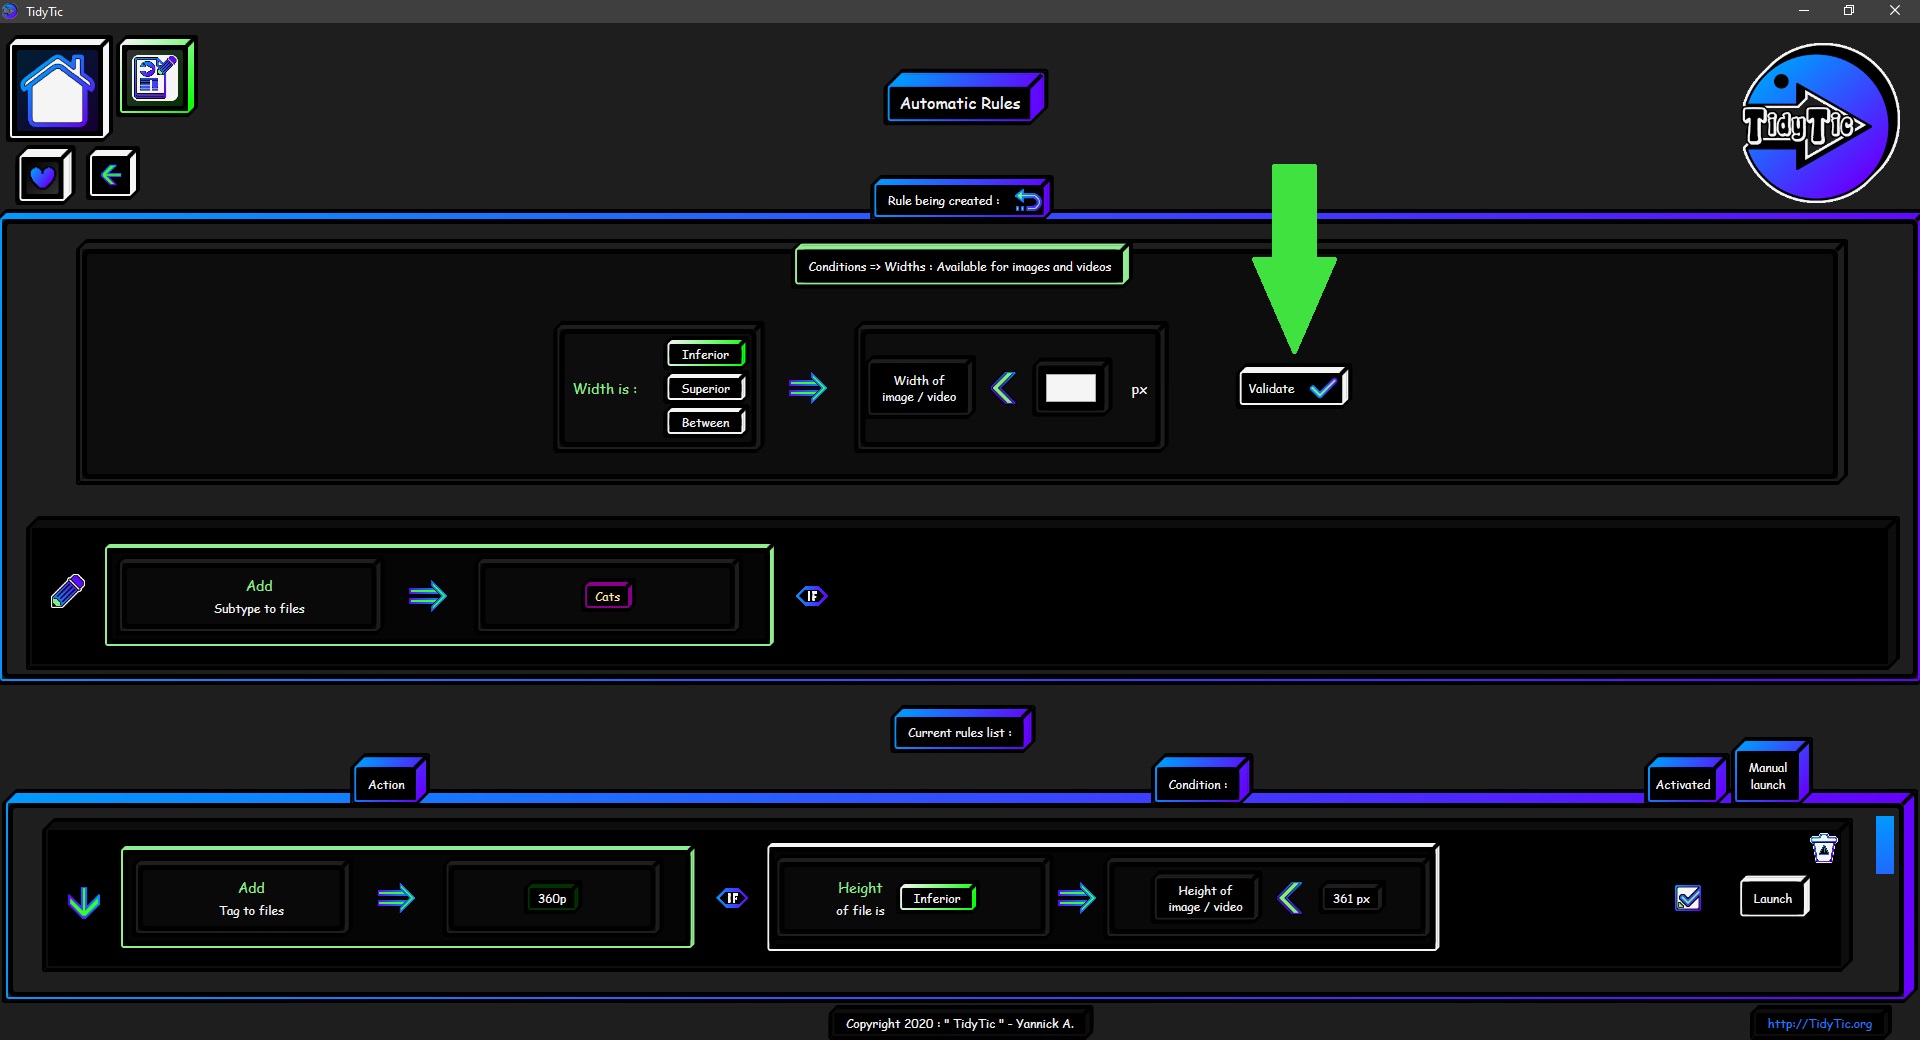
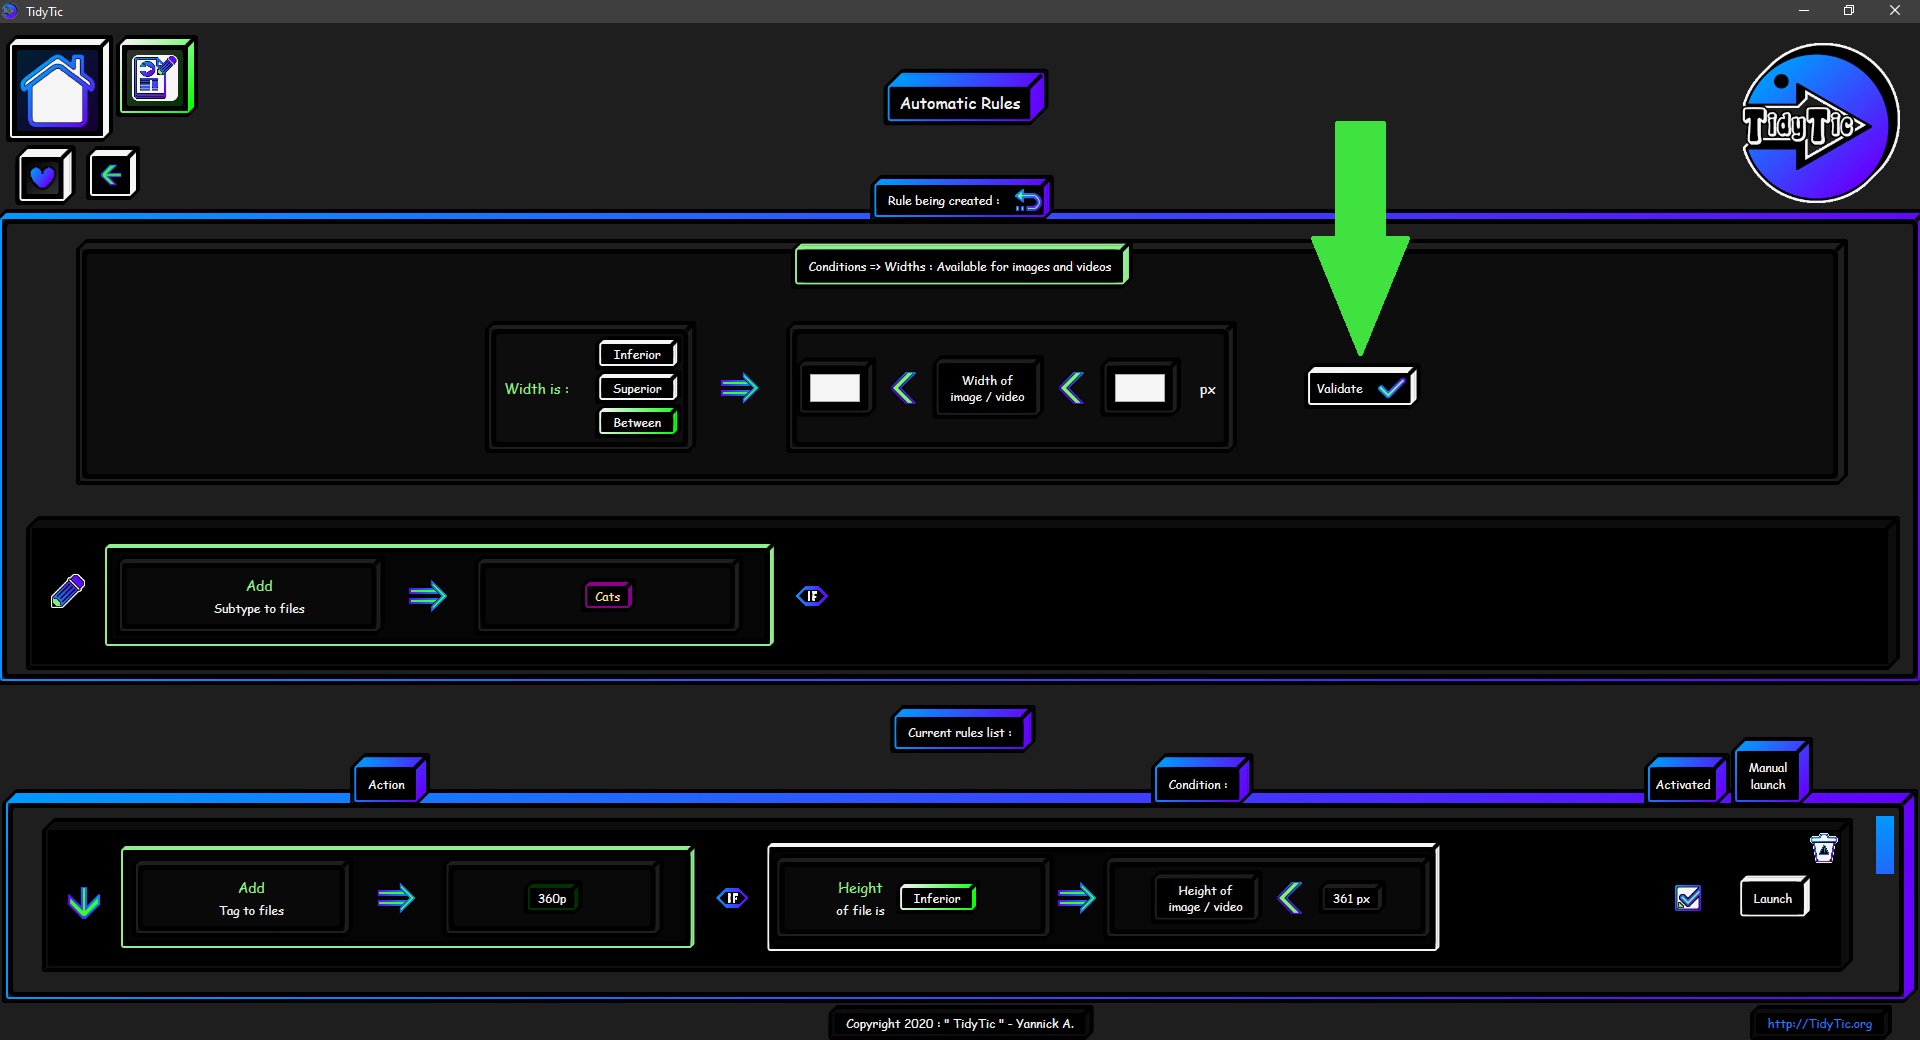
The "The file has a specific width" option :
Then you will have to choose when the condition is met and therefore when it will trigger the action :
- When the width is less than the width indicated.
- When the width is greater than the width indicated.
- When the width is between the width indicated.
When you select a comparison by clicking on it, its border turns green and the part where you indicate the date(s) will update.
 ____
____  ____
____ 
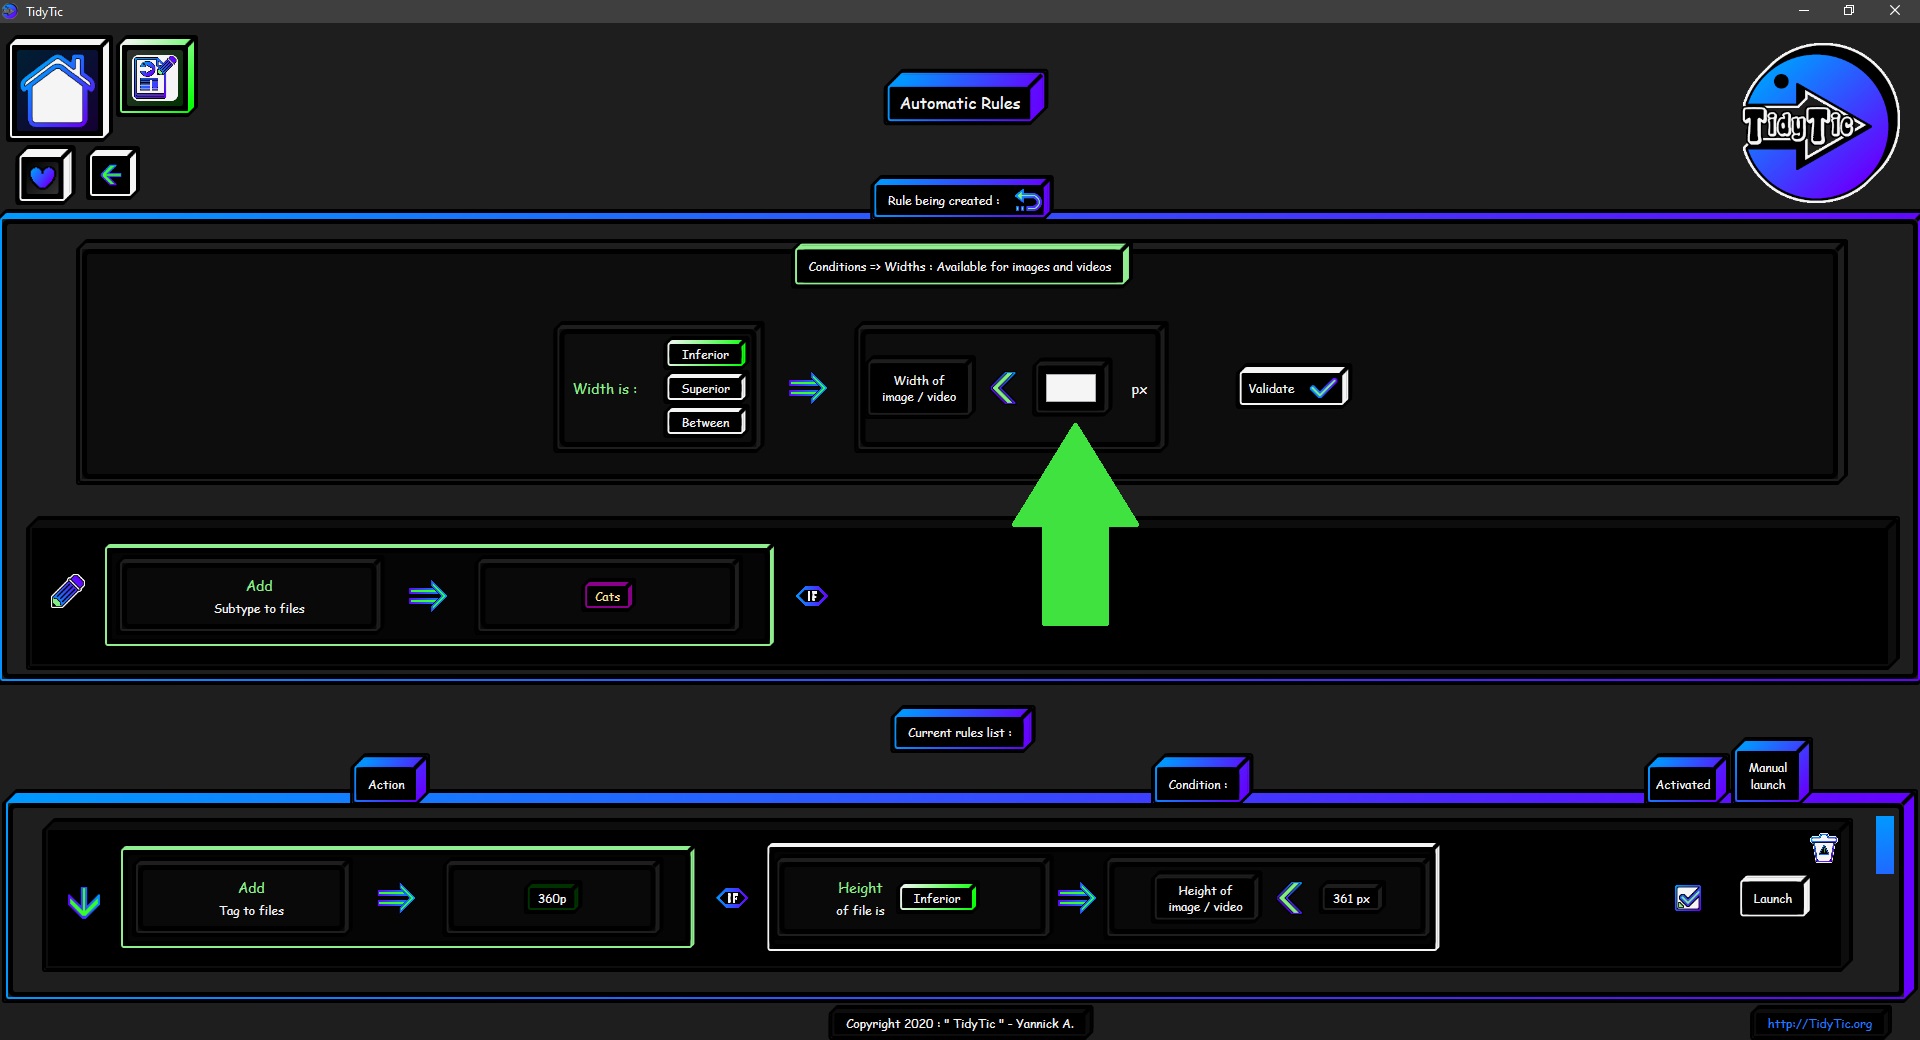
You will then have to indicate the width(s) with which the condition will compare that of the file.
The width(s) you indicate will be in Pixels (px).
 ____
____  ____
____ 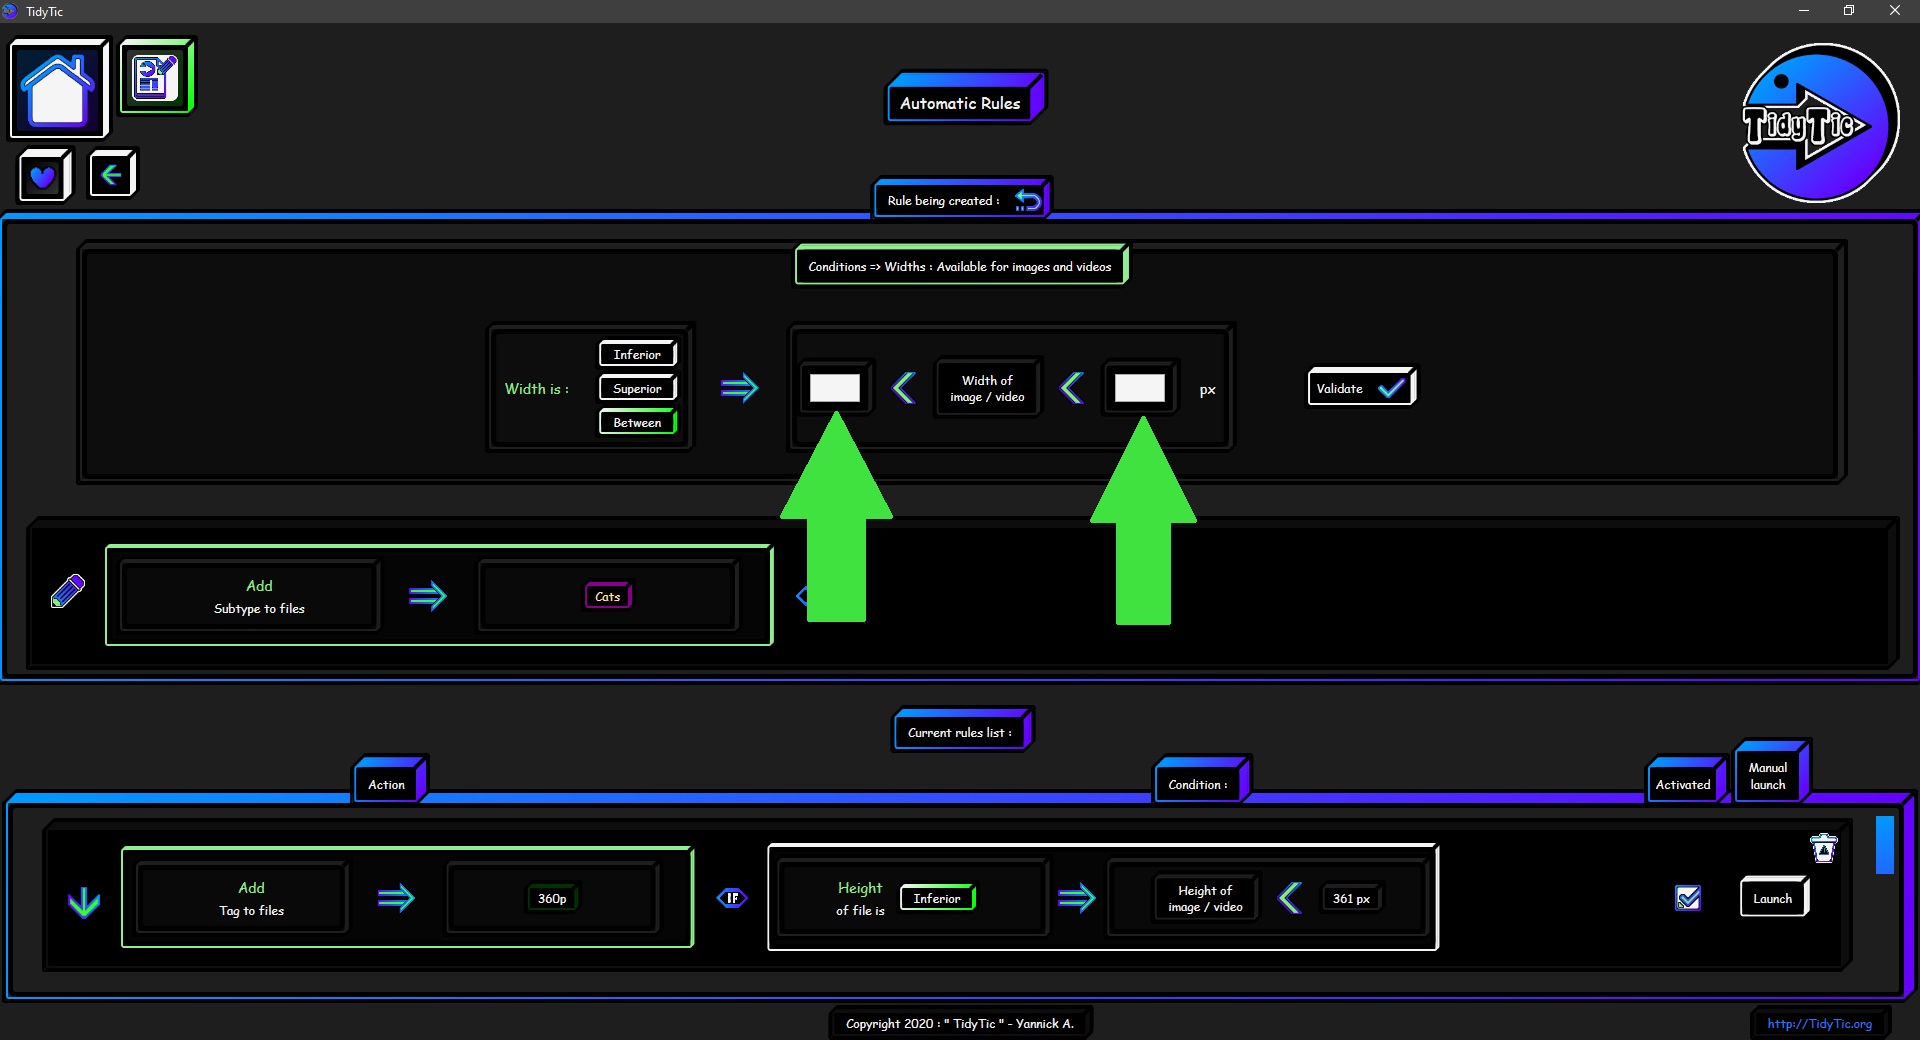
Then you just have to validate this condition.
 ____
____  ____
____ 
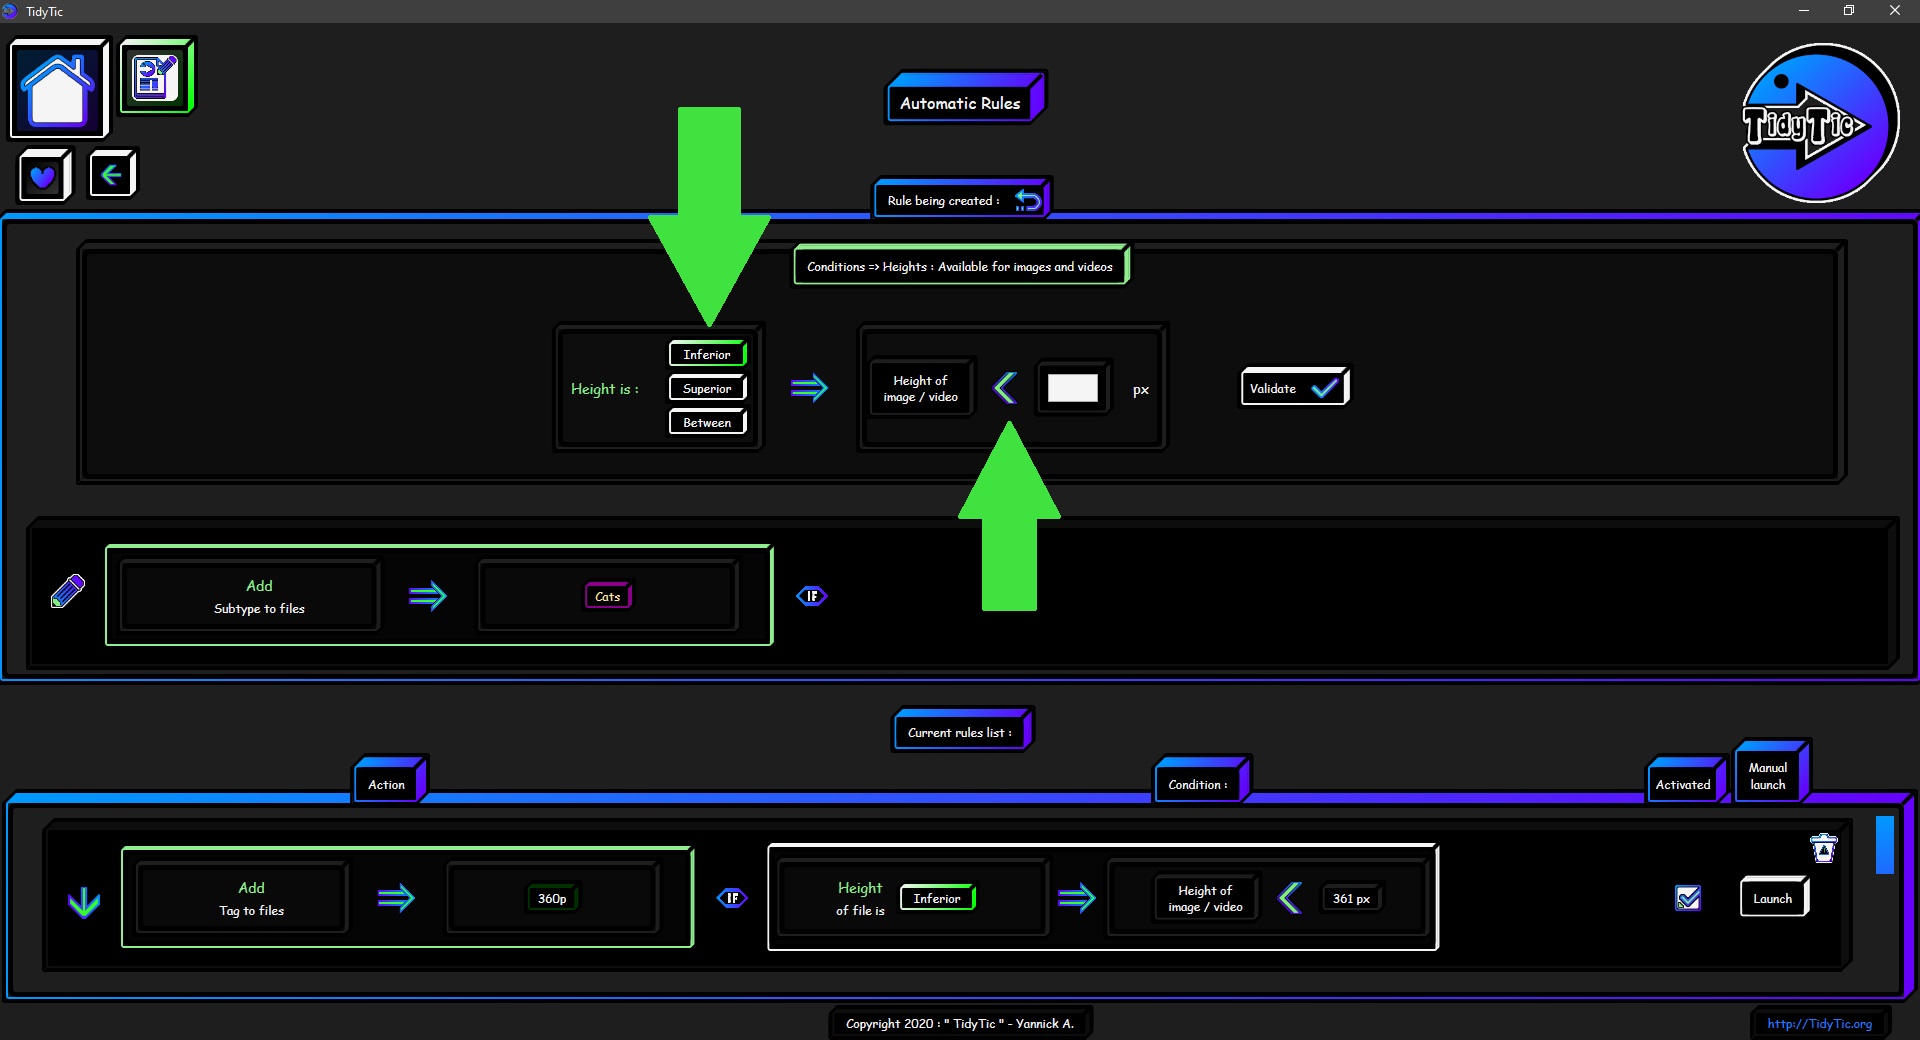
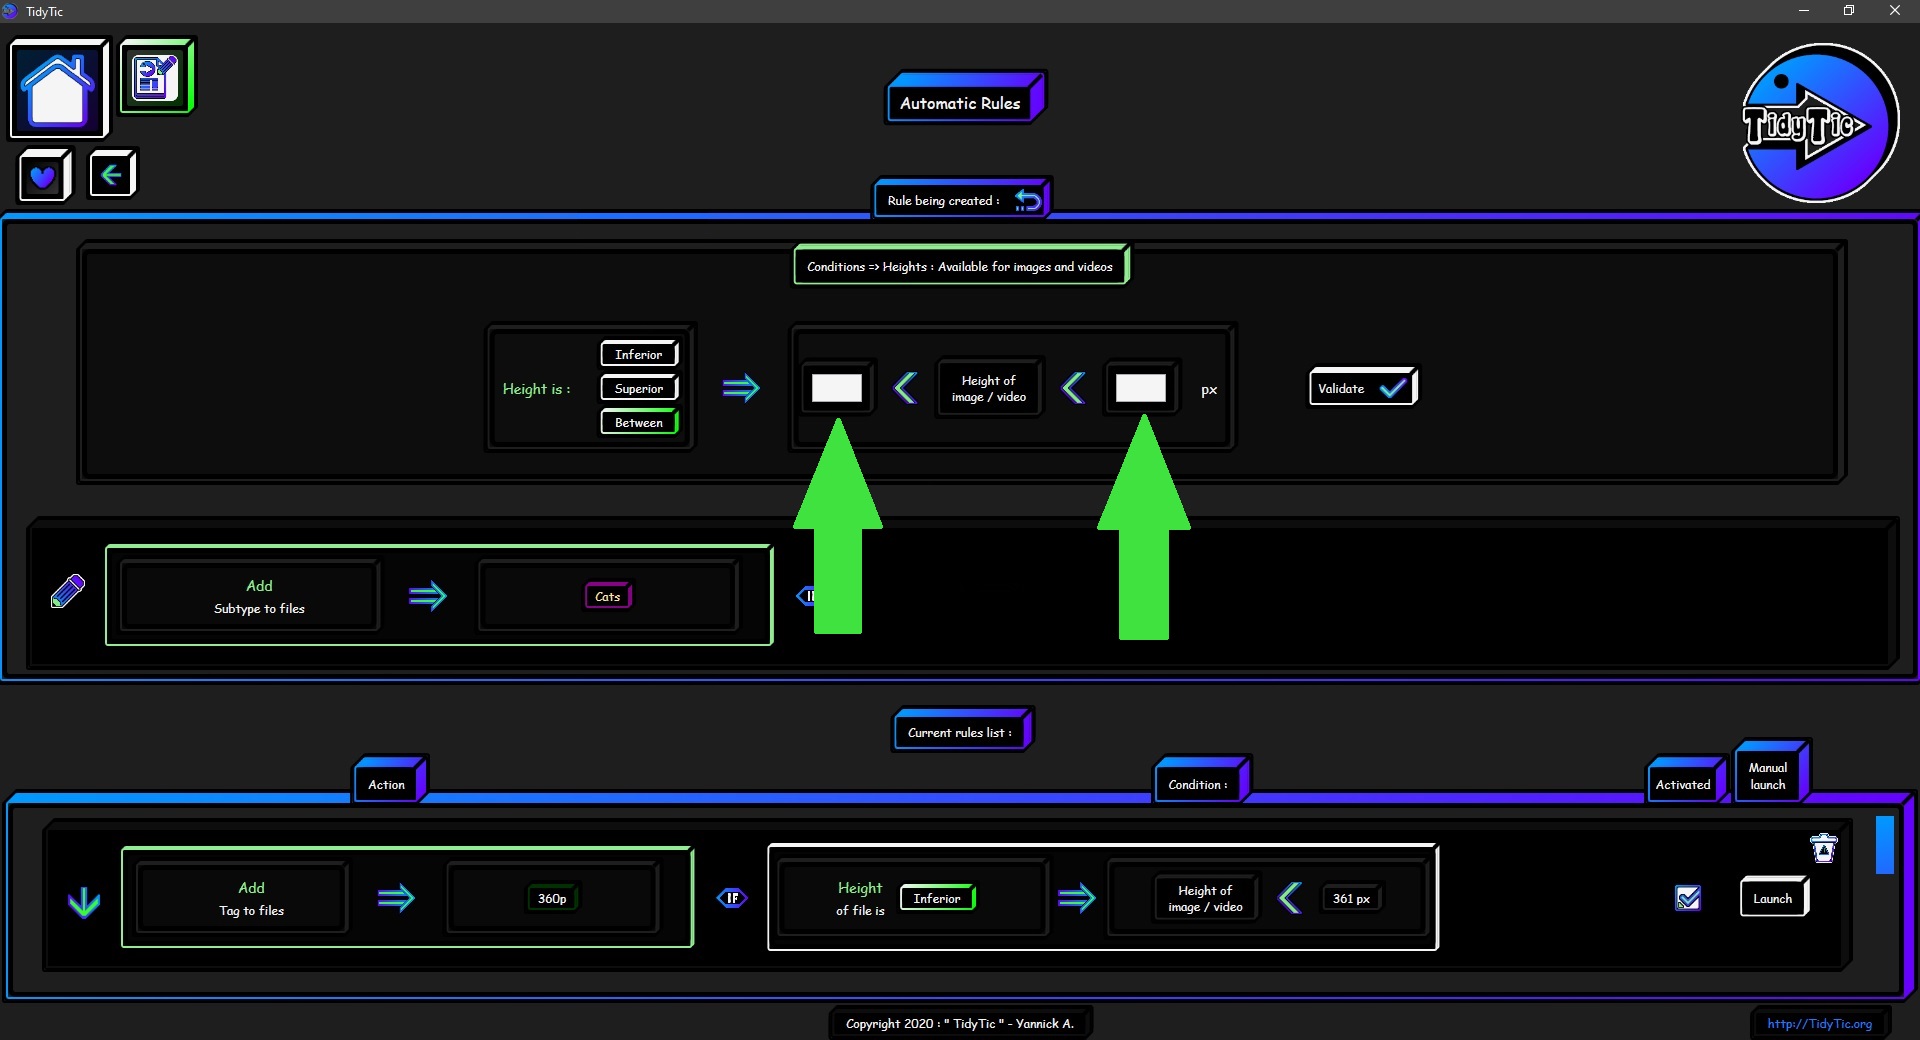
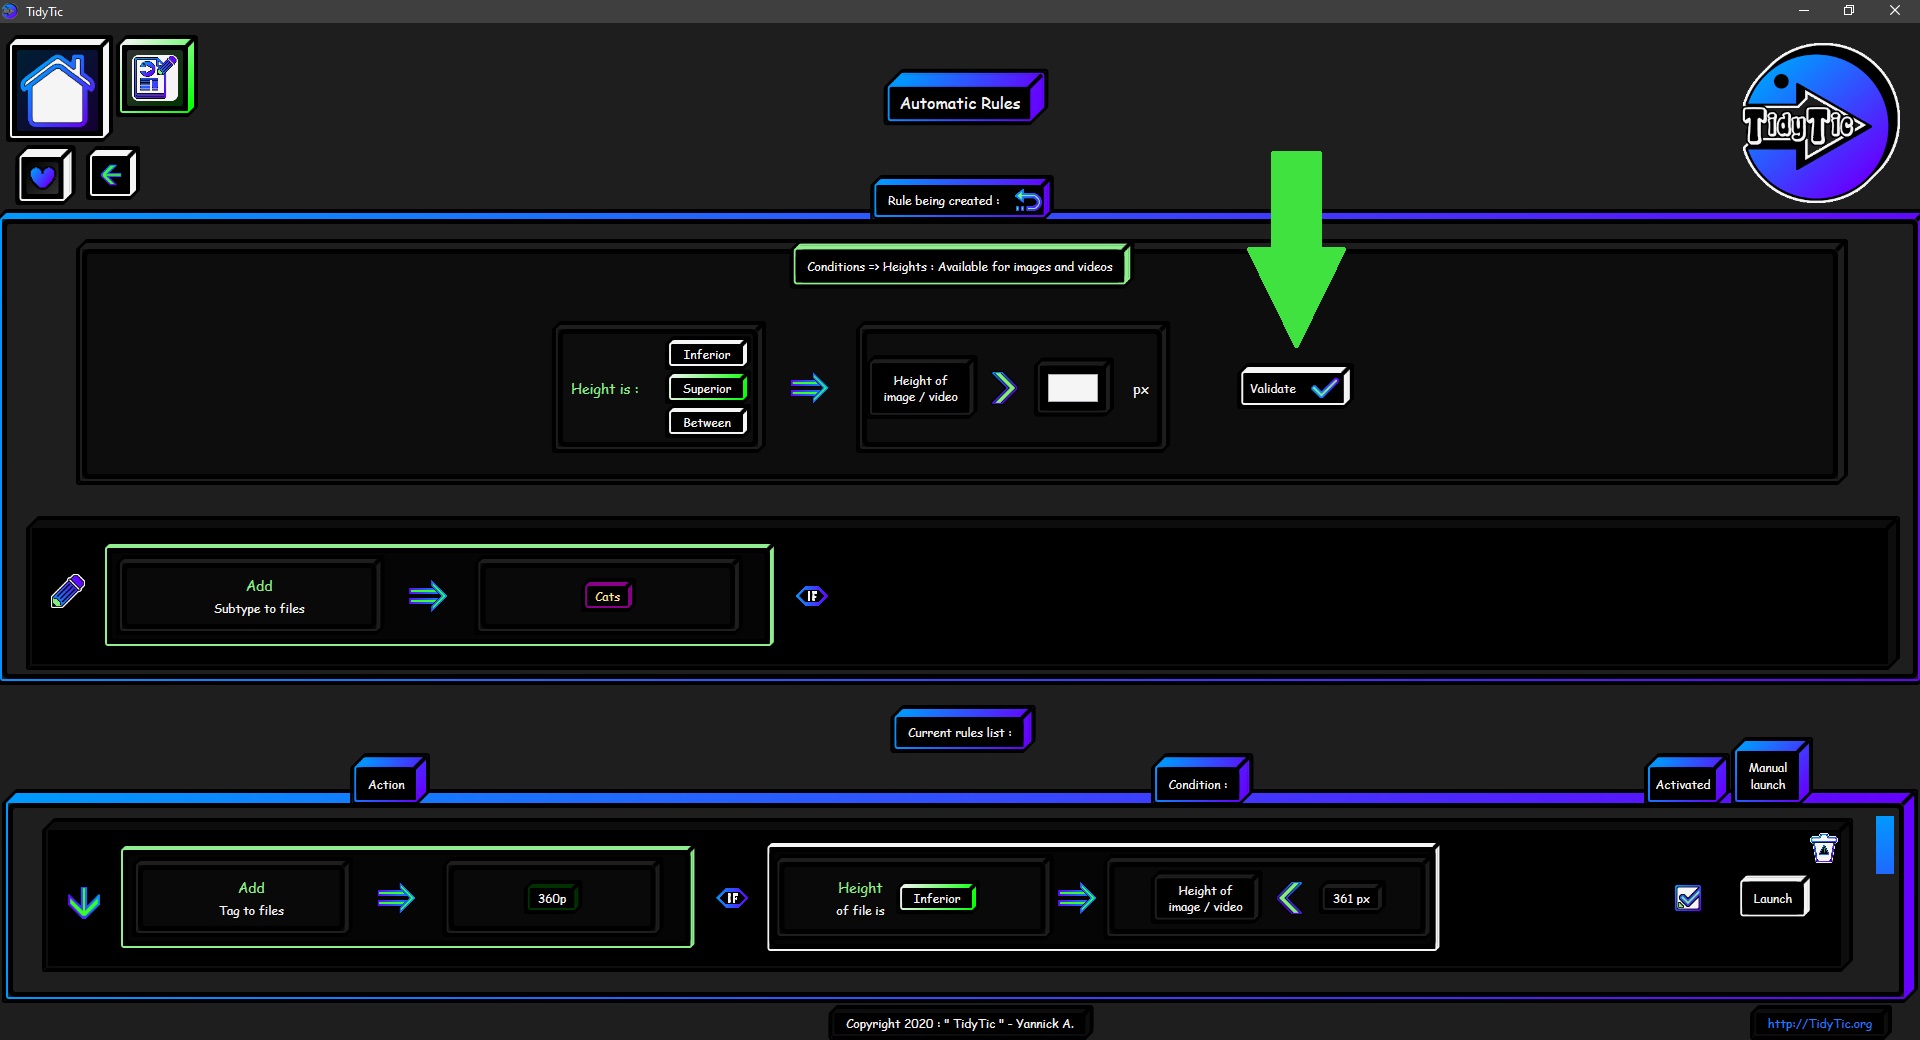
The "The file has a specific height" option :
Then you will have to choose when the condition is met and therefore when it will trigger the action :
- When the height is less than the height indicated.
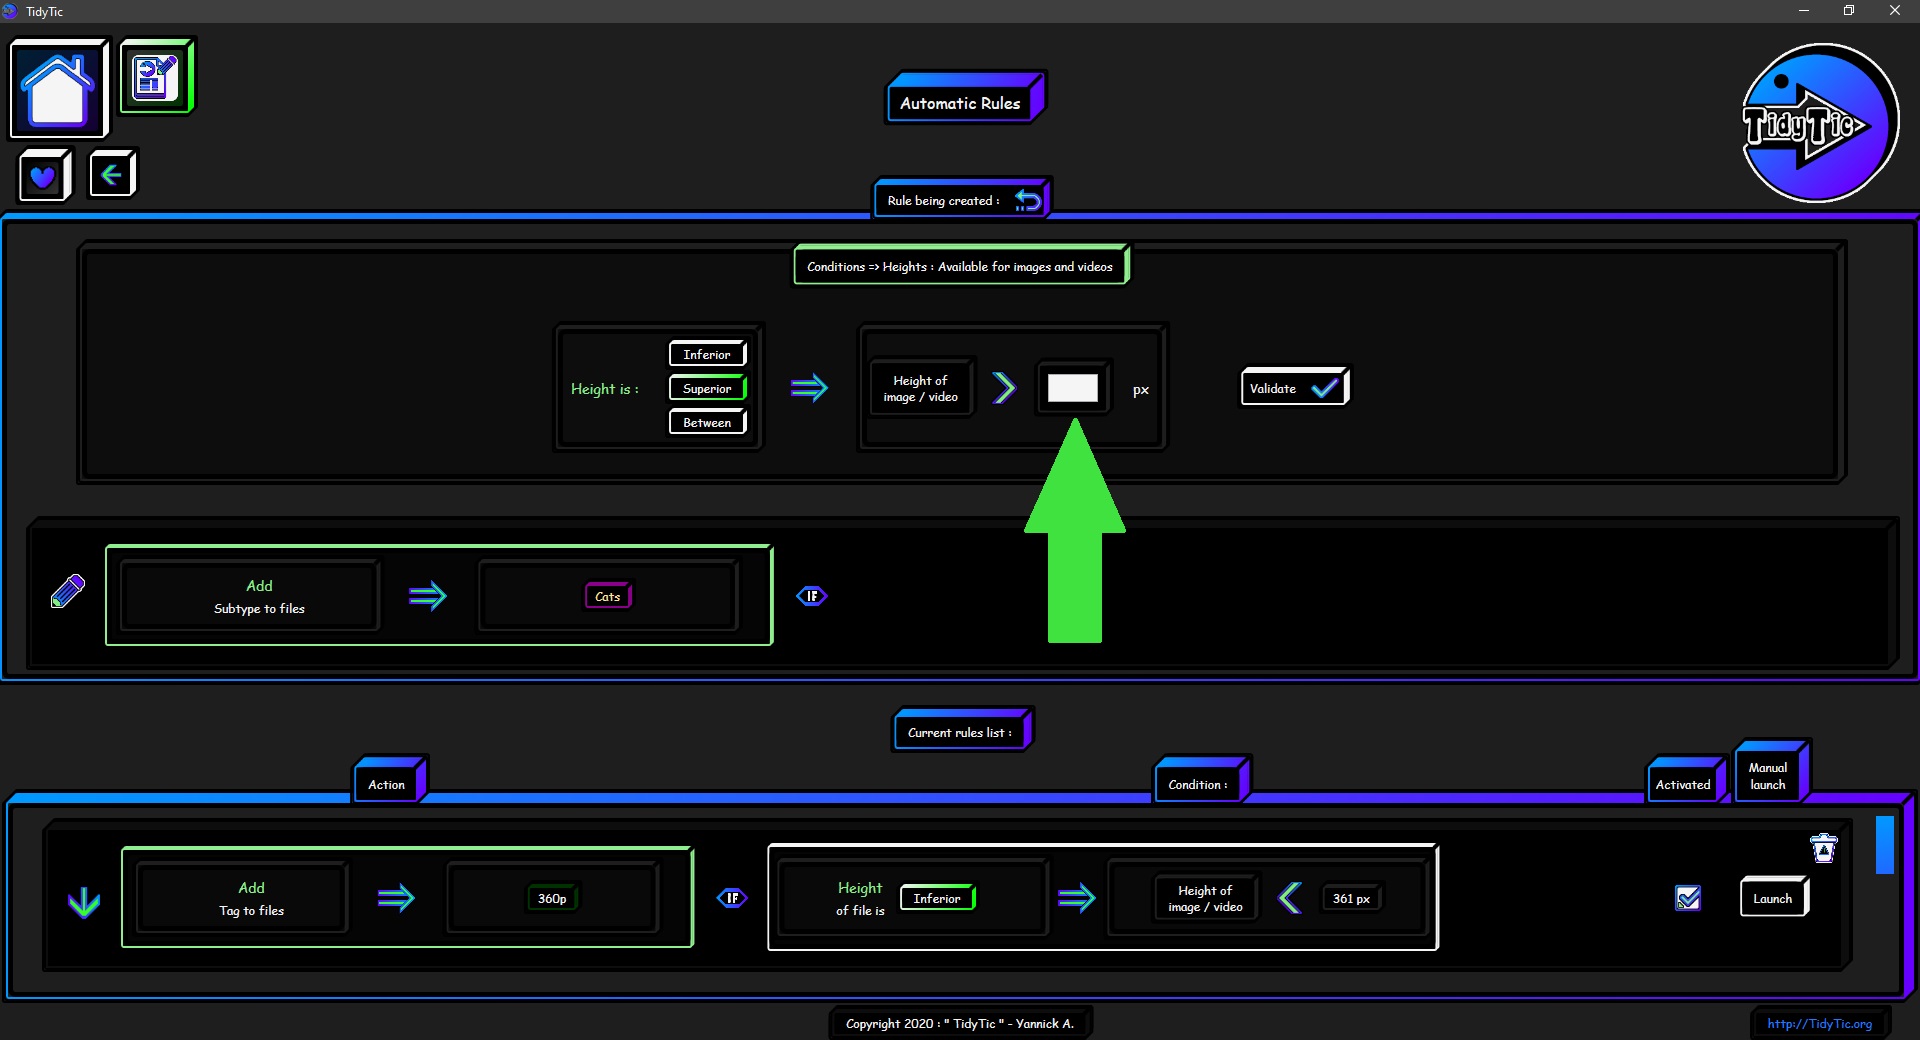
- When the height is greater than the height indicated.
- When the height is between the height indicated.
When you select a comparison by clicking on it, its border turns green and the part where you indicate the date(s) will update.
 ____
____  ____
____ 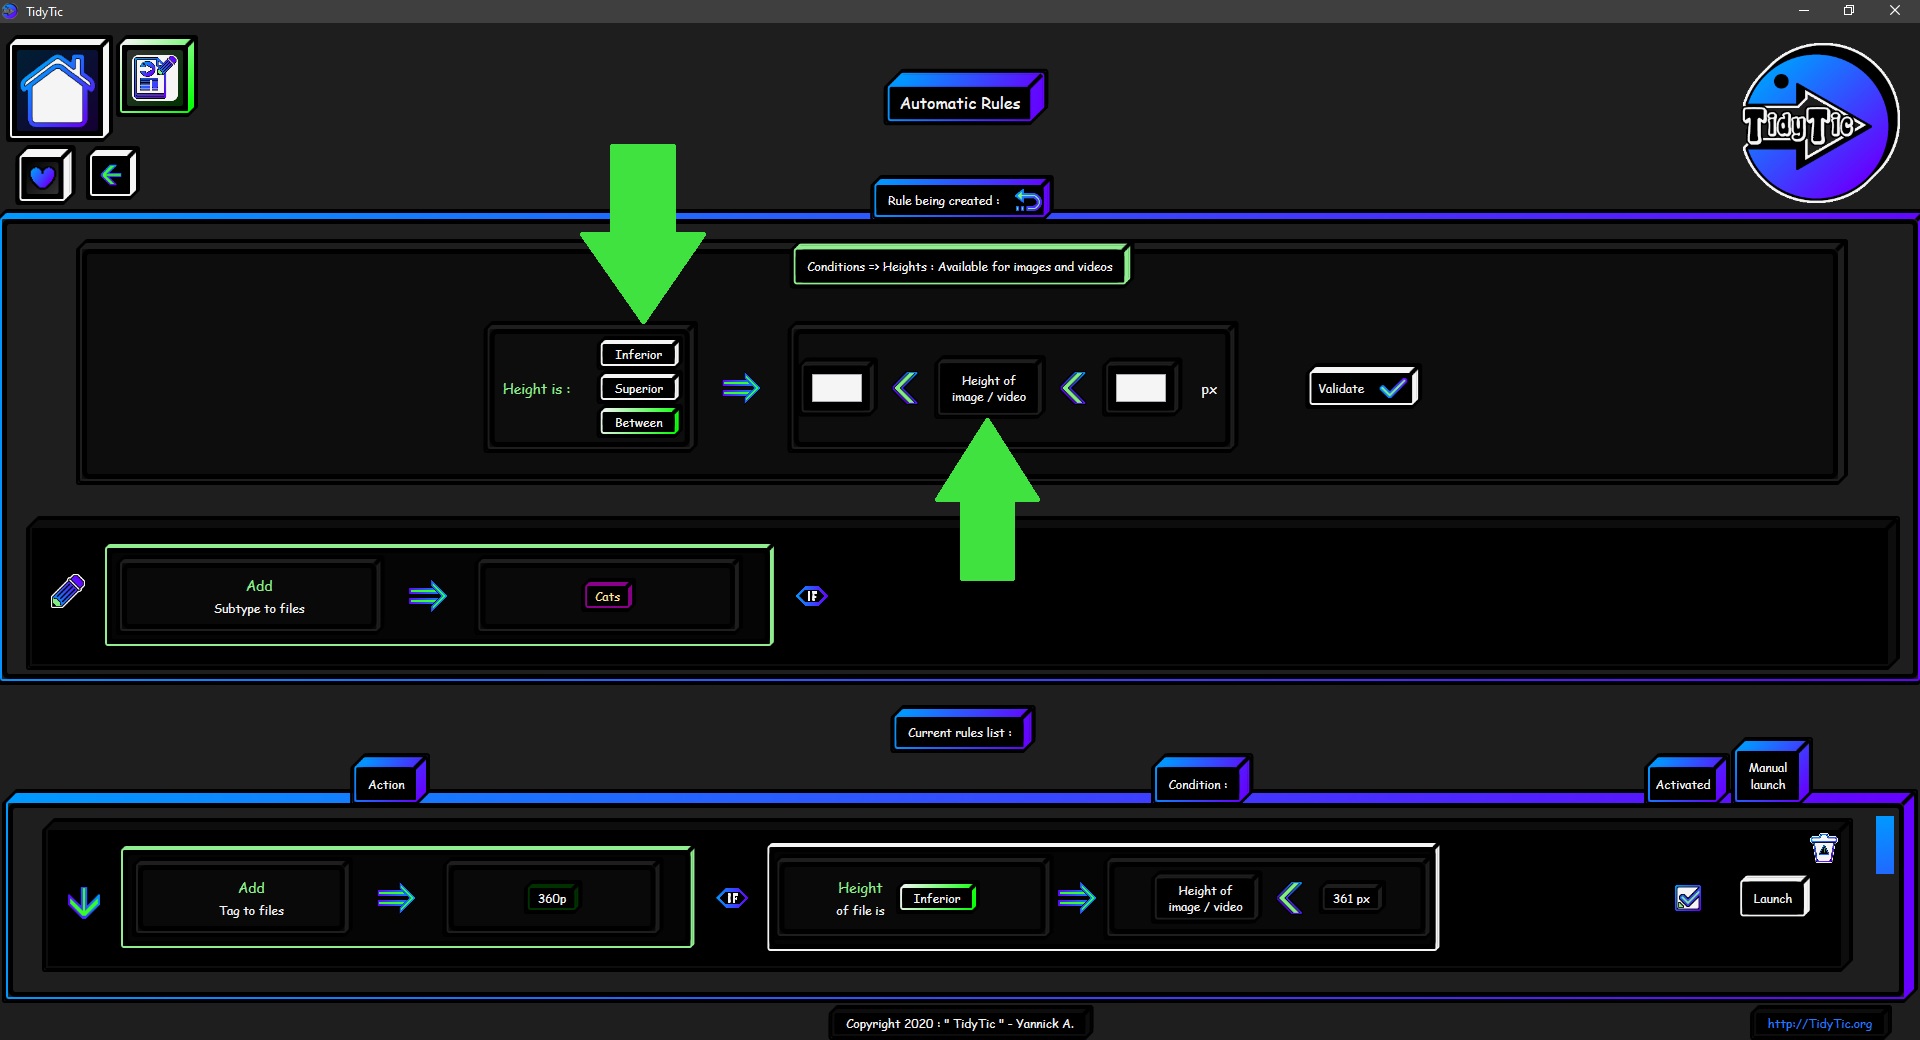
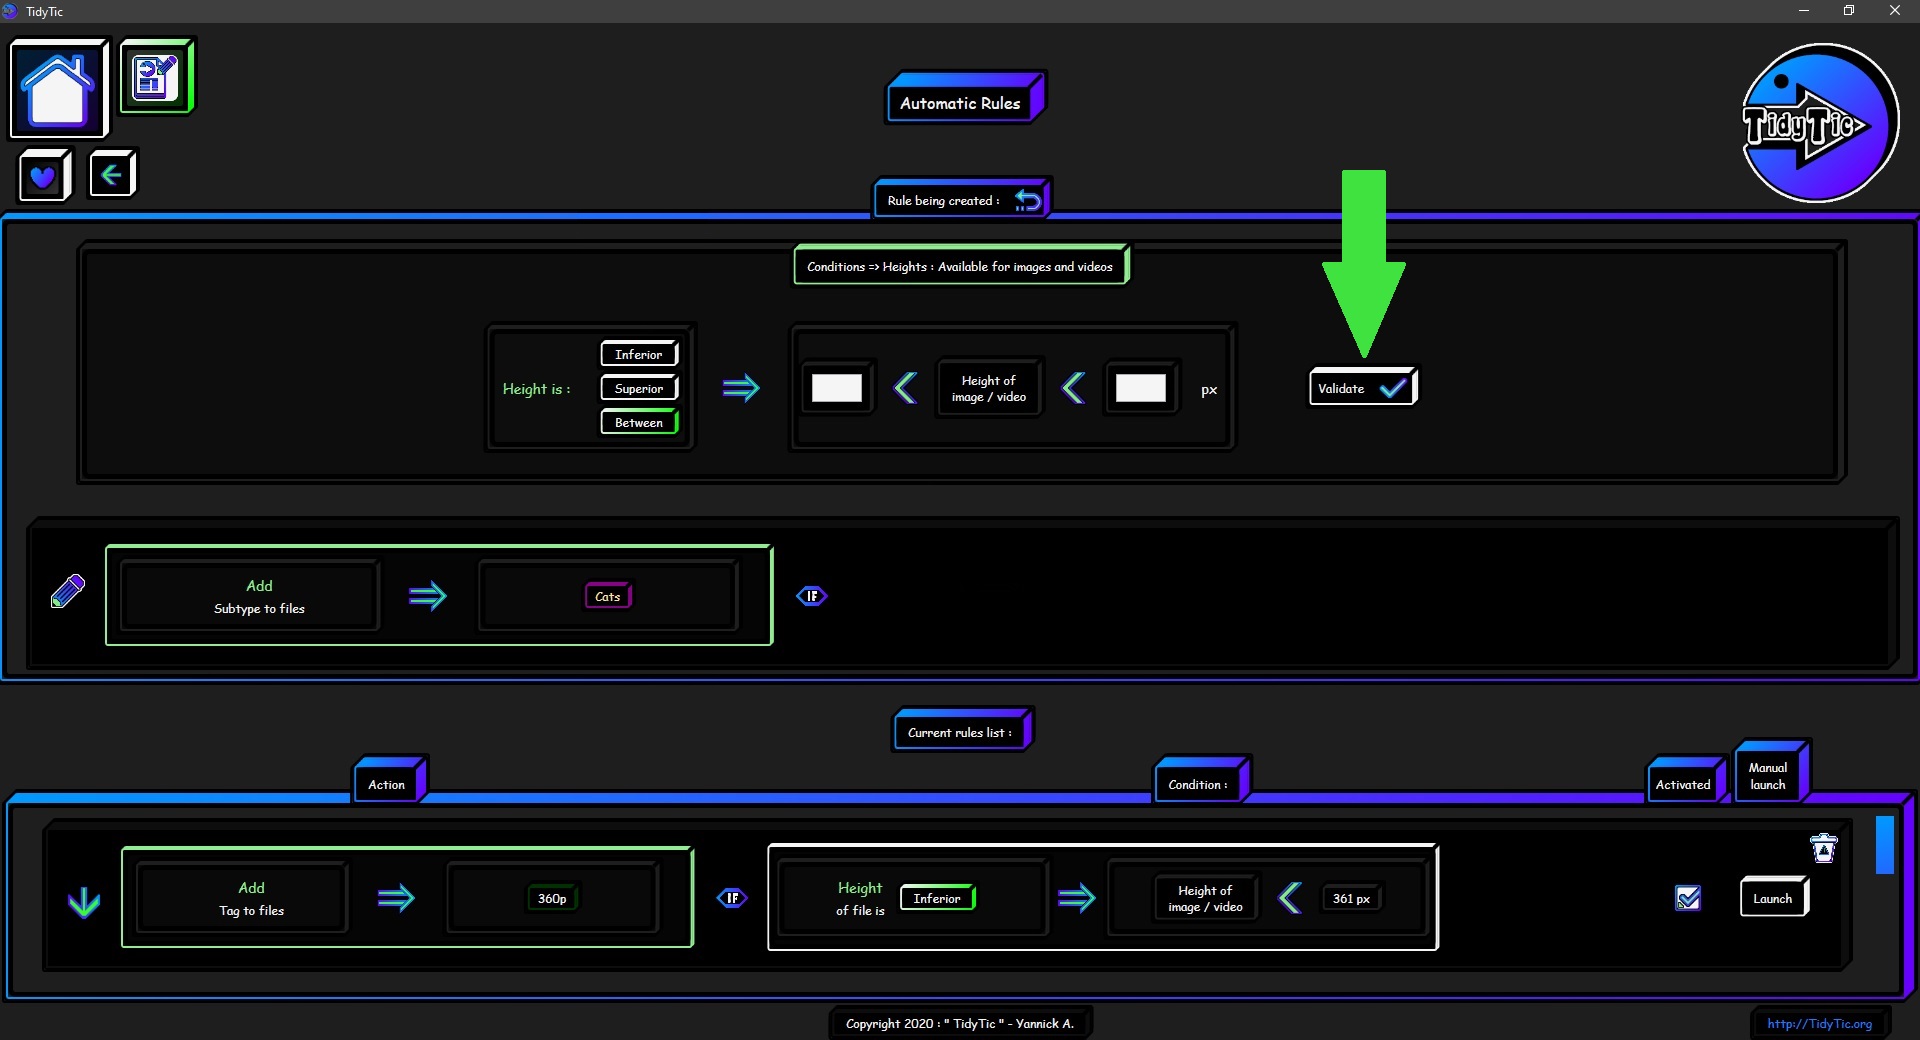
You will then have to indicate the height(s) with which the condition will compare that of the file.
The height(s) you indicate will be in Pixels (px).
 ____
____  ____
____ 
Then you just have to validate this condition.
 ____
____  ____
____ 
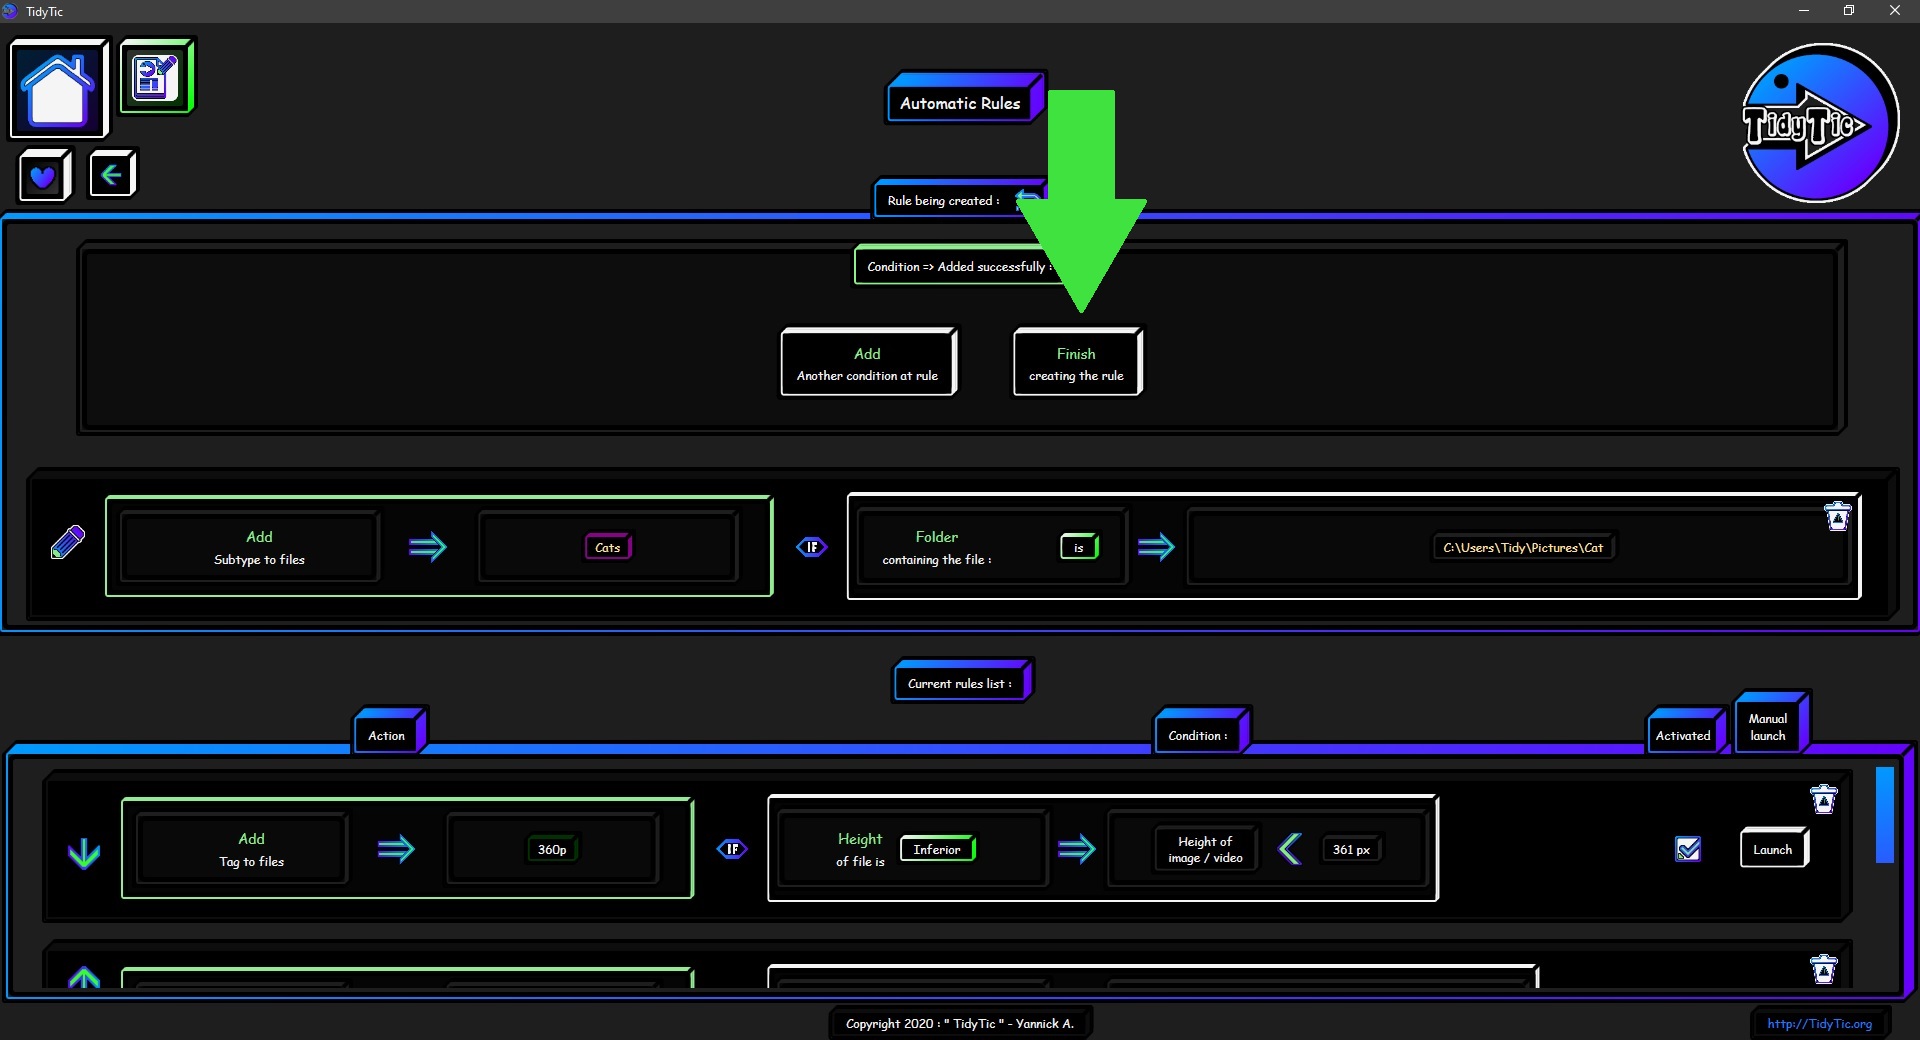
Add other conditions to the rule being created :
Once the condition has been added, the menu for creating the rule will offer you to add another condition to the current rule.
Simply click on "Add another condition to the rule" and you will again be able to add any conditions.
These conditions will add up and they must all be met for the action to apply to your files.
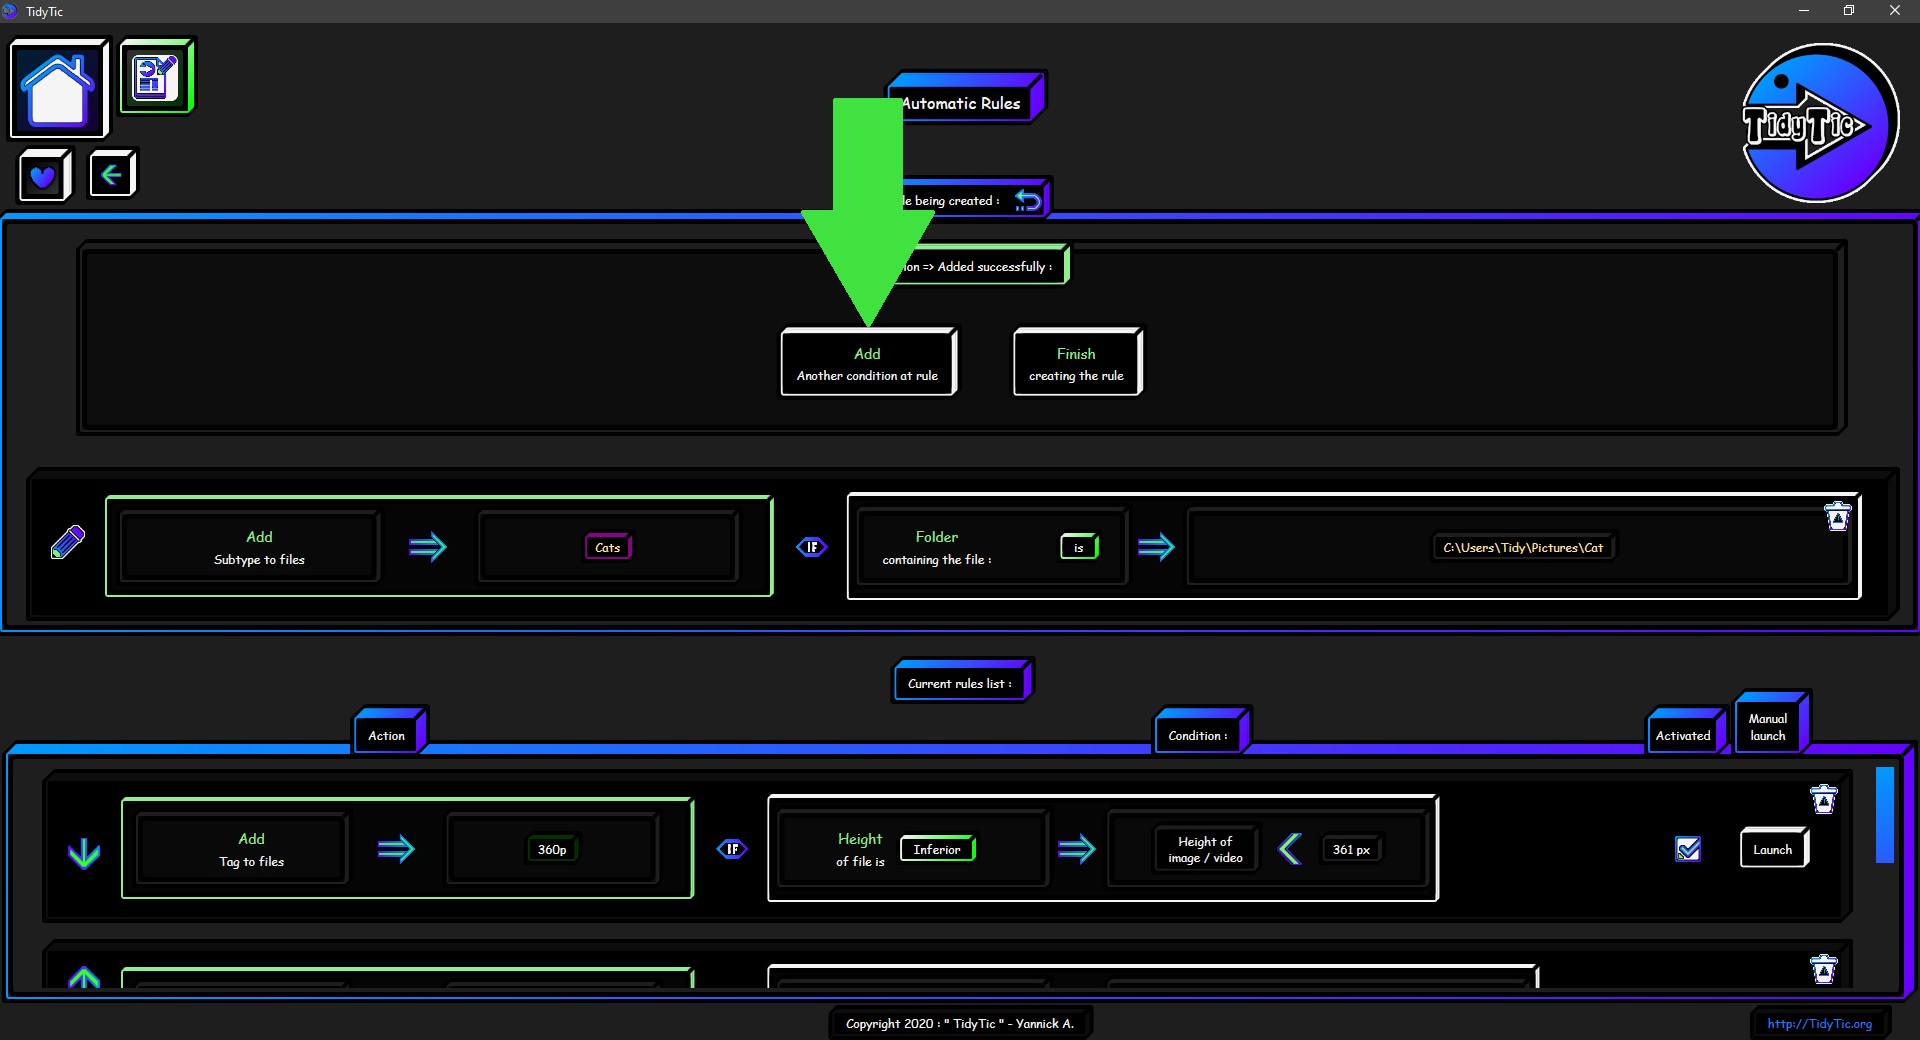
End the automatic rule being created :
At the end of each condition addition, the menu for creating a rule will offer you to end the creation of the rule in order to add it to the list of rules that you have created.
This new rule will apply after each scan of your monitored folders if it is "activated" or you can start it manually if you need.
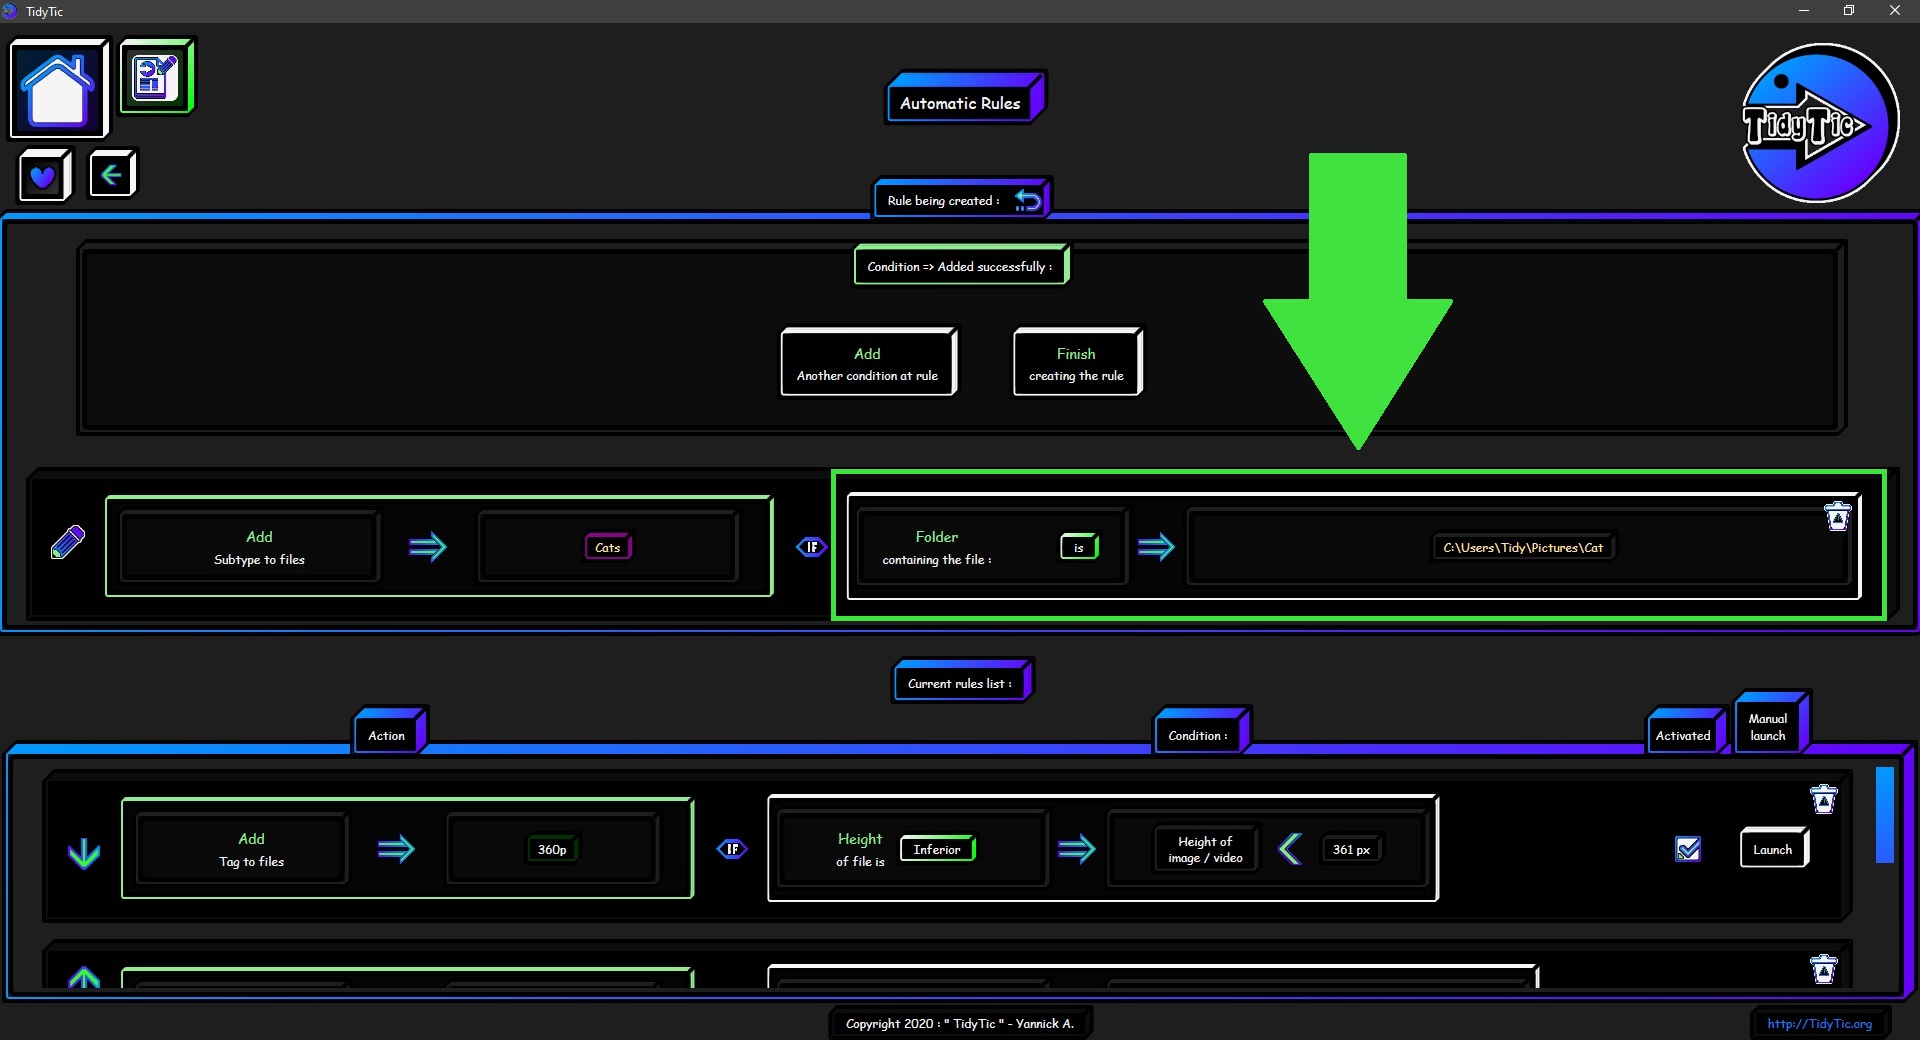
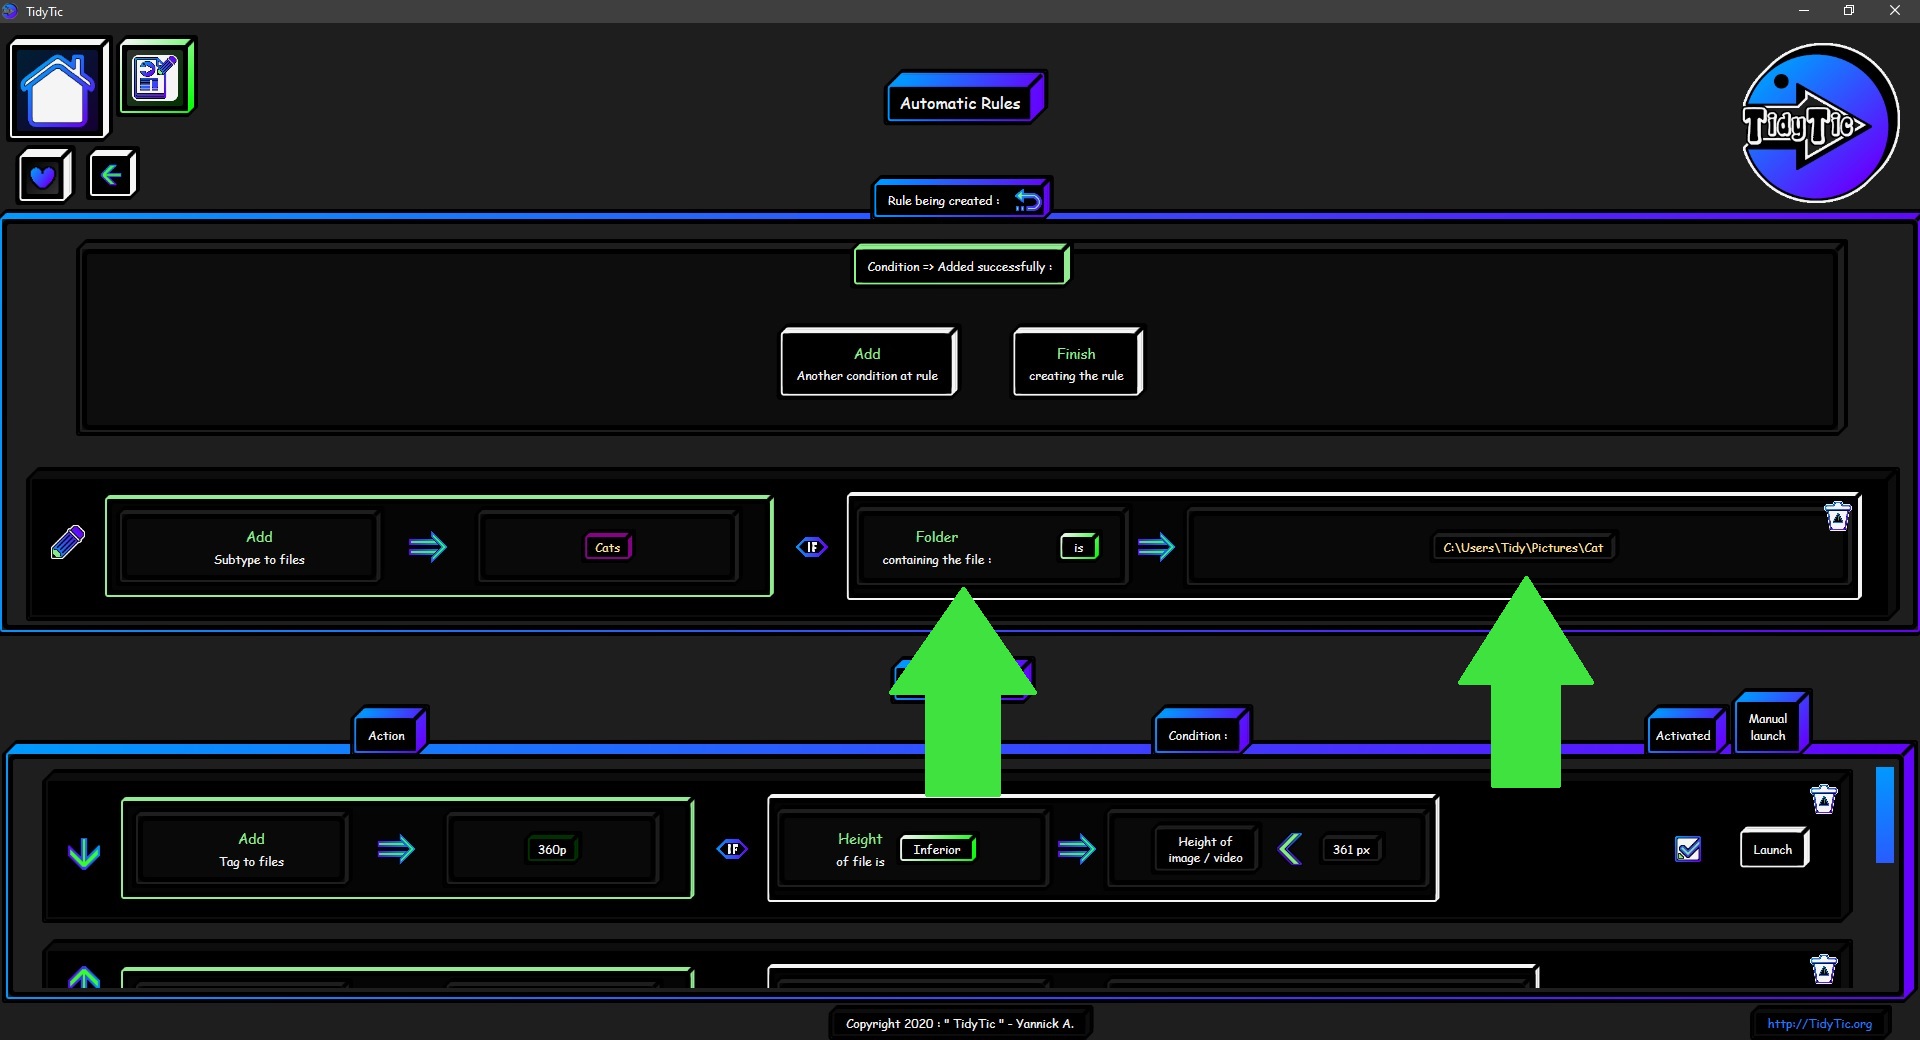
See the conditions of a rule being created :
When a condition is added you can see that it appears in the rule being created below the rule creation menu.
At the right you can see the condition you just added :
The 1st part describes the model of the chosen condition.
The second part gives you the value of this condition.
 ____
____ 
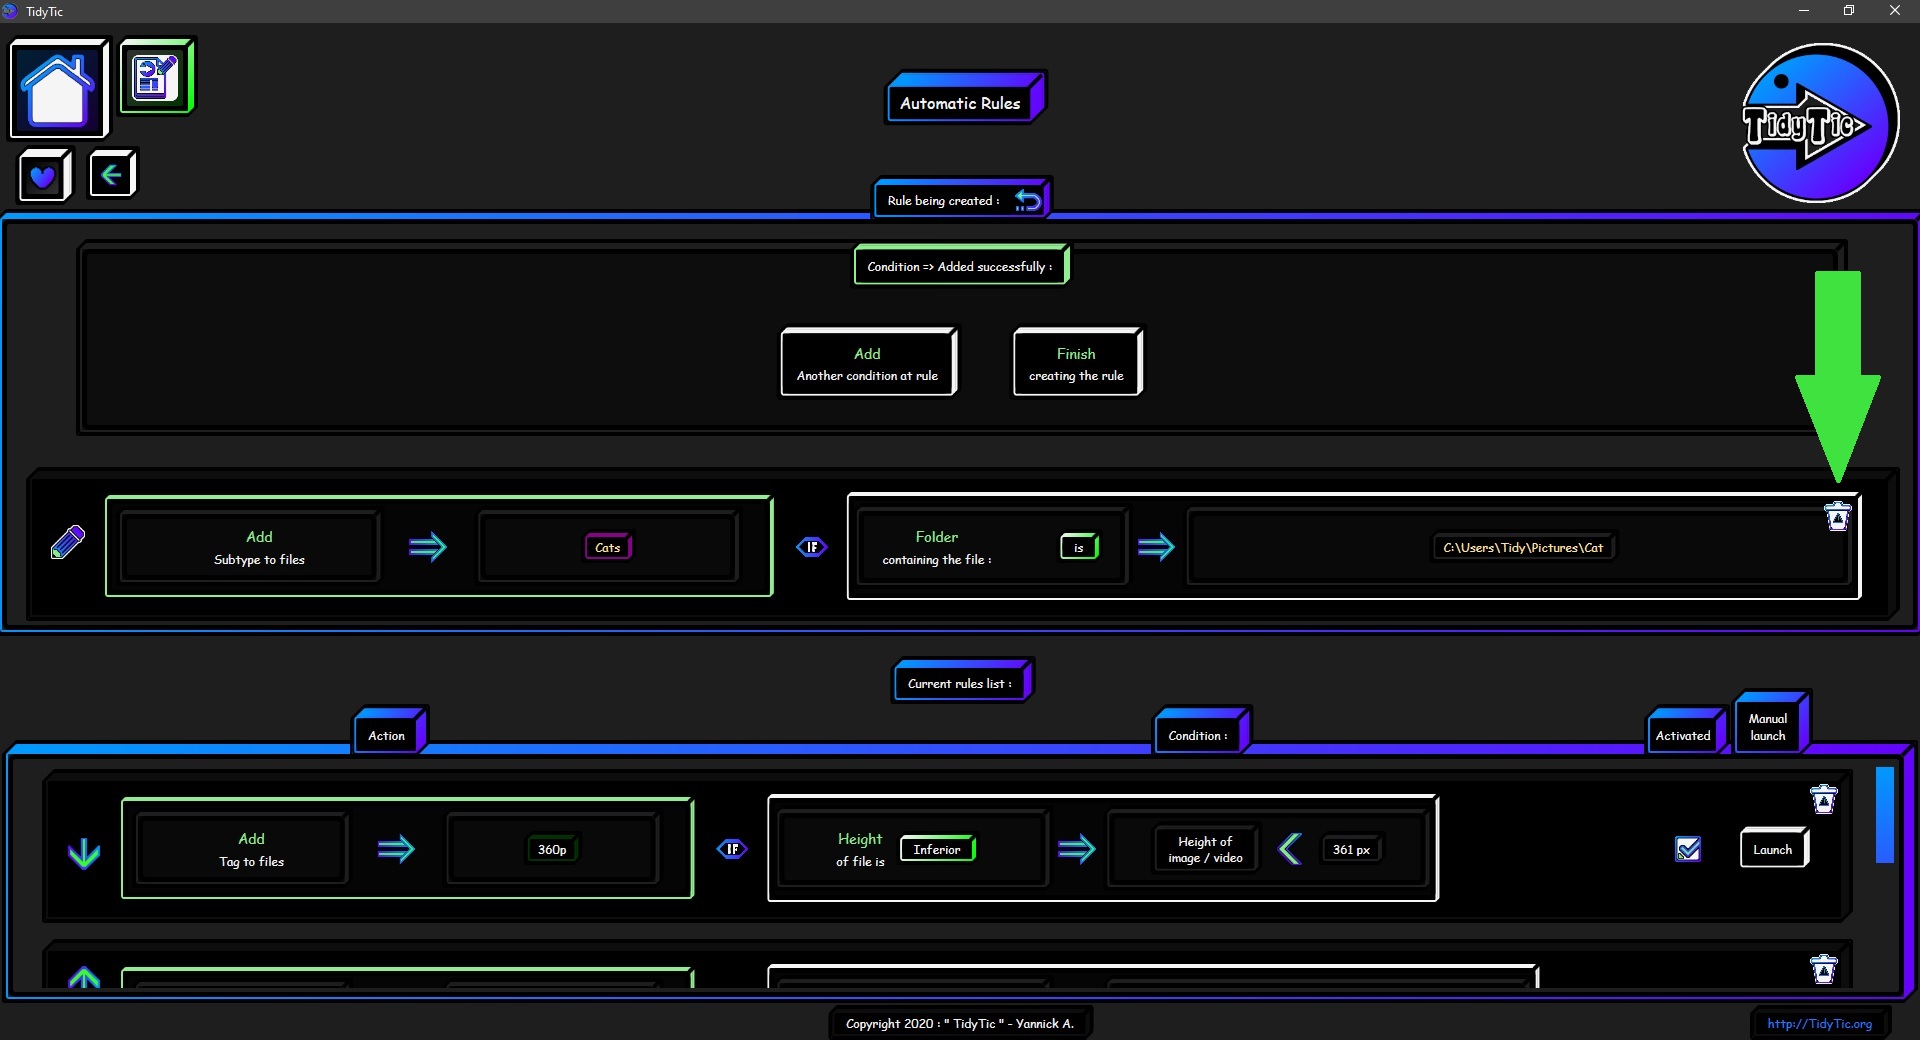
Delete a condition from a rule being created :
To delete a condition from a rule being created, just double left click on the " ![]() " icon.
" icon.
You will find this icon at the top right of each condition.
Use your automatic rules on your files :
Once you have created one or more automatic rules you will have two choices in order to use them.
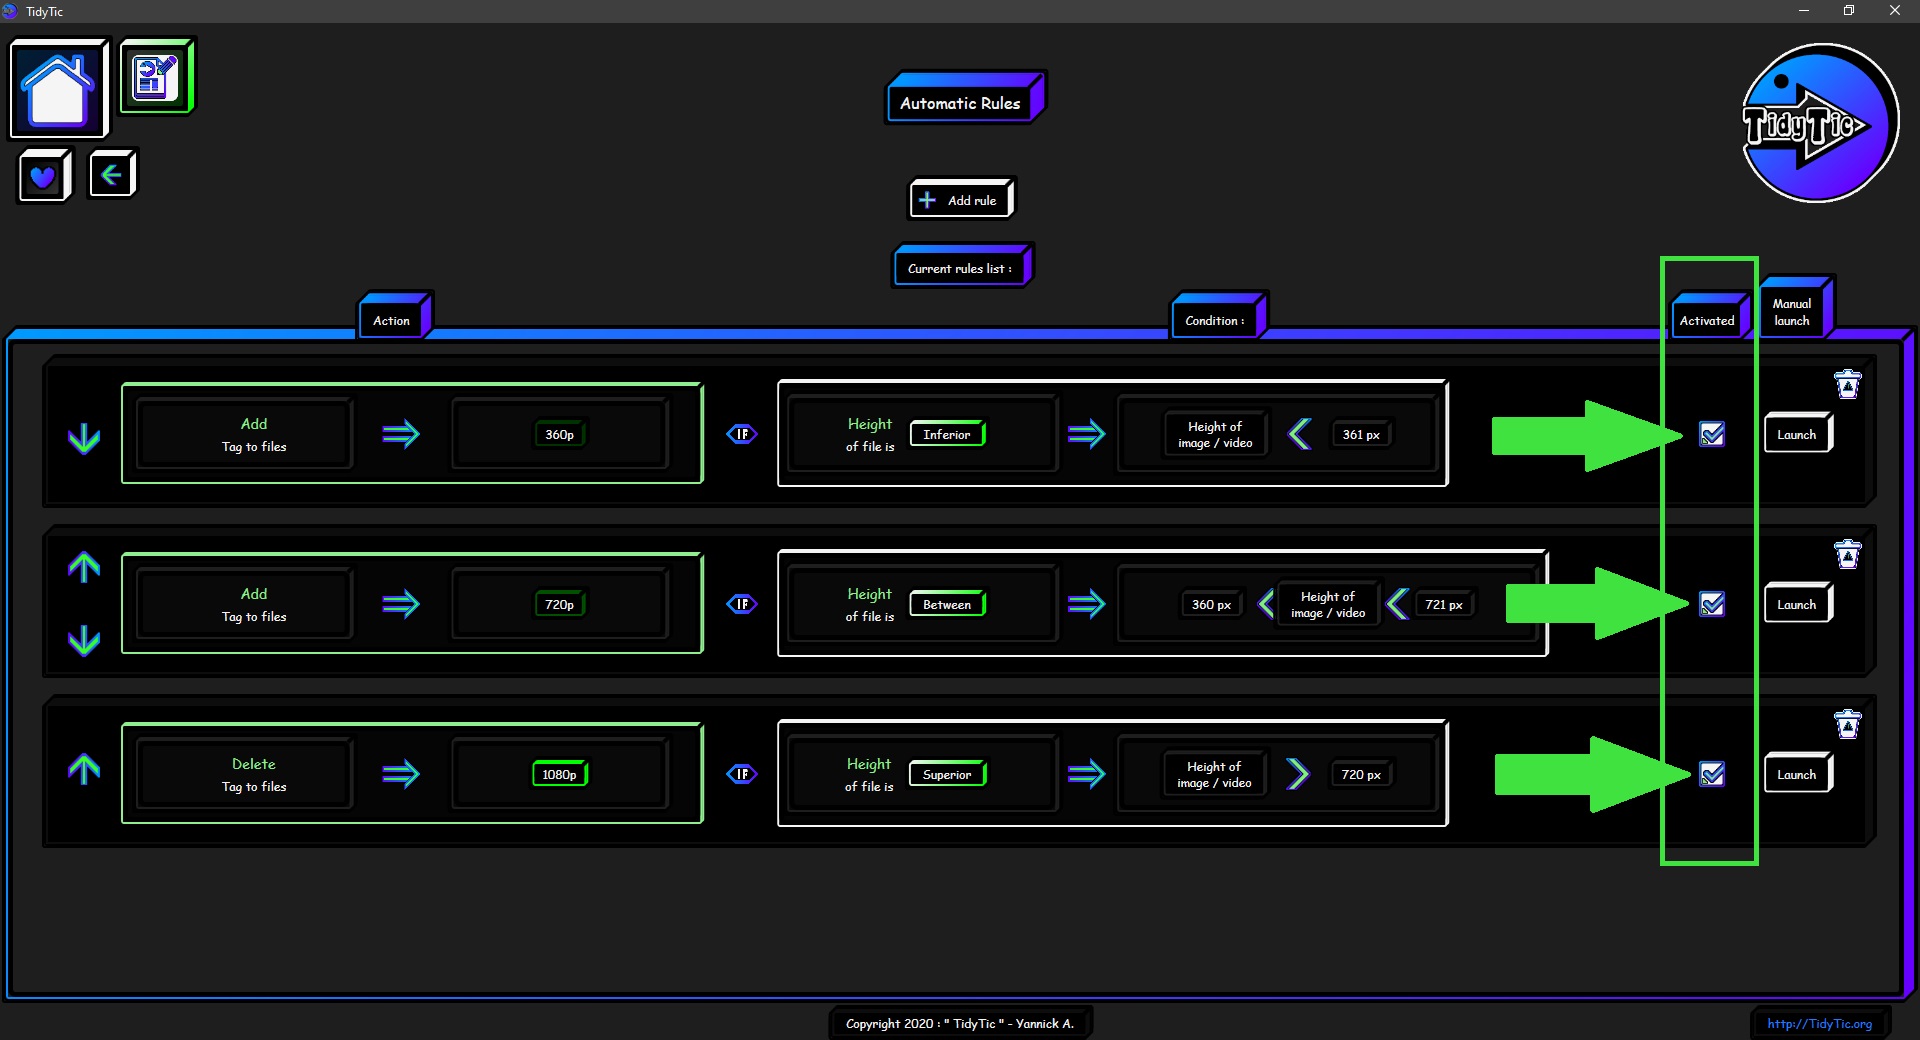
You can define the rule as "Activated" :
The “activated” automatic rules will be used automatically after each scan of your monitored folders.
They will look at ALL of the files in your monitored folders to detect those that meet the conditions described in the rule.
All files that meet the rule condition(s) will automatically have the defined action applied to them.
To define an automatic rule as "activated", simply click on the check box present for each rule.
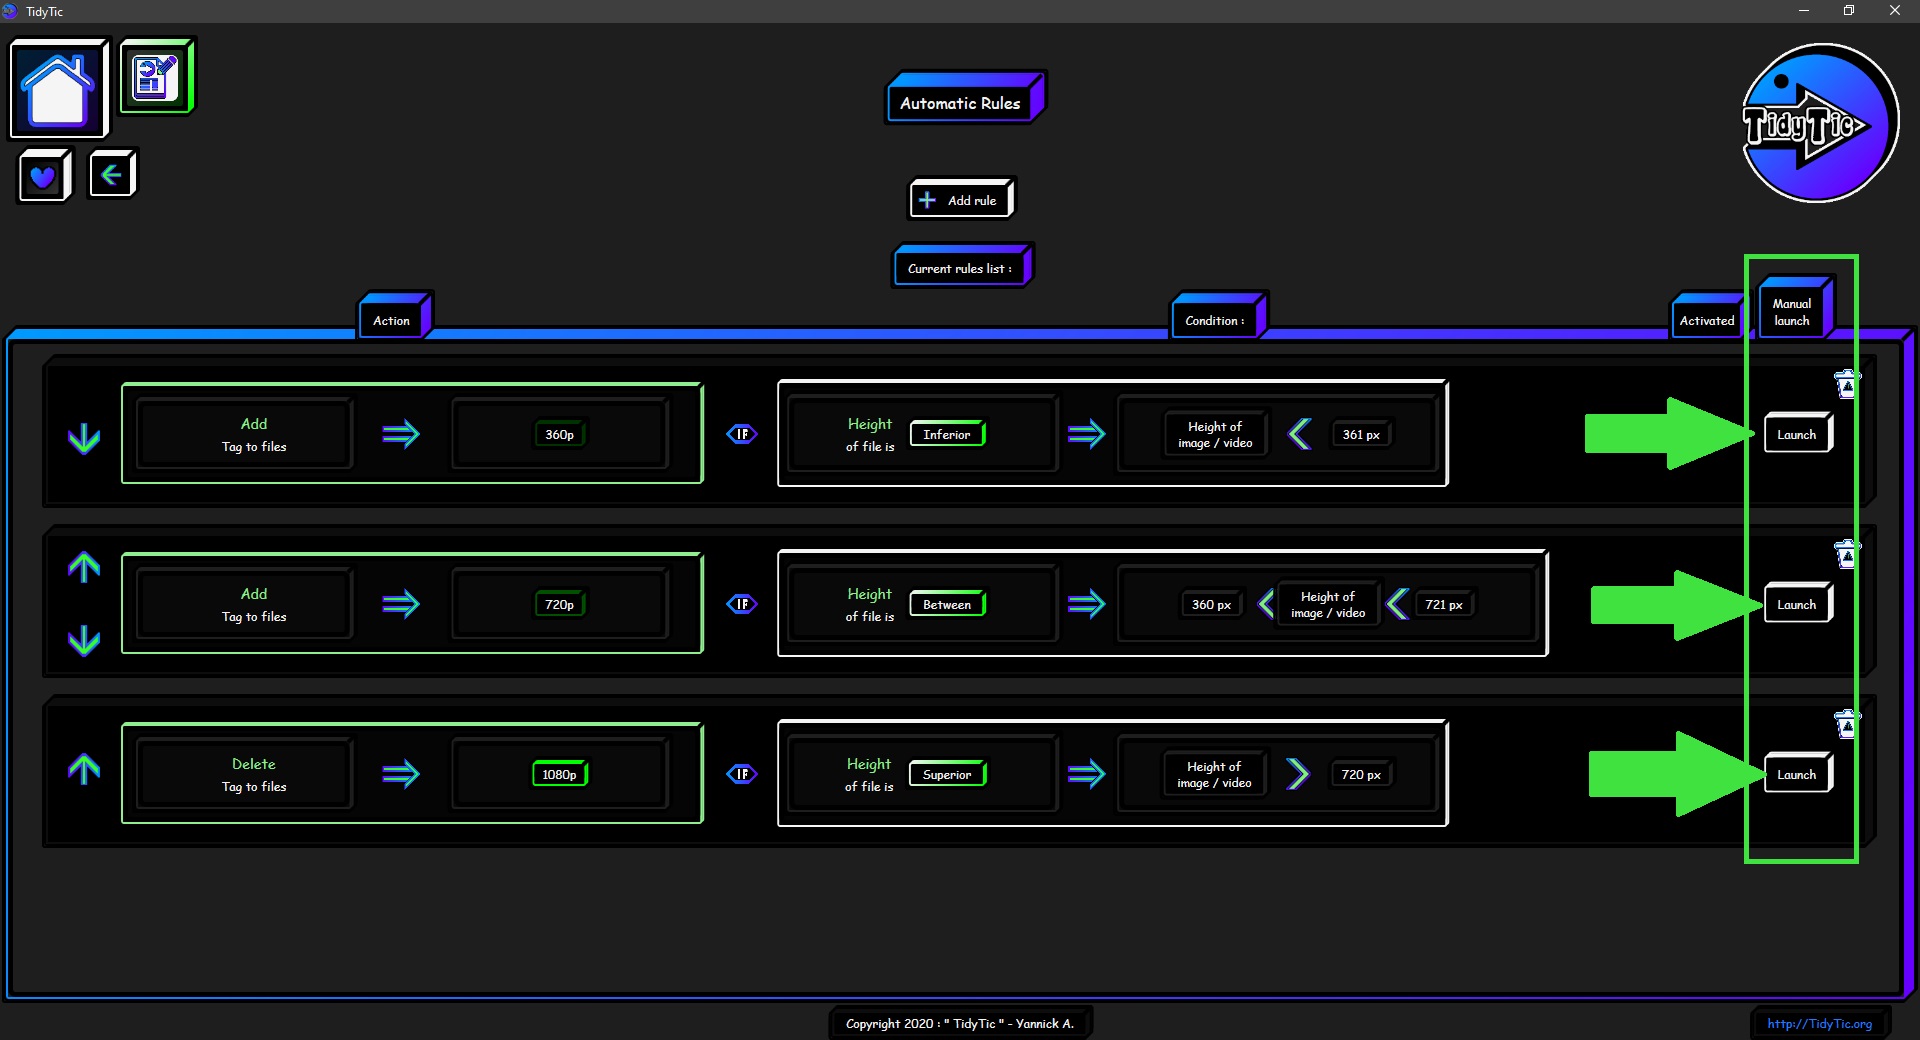
You can also launch each rule manually :
The rules that you launch manually will also look at ALL the files that are contained in your monitored folders in order to see those that meet the conditions described in the rule.
All files that meet the rule condition(s) will automatically have the defined action applied to them.
To manually launch an automatic rule, simply click on the button present for each rule.
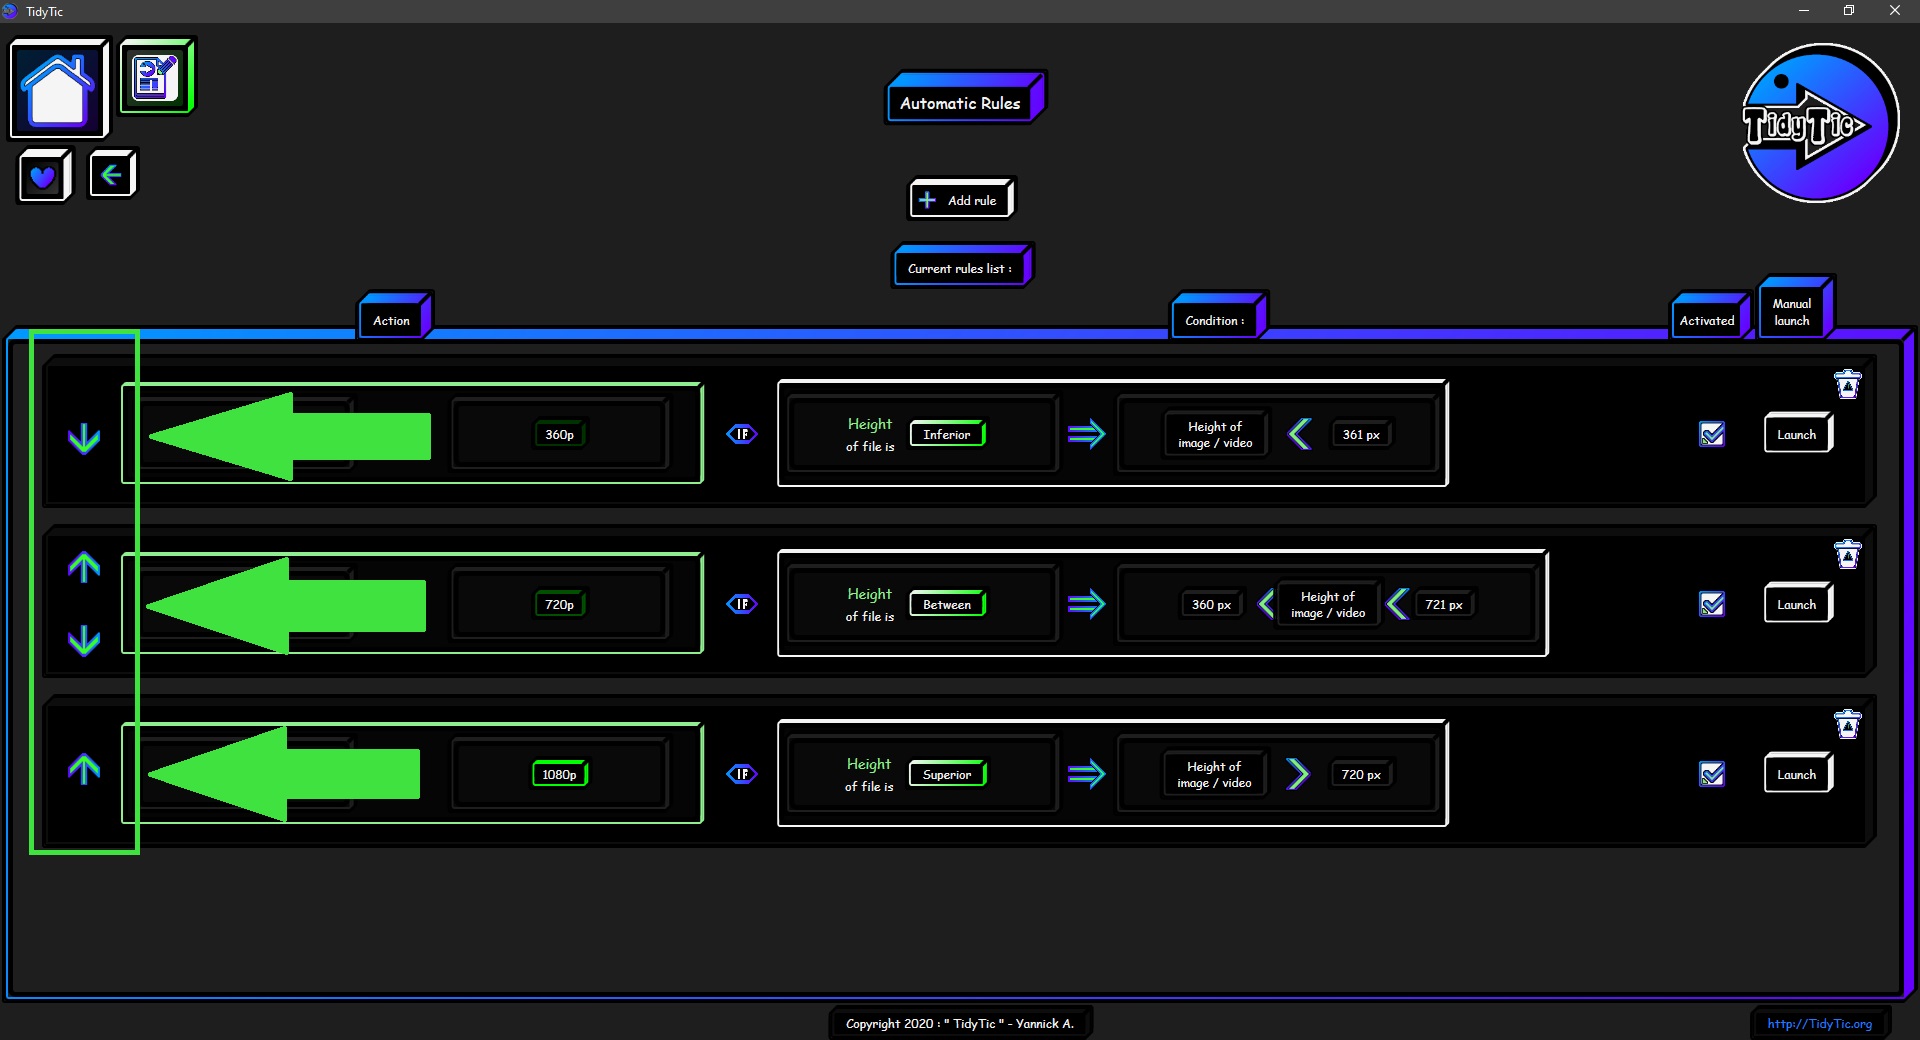
Manage your automatic rules :
Change the order of your automatic rules :
When you have several automatic rules you will find arrows to the left of each rule in order to change the order of this one.
Each rule will test all your files and then launch the action on the files that meet its conditions BEFORE another rule tests your files for its conditions.
This allows you to create complementary rules :
For example, you can ask a rule to add a tag to files that meet its conditions.
And in the following rule apply a renaming on the files which will have this associated tag.
You can therefore create rules which will allow “cascading” actions in order to perform truly complex actions on your files.
I will give you in the examples of the rules where the triggers of their actions are complementary.
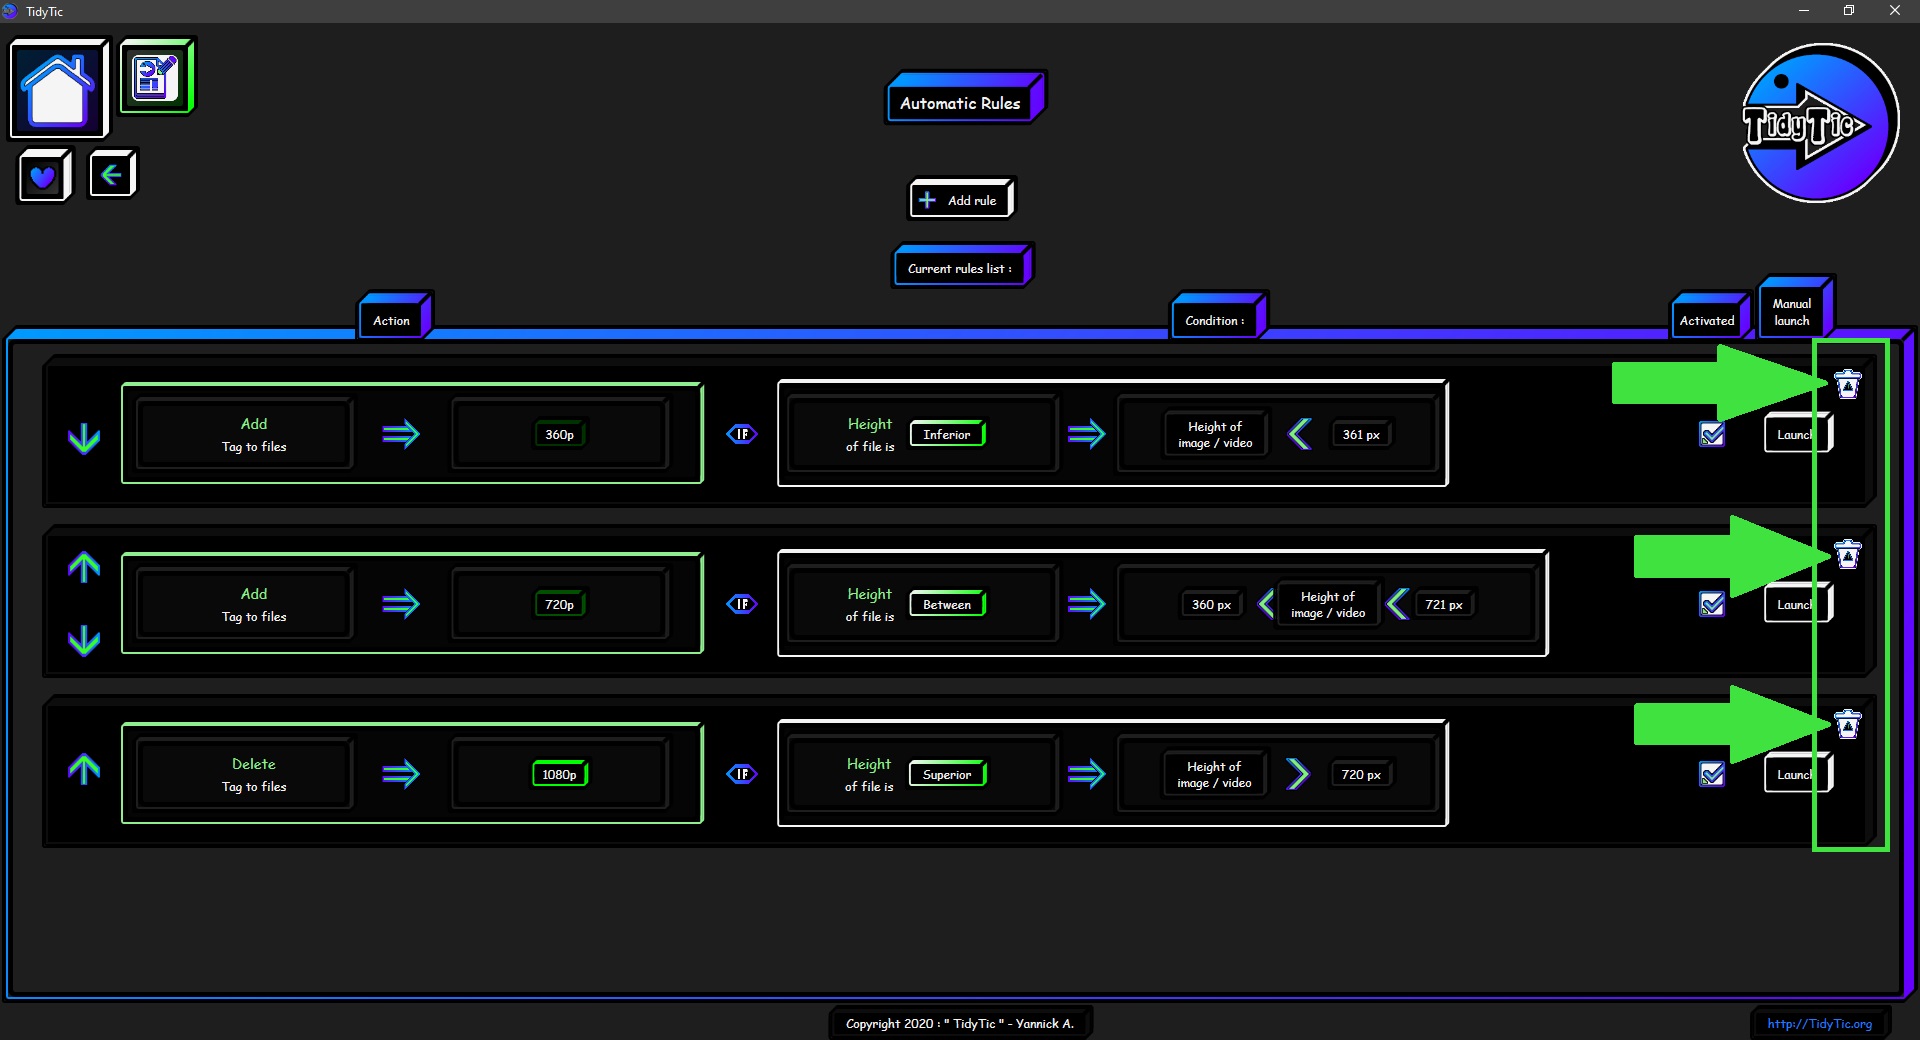
Delete one of your automatic rules :
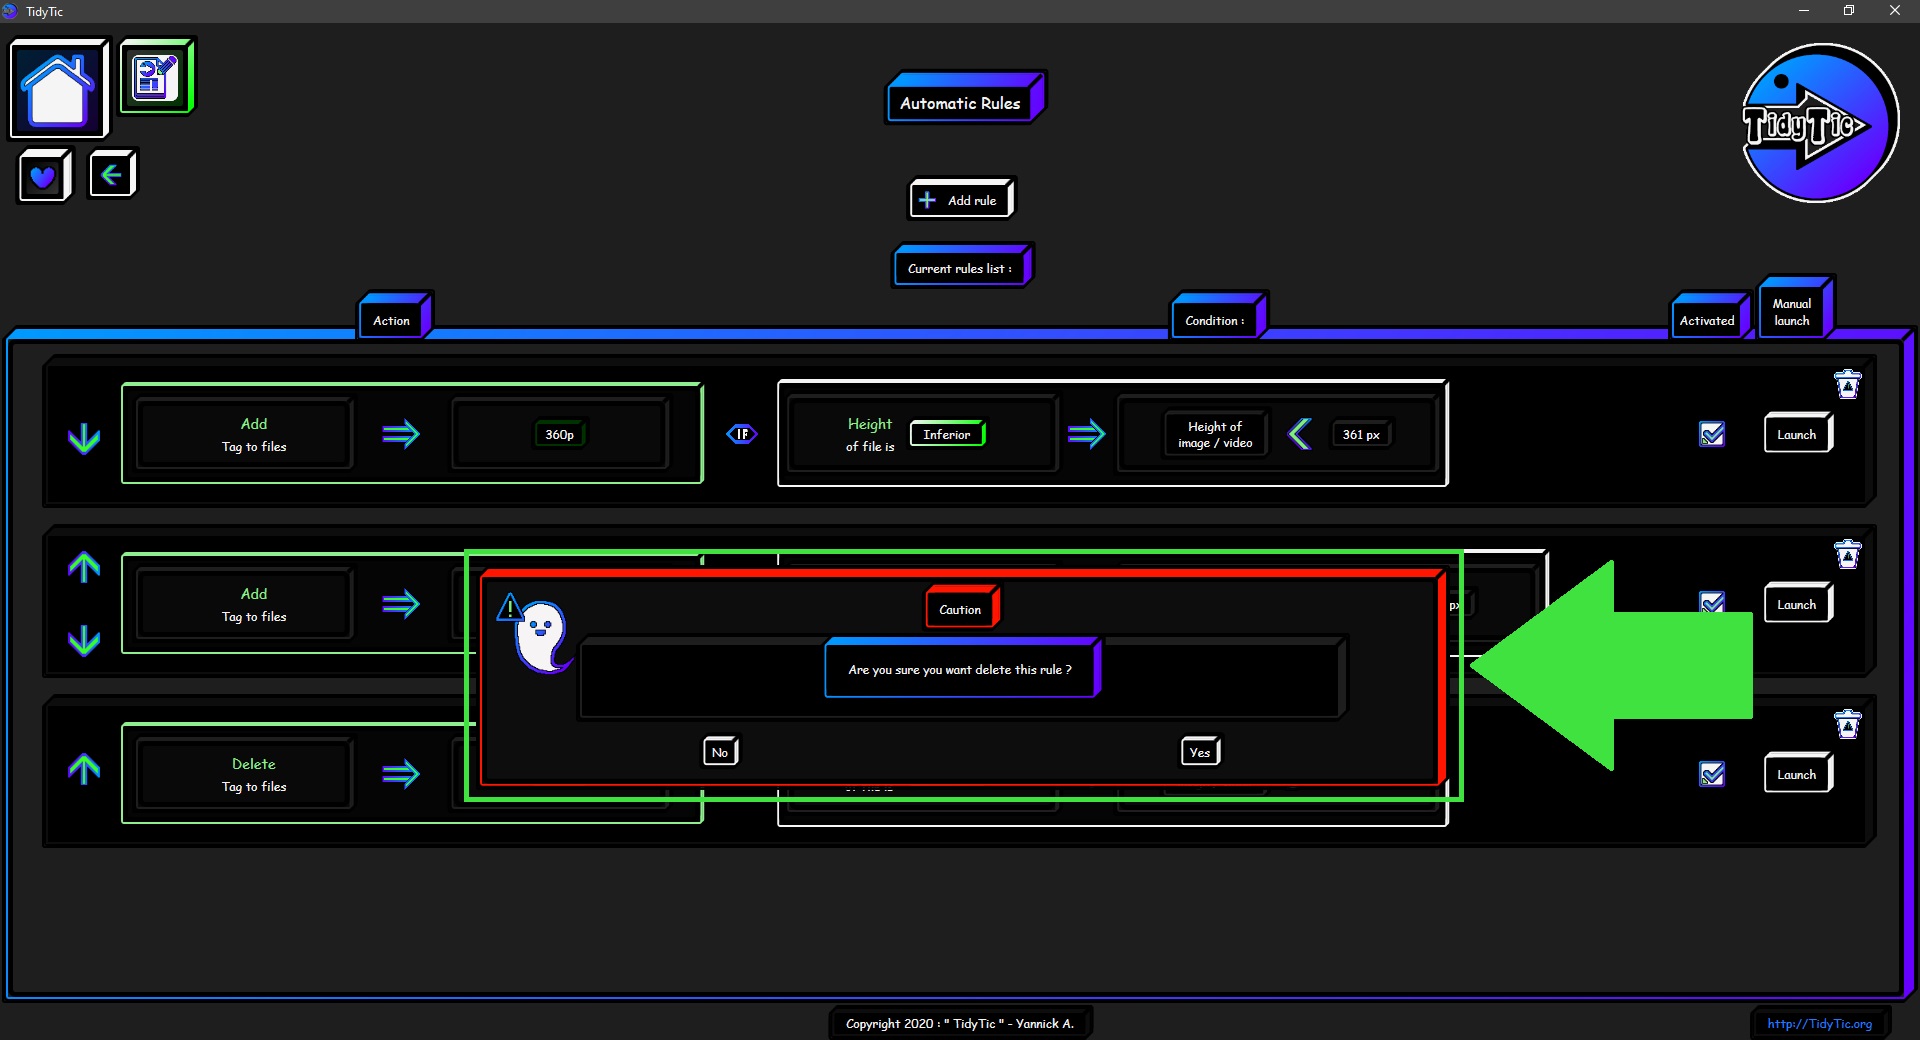
To delete an automatic rule, just double left click on the " ![]() " icon at the top right of each rule.
" icon at the top right of each rule.
A warning message will ask you to confirm the deletion of the rule.
 ____
____ 
Some information on automatic rules :
The "add to the file name" action :
The software will check by itself if what you want to add is not already present in the name.
This is to avoid add in loop the same thing every time the rule detects the file that meets conditions.
Convenient for the "activated" rules which will launch each time the software is started (at the end of the scan).
The "add to the file name" action :
The software will also verify that the file is not already in the selected destination folder or in one of its subfolders.
This avoids moving the same file repeatedly in the same folder.
Or undo a tidying that you would have already done in sub-folders of the folder in question.
You can therefore easily ask the software to move all the images it finds in your "Pictures" folder.
For come later to manually tidying the images he have moved in sub-folders of the "Pictures" folder to be more precise in your tidy.
Even if the move rule is restarted, it will not touch these files.
The "add type / subtype / tag / artist / album / genre " actions :
If the type / subtype / tag / artist / album / genre is already associated with the file, the software will simply ignore this file and will not restart the action on it.
The "delete type / subtype / tag / artist / album / genre " actions :
If the type / subtype / tag / artist / album / genre is NOT associated with the file, the software will simply ignore this file and will not launch the action on it.
It simply cannot delete an information from a file if this information does not exist.
Examples of automatic rules :
I download a lot of files from a site and there is always the site in the file name, how to remove it automatically :
For this example I will work on PDF documents, this example will speak for many of you :
We are often forced to download reference documents on products or other.
But the example below also works for any type of file : Image, video, audio etc.
You can easily adapt it to your situation.
Here the names of the files I want to rename are :
Doc ref 001 – www.Site-Example.com.pdf
Doc ref 002 – www.Site-Example.com.pdf
Doc ref 003 – www.Site-Example.com.pdf
Doc ref 004 – www.Site-Example.com.pdf
etc
I will therefore simply create a rule having the action of removing " - www.Site-Example.com.pdf" from the name of the files.
Here I will take as a condition that the files belong to the "documents" type.
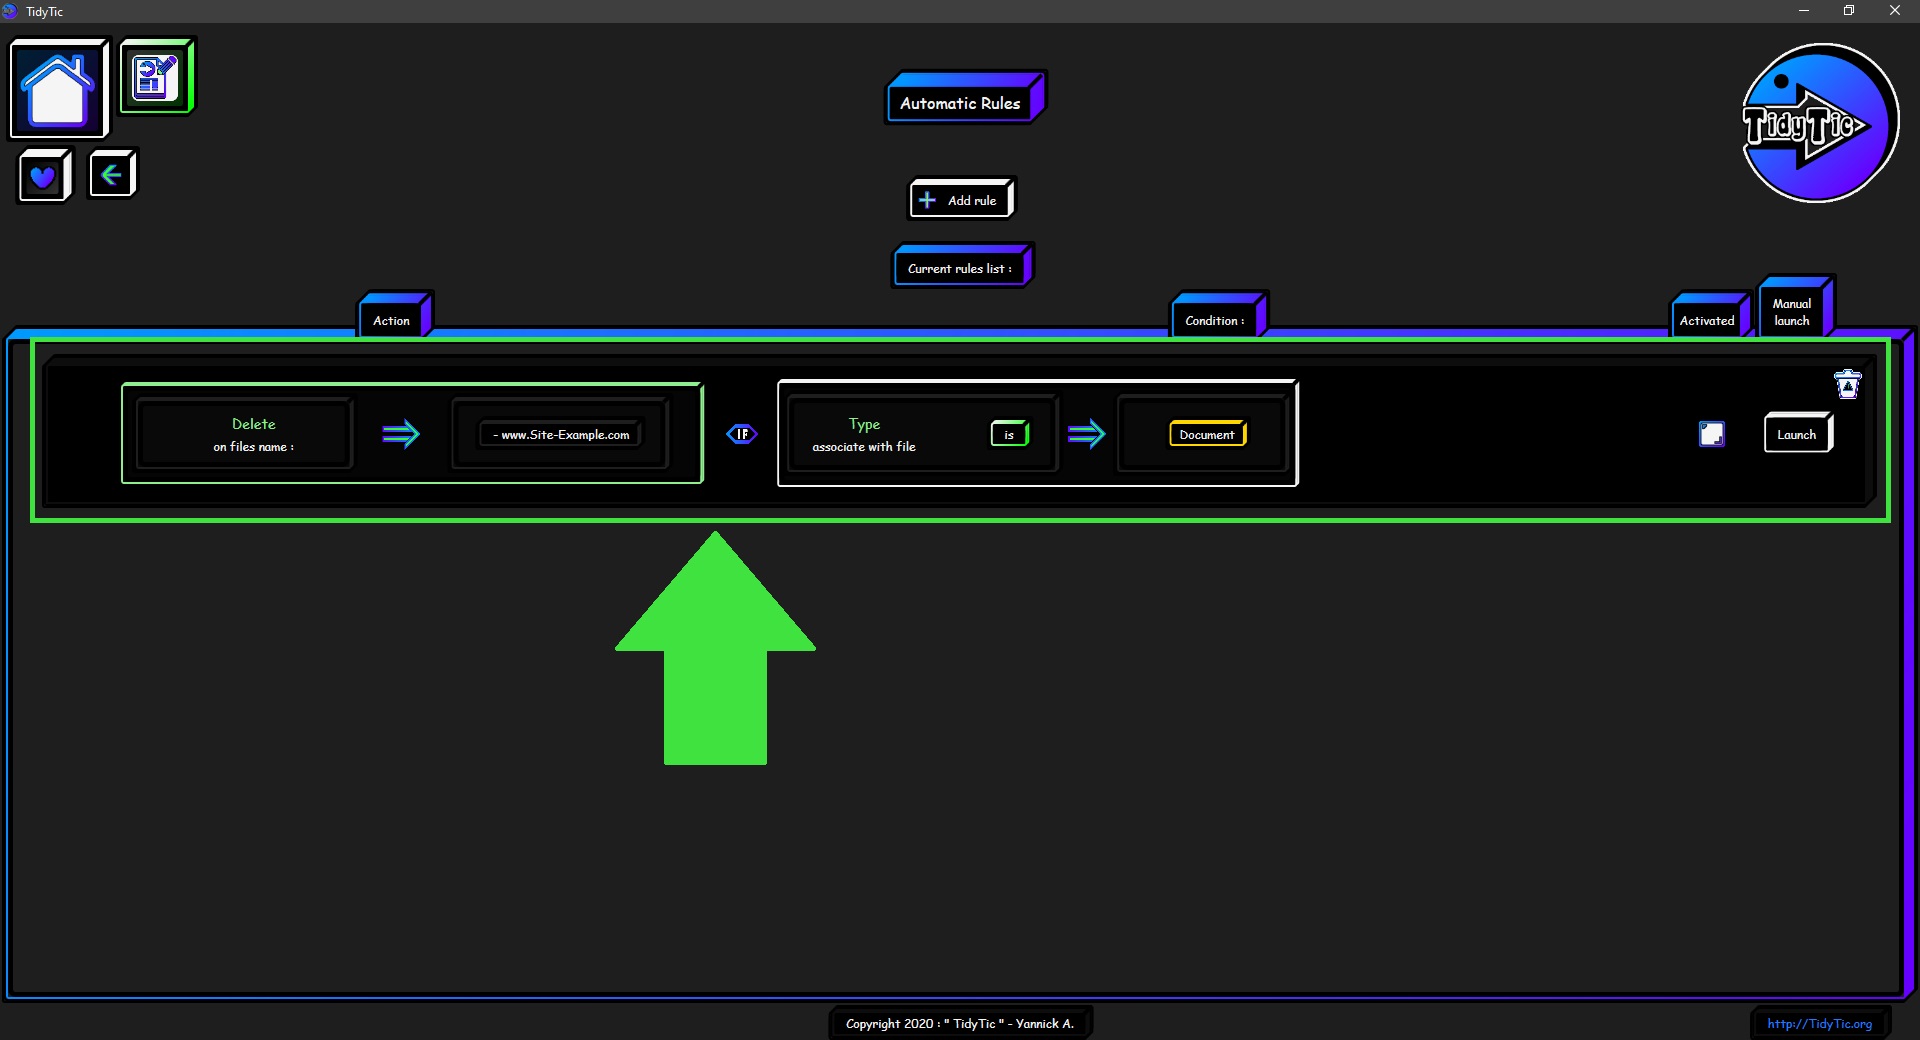
My PDF files will therefore be automatically renamed and will become :
Doc ref 001.pdf
Doc ref 002.pdf
etc
If you download the files from different sites but the sites appear each time in the name you can use the search characters in order to have only one rule which will work for all the sites.
By asking in the rule to delete " - www.*.com" or "www.*.com" from the name of the files.
Thus all the sites which will be write in the name of the files will be automatically deleted.
If there is no site in the name, the files will be ignored.
Be careful not to be too greedy with the search characters by asking for example to delete "w*m" because you risk deleting something that you did not want to delete.
Even if there is nothing irreversible about this because you can still use the "Name → Restore" function of the "Edit files" menu in order to recover the original name of the file.
For more information on the search characters and the "Restore" function see the tutorial "Edit your files in TidyTic: Rename, sort, move etc.
You can also add another condition to the rule, for example that the file is present in a particular folder, to be sure that the rule will not modify files that you did not want to modify.
Thus this rule can only be applied to files in this folder.
This condition can also very well replace the "belongs to the documents type" condition so that the rule can remove the name of the site on PDF files and on images files for example.
Who come from the same site and are present in this folder or one of its subfolders.
Automatically sort files of my download folder :
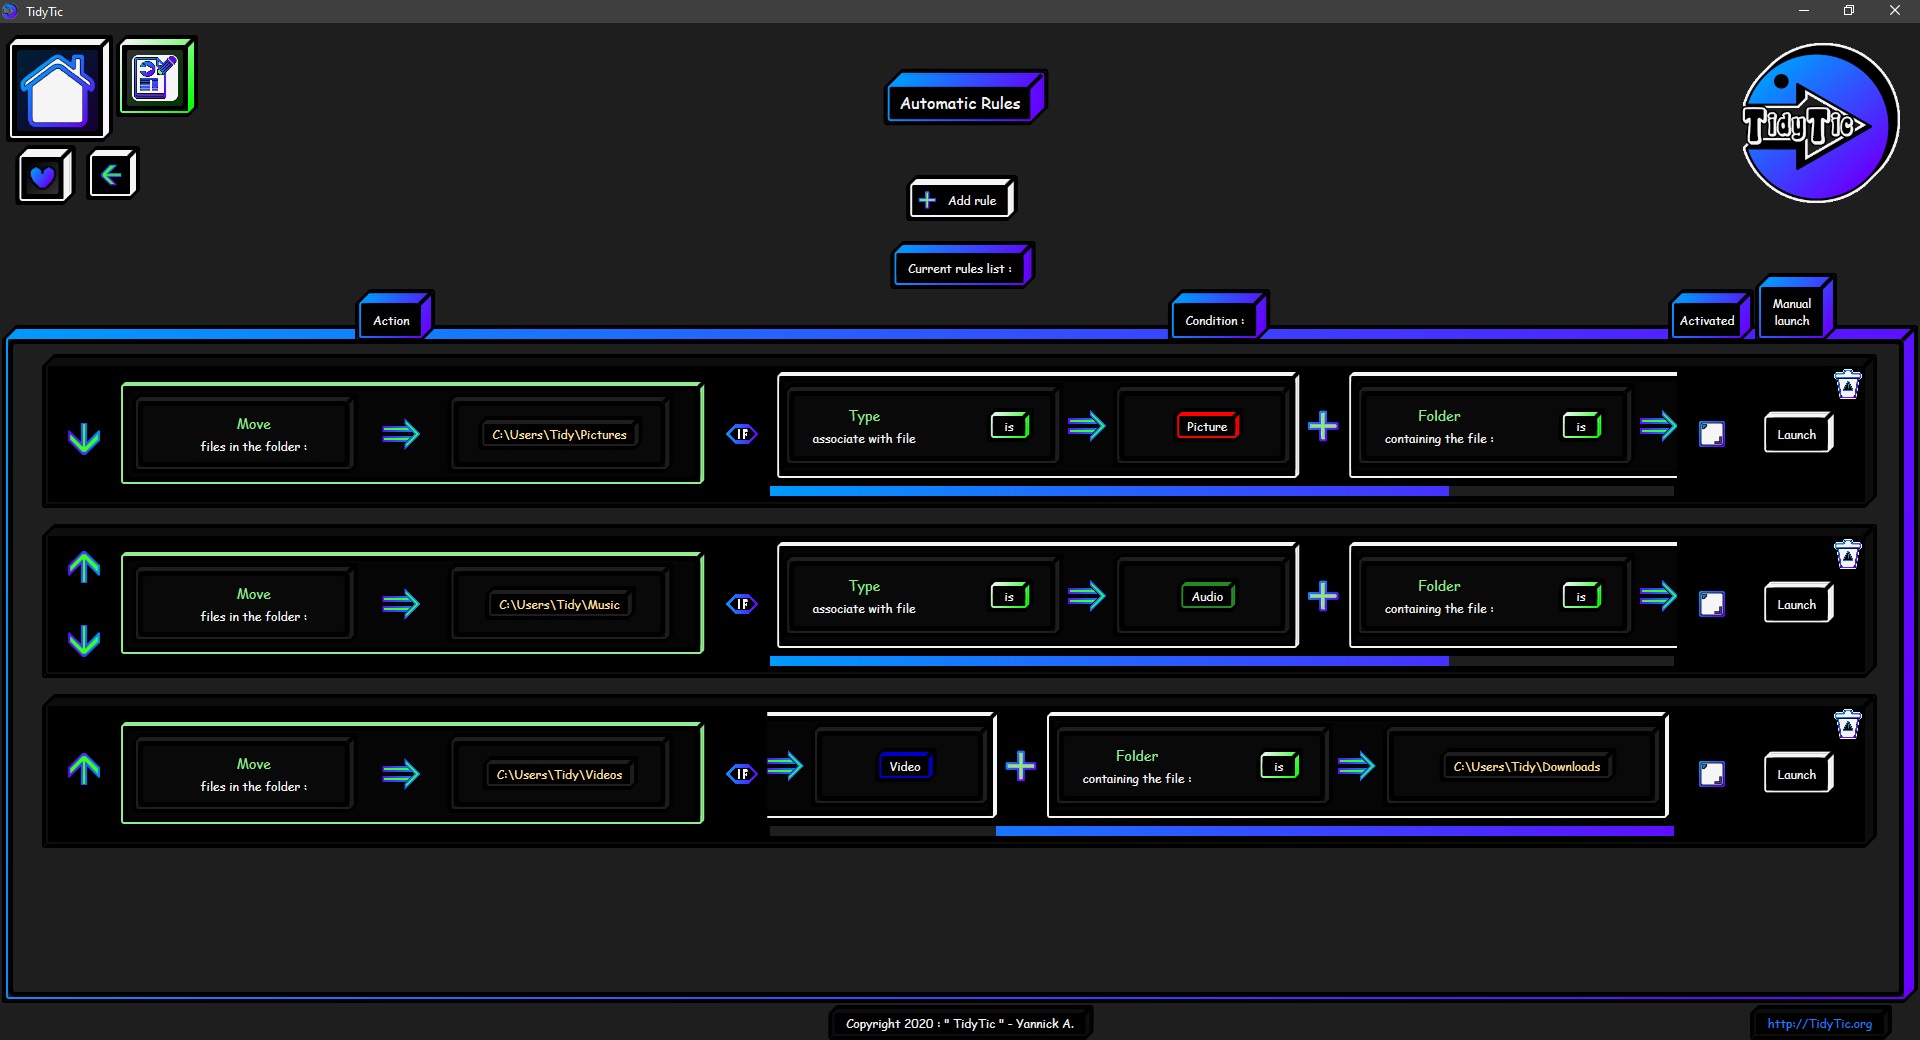
For this example I will make it simple, I will create 3 rules which will organize my files according to their type in their respective folder :
All the images in my "Pictures" folder.
All videos in my "Videos" folder.
All my audio files in my "Music" folder.
So all the videos / music / images that I download will be automatically placed in the right folder.
I will also declare the rules as "activated", so each time TidyTic is launched or scan my folders, my download folder will be automatically tidy.
Leaving this folder as clean as possible.
In the conditions of each rule I will also add : is in the "Downloads" folder so as not to move files that I would have intentionally placed elsewhere.
I could also come later to tidy these files manually more precisely if having them in these folders was not enough for me.
Or create a more precise rule like : audio files with this artist must be placed in the folder of the artist in question (which I had previously created in my "Music" folder).
You can also create more rules with the other file types so that you do not leave any files in your download folder and have all of them automatically tidy.
Automatically tidy my working documents by year :
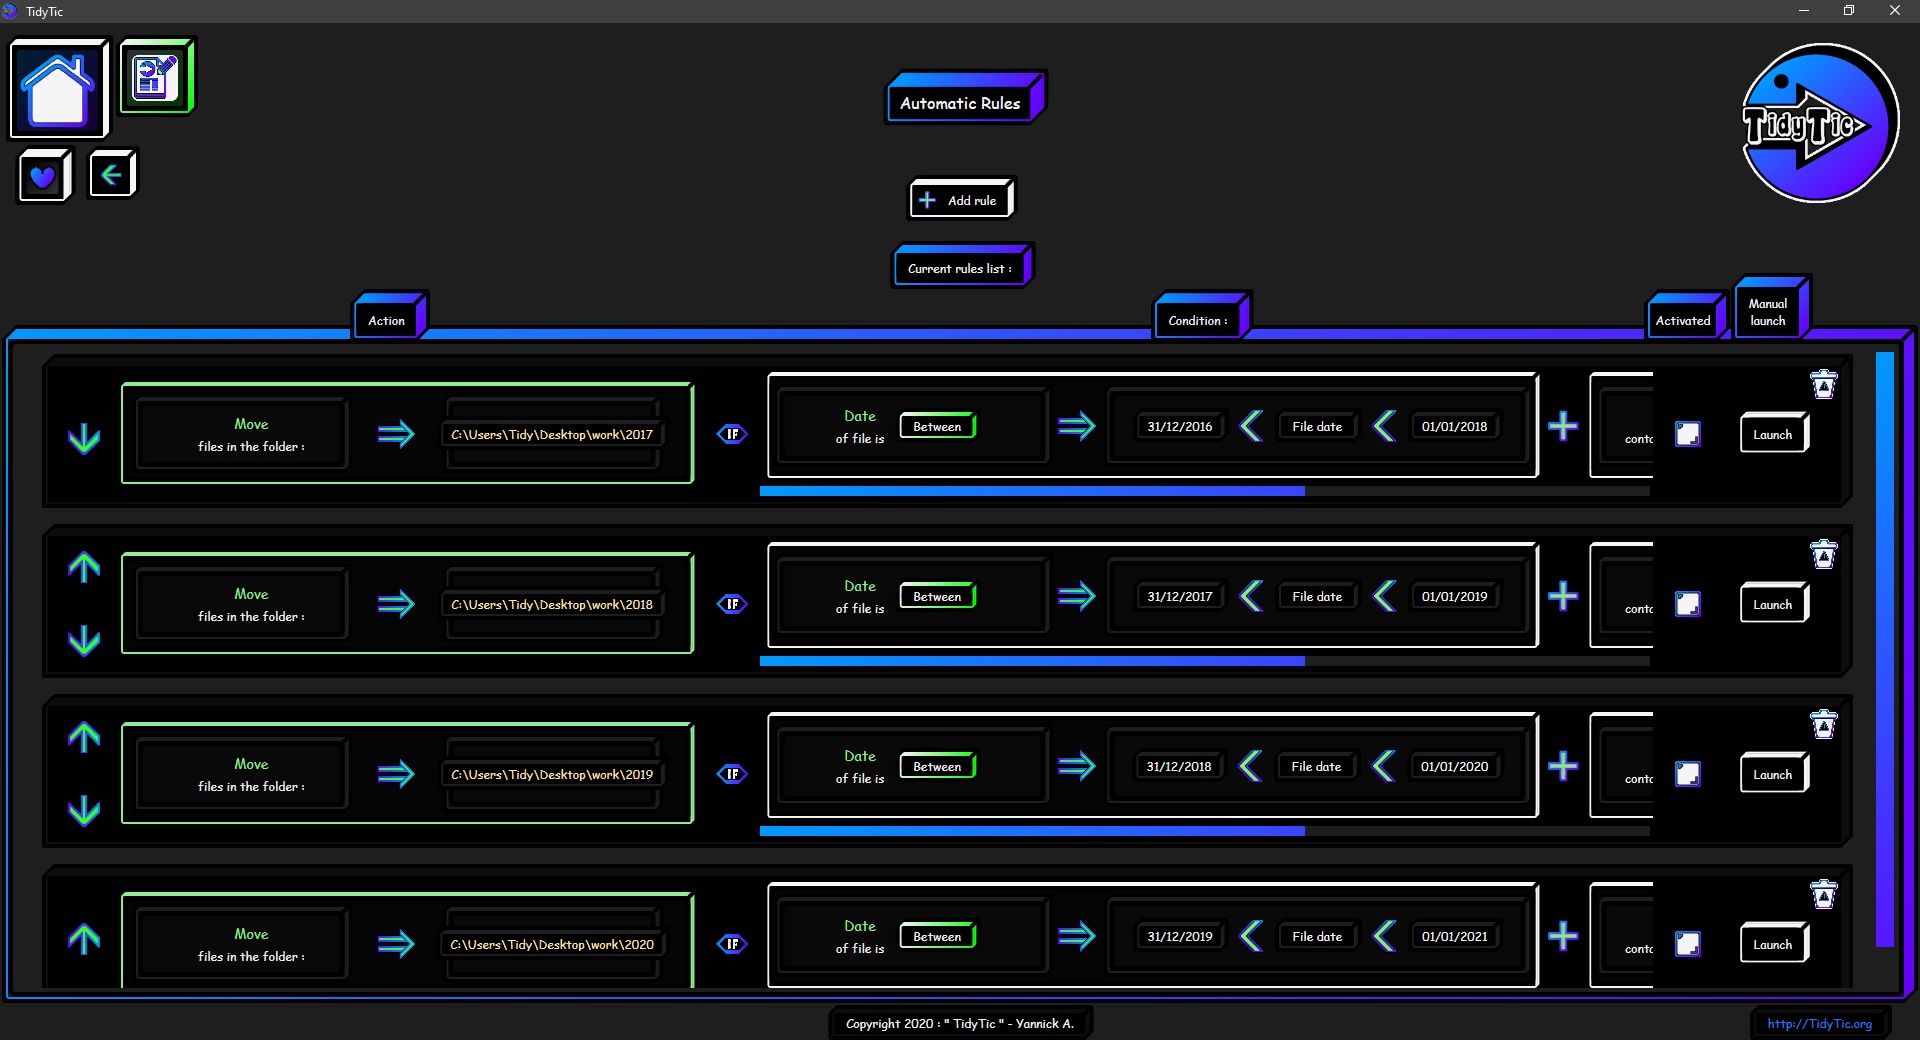
In this example I am going to make rules which will automatically arrange the files by year in my "Work" folder which is on my desktop in folders.
I previously created these folders inside my "Work" folder, so I have sub-folders named "2017", "2018", "2019" and "2020" in this folder.
It only remains for me to create the rules :
Move the files whose date is between 31/12/2016 and 01/01/2018 to “Work \ 2017” and which are present in the “Work” folder.
Move the files whose date is between 31/12/2016 and 01/01/2018 to “Work \ 2017” and which are present in the “Work” folder.
Move the files whose date is between 31/12/2016 and 01/01/2018 to “Work \ 2017” and which are present in the “Work” folder.
Move the files whose date is between 31/12/2016 and 01/01/2018 to “Work \ 2017” and which are present in the “Work” folder.
 ____
____ 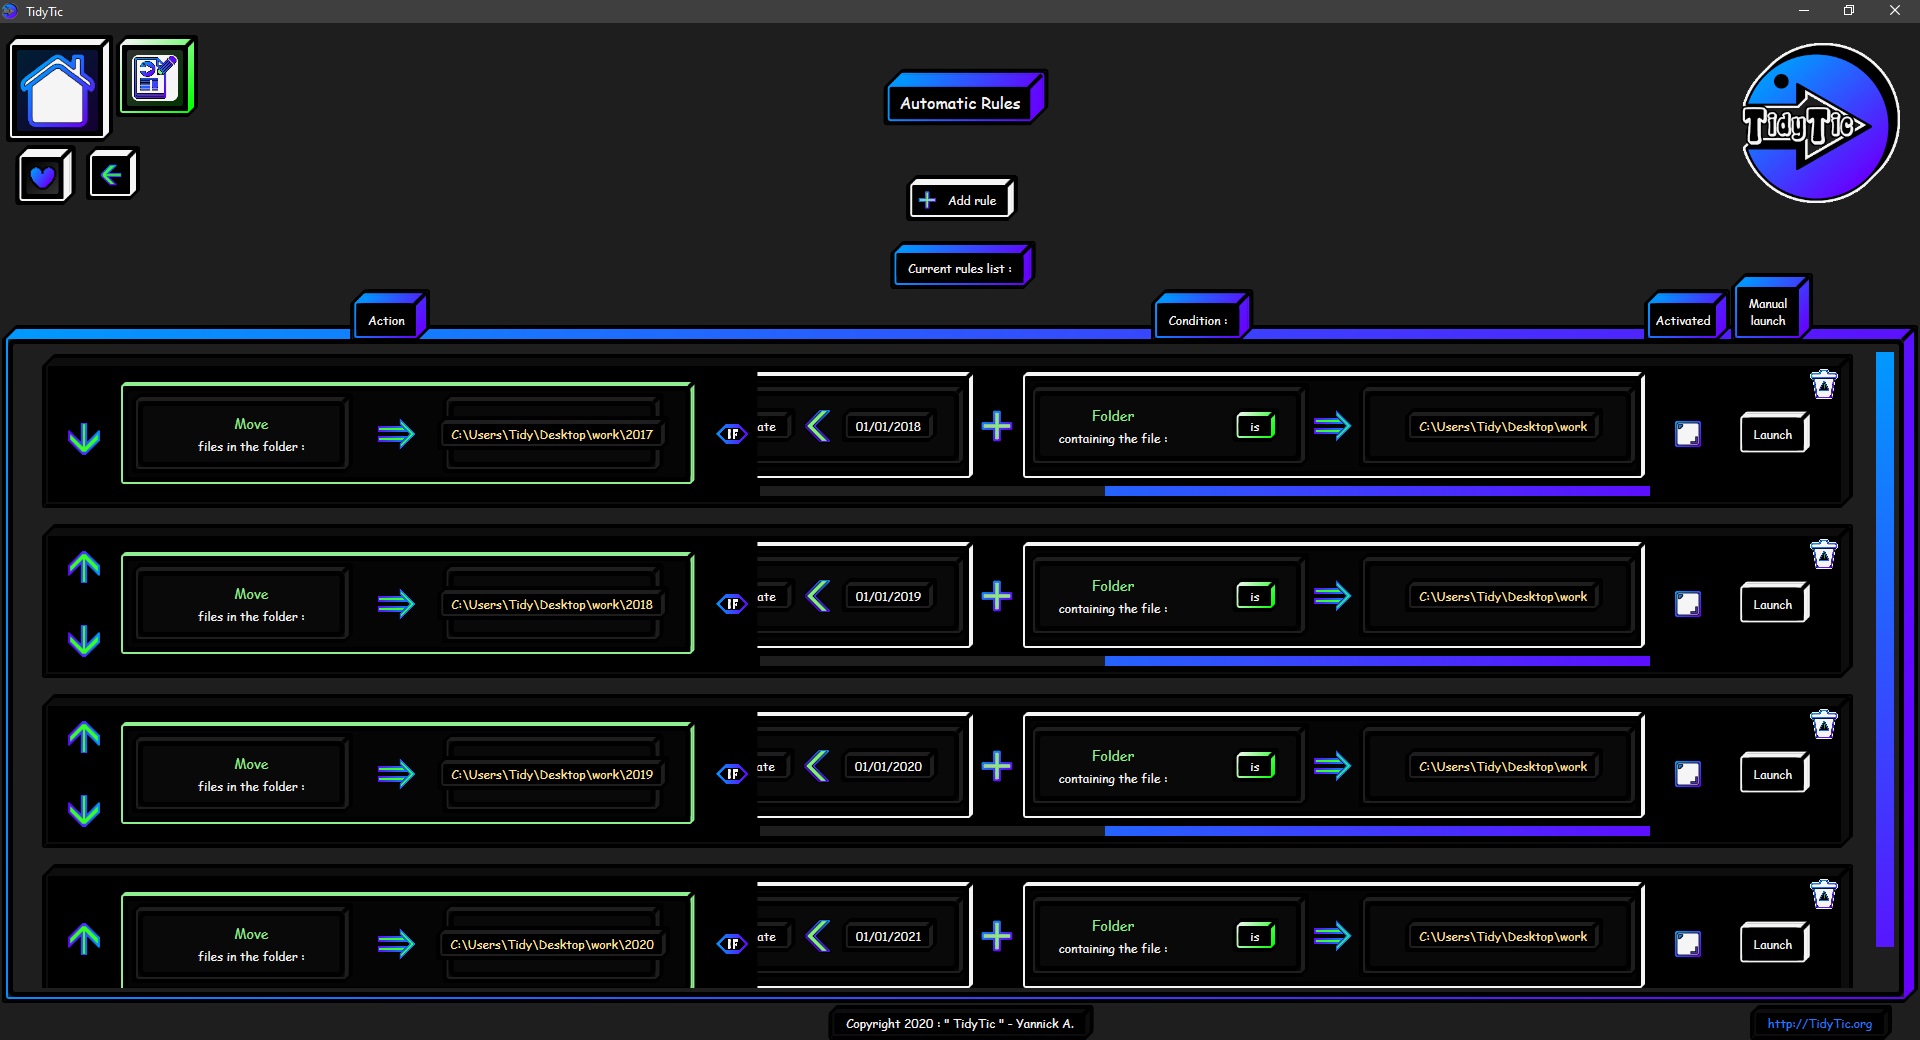
With these 4 rules, all the files I have in the “Work” folder will therefore be automatically tidy in the folder for the year that corresponds to the date of the file.
I can manually place these files in this folder or use another automatic rule to do so.
Like for example a rule that would automatically move all files that have the subtype "work" or a tag that I would have created.
By putting this rule at the top of the list of my rules, all the files to which I will assign the subtype or tag will first be moved to the work folder and then moved to the folder that corresponds to their year.
By declaring these rules as "activated" the only thing I will have to do to tidy these files will be to open the software.
The rest will be automatically done by TidyTic.
Automatically determine the quality of your videos on your PC :
To define if a video is in 360p, 720p, 1080p or 4k you have to look at its height :
A video which will have 720 pixels in height will therefore be in 720p.
A video which will have 1080 pixels in height will therefore be in 1080p.
One video of 4096 pixels will be a 4K video.
You can easily detect this with TidyTic.
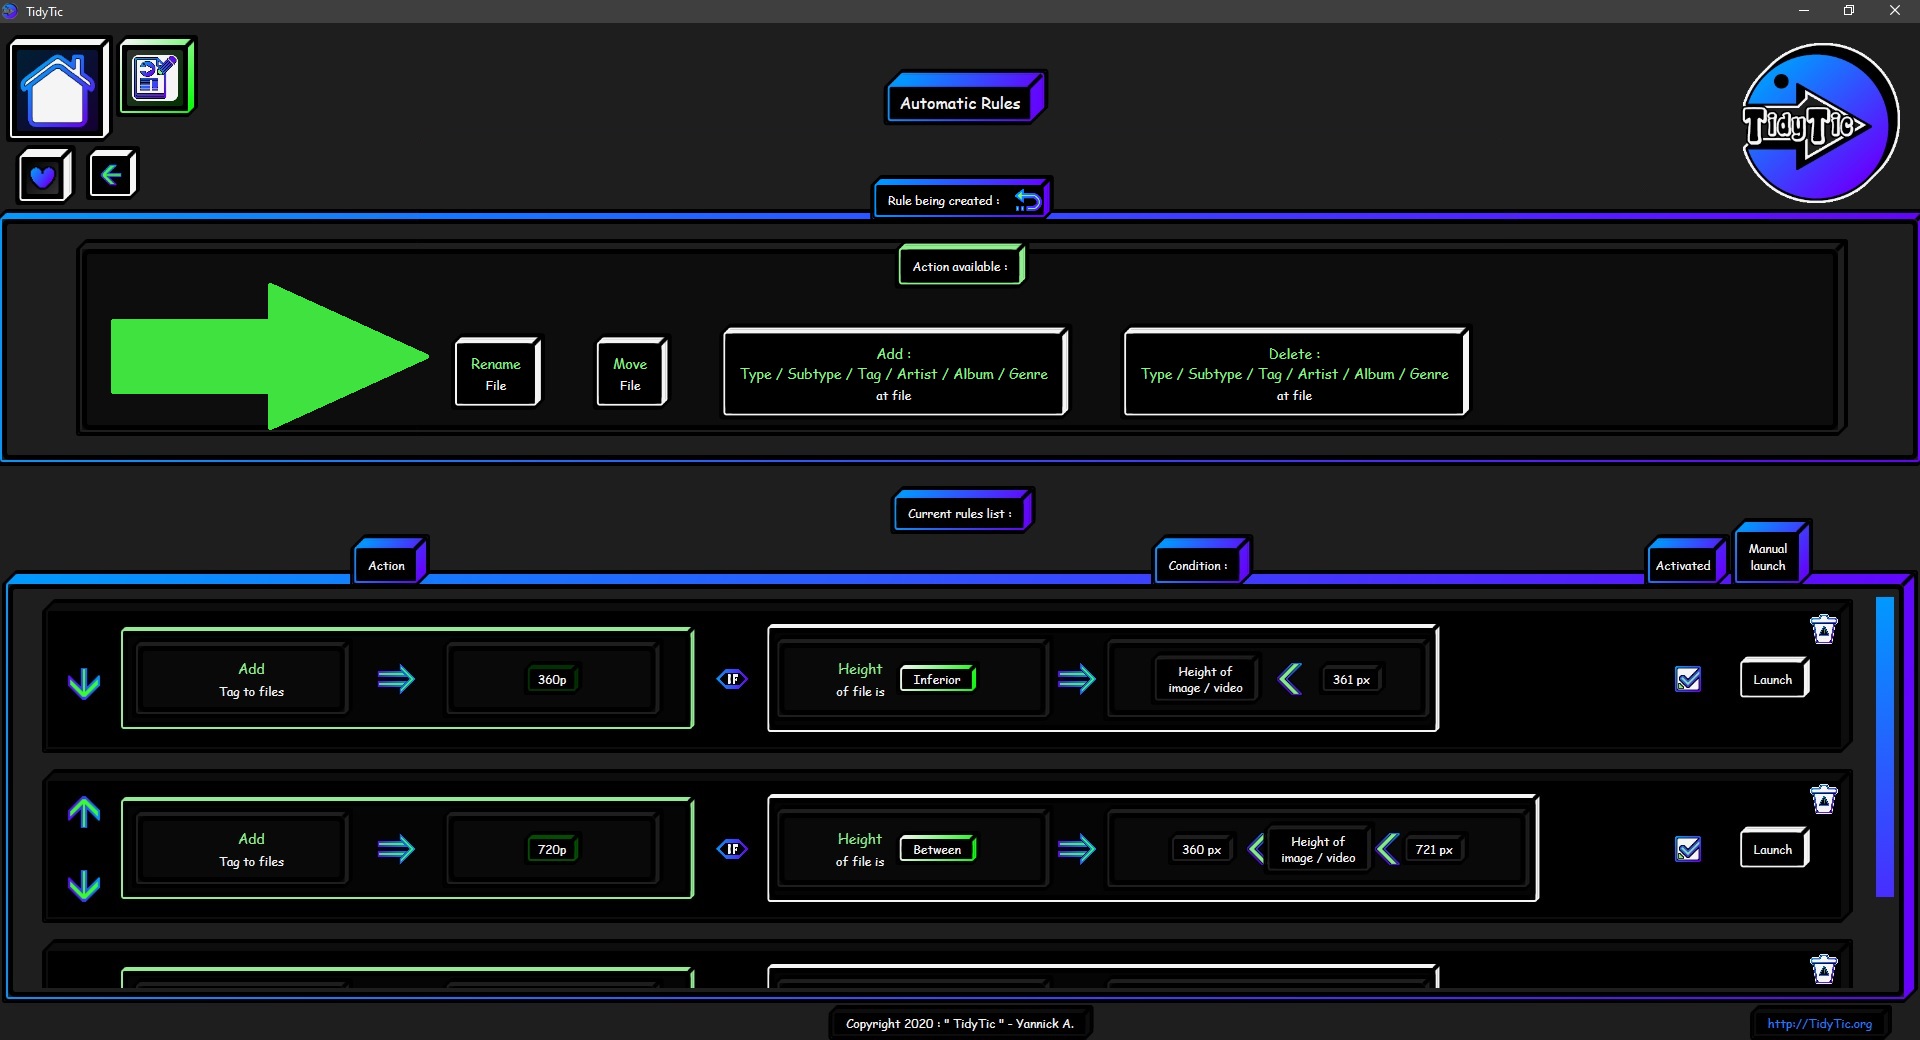
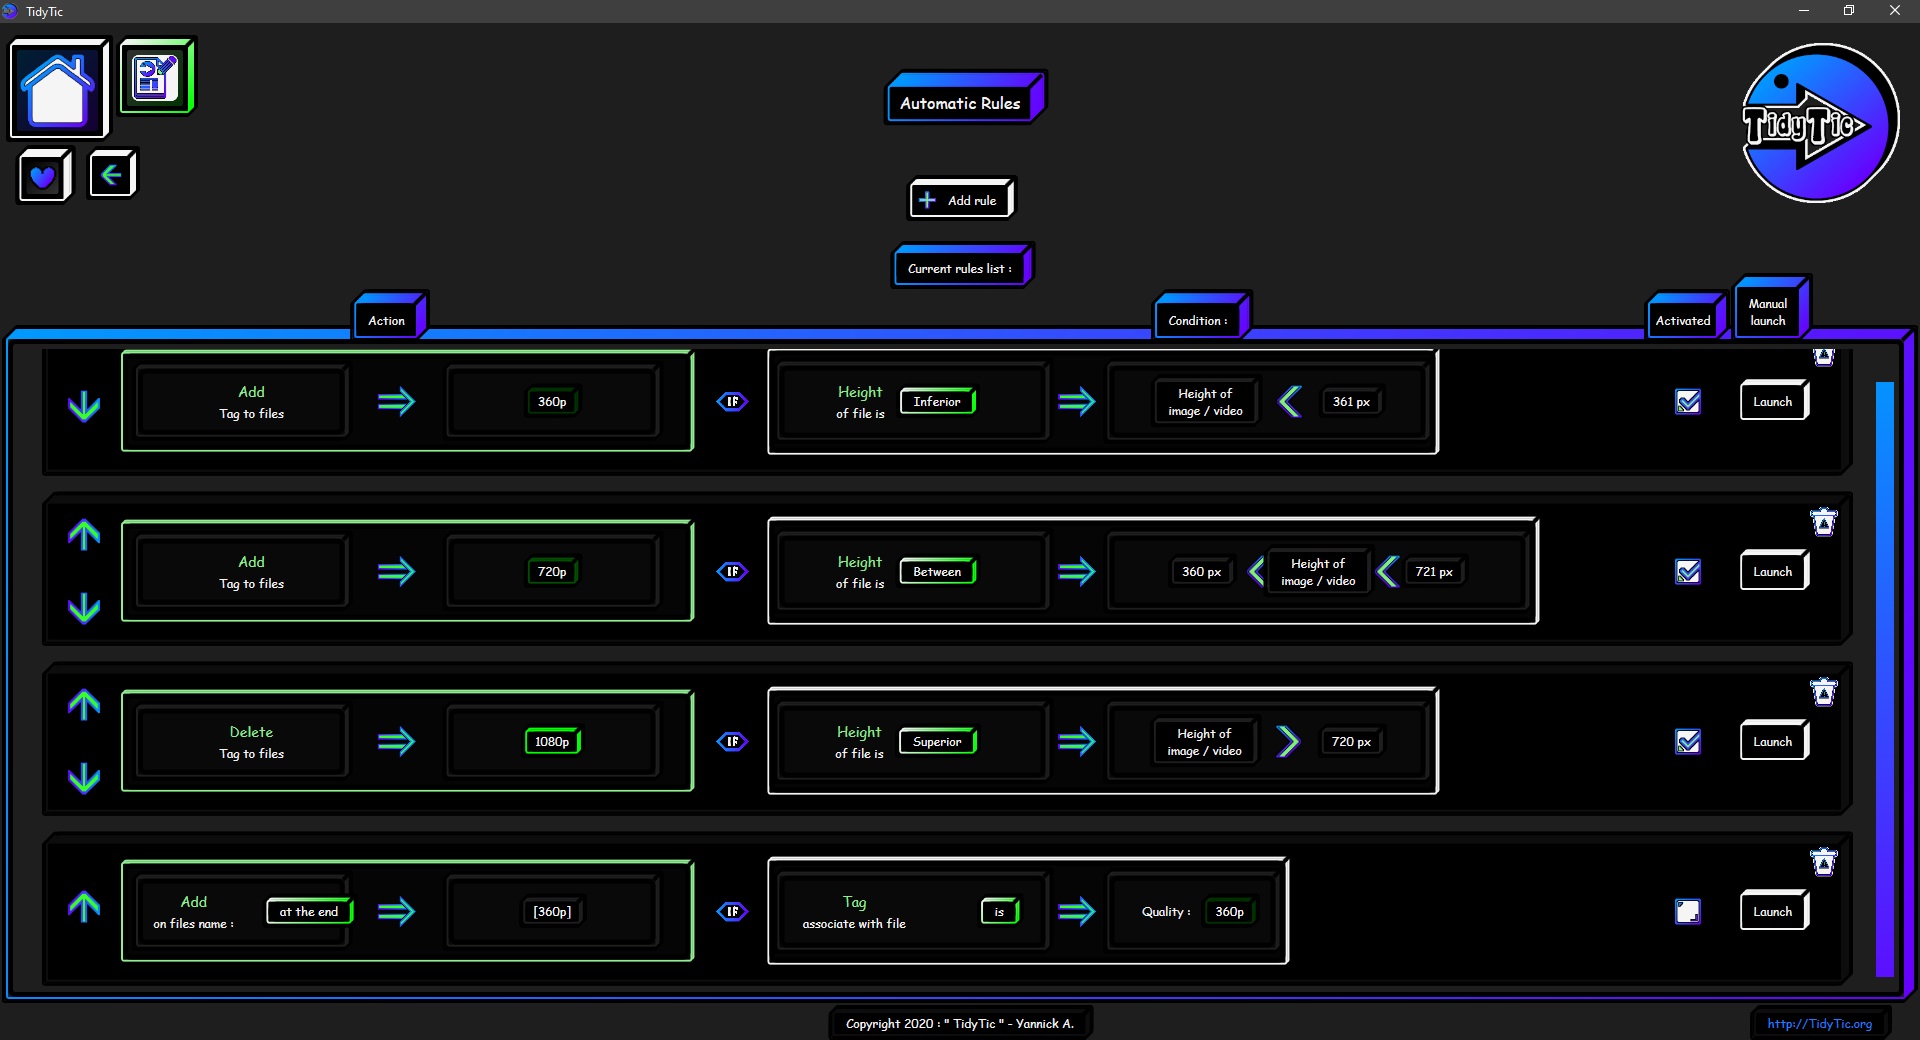
The 3 rules you can see in the screenshot below allow me to do that :
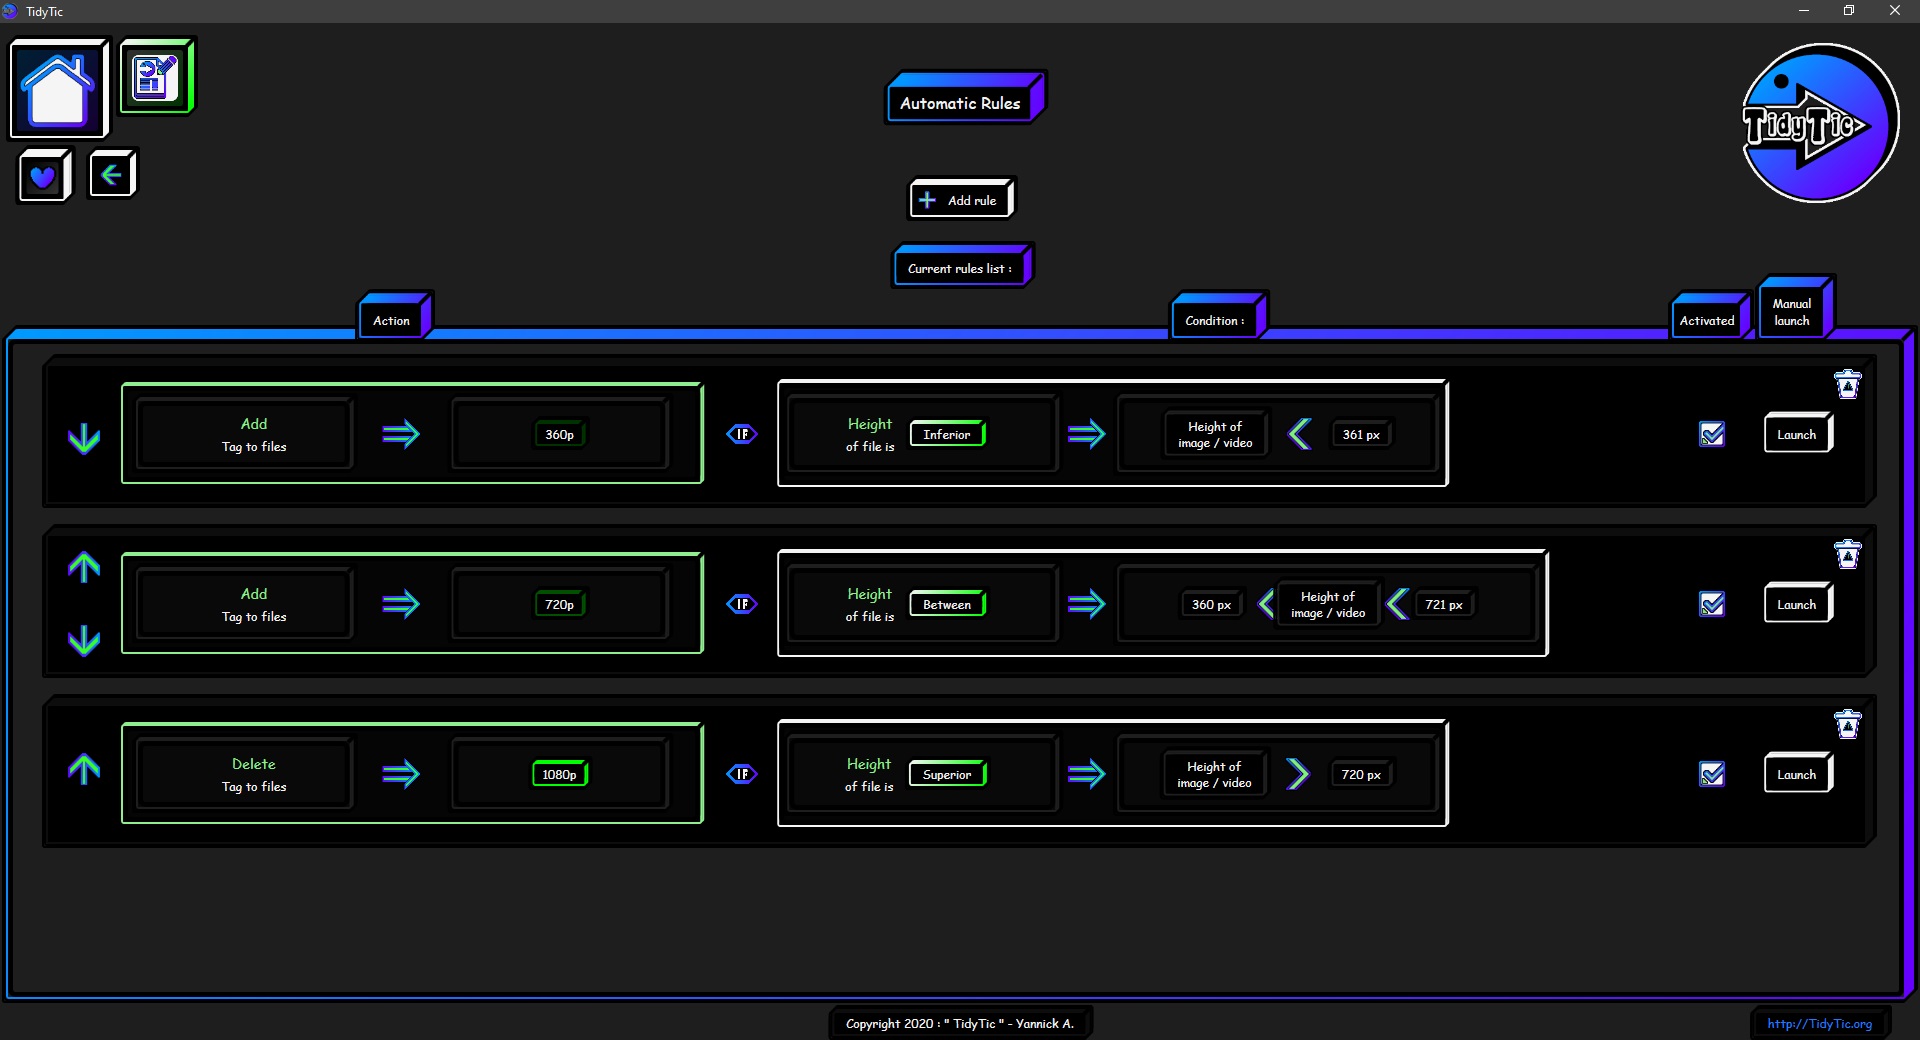
As you can see I have a rule that will add the "360p" tag for all files whose height is less than 361 pixels.
Here I do not need to specify in condition in the rule to do it only on my videos.
The software will do it by itself because the "Quality : 360p" tag is associated only with the "Video" type.
It will therefore ignore by itself all files that are not videos.
There is therefore no risk that he will add this tag to an image for example. Even if this image meet the condition and its height is less than 360 pixels.
Same thing for the 2nd rule in which I asked to add "720p" if the height is between 360 pixels and 721 pixels.
For the 3rd I simply asked him to add "1080p" for all videos that are greater than 720 pixels.
With these three rules all my videos will therefore have the quality tag associated automatically according to their resolutions.
I can therefore later use this information to filter my videos in the display by types and only display my videos in 1080p, for example.
I was talking to you a little earlier about making "cascading" rules.
I can for example here create a new rule in which I will ask to add "[360p]" in the name of my files which have the "Quality : 360p" tag associated with the files.
This allows me to have also this information directly in the file name.
To find this information if I wanted to play the video on my television for example.
You may wonder: Why not have renamed the files directly according to their heights without going through the quality tag ?
Yes it is also possible, but I would still have had to add a second condition to the rule: "belongs to the video type" otherwise even my images would have been renamed.
I also couldn't have organized my videos by quality if I hadn't used a tag.